TOOL HUNTER

Have you ever been walking while recording a video, or maybe someone accidentally jostled your arm while you were filming something important? We’ve all been there! Those wobbly, shaky videos can be so frustrating to watch later. But here’s the good news – you can actually fix this problem! Learning how to stabilize a video on iPhone is easier than you might think, and there are multiple ways to do it.
Whether you use features already built into your phone, download special apps, or even get some cool equipment, you can make your videos look smooth and professional. No more seasick viewers! This complete guide will show you all the different methods for iPhone stabilisation, from simple settings adjustments to awesome apps and gadgets that keep your footage rock steady.
Let’s dive into the world of smooth video recording!
What is video stabilization anyway?
Sometimes you can’t just re-shoot a video when it comes out shaky. Maybe you captured a once-in-a-lifetime moment, or perhaps you just don’t have time to film everything again. That’s where video stabilization comes to the rescue! It’s like magic for your videos – it fixes all those unwanted camera shakes and jitters that make your footage look amateur.
Video stabilization technology works by reducing shaky movements while keeping the important parts of your video intact. It’s especially useful for iPhone filming because phones are so lightweight – they tend to pick up every little movement your hand makes. Good iPhone stabilisation makes your videos look clear, steady, and much more enjoyable to watch.
When we talk about how to stabilize videos on iPhone, we’re really looking at two main approaches: fixing shaky footage after you’ve already recorded it, and preventing the shaking from happening in the first place while you’re filming.
How to stabilize video on iPhone using built-in features
Your iPhone actually comes with some pretty amazing tools already built right in that can help with stabilization. You might not even know about all of them! Here are the main ways you can use your iPhone’s own features to get better video stability without downloading anything extra.
Using Enhanced Stabilization
iPhones are famous for their cool features, and the enhanced stabilization is definitely one of them. This is a video-only feature that’s available on iPhone 14 and newer models. It works in both regular Video mode and the fancy Cinematic mode too.
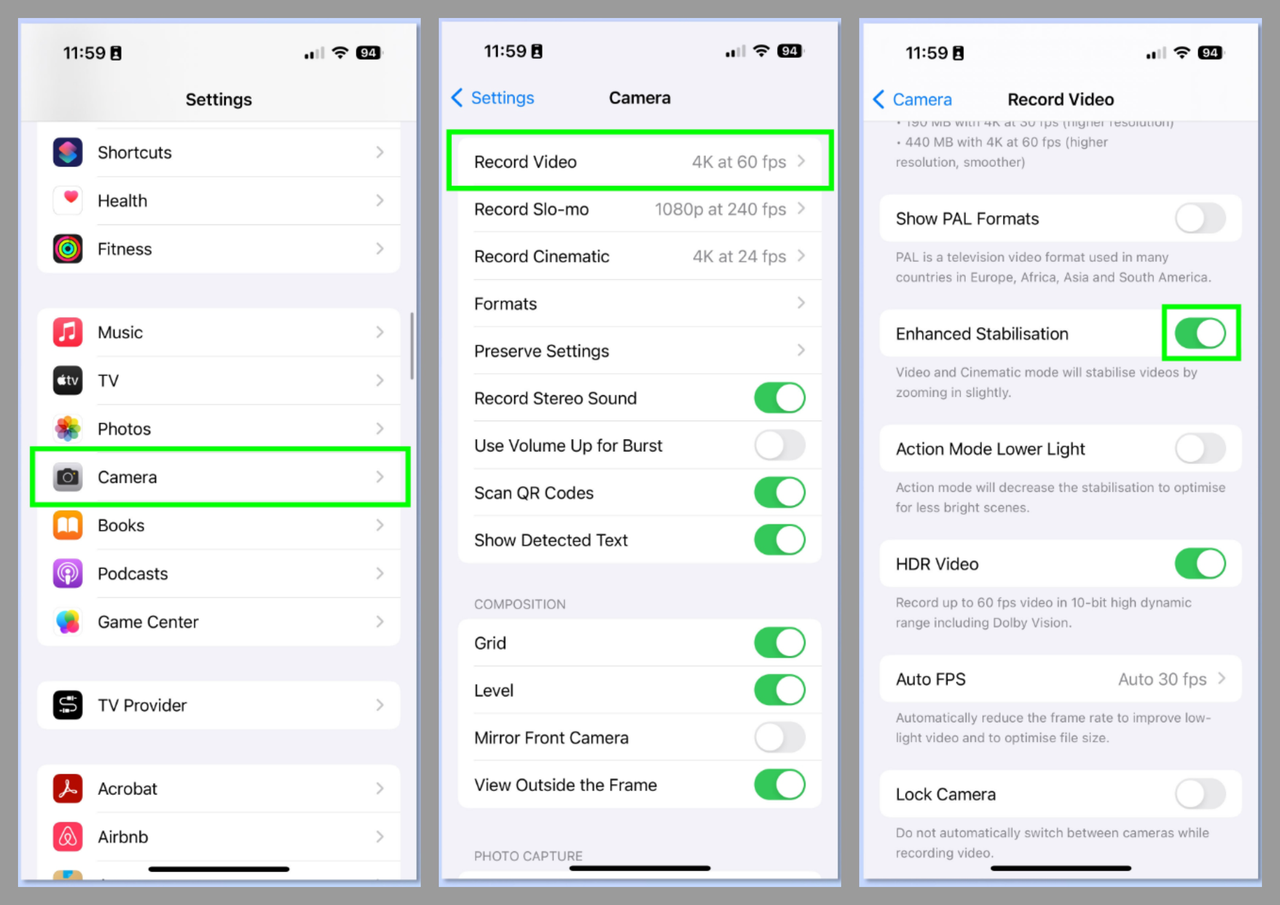
This feature is a type of electronic image stabilizer. It works by slightly cropping the edges of your video or zooming in just a bit while you’re recording. This might sound like it would make your video worse, but actually it helps reduce camera movement and makes your footage much more stable. Usually, Enhanced Stabilization is turned on automatically, but if you want to check or change it, here’s what you do:
- Open your Settings app and tap on Camera
- Tap on Record Video
- Look for Enhanced Stabilization and toggle it on or off
Using Motion Tracking
Motion tracking is a feature that usually works on Mac computers rather than directly on your iPhone. It involves tracking the movement of something in your video and then using that information to stabilize the whole footage. For example, you can use motion tracking to fix a super shaky camera.
There are several different tracking options available, but the one we care about is the Stabilize feature. Here’s how it works:
- Select the video you want to stabilize
- Go to Behaviors in the toolbar, then choose Motion Tracking and select Stabilize
Using Action Mode
Action Mode is another built-in stabilizer for iPhone that gives you great image stabilization when you’re moving around. It lets you capture smooth video that handles shakes and vibrations almost like you’re using a professional gimbal (those fancy stabilizer tools that filmmakers use).
This feature is built right into your iPhone’s Camera app, so you don’t need to download anything. When you use it, you can record up to 60 frames per second with Dolby Vision HDR, which means you get excellent video quality too. All iPhone 14 models and newer support Action mode.
Here’s how to use Action Mode:
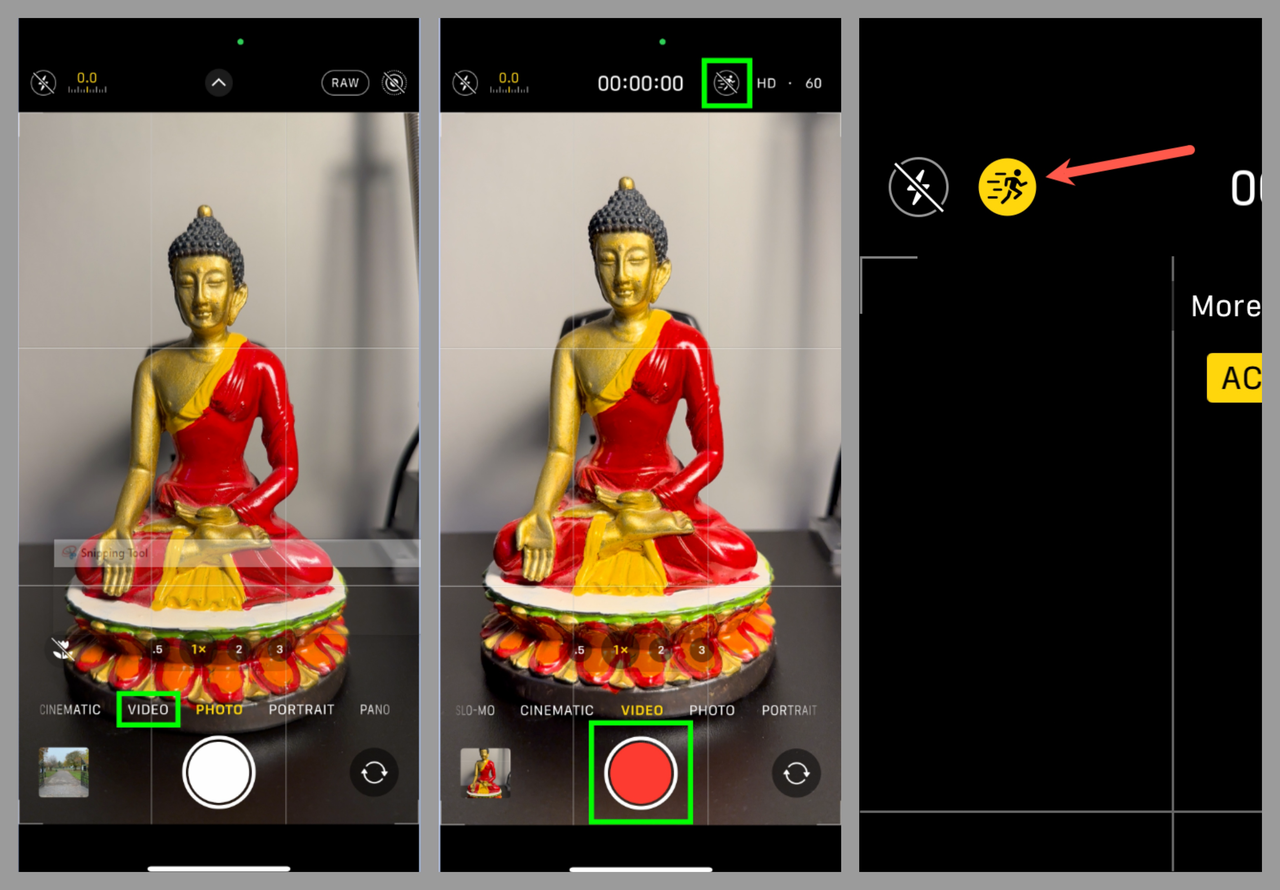
- Open the Camera app on your iPhone
- Swipe through the camera modes until you get to Video
- Tap the Action mode button (it looks like a person running) until it turns yellow
- Tap the red Record button to start filming with stabilization
Helpful tip: If you’re using Action Mode indoors where the lighting isn’t great, your Camera app might ask for more light. You can toggle Action mode for low light in the settings, but this might reduce the stabilization effect a little bit.
The best iPhone video stabilizer apps
Sometimes the built-in iPhone features aren’t quite enough for what you need. Maybe you want more control, or perhaps you’re working with footage that’s really shaky. That’s when third-party apps can really help! There are some fantastic apps out there that work as amazing stabilizers for iPhone videos. Let’s check out some of the best options available.
CapCut — Your all-in-one video & photo editing powerhouse! Experience AI auto-editing, realistic effects, a huge template library, and AI audio transformation. Easily create professional masterpieces and social media viral hits. Available on Desktop, Web, and Mobile App.

CapCut mobile video editor – powerful stabilization and more
CapCut is a mobile editing app for iPhone that lets you make amazing edits to your videos. Besides the basic editing tools like cut, trim, and merge, it works incredibly well as a stabilizer for iPhone videos. It has an AI-powered stabilizer that’s really effective, and it also lets you control the speed of your video, which is great for slow-motion effects or time-lapses.
Getting started with CapCut is super easy. Here’s how to stabilize your iPhone videos with this awesome app:
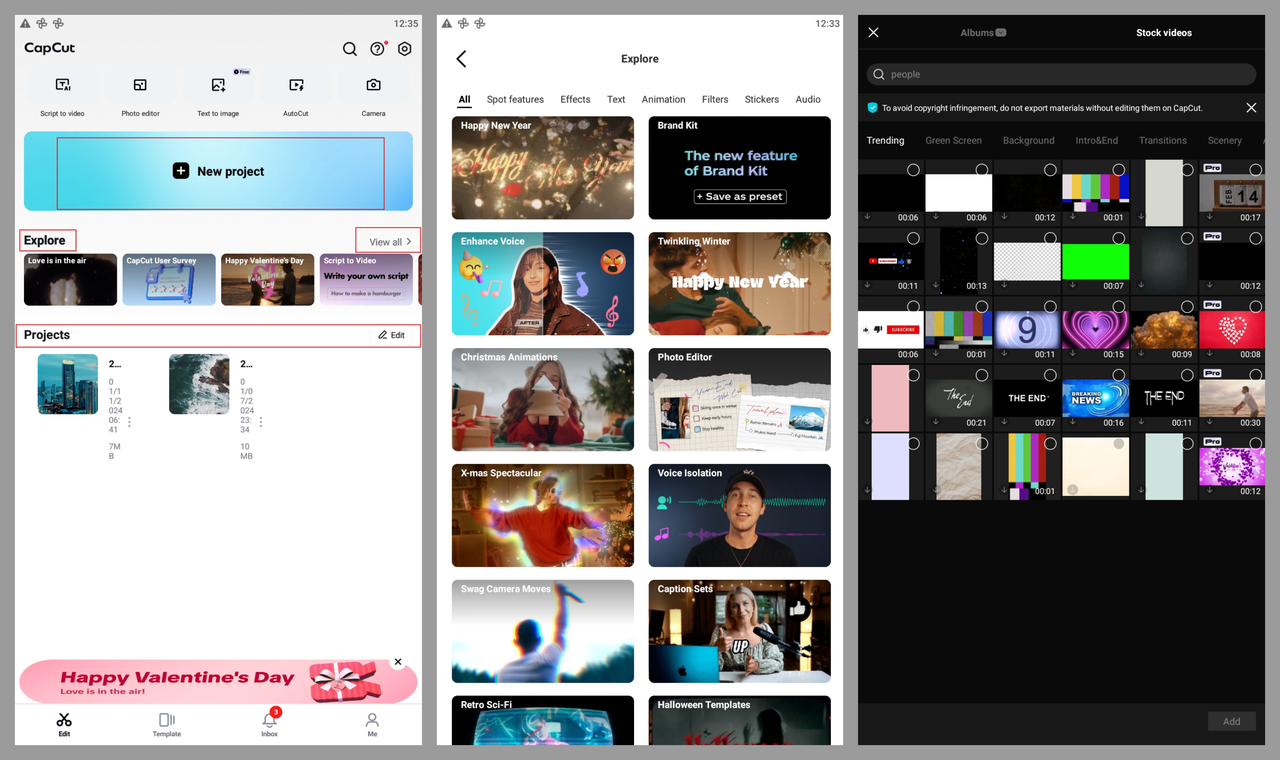
First, tap the plus icon to begin a new project. Choose the video you want to stabilize from your phone’s storage or from stock videos. You can also explore templates and choose one you like, or pick a recent project to work on.
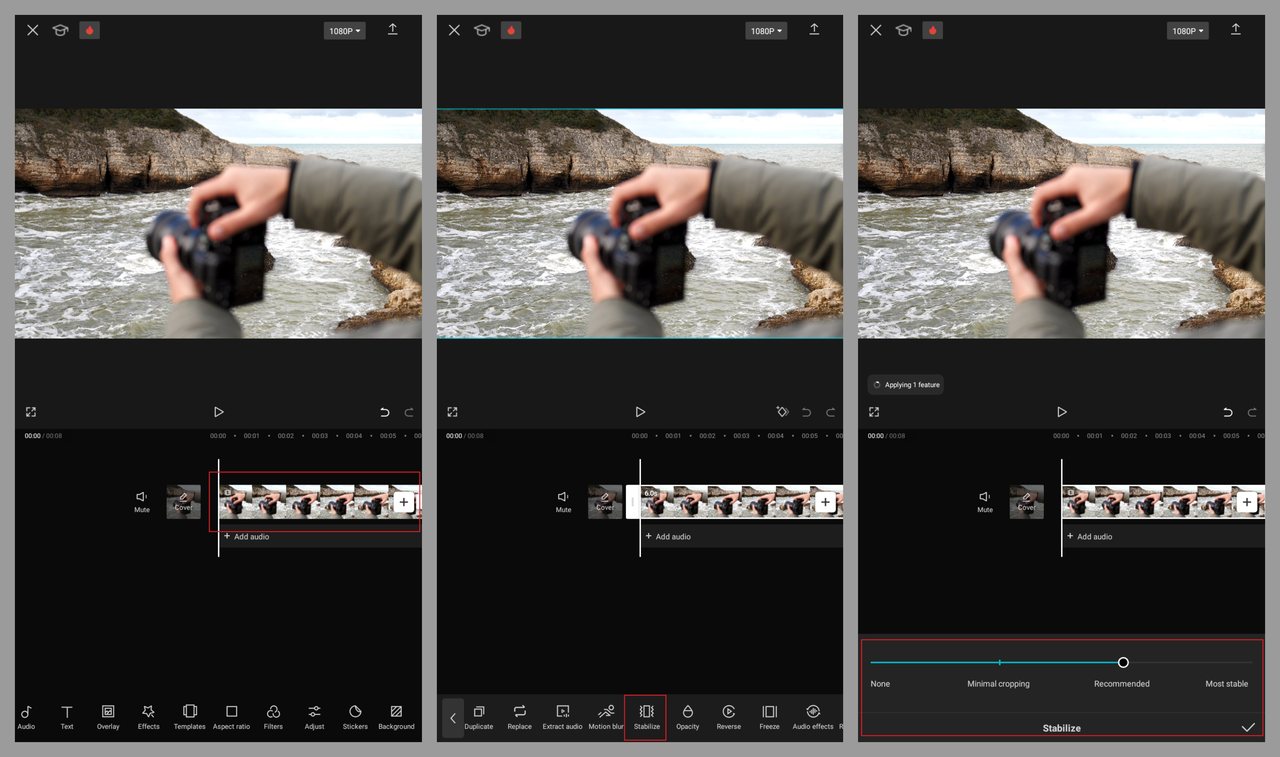
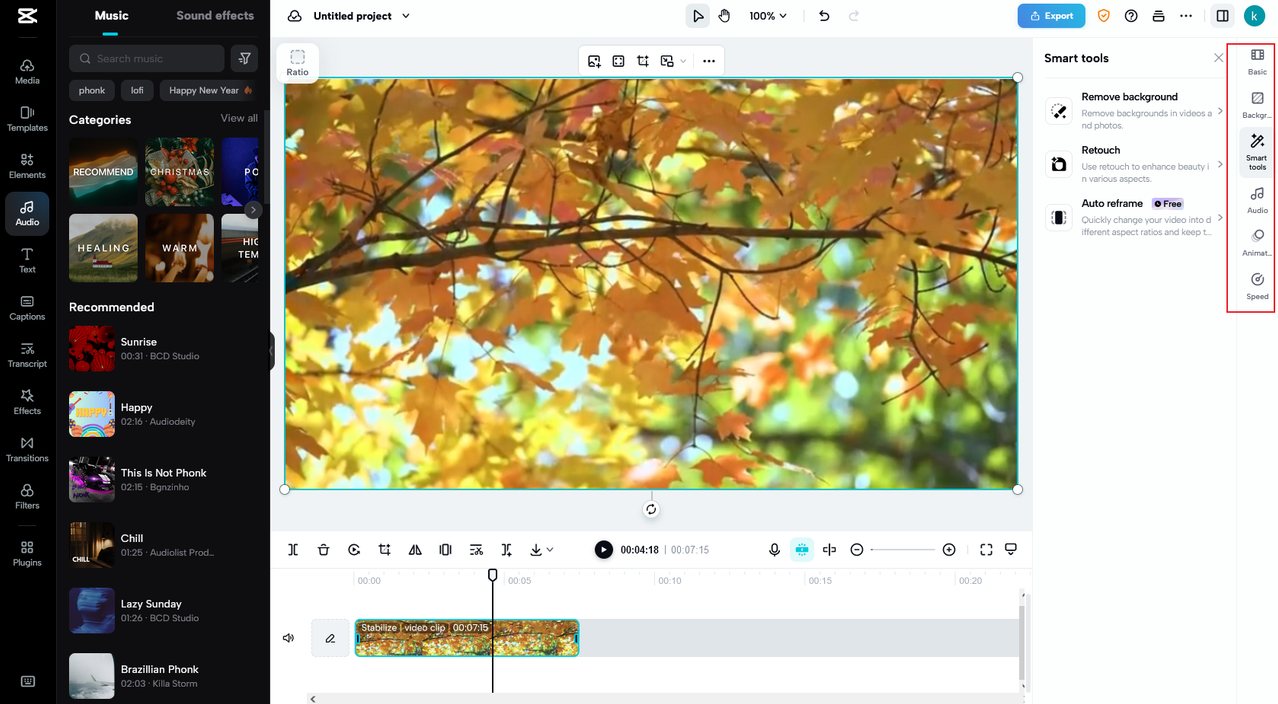
Next, select your video in the timeline to see all the editing options. Look for the Stabilize option and select it to fix shaky footage. You can choose between minimal cropping, recommended, or most stable settings depending on what you need. There’s a progress icon to show you how the stabilization is going. Click the checkmark to confirm when you’re happy with the settings.
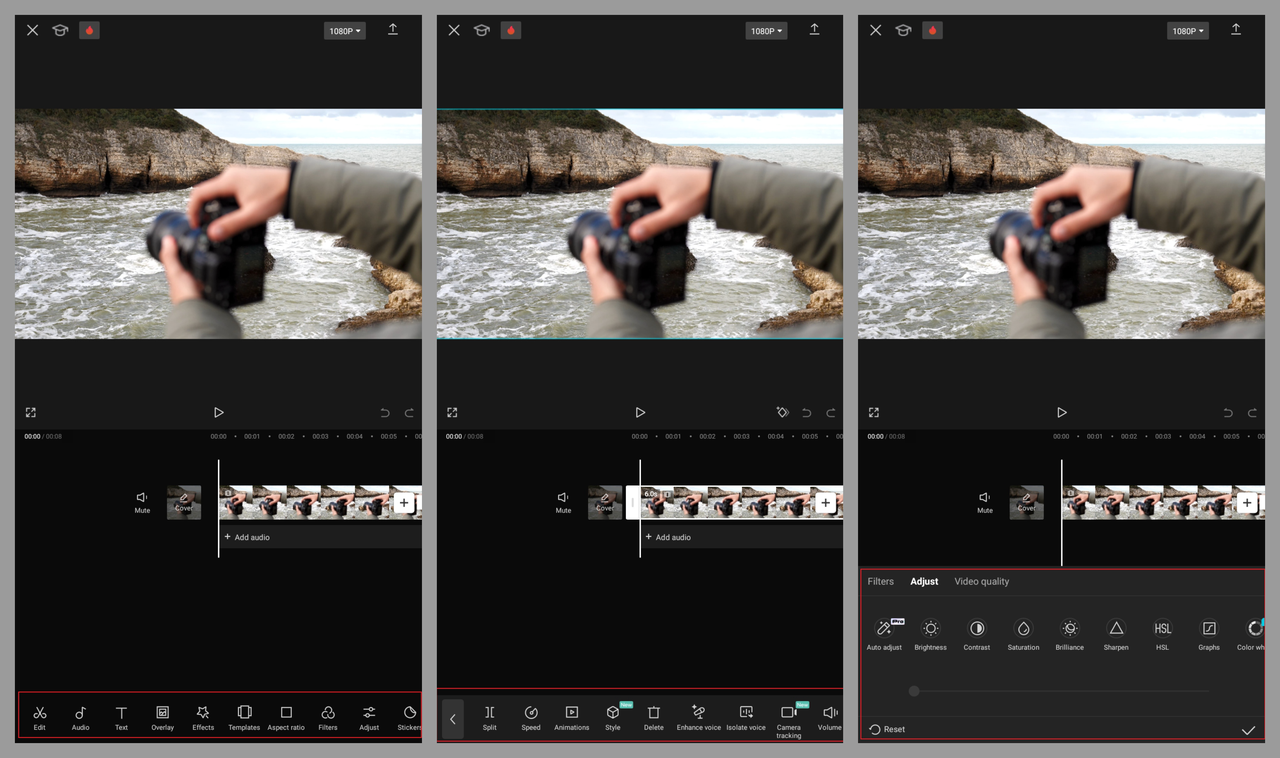
But wait, there’s more! You can also use CapCut’s resources to add background music or video overlays. The app lets you apply filters and text, adjust brightness, or even change the video background. You can adjust the aspect ratio to fit different devices. There are also animations, video splitting tools, and options to adjust playback speed or audio volume. It’s like having a mini editing studio right in your pocket!
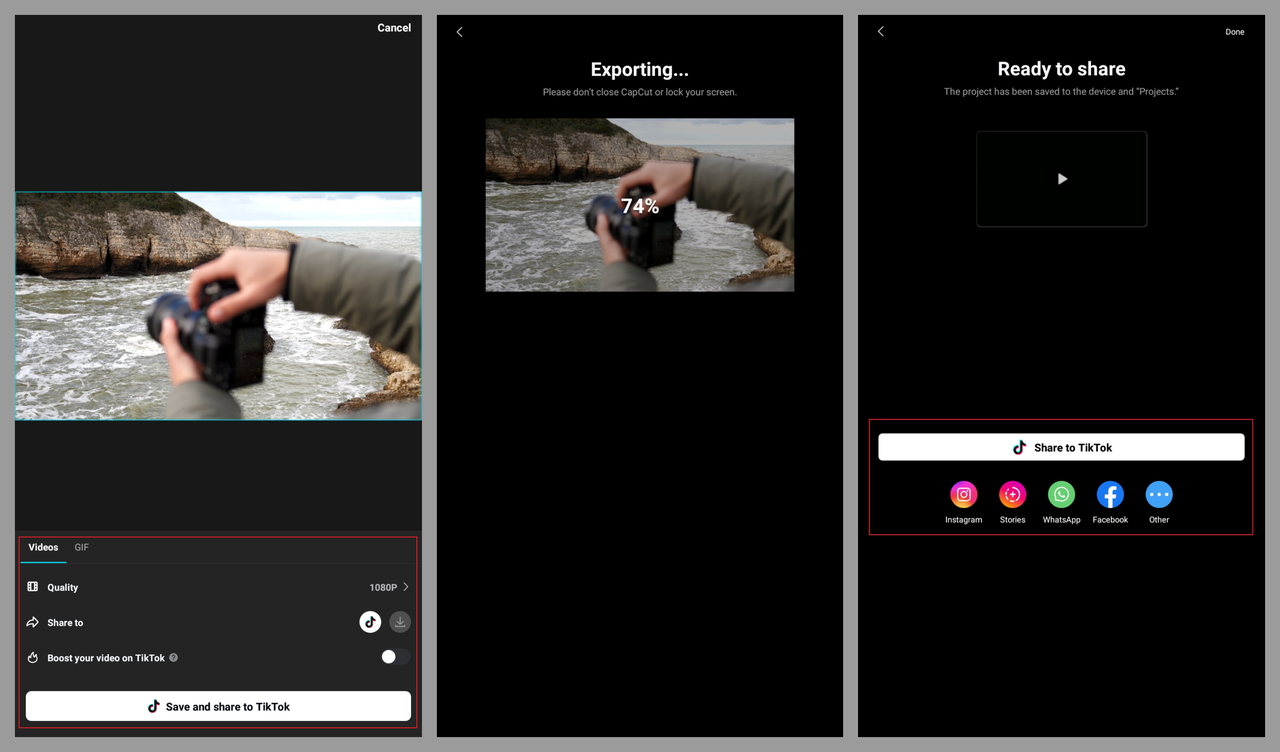
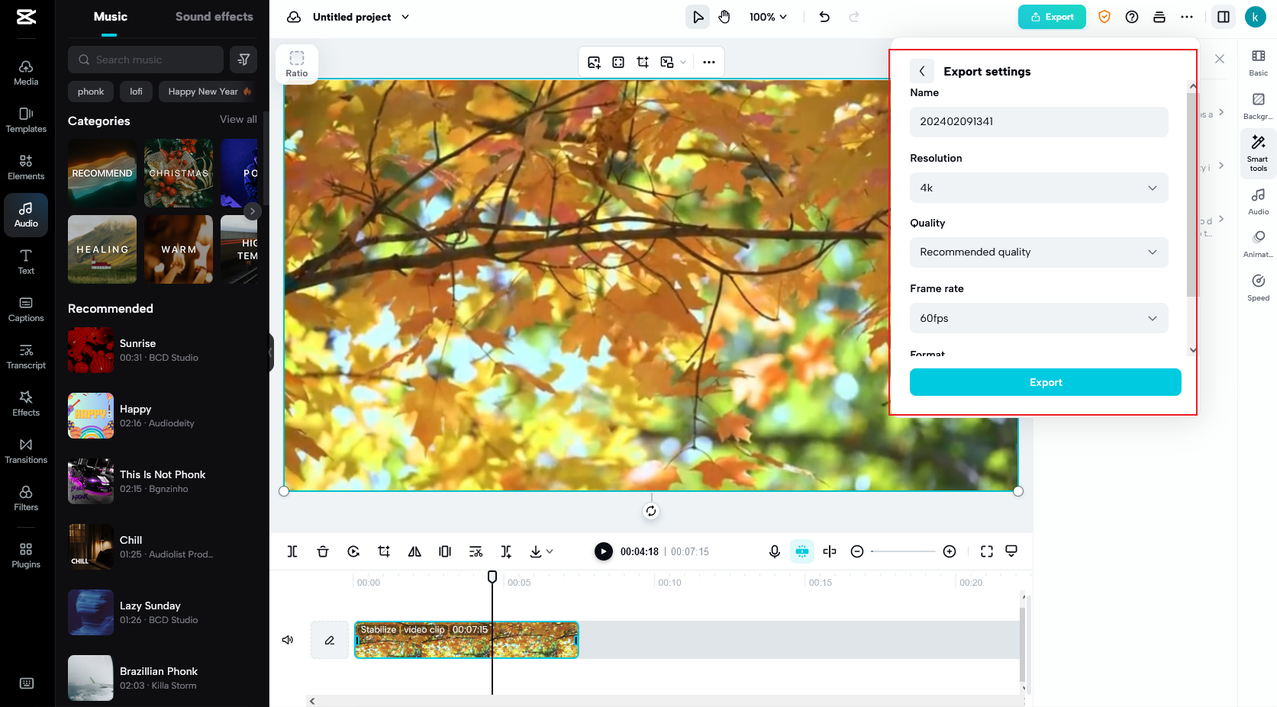
Finally, when you’re all done, click the Export button at the top (it looks like an upward arrow) to save your video. You can save it as a video or GIF and choose the quality settings. Options include resolutions from 480p up to 4K, frame rates up to 60fps, and different code rates. The higher the quality, the larger the file size, so choose what works best for your needs.
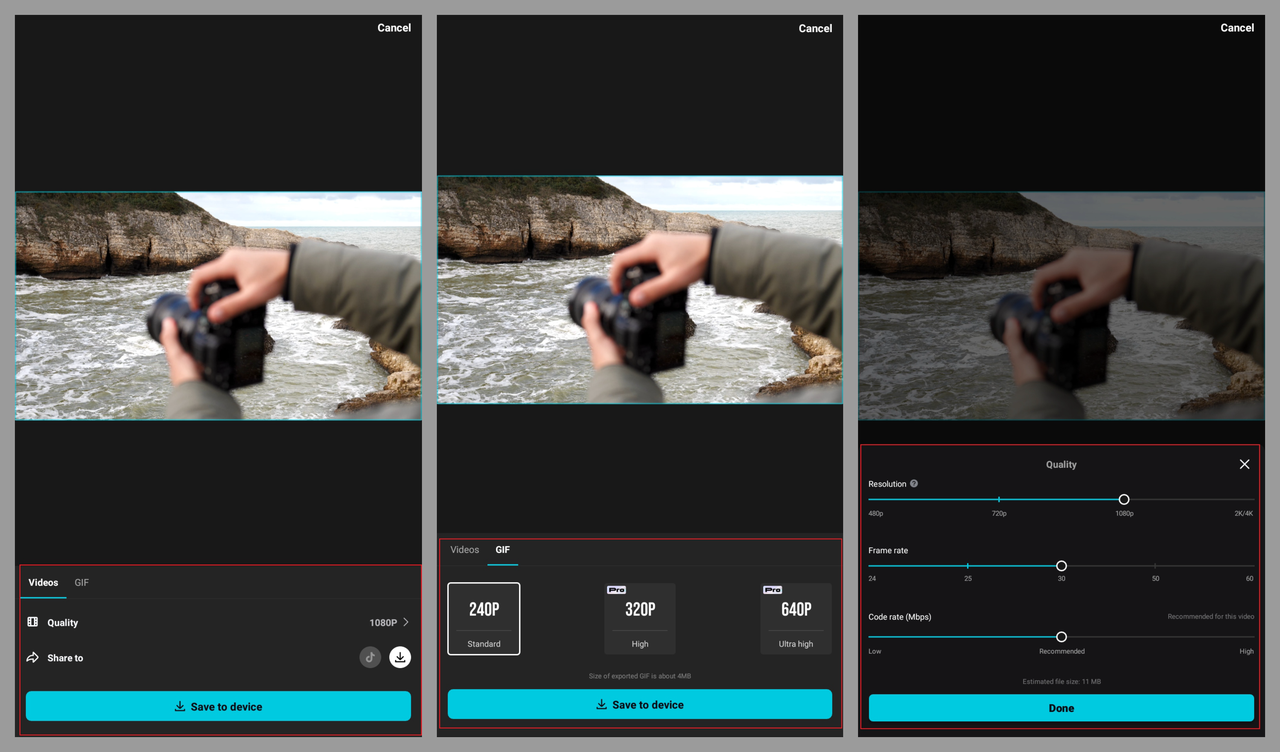
You can save directly to your iPhone or share to TikTok. After exporting, you can also share to Facebook, Instagram, WhatsApp, or other platforms on your iPhone. It makes sharing your newly stabilized videos with friends and family super easy!
If you don’t want to install an app or your iPhone is low on storage, there’s also CapCut online video editor. This is great for bigger projects or team collaborations. The online version has some excellent features that make learning how to stabilize video on iPhone even easier.
It has rich media resources with templates and music to make your videos more exciting. These help you personalize videos for social media and increase engagement with your content.
Cloud storage means you can access your projects from anywhere – start on your phone, continue on your computer! Team collaboration features allow multiple people to work on projects together or give feedback, which is perfect for school projects or work presentations.
The editing tools are extensive – from basic cutting and trimming to advanced transitions and AI tools like background removal and color correction. You can easily share to social media platforms like Instagram, Facebook, YouTube, or TikTok right from the editor.
Here’s how to use the online version to stabilize your iPhone videos:
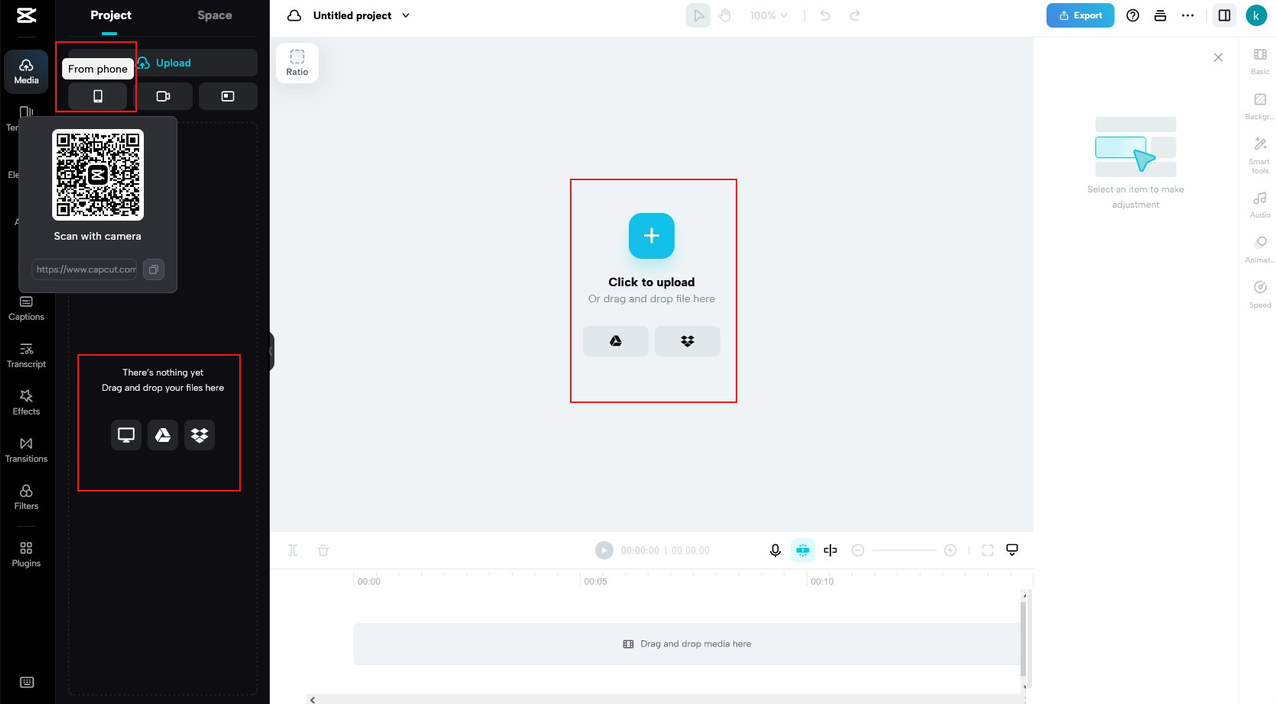
First, import media from your iPhone by scanning a QR code with your camera or accessing videos from your CapCut cloud space, Google Drive, or Dropbox. You can also transfer the shaky video to your computer and access it from there.
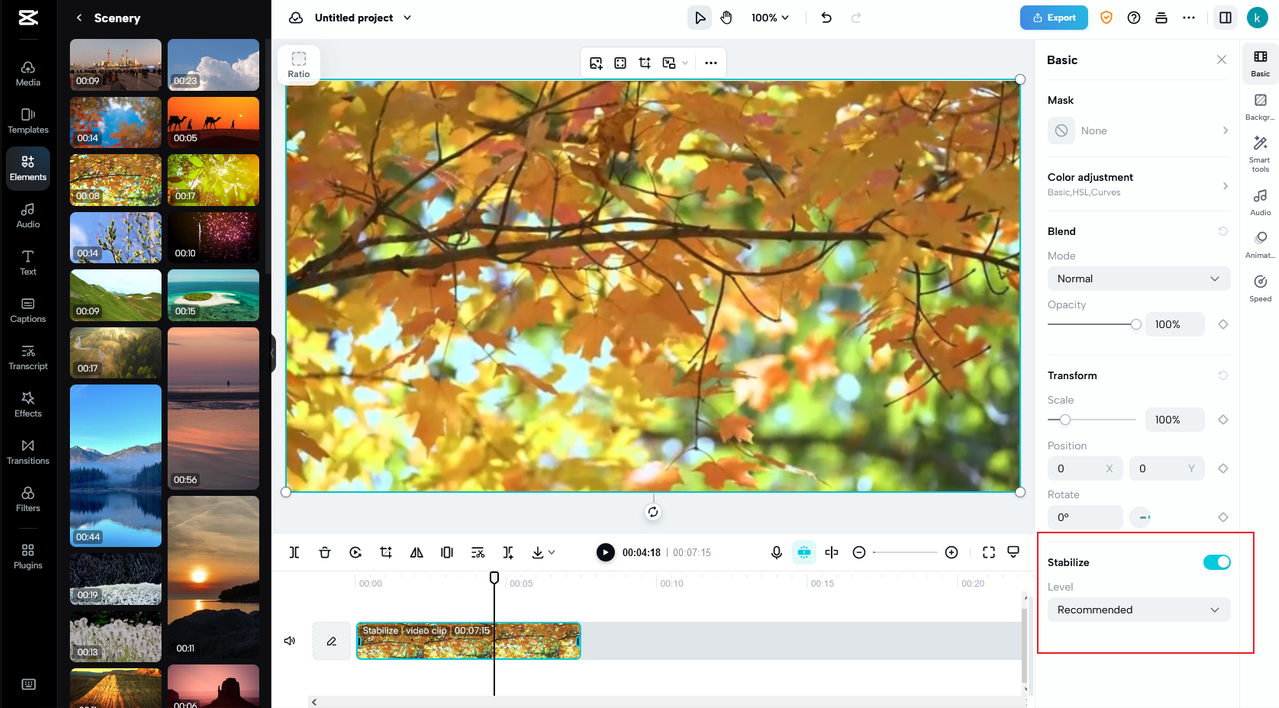
Click on your video and select Basic on the right toolbar. Scroll down to find the Stabilize feature. Toggle it on and choose your preferred level: Recommended, Minimum cut, or Most stable. The “Minimum cut” option preserves more of your original frame, while “Most stable” gives you the smoothest result but crops in more.
You can also add effects, transitions, captions, filters, and text to make your video even better. There are basic and advanced editing tools like cropping, splitting scenes, freeze frames, speed adjustment, and even transcript-based editing to work with speech gaps and filler words. This is great if you’re making tutorial videos or vlogs!
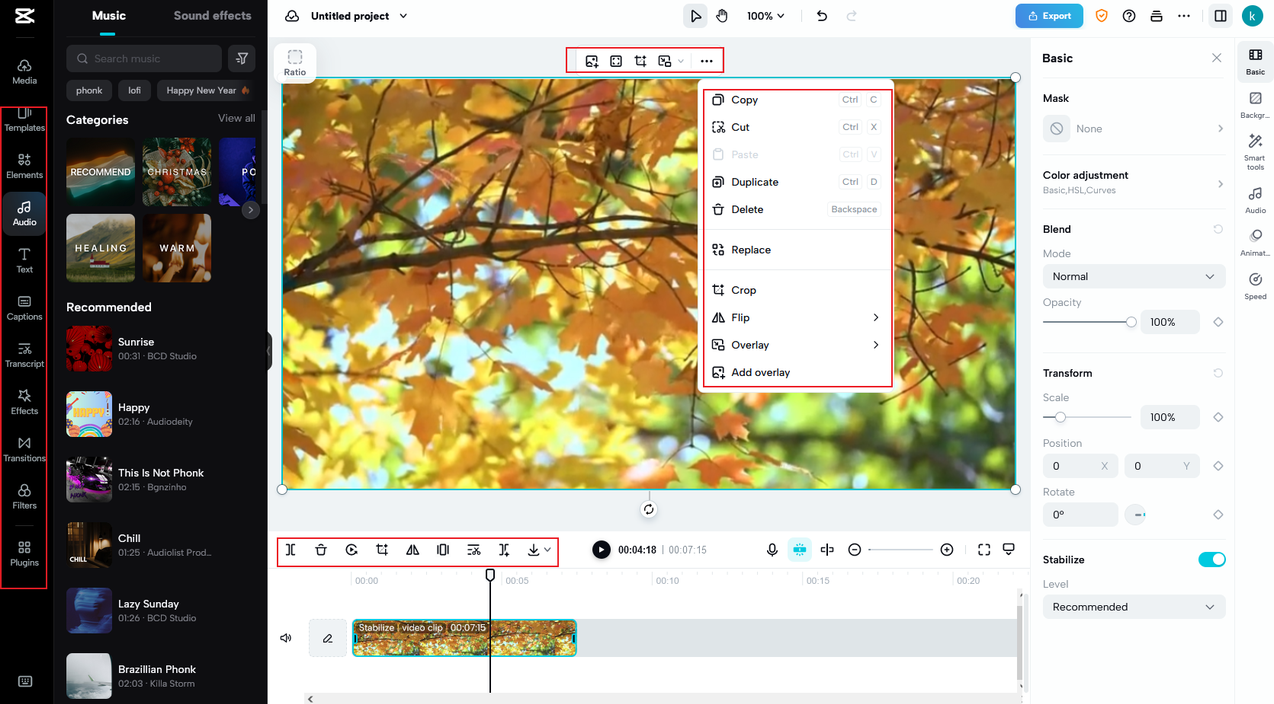
Add background music and adjust volume or reduce noise. You can adjust colors, add blends or animations. Smart tools include auto-reframing, background removal, and character retouching. It’s amazing how many professional features are available for free!
When your video is stable and looking good, click Export to save and share. You can share for review with others or directly to your online followers to see their engagement. This is perfect for content creators who want feedback before publishing their work.

If you just want to download, adjust the settings including resolution (480p to 4K), quality, frame rate, and format (MP4 or MOV). Higher resolutions look better but take up more storage space, so choose what works for your needs.
LumaFusion – professional-grade stabilization
LumaFusion is a professional iPhone video stabilizer app that’s really popular among serious videographers. It lets you film, edit, and stabilize videos right on your iPhone without moving clips to an iPad or Mac. Its Lock and Load Stabilizer allows you to adjust video strength and has automatic shutter correction, which is great for dealing with different types of camera shake.
The stabilization quality is excellent – definitely professional level. The interface might take a little getting used to if you’re new to video editing, but it’s worth it for the results you get. The main downside is that it’s not free – it’s a paid app, but it’s a good choice if you’re serious about video creation and have a budget for quality tools.
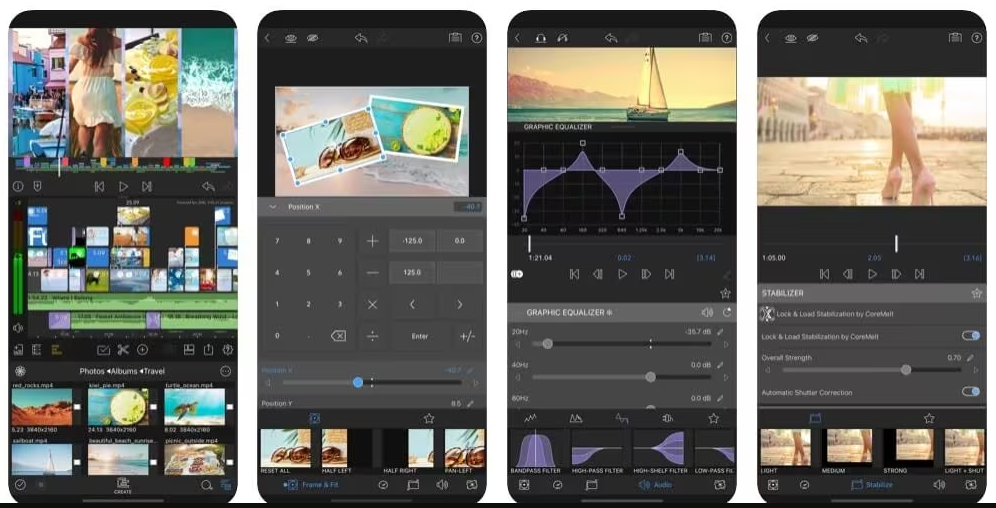
Key features include excellent stabilization speed (it processes footage quickly), top quality output that maintains your video’s sharpness, color correction tools to fix any color issues, and playback speed adjustment for slow-motion or fast-motion effects.
Deshake – simple and effective
As the name suggests, Deshake is specifically designed for dealing with shaky videos – and it does this one job really well! You can stabilize videos and see the results right away on your iPhone with its live preview feature, which is super helpful for getting things just right.
The stabilization is desktop-quality and works super fast thanks to advanced technology they use. This iPhone video stabilizer app works with any video in your iOS Photo Library and lets you import from other compatible apps, making it really flexible for different workflows.
Key features include adjustable stabilization strength (so you can choose how much smoothing to apply), live preview (see results before finalizing), fast processing (no long waits), adjustment of different motion types (it can handle various kinds of camera shake), and instant removal of wobble and distortion.
PowerDirector – user-friendly option
PowerDirector is an easy-to-use video stabilizer app for iPhone that’s great for beginners. It offers adjustable stabilization so your videos look smooth and professional without requiring advanced technical knowledge. This iPhone filming stabilizer eliminates camera shake precisely, with low, medium, and high stabilization options so you can choose what works best for your particular video.
You can download videos from sites like Giphy, Pexels, and Pixabay directly within the app, which is handy for adding stock footage to your projects. The main limitation is that the stabilizer is a paid feature requiring a subscription, so you’ll need to pay to access the best stabilization tools.
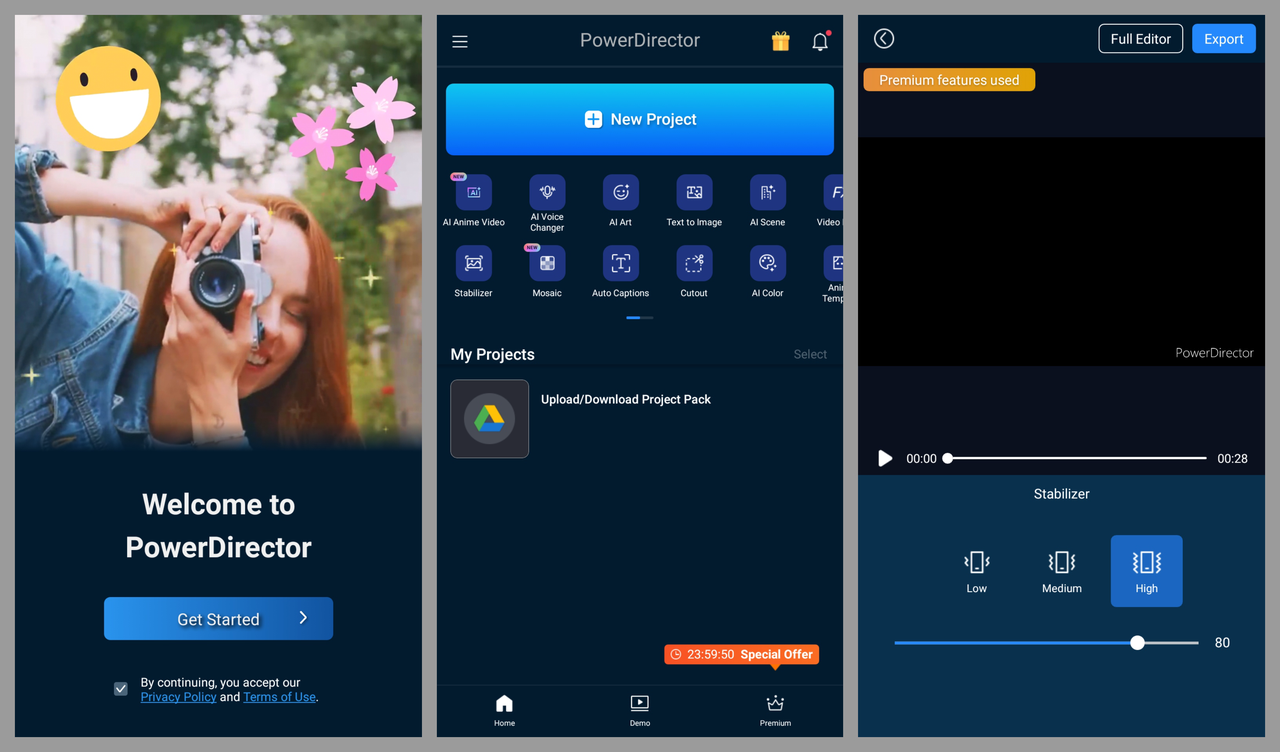
Key features include accurate stabilization that really works, improved video quality overall, great transitions between clips, blending effects for creative options, and multi-track editing for more complex projects.
Using handheld devices for iPhone camera stabilisation
Sometimes the best approach is to prevent shaking before it even happens! Using handheld stabilizers can help your iPhone camera capture stable scenes from the very beginning, saving you from needing to do lots of editing later. These physical devices can make a huge difference in your video quality, especially when you’re moving around while filming.
CapCut — Your all-in-one video & photo editing powerhouse! Experience AI auto-editing, realistic effects, a huge template library, and AI audio transformation. Easily create professional masterpieces and social media viral hits. Available on Desktop, Web, and Mobile App.
DJI Osmo Mobile 6
The DJI Osmo Mobile 6 was designed specifically for phones, and it shows in how well it works. It turns on automatically as soon as you unfold it – no power buttons to fuss with! It has a handy zoom wheel, telescoping arm, and really powerful software that makes keeping your shots steady almost effortless.
The magnetic mounting system keeps handheld video steady and smooth, even when tracking subjects that are moving around. The built-in light charges separately from the gimbal, which is convenient, and with a foldable design weighing only 309g, this phone stabilizer is