TOOL HUNTER

Ever hit record on what you thought was an awesome video, only to watch it back and see it’s all blurry and blocky? Yeah, we’ve all been there. That frustrating mess of squares is what we call a pixelated video. It’s annoying, right? Especially when you really want to share it or use it for something important.
The good news is, you don’t have to just live with it. In this guide, we’re diving into how to unpixelate a video using some simple but powerful tools. Whether you’re a student trying to clean up a project clip or just someone who wants their videos to look crisp, we’ve got your back. We’ll walk through four effective methods, explain why videos get pixelated in the first place, and share tips to avoid it next time. Let’s jump in!
What Exactly Are Pixelated Videos?
So, what does it mean when a video is pixelated? Basically, the image looks fuzzy, and you can see tiny squares or blocks all over. This happens when the video quality isn’t high enough, making everything less sharp and clear. It can make your video look unprofessional and just plain hard to watch.
Wondering, “Why is my video pixelated?” A few common reasons cause this. Heavy compression is a big one—when you shrink a video file too much for easier sharing or uploading, it loses detail. Low resolution is another culprit. If you film in low res and play it on a big screen, those pixels become obvious. Also, stretching a video beyond its original size can distort it and make pixelation worse.
It’s a super common issue, but thankfully, there are ways to fix it. Below, we’ll cover some of the best tools and techniques for pixelation removal.
Top 4 Methods for Removing Pixelation from Videos
Looking for a trustworthy video pixel remover? You’re in the right spot. Here are four solid methods to help clean up your footage. Each uses a different tool, so pick what fits you best.
Method 1: Using CapCut
CapCut is a super user-friendly video editor packed with strong features. Lots of people consider it one of the top choices for video pixel removal. It supports high-res exports and frame-by-frame tweaks to effectively reduce pixels.
If you want to learn how to depixelate a video fast, CapCut could be your go-to. It comes with all the essentials to make your videos look pro and clear.
Steps to Remove Pixelation with CapCut
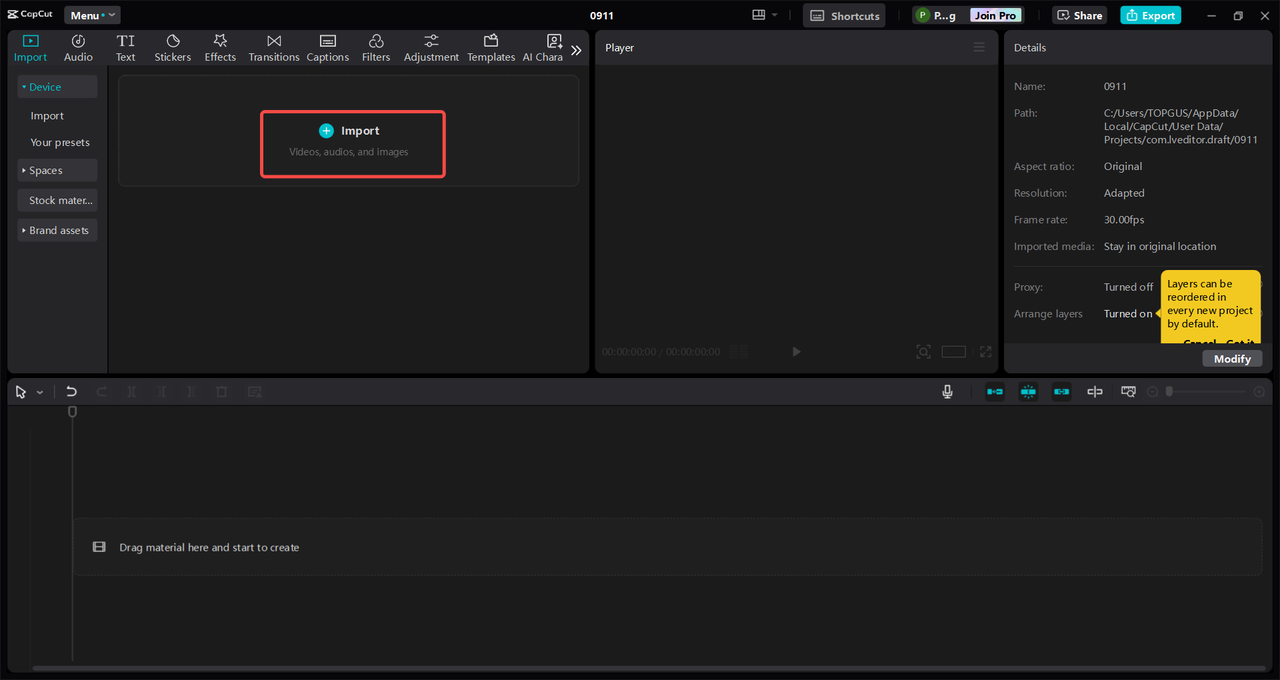
Start by importing your pixelated video. Open CapCut, create a new project, then hit “Import” to bring your video in from your computer. You can also drag and drop it right into the timeline. If it’s already in your CapCut library, find it under “My Spaces.”
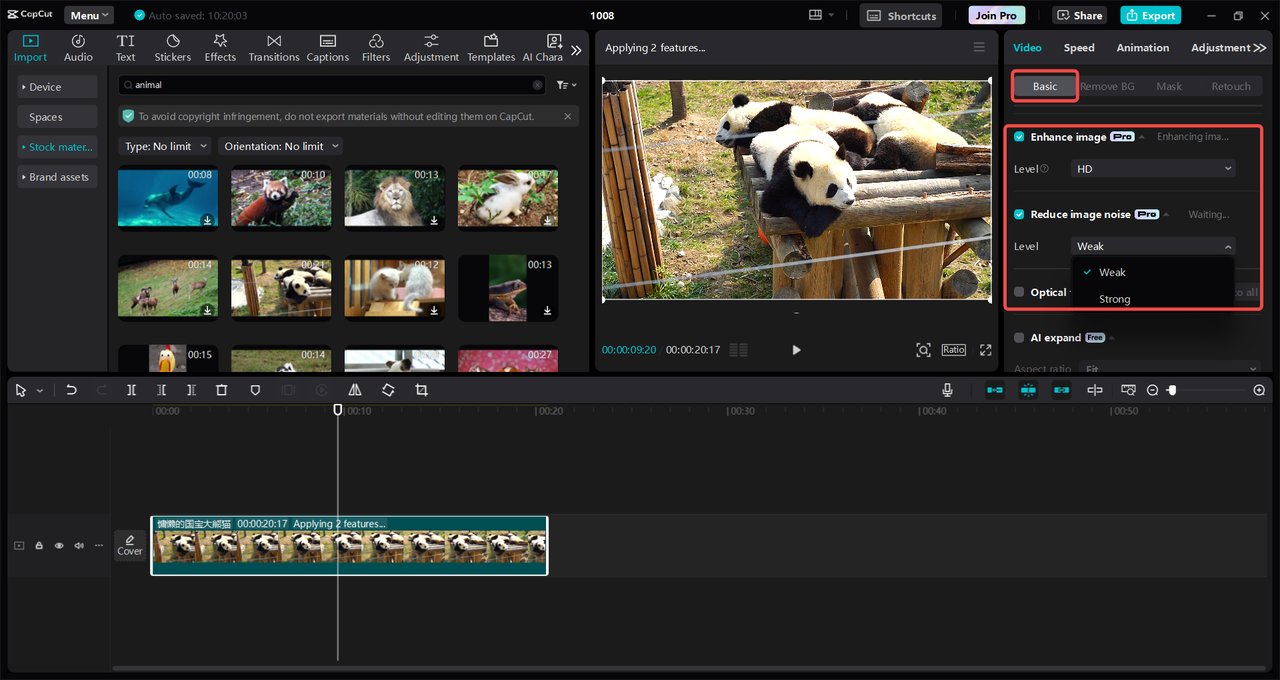
Next, let’s tackle those pixels. On the right-side panel, click “Enhance Image” and choose between HD or UHD enhancement. You can also use the “Reduce Image Noise” option and pick “Weak” or “Strong.” Once you see “Noise reduction applied,” you’re good to go.
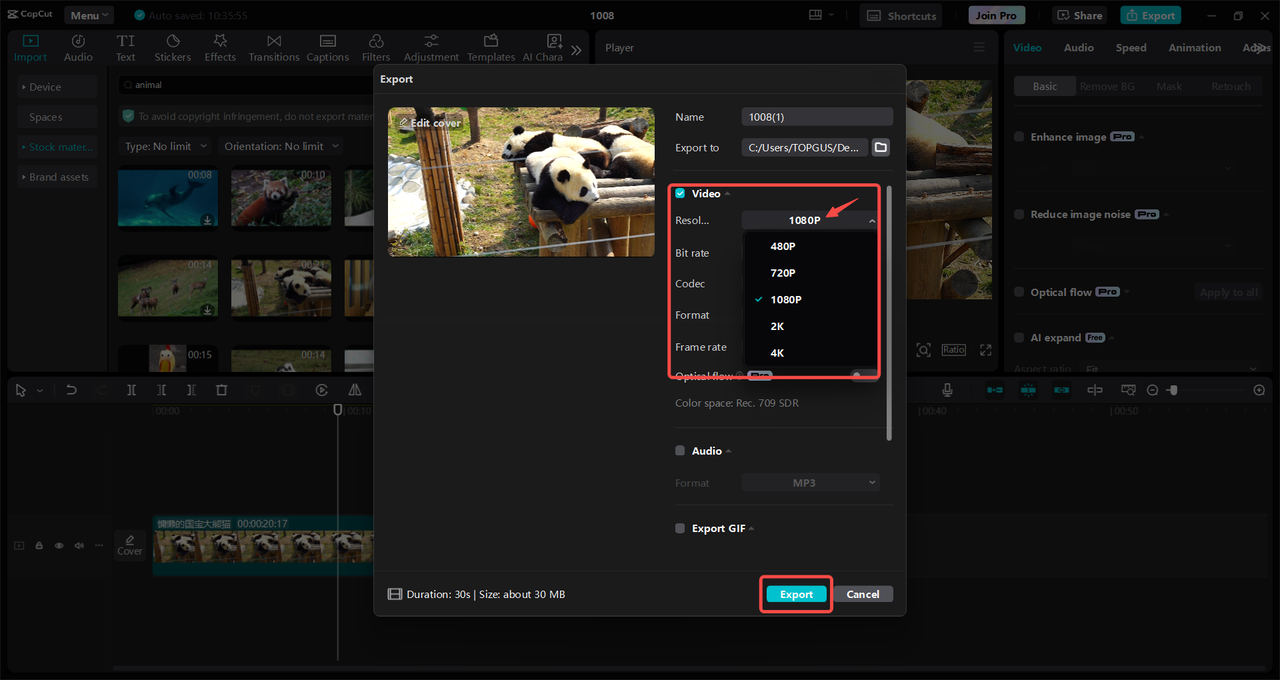
Happy with how it looks? Click “Export” in the top right corner. Select a high resolution like 2K or 4K, then hit “Export” again to save the video. You can also share it straight to TikTok or YouTube if you want.
Key Features of CapCut
CapCut uses AI-powered enhancement to reduce noise and boost clarity. The “Reduce Image Noise” tool specifically targets pixelation and refines video quality. You can also manually adjust sharpness and clarity for even more control. If you’re after a reliable way how to unpixelate a video, CapCut is definitely worth a shot.
CapCut — Your all-in-one video & photo editing powerhouse! Experience AI auto-editing, realistic effects, a huge template library, and AI audio transformation. Easily create professional masterpieces and social media viral hits. Available on Desktop, Web, and Mobile App.

Method 2: Using Video Proc Converter AI
Video Proc Converter AI is another awesome tool for pixelation removal. It’s an advanced video processor that uses AI to enhance low-quality clips. It’s super handy for boosting clarity with little effort, thanks to features like “Denoise” and “Deblock.”
Steps to Remove Pixels with Video Proc Converter AI
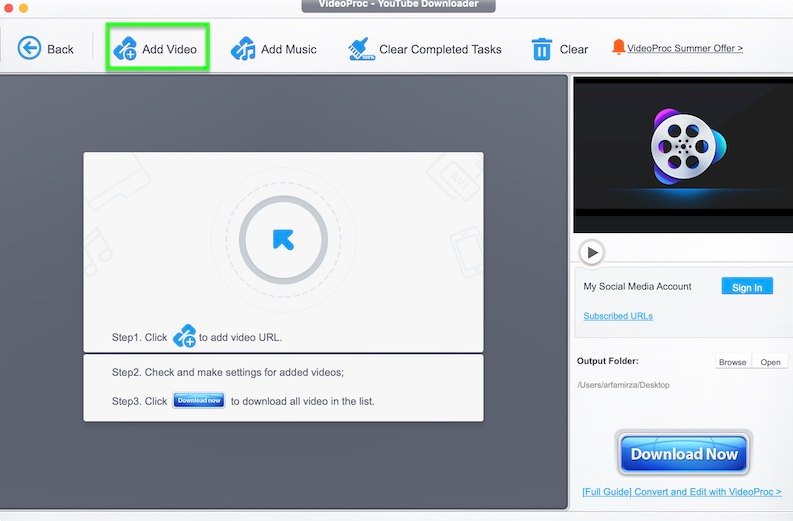
Open the software and click “+Add Video” on the home screen. Select your pixelated video, and it’ll pop onto the timeline ready for edits.
Head to the “Toolbox” and pick the “Deblock” feature to smooth out pixelation. For even better results, click the video in the timeline and choose “Denoise Level.” Tweak the intensity to totally clear out those pixels.
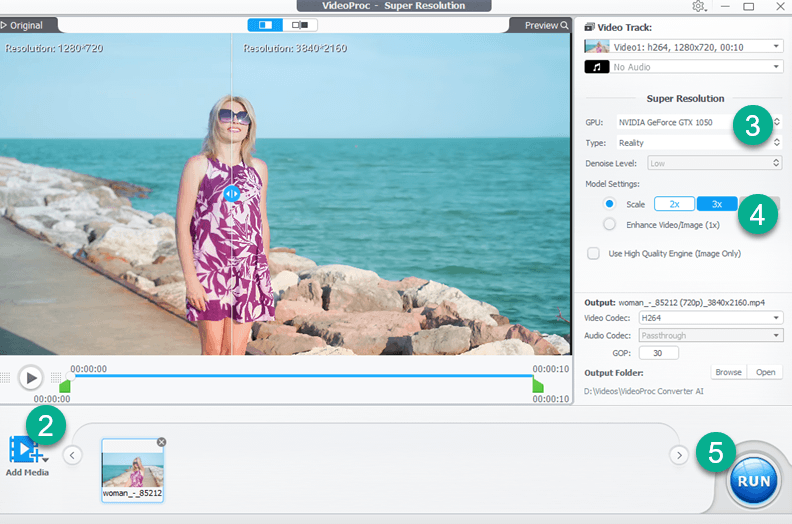
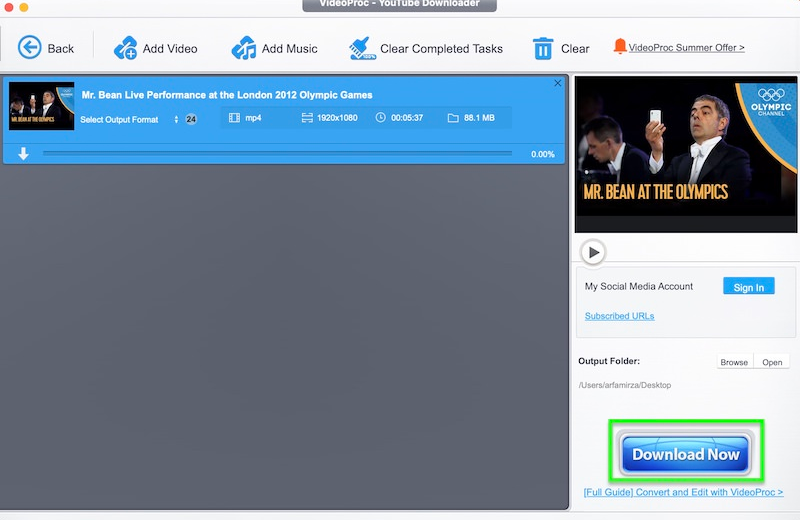
All set? Click “Run” at the bottom right. Pick your format and resolution, then hit “Download Now” to save the video to your computer.
Key Features of Video Proc Converter AI
The Deblock tool is made to fight pixelation. Denoise helps deliver a cleaner image. Plus, its AI upgrades video quality with barely any tweaking needed. It’s a strong video pixel remover for fast, solid results.
Method 3: Using Adobe Premiere Pro
Adobe Premiere Pro is a pro-level editor loved by experts. It offers precise controls and high-end features, making it great for pixelation removal. With noise reduction and sharpening options, you can seriously improve video quality.
Steps to Remove Pixelation with Adobe Premiere Pro
Open Premiere Pro and start a new project. Go to “File” > “Import” to add your pixelated video, then drag it from the project panel to the timeline.
Open the “Effects” panel and search for “Unsharp Mask.” Apply it to your video to reduce pixels and smooth the image. For more fine-tuning, use the “Lumetri Color” panel. Go to “Windows” > “Lumetri Color Panel,” then use the “Light” and “Color” tabs to improve clarity.
Done editing? Export by going to “File” > “Export” > “Media.” Choose your format and resolution (1080p or higher is best), then click “Export” to save.
Key Features of Adobe Premiere Pro
“Unsharp Mask” is great for cutting pixelation. The “Lumetri Color Panel” lets you adjust brightness, contrast, and sharpness exactly how you want. You can also export in high resolution for a crisp, pro look. If you’re exploring how to unpixelate a video with advanced tools, Premiere Pro is a reliable pick.
Method 4: Using VLC Media Player
VLC is mostly known as a media player, but it also has some basic editing tricks. It includes built-in tools that can help with pixel removal, making it a handy free option for quick fixes.
Steps to Remove Pixels with VLC Media Player
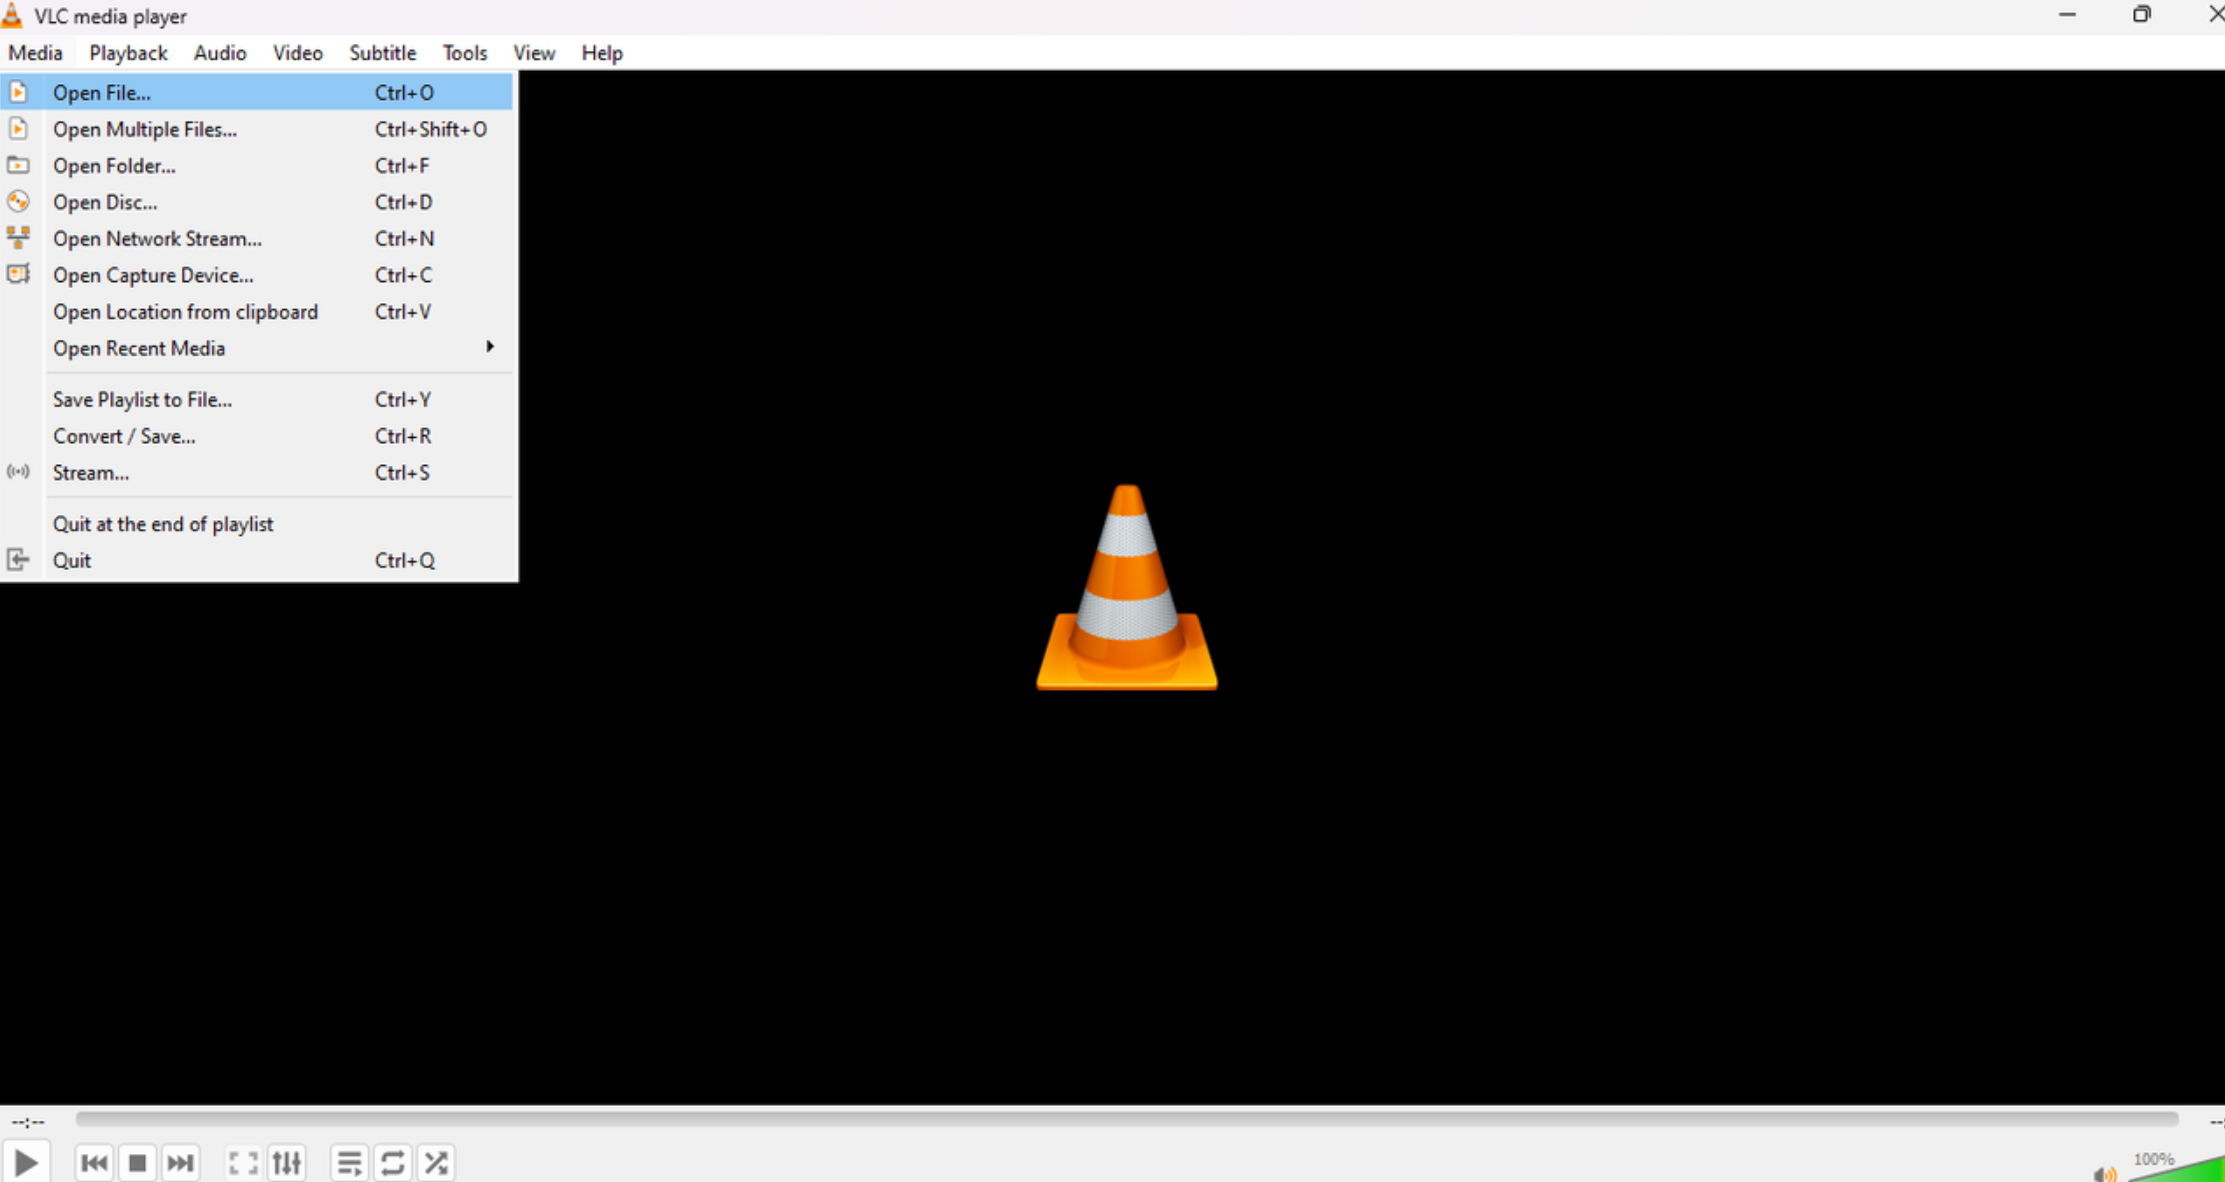
Open VLC, go to “Media” > “Open File,” and load your pixelated video.
Once it’s playing, go to “Tools” > “Adjustments and Filters” and open the “Video Effects” tab. Check the “Sharpen” filter to boost clarity. You can also enable the “Denoiser” filter under the “Advanced” tab to smooth pixelation. Use the sliders to adjust until it looks good.
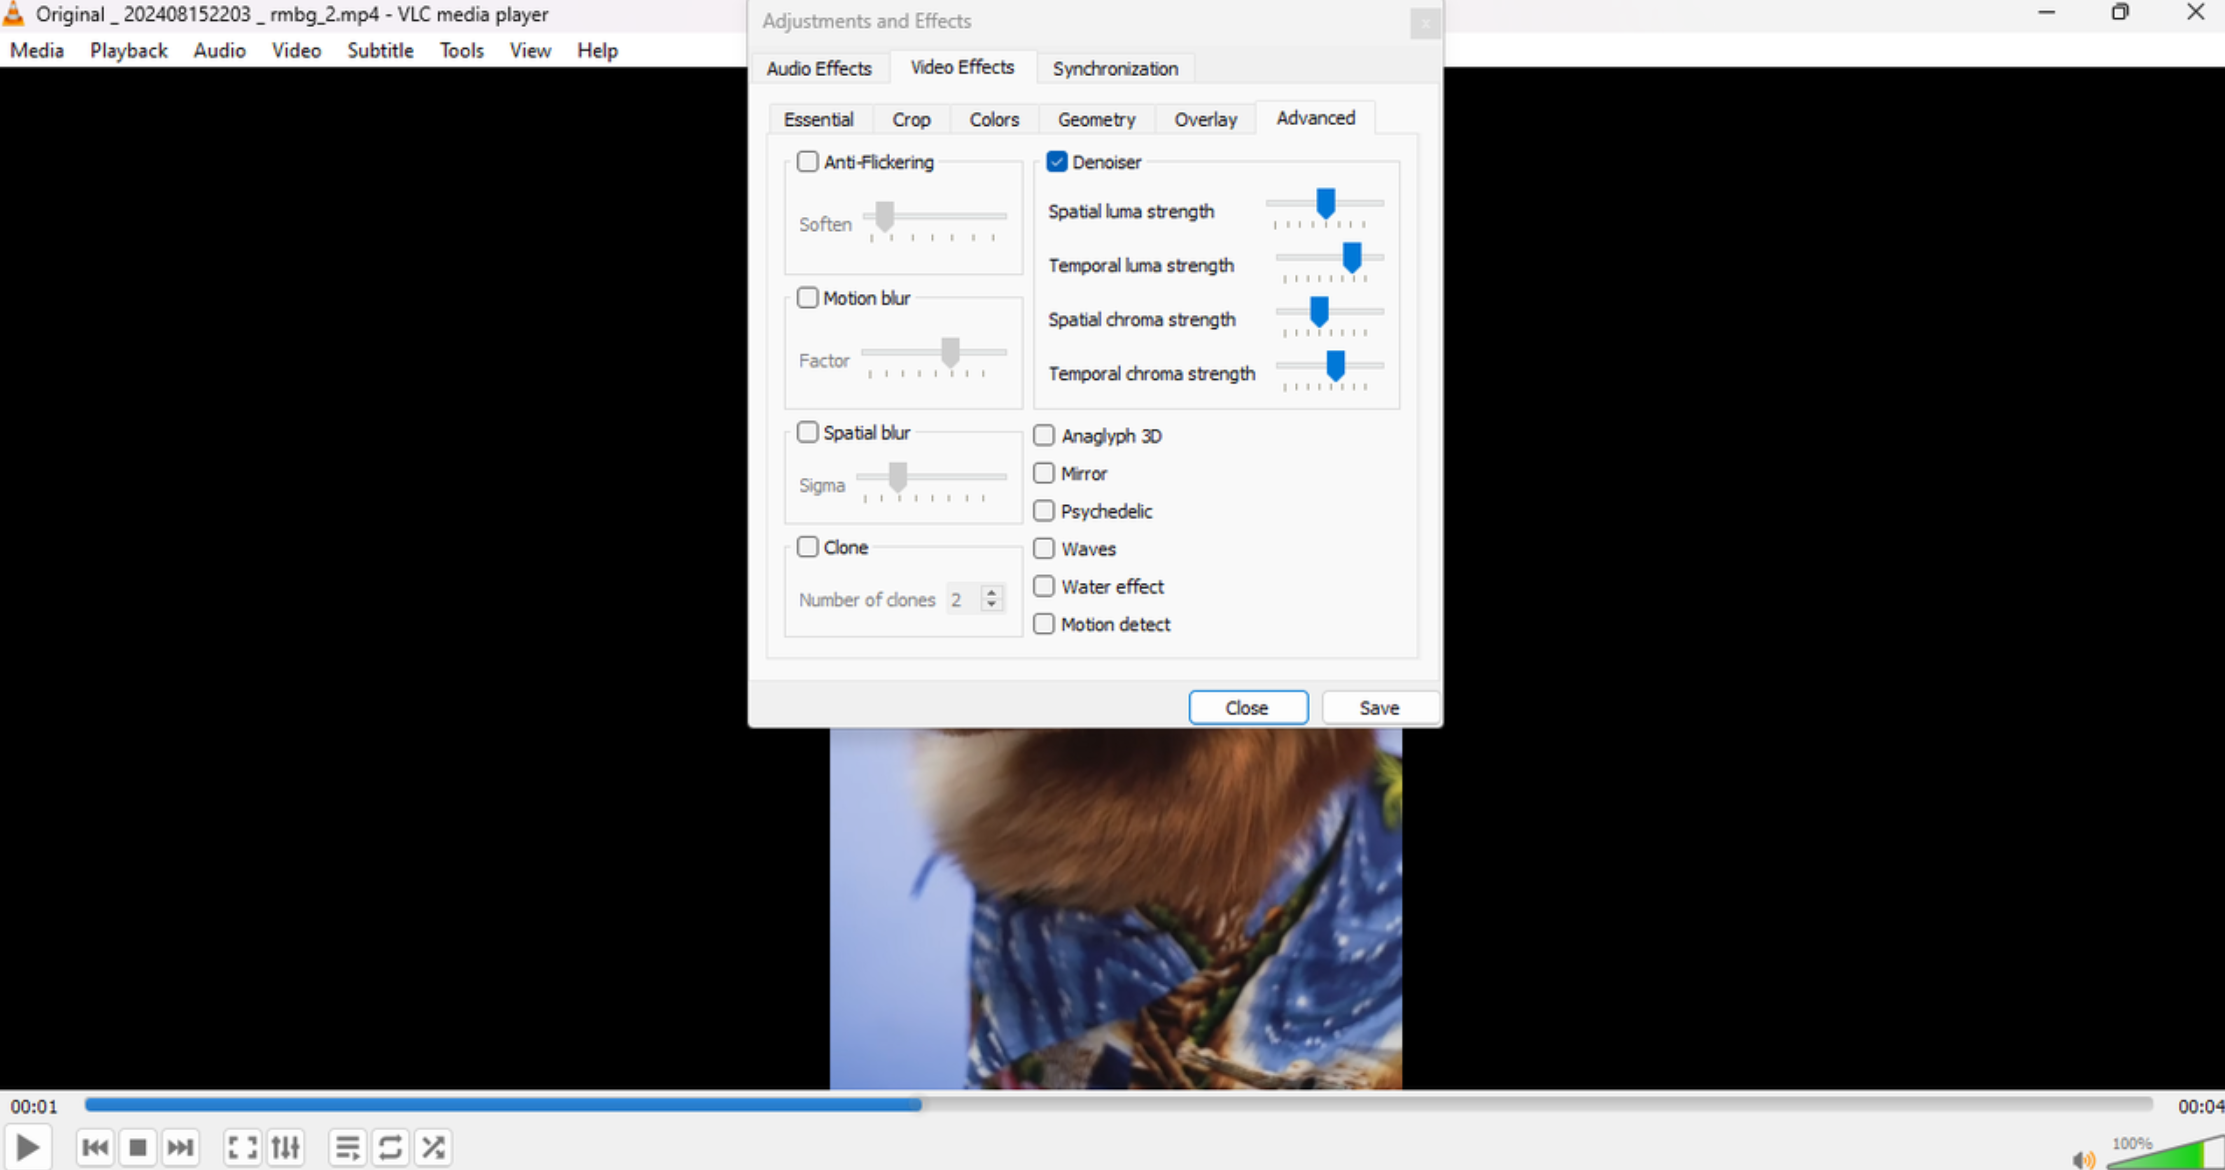
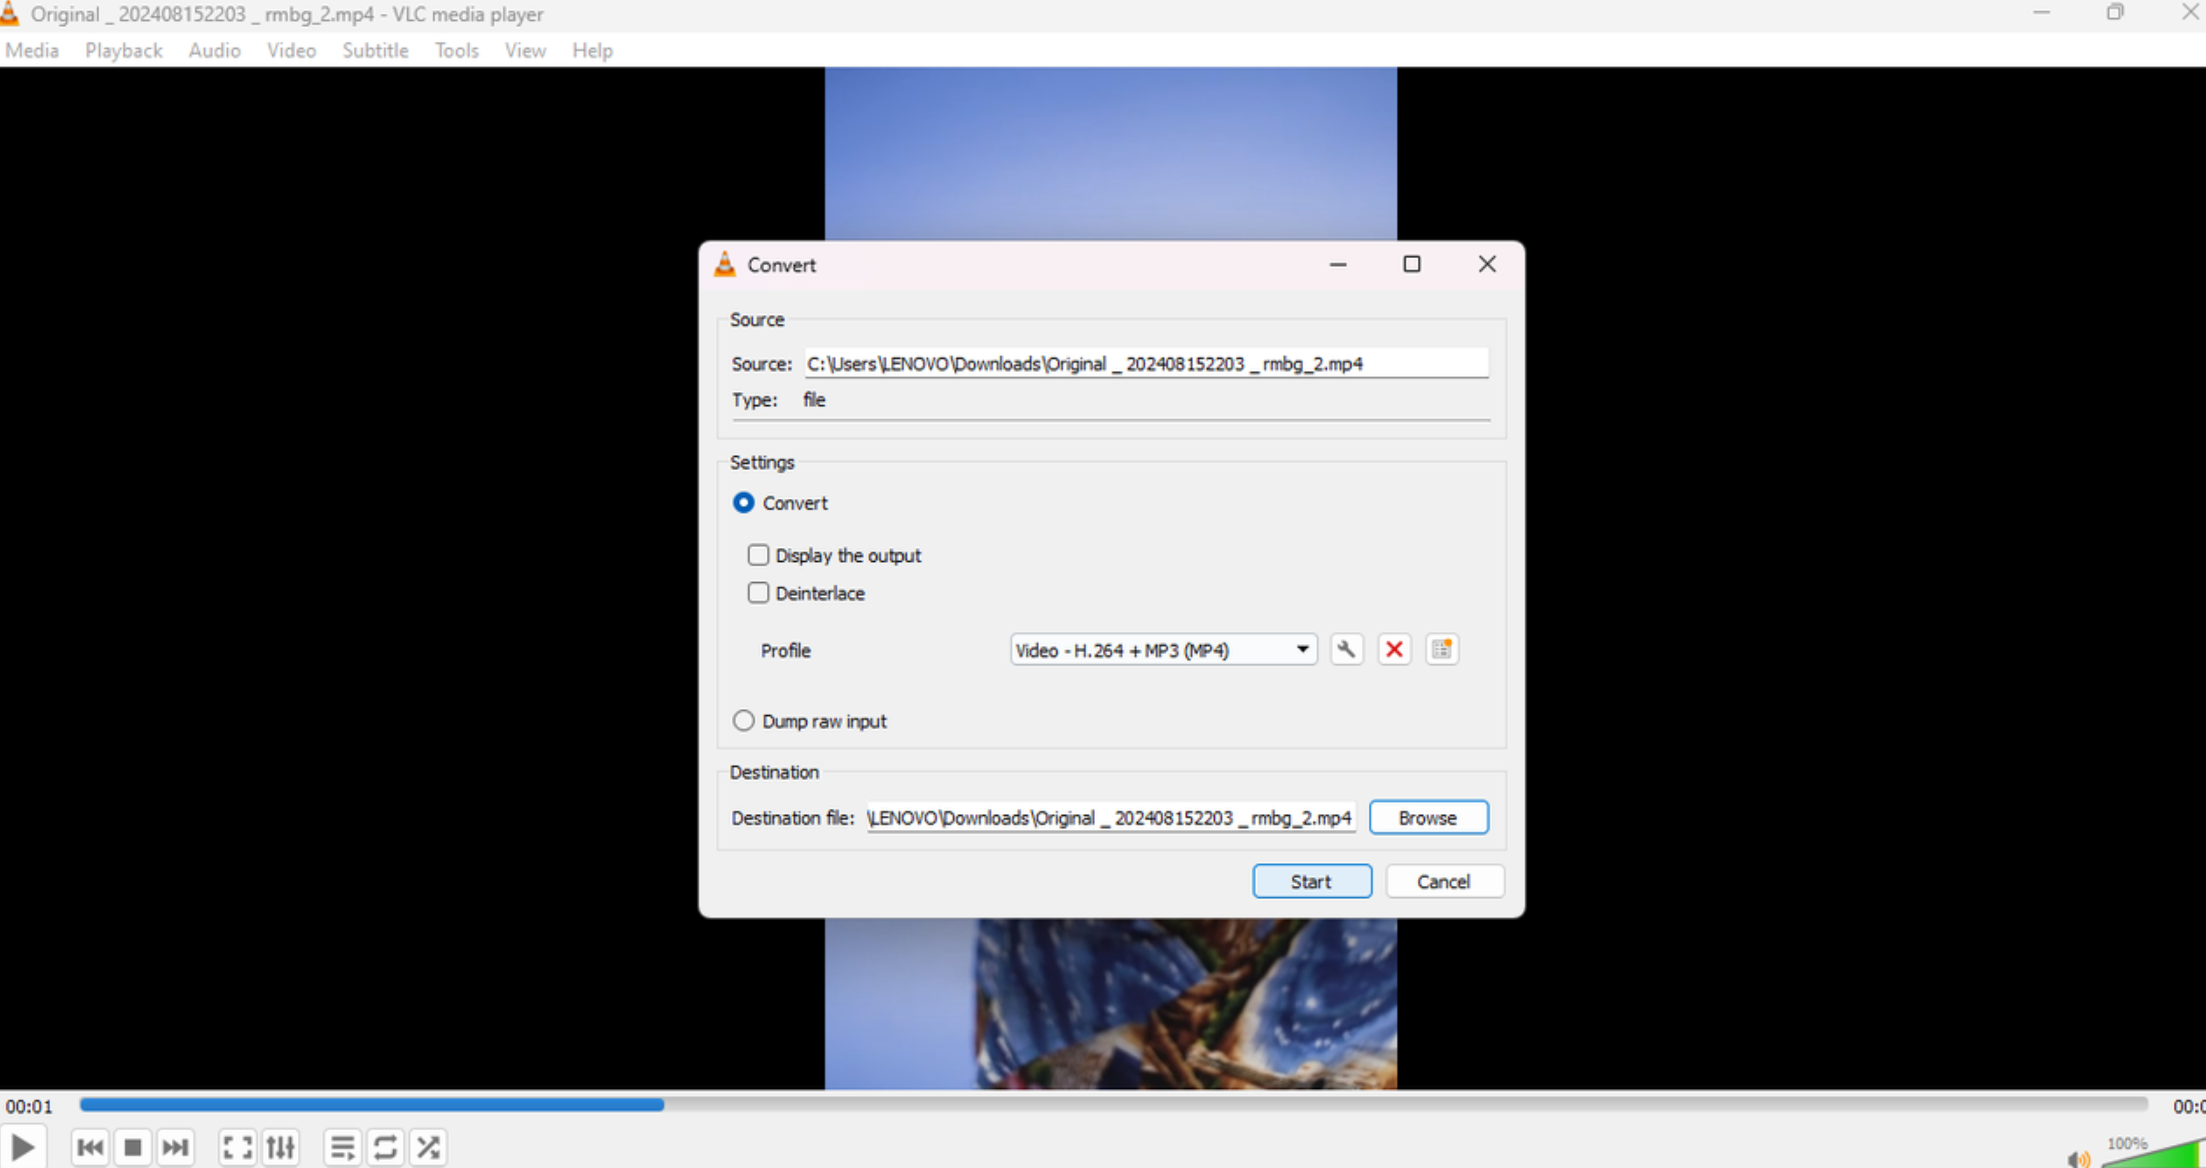
After applying filters, go to “Media” > “Convert/Save.” Choose high-quality export settings, then click “Start” to save your now-clear video.
Key Features of VLC Media Player
The “Sharpen” filter helps minimize visible pixels. “Denoise” cleans up pixelated spots. And since it’s free and open-source, everyone can use it. It’s a simple but useful video pixel remover when you need a fast solution.
Helpful Tips: How to Avoid Pixelated Videos
Now that you know how to depixelate a video, let’s talk prevention. Here’s how to avoid pixelation from the start.
First, keep your camera steady while filming. Shaky shots often lead to motion blur and pixelation. Using a tripod can help a lot.
Second, always shoot in high resolution. Recording in 1080p or 4K keeps your video clear, even if you edit or enlarge it later. Low-res videos tend to pixelate more easily.
Third, don’t over-compress. While compression reduces file size, too much crushes quality. Use moderate settings to balance clarity and size, especially for platforms that need good playback quality.
Following these can save you from needing pixelation removal down the road.
Wrapping Up
Cleaning up pixels is key if you want your videos to look good. Whether you’re new to this or a pro, there’s a tool here for you. We covered four methods for pixelation removal: CapCut, Video Proc Converter AI, Adobe Premiere Pro, and VLC Media Player.
Each tool has its perks. CapCut is user-friendly with great features like Enhance Image and Reduce Noise. Video Proc Converter AI uses AI for quick upgrades. Premiere Pro gives you pro-level control. VLC is free and simple for basic fixes.
If you want the best way how to unpixelate a video, we suggest trying CapCut. It’s easy and doesn’t require advanced skills. Start cleaning up your videos today for clearer, sharper results!
CapCut — Your all-in-one video & photo editing powerhouse! Experience AI auto-editing, realistic effects, a huge template library, and AI audio transformation. Easily create professional masterpieces and social media viral hits. Available on Desktop, Web, and Mobile App.
FAQs
What’s the best resolution to avoid video pixelation?
Go high—1080p, 2K, or 4K. Higher resolution means more detail and fewer visible pixels during editing. Always shoot and resize in high res to maintain quality. A good camera helps too. Tools like CapCut let you export in 2K or 4K, which aids in pixelation removal.
How do I pick the right video pixel remover?
Think about what you need. Look for features like image enhancement and noise reduction. CapCut has both in an easy package. Also, check export options and read reviews to find something reliable and simple. If it’s your first time learning how to depixelate a video, choose something user-friendly.
How do different video formats affect pixelation?
It depends on their compression. Formats like MOV and MP4 keep quality high and reduce pixelation. Heavy compression can make it worse. When processing, pick formats that support high res and low compression. CapCut exports in MOV and MP4, which helps effective pixelation removal.
Some images sourced from CapCut.