TOOL HUNTER
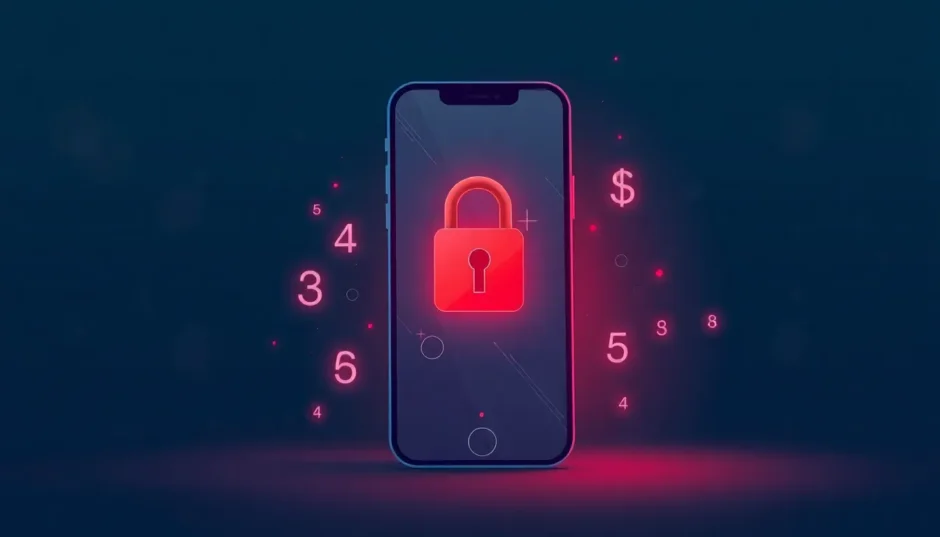

TL;DR: If you repeatedly enter the wrong passcode, your iPhone will enforce escalating delays, leading to the longest iPhone lockout time—a permanent disablement after ten failed attempts. Understanding how many times can you try to unlock an iPhone before this happens is key to managing security lockouts.
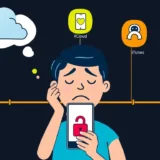
Ever found yourself staring at your iPhone screen, completely locked out because you can’t remember your passcode? You’re certainly not alone. We’ve all experienced that sudden wave of panic when you realize you’ve entered the wrong code too many times and now your phone is disabled. But have you ever stopped to seriously consider exactly how many attempts to unlock an iPhone you get before it becomes permanently locked? Knowing the parameters of iPhone lock out time is more than just trivia; it’s crucial for every iPhone user to understand Apple’s robust security framework.
Whether you are currently dealing with a forgotten passcode and facing a tense wait, or are just curious about Apple’s proactive security measures, grasping what happens after multiple failed entries can save you from significant future frustration. Let’s delve deep into the specifics of iPhone locked out times and outline clear paths to regaining access when things inevitably go awry.
Table of Contents
- Understanding iPhone Security Lockouts: Why the Limits?
- How Many Attempts to Unlock iPhone Before Lockout?
- Solutions for Easing iPhone Lock Out Times
- Preventing Data Loss During iPhone Lock Out Times
- Comprehensive Solutions for Different Scenarios
- Exploring Other Platforms: Android Considerations
- Frequently Asked Questions About iPhone Lockout
- Final Thoughts on iPhone Lock Out Times
Understanding iPhone Security Lockouts: Why the Limits?
Apple places a very high premium on user data security, which is why they have implemented a systematic approach that gradually increases the lockout periods following consecutive failed passcode attempts. This isn’t simply some punitive measure designed to annoy you; it’s a sophisticated defense mechanism intended to vigorously protect your personal information from unauthorized eyes. This system begins with very short timeouts and swiftly escalates to what could quickly become the longest iPhone lockout time you ever hope to encounter.
So, precisely how many times can you try to unlock an iPhone before facing these escalating consequences? The answer might be more stringent than you assume. While many people mistakenly believe in unlimited attempts, the reality imposed by Apple’s security structure is quite different. The system is engineered to progressively restrict access with every incorrect entry, ultimately leading to what feels like an eternity—the longest iPhone lockout time possible.
Historically, in the early stages of iOS, passcode attempts were practically unlimited, albeit with increasing delays. Extreme cases led to ridiculous suggestions like “Next attempt in 100 million years.” However, this evolved significantly with subsequent iOS versions to deter brute-force attacks.
How Many Attempts to Unlock iPhone Before Lockout?
Let’s clearly break down the sequence of events with each failed attempt. Understanding these specific iPhone lock out times can be the difference between a quick recovery and a long, agonizing wait.
For the initial five incorrect passcode entries, your iPhone remains relatively forgiving. It will simply display a “Try Again” message, allowing you to continue attempting the correct code freely. However, things take a sharp turn starting with the sixth wrong attempt.
Here is the widely recognized breakdown of standard iPhone lock out times:**
| Failed Attempts | Consequence of Wrong Passcode Input |
|---|---|
| 1st – 5th attempts | No lockout – continuous attempts allowed |
| 6th attempt | 1-minute lockout |
| 7th attempt | 5-minute lockout |
| 8th attempt | 15-minute lockout |
| 9th attempt | 1-hour lockout |
| 10th attempt | Permanent lockout |
When you hit that tenth failed attempt, one of two distinct scenarios will unfold based on your prior settings. If you had the “Erase Data” feature enabled in your settings, your iPhone will automatically initiate a factory wipe, erasing all content and settings. If this critical safeguard was turned off, your device enters a permanent disabled state, displaying the dreaded message, “iPhone is disabled, connect to iTunes.” This latter state represents the longest iPhone lockout time—a hard lock that necessitates external computer intervention to resolve.
For context, older iOS versions (like iOS 10 and 11) had slightly different escalation paths, often resulting in the 10th attempt leading to a 1-hour wait, and the 11th resulting in disablement. However, newer iOS iterations (as observed around 2023/2024) appear to have significantly increased the penalty for repeated errors, introducing extremely long waits before the final wipe/disable state:
- 1st–3rd attempts: No delay.
- 4th attempt: 1 minute lockout.
- 5th attempt: 5 minute lockout.
- 6th attempt: 15 minute lockout.
- 7th attempt: 1 hour lockout.
- 8th attempt: 3 hours lockout.
- 9th attempt: 8 hours lockout.
- 10 or more attempts: Device is disabled and must connect to a Mac or PC.
This demonstrates Apple’s tightening security to make manual brute-force attacks increasingly impractical. Knowing how many times can you try to unlock an iPhone with these increasing timers is vital for managing expectations.
Solutions for Easing iPhone Lock Out Times
Finding yourself staring down extensive iPhone locked out times can be monumentally frustrating, particularly when you desperately need access to your device. The good news is that effective methods do exist to help you regain access, although they vary in complexity and whether they preserve your existing data.
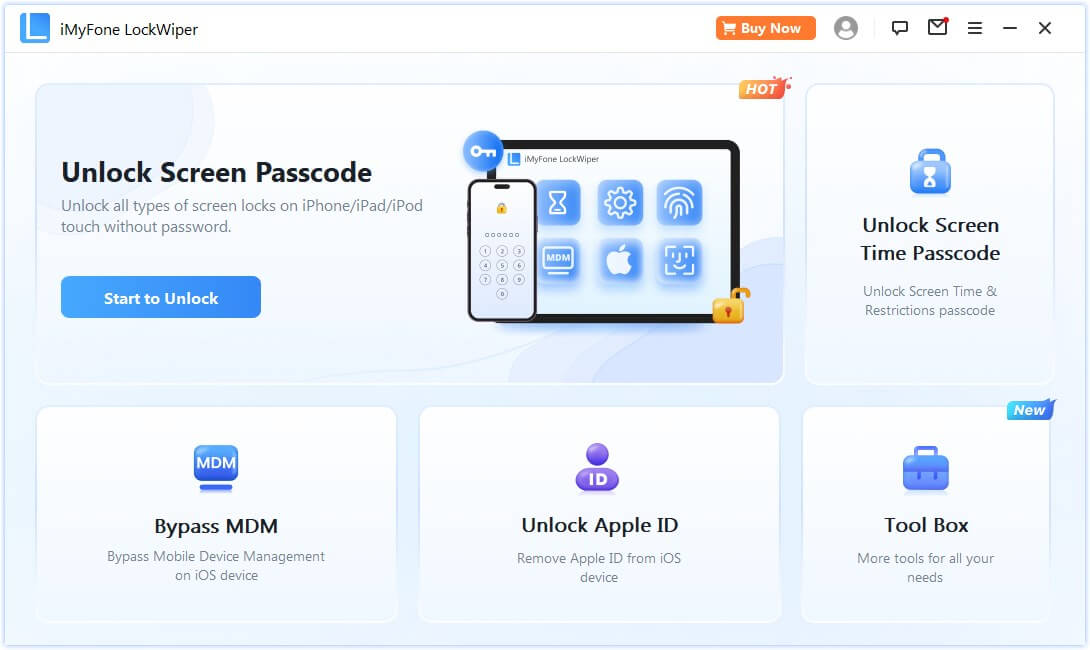
Using iMyFone LockWiper to Clear iPhone Lock Out Times
When you are facing what feels like the longest iPhone lockout time or a permanently disabled device, specialized software like iMyFone LockWiper often presents one of the most reliable solutions available today. This dedicated program is purpose-built to address stringent iPhone lock out times without demanding prior synchronization with iTunes or an existing iCloud backup.
iMyFone LockWiper.All-in-One iPhone Unlock Tool.Unlock all types of screen locks, including 4/6 digit passcode, Face ID, Touch ID.Remove iPhone Apple ID within a few minutes without password.Bypass MDM and remove MDM profile without needing credentials.Recover and reset Screen Time passcode without losing data.Support all iPhone models and iOS versions including iPhone 17 & iOS 26.Unlock the device only with user’s permission.

Check More Details | Download Now! | Check All Deals
What sets LockWiper apart is its utility in scenarios presenting the longest iPhone lockout time. Regardless of whether you are stuck waiting for a 1-minute delay or facing permanent disablement, this tool is engineered to efficiently clear iPhone lock out times.
![]()
The operation path is generally streamlined, often concluding in under five minutes. You won’t need to second-guess how many times can you try to unlock an iPhone previously; LockWiper is designed to handle devices regardless of their current lockout status.
Step-by-Step Guide Using LockWiper:
Step 1: Get iMyFone LockWiper set up on your computer and launch it. From the main screen, clearly select the option labeled “Unlock Screen Passcode.”
Step 2: Connect your disabled iPhone to the computer via USB. The software should swiftly recognize your device. Hit “Start” to initiate the process, and then proceed to download the necessary firmware package when prompted.
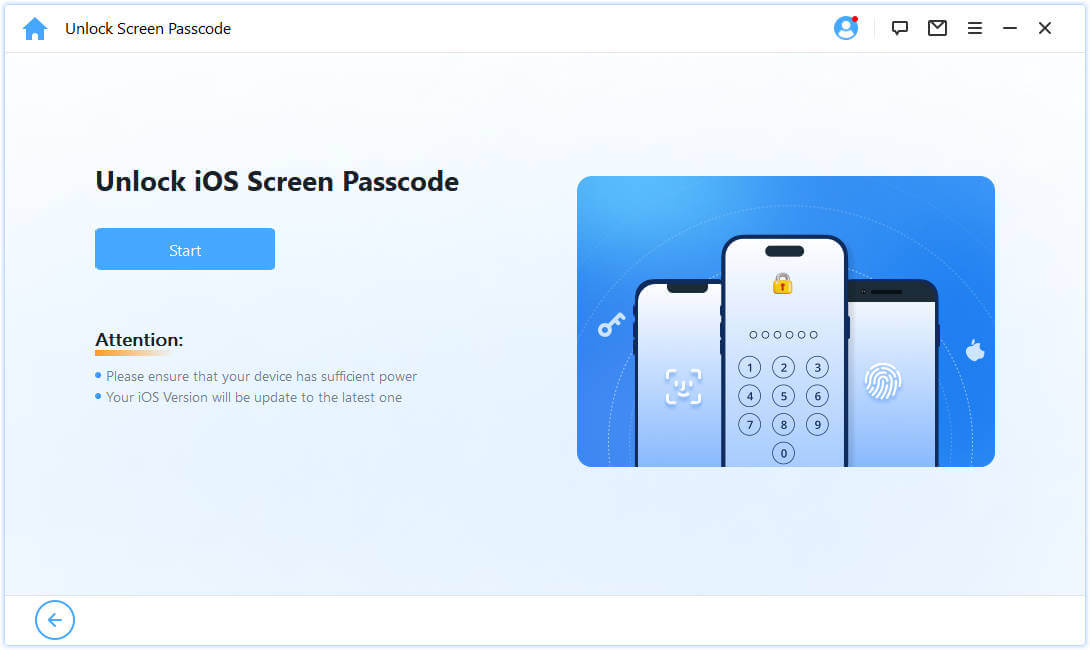
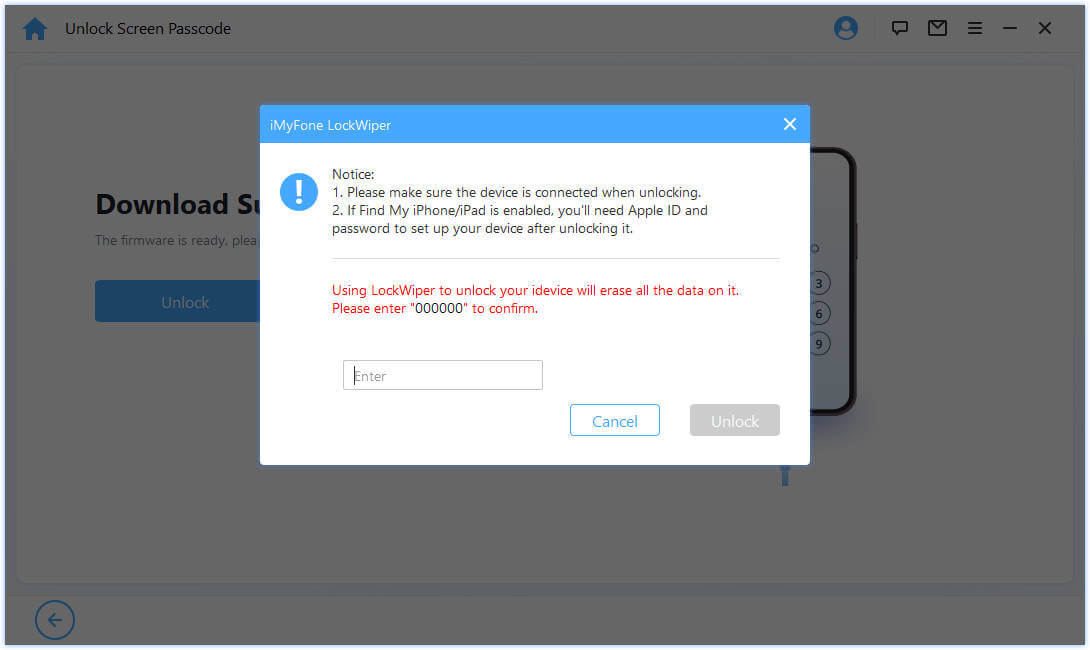
Step 3: After the firmware download is complete, select “Start Unlock.” You will be asked to input “000000” to provide final confirmation that you intend to proceed with unlocking your device.
Step 4: LockWiper will then begin the process of removing the screen lock and clearing the iPhone lock out times. This entire unlocking sequence typically finishes in under five minutes.

One major benefit of relying on LockWiper is its capability to function even when you haven’t previously synced your iPhone with iTunes or lack iCloud backups. This is particularly useful when confronting the longest iPhone lockout time scenarios where standard recovery methods hit dead ends.
Using iTunes to Handle iPhone Lock Out Times
If you have previously maintained synchronization between your iPhone and iTunes, using iTunes might be a viable route to clear your iPhone lock out times. This standard method works whether you have available backups or not, though the specific steps change slightly.

Essential Requirements for the iTunes Method:
- You must have the absolute latest version of iTunes installed.
- The iPhone must have been synchronized with this specific computer before.
- Find My iPhone must have been disabled prior to the lockout event.
Method A: When No Backups Are Available
Step 1: Launch the most current iteration of iTunes installed on your computer.
Step 2: Connect your locked iPhone using a standard USB cable. Allow a moment for iTunes to properly recognize the device.
Step 3: Once your iPhone icon appears within iTunes, select it and choose the “Set up as new iPhone” option, deliberately bypassing the restoration from backup prompt.

Step 4: After choosing the “Set up as new iPhone” path, proceed by clicking “Restore.”
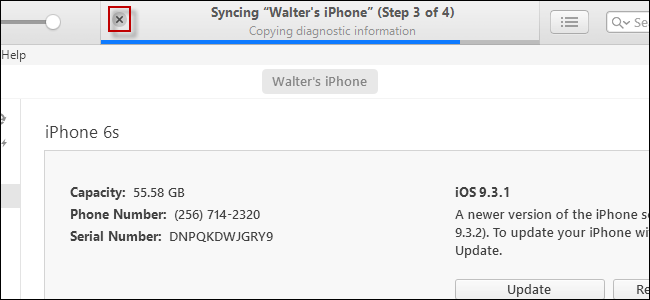
Step 5: If iTunes immediately tries to initiate an automatic backup of your device, you must cancel this process immediately by clicking the “x” visible in the iTunes status window.

Step 6: Similarly, actively cancel any synchronization attempts that iTunes might launch.
After completing these cancellations, your iPhone lock out times should be cleared, allowing you to set up the device anew. Keep in mind, however, that this only works if all prerequisites are meticulously met.
Method B: When Backups Are Available
If you happen to possess recent iTunes backups, this route is somewhat more straightforward:
Step 1: Connect your iPhone to the computer with iTunes confirmed as open.
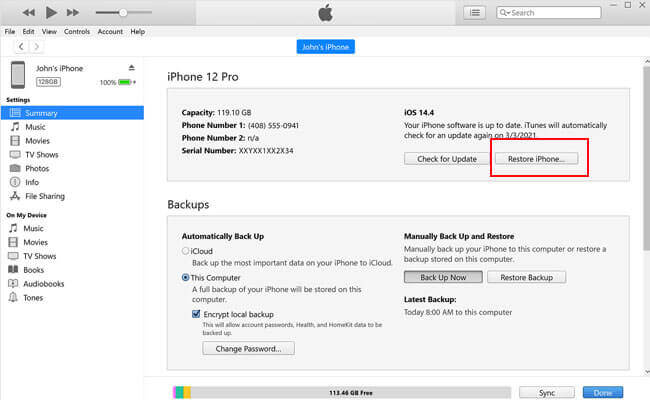
Step 2: Select your device and navigate directly to the “Summary” tab.
Step 3: Click the “Restore iPhone” button and patiently await the completion of the restoration process.
Step 4: Upon successful restoration, choose the option to restore from your existing iTunes backup to reclaim your data.
While the iTunes route can be effective under specific conditions, many users report that it often fails to recognize devices stuck in a disabled state, pushing them toward dedicated software like LockWiper for resolving tougher iPhone lock out times.
Recovery Mode for Clearing iPhone Lock Out Times
Recovery Mode offers an established alternative for confronting iPhone lock out times, although its success is contingent upon meeting certain technical conditions.
Necessary Conditions for Recovery Mode:
- Your copy of iTunes (or Finder on newer macOS versions) must be fully updated.
- The iPhone must have been synced with iTunes previously.
- Find My iPhone must have been disabled beforehand.
Step 1: Ensure your computer has the latest iTunes installed, then link your iPhone with its USB cable.
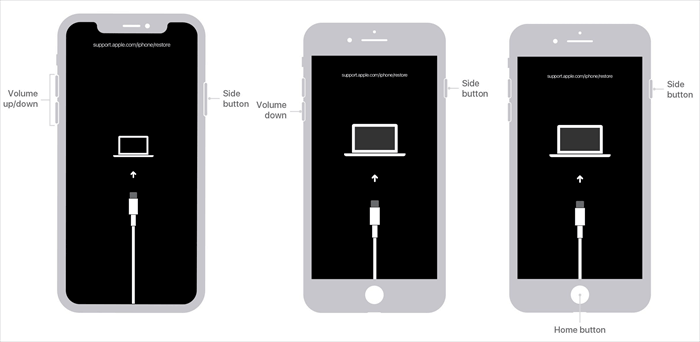
Step 2: Guide your iPhone into Recovery Mode. The specific button combination required differs depending on your iPhone model:
- iPhone 6S or earlier: Press and hold the Home and Side buttons concurrently.
- iPhone 7/7 Plus: Press and hold the Side and Volume Down buttons together.
- iPhone 8 or later: Rapidly press and release the Volume Up button, then Volume Down, and finally press and hold the Side button.
Step 3: iTunes/Finder should finally detect your iPhone in Recovery Mode, presenting you with options to either restore or update. Select “Restore” to initiate a factory reset, which effectively clears all iPhone lock out times.
The recovery procedure can often require more than 30 minutes to complete, and there’s always a slight risk of the iPhone getting stuck in this recovery loop. Should this troublesome scenario occur, you’re forced to exit Recovery Mode manually and start the process over again.
iCloud Method for Addressing iPhone Locked Out Times
If you were diligent about keeping Find My iPhone active and you retain knowledge of your Apple ID credentials, iCloud fortunately offers remote intervention for stuck iPhone locked out times.
Prerequisites for the iCloud Method:
- The Find My feature must have been active.
- You must know your current Apple ID and password.
- The locked iPhone needs to have a working connection to a network (Wi-Fi or cellular).
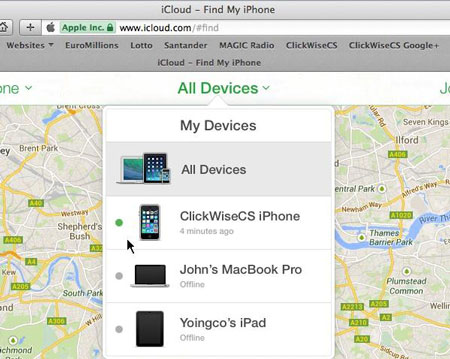
Step 1: On any computer or functioning device, navigate to iCloud.com and sign in securely using your primary Apple ID and corresponding password.
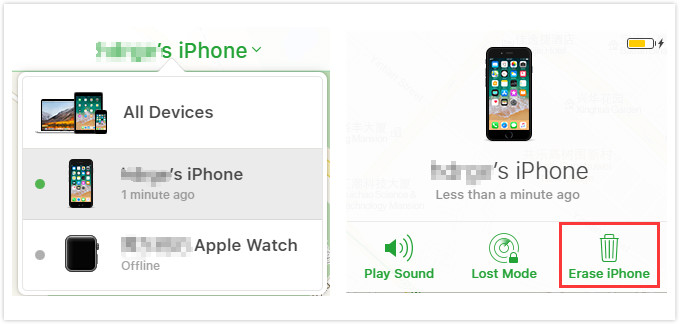
Step 2: Once logged in, locate and click “All Devices” usually found at the top of the screen, then select your currently locked iPhone from the ensuing list.
Step 3: Confirm your intention by selecting “Erase iPhone.” This remote command wipes all data and passcodes, thereby resolving any iPhone lock out times you might be facing.
After the remote erasure concludes, you are free to set up your device as new or restore your precious data from a recent iCloud backup. Crucially, this entire fix hinges on Find My being enabled before the device was locked.
Preventing Data Loss During iPhone Lock Out Times
One of the most significant anxieties surrounding multiple entries that lead to iPhone lock out times is the potential—and sometimes guaranteed—loss of personal data. Apple’s default security hardens your protection by including the option to automatically wipe all data after ten failed passcode attempts, which is logical for security but devastating if triggered accidentally.
However, you absolutely can disable this feature to ensure your data remains safe, no matter how many times can you try to unlock an iPhone before you get back in. Here is how to proactively secure your information:
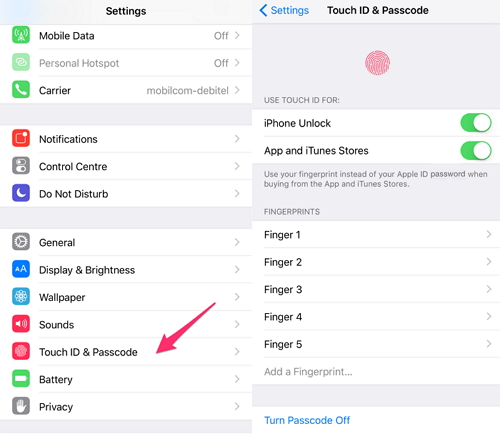
Step 1: When your iPhone is still accessible (i.e., you are not in a severe security lockout), open the main Settings application.
Step 2: Scroll down and select the menu option for “Touch ID & Passcode” (or “Face ID & Passcode” on newer hardware).

Step 3: You will naturally be required to input your current, known passcode to access these options.
Step 4: Once inside the security settings, scroll near the very bottom until you locate the toggle switch labeled “Erase Data.”
Step 5: Toggle the “Erase Data” feature to the OFF position.
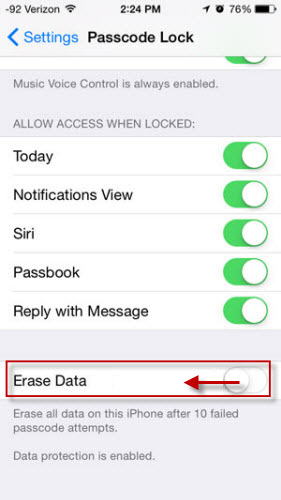
With this setting deactivated, your iPhone will still enforce the set iPhone lock out times after failed passcode entries, but it will hold back from wiping everything clean. This foresight grants substantial peace of mind while you work on recovering legitimate access.
Comprehensive Solutions for Different Scenarios
When you find yourself facing unfortunate iPhone locked out times, the choice of recovery method truly hinges on the specific circumstances you find yourself in. Identifying the correct path based on your situation can save considerable amounts of time and unnecessary stress.
- For the Newest iPhones Without Recent Backups: In these modern scenarios, using a third-party utility like iMyFone LockWiper usually becomes your most sensible path, given it doesn’t rely on previous synchronization records and supports the latest iOS iterations.
- For Older Devices with iTunes Sync History: If you have a history of backing up via iTunes on a trusted computer, that method may still prove sufficient, especially if your backups are current.
- For Devices with Find My Enabled: If you are certain you have Find My active, the iCloud method serves as an excellent remote override, provided you recall your Apple ID details.
- For Situations Where Data Preservation is Key: Proactively disabling the “Erase Data” feature is paramount. Furthermore, tools like LockWiper are often sought out for their potential to retain data even when forcibly clearing screen locks.
Always remember, regardless of the tool or approach you select, the ultimate goal remains the same: successfully clear iPhone lock out times and restore your device access. Facing the longest iPhone lockout time doesn’t have to translate into the permanent loss of your device if you are armed with the right knowledge and tools.
Exploring Other Platforms: Android Considerations
While the focus here has been laser-sharp on iPhone passcode vulnerabilities and longest iPhone lockout time issues, it’s worth acknowledging that similar security challenges exist on other platforms. Thankfully, solutions like those offered by iMyFone extend to the Android ecosystem for users facing comparable locking situations.
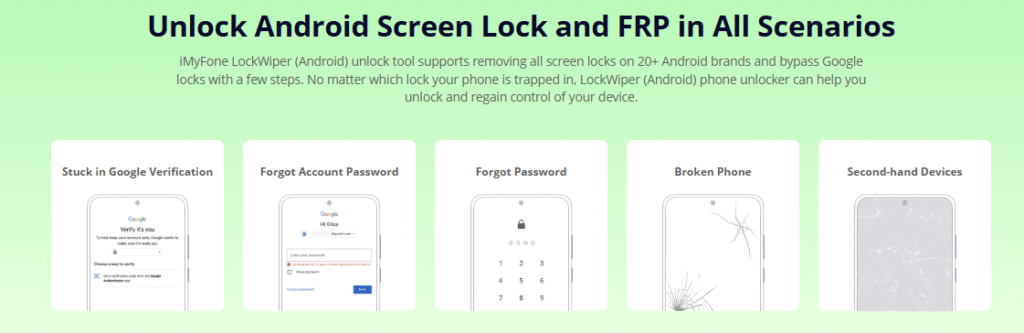
iMyFone LockWiper (Android).Android Unlocker forScreen Lock & FRP.Remove all types of Android screen passcodes: PIN, pattern, password, fingerprints, face ID.Bypass FRP & Google account verification for Samsung, Xiaomi, Redmi, and Oneplus without password.Unlock Samsung screen lock without losing data.Factory reset Android Phones & tablets in 5 minutes.Support 6,000+ Android phones, tablets including devices running on Android 15.0.iMyFone LockWiper (Android) is intended for use only with the informed consent of the device’s lawful owner.
Check More Details | Download Now! | Check All Deals
Frequently Asked Questions About iPhone Lockout
Navigating these lockouts often generates common questions. Let’s address the most frequent inquiries regarding how many times can you try to unlock an iPhone and the resulting delays.
What is the maximum number of times you can try to unlock an iPhone before a serious lockout?Apple’s system generally allows five failed attempts without a timed restriction. The first timed restriction begins after the sixth incorrect attempt. If you keep guessing, you eventually reach the tenth attempt, which triggers the longest iPhone lockout time scenario—permanent disablement or data erasure, depending on settings.
Is there any legitimate way to get unlimited passcode attempts on an iPhone?Absolutely not. Apple’s design strictly forbids unlimited attempts. The progressive escalation of iPhone lock out time is a core security feature. If you risk going beyond the initial small delays, you face severe consequences.
In practical terms, what constitutes the longest iPhone lockout time?Realistically, the longest iPhone lockout time is when the device reports “iPhone is disabled, connect to iTunes.” This means you’ve exhausted manual entry options and must resort to restoring the device via a computer, which results in data loss unless a pristine backup exists.
Can I stop my iPhone from automatically erasing its data after too many wrong passcodes?Yes, you can take preventive measures. By navigating to Settings > Face ID & Passcode and disabling the “Erase Data” toggle, you prevent the contents from being instantly wiped, even if you exceed the how many times can you try to unlock an iPhone threshold.
Does waiting for the timer to expire reset the attempt counter?Yes, once a temporary iPhone lock out time has passed—for instance, after a 1-hour wait—you can attempt entry again, and the failed attempt counter effectively resets to zero for the next cycle.
How many times can you try to unlock an iPhone before the first lockout message appears?Before the system imposes the first noticeable wait, you are permitted five consecutive wrong entries. The wait begins on the sixth attempt, usually starting with just one minute.
Final Thoughts on iPhone Lock Out Times
Dealing with iPhone locked out times can induce significant anxiety, especially when you feel you are approaching the edge of what seems like the longest iPhone lockout time imaginable. Whether you are grappling with a short, irritating delay or the absolute worst-case permanent disablement, knowing your potential next steps is vital to regaining control of your mobile sanctuary.
From utilizing powerful, dedicated software solutions like iMyFone LockWiper to relying on traditional recovery avenues such as iTunes or iCloud, multiple pathways exist to clear these exasperating iPhone lock out times. The most effective course of action will always be dictated by your specific situation—do you have backups? Was Find My active? What iOS version are you running?
It bears repeating: proactive defense trumps reactive panic. Simple steps, like disabling the “Erase Data” feature when you remember your code and maintaining rigorous, regular backups, can save you from untold stress down the road. And if you ever find yourself anxiously counting how many times can you try to unlock an iPhone before the digital door slams shut, hopefully, this guide has provided clarity and actionable solutions.
No matter how bleak the iPhone lock out time situation appears, there are established procedures to resolve it. Armed with the right knowledge and the right tools, you can overcome even the severest lockouts and get back to using your device as intended.
Some images in this article are sourced from the internet.