TOOL HUNTER

Music streaming has become an integral part of our daily lives, offering endless entertainment and relaxation. However, one common frustration many listeners encounter is inconsistent volume levels between tracks. You might be enjoying a quiet ballad only to have your ears assaulted by an unexpectedly loud rock song that follows. This is where Spotify’s audio normalization feature becomes your best friend.
Audio normalization on Spotify is designed to create a seamless listening experience by automatically adjusting volume levels across all tracks. Whether you’re creating a workout playlist with high-energy tracks or a relaxing mix for your evening wind-down, this feature ensures that every song plays at a comfortable, consistent volume level without requiring constant manual adjustments.
Table of Contents
- Understanding Audio Normalization on Spotify
- How to Enable Audio Normalization on Different Devices
- Enhancing Your Spotify Listening Experience
- When to Consider Disabling Audio Normalization
- Advanced Audio Editing with CapCut Desktop Editor
- Step-by-Step Guide to Audio Normalization in CapCut
- Additional CapCut Features for Audio Perfection
- Optimizing Your Overall Audio Experience
- Frequently Asked Questions
Understanding Audio Normalization on Spotify
Audio normalization technology works by analyzing each track’s volume characteristics and adjusting them to match a standardized loudness level. When you enable audio normalization on Spotify, the platform uses advanced algorithms to scan each song and make precise adjustments to ensure consistent playback volume.
The science behind this process involves LUFS (Loudness Units Full Scale), which is the industry standard for measuring audio loudness. Spotify’s audio normalization system calculates the average loudness of each track and adjusts it to meet their target LUFS level, ensuring that your music maintains consistent volume whether you’re listening to classical music or modern pop tracks.
What makes Spotify audio normalization particularly impressive is its ability to maintain audio quality while making these adjustments. The algorithms are designed to prevent distortion and preserve the dynamic range of your music, ensuring that you get the best possible listening experience without sacrificing audio fidelity.
How to Enable Audio Normalization on Different Devices
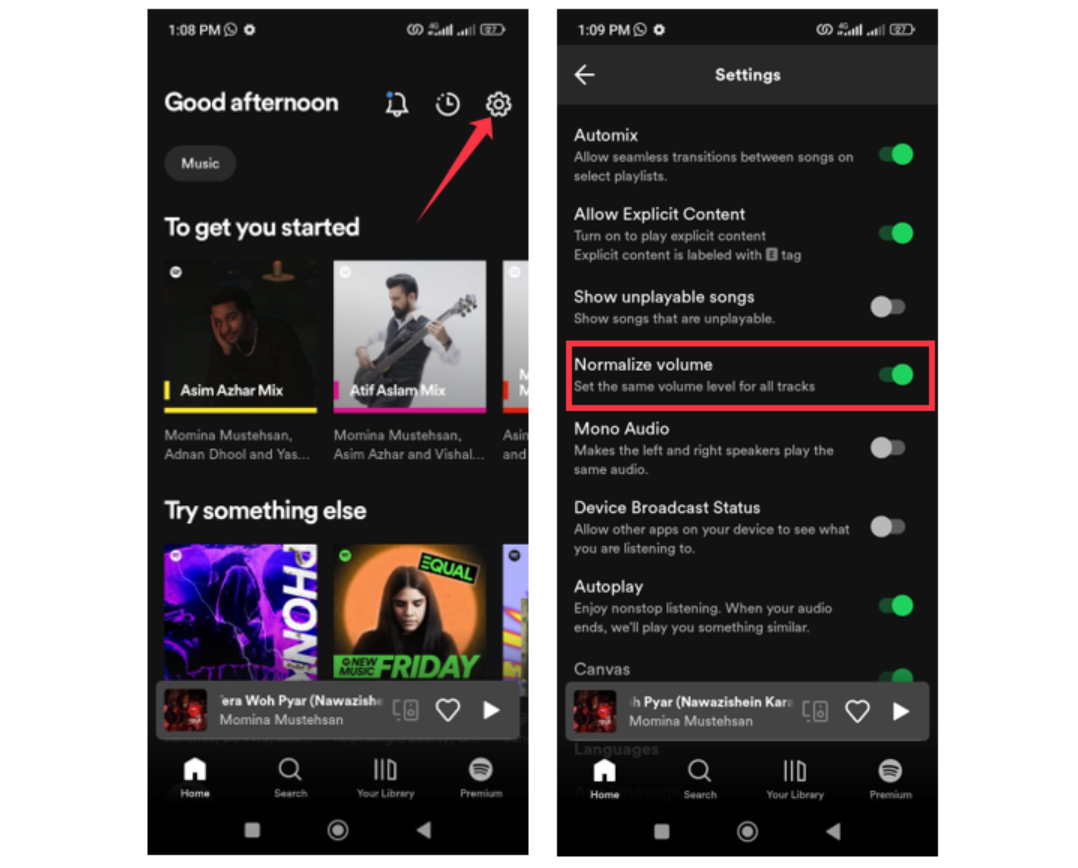
Android Device Setup
Getting started with audio normalization on your Android device is straightforward. Open your Spotify application and locate the Settings icon, typically found in the upper right corner of your screen. Navigate to the Playback section within your settings menu, where you’ll find the “Enable Audio Normalization” option. Simply toggle this switch to activate the feature and enjoy consistent volume across all your tracks.
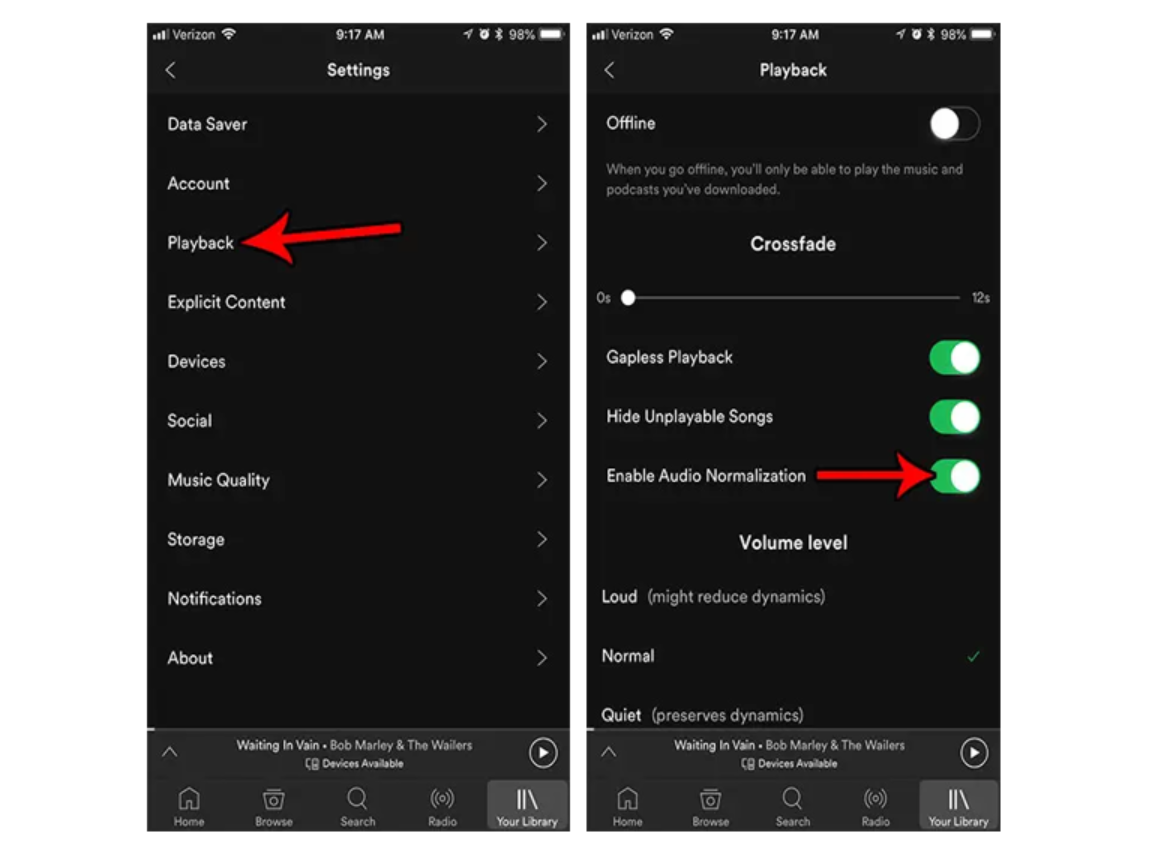
iPhone Configuration
iPhone users can access the audio normalization feature through a slightly different path. Open your Spotify app and either swipe left or tap on your profile picture to access the main menu. Select “Settings and privacy,” then choose “Playback” from the options available. Here you’ll find the audio normalization toggle that you can switch on to activate volume consistency across your music library.
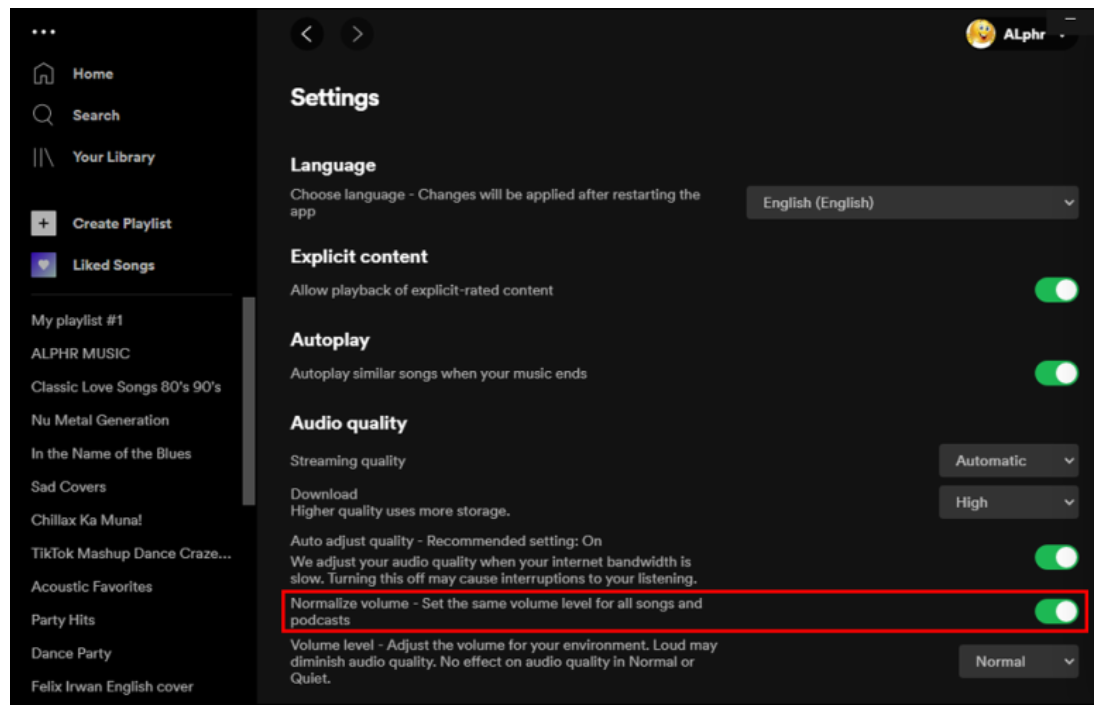
Desktop Application Settings
For those using Spotify on their desktop computers, the process is equally simple. Launch the Spotify application and click on your profile picture located in the top right corner. From the dropdown menu, select “Settings” and look for the “Audio Quality” section. Within this section, you’ll find the “Normalize volume” option that you can toggle to enable consistent audio levels.
Enhancing Your Spotify Listening Experience
Beyond enabling audio normalization, there are several ways to optimize your Spotify experience. The built-in equalizer allows you to customize sound profiles based on your personal preferences or specific headphone characteristics. You can boost bass frequencies for electronic music or enhance treble for classical compositions, creating a tailored listening experience that matches your audio preferences.
Streaming quality settings also play a crucial role in your listening experience. Premium subscribers should ensure they’ve selected the highest quality streaming option available, which provides 320 kbps audio quality for the best possible sound reproduction. This setting works hand-in-hand with audio normalization to deliver superior audio performance.
Environmental considerations are also important when optimizing your Spotify settings. The platform offers different normalization intensity levels labeled “Quiet” and “Loud” to accommodate various listening environments. If you’re in a noisy coffee shop, the “Loud” setting might be more appropriate, while the “Quiet” setting works better for late-night listening sessions.
For offline listening, ensure your download quality is set to the highest available option. This guarantees that even when you’re not connected to the internet, you’ll enjoy the same high-quality audio experience with consistent volume levels thanks to Spotify’s audio normalization technology.
When to Consider Disabling Audio Normalization
While audio normalization offers numerous benefits, there are specific scenarios where disabling the feature might be preferable. Audiophiles and music purists sometimes prefer to disable normalization to experience music exactly as the artists and producers intended. This is particularly relevant for classical music and live recordings where dynamic range—the difference between the quietest and loudest passages—is an essential artistic element.
Some listeners with high-quality audio equipment argue that audio normalization can sometimes introduce subtle compression that affects the natural sound characteristics of their music. If you have invested in premium headphones or speakers, you might want to experiment with both enabled and disabled normalization settings to determine which option provides the most satisfying listening experience for your specific setup.
Thankfully, toggling audio normalization on and off is simple through the same settings menu where you enabled the feature. This flexibility allows you to customize your listening experience based on your current activity, music genre, or audio equipment.
Advanced Audio Editing with CapCut Desktop Editor
While Spotify’s audio normalization excels at music playback, content creators often need more advanced tools for their projects. This is where CapCut Desktop Video Editor shines with its comprehensive audio normalization capabilities and additional professional-grade features.
CapCut — Your all-in-one video & photo editing powerhouse! Experience AI auto-editing, realistic effects, a huge template library, and AI audio transformation. Easily create professional masterpieces and social media viral hits. Available on Desktop, Web, and Mobile App.

Download App | Sign Up for Free
CapCut provides creators with sophisticated audio tools that go beyond simple volume adjustment. The platform’s loudness normalization feature ensures consistent audio levels across all your clips, which is particularly valuable when combining multiple audio sources such as voice recordings, background music, and sound effects.
Step-by-Step Guide to Audio Normalization in CapCut
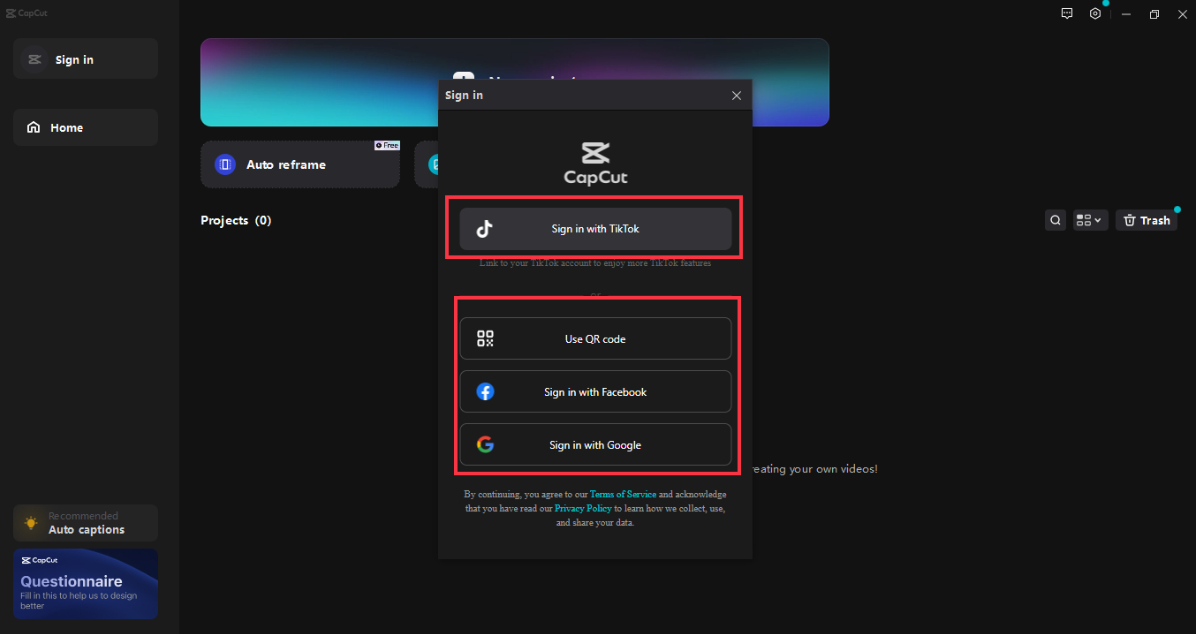
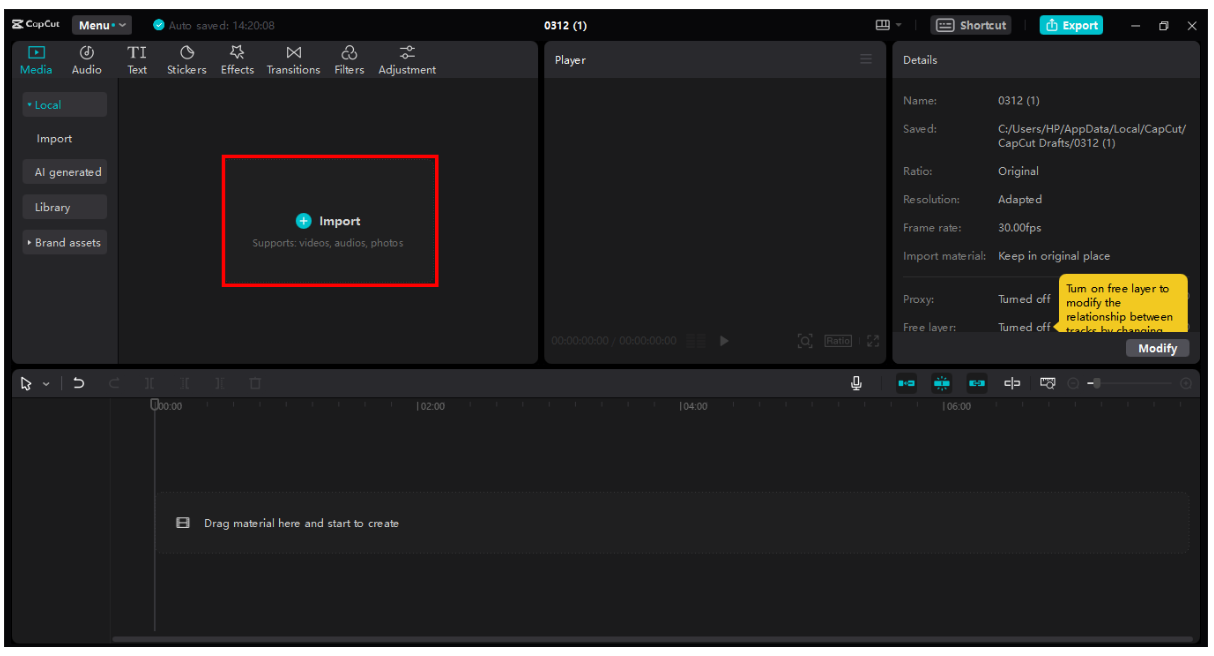
Getting started with CapCut’s audio normalization is straightforward. Begin by downloading the application from the official website and installing it on your computer. The registration process is simple, allowing you to sign up using existing Google, Facebook, or TikTok credentials.
Once installed, create a new project and import your audio files. CapCut supports various audio formats including MP3, WAV, M4A, and FLAC, making it compatible with most recording devices and audio sources. Drag your imported files to the timeline to begin the editing process.
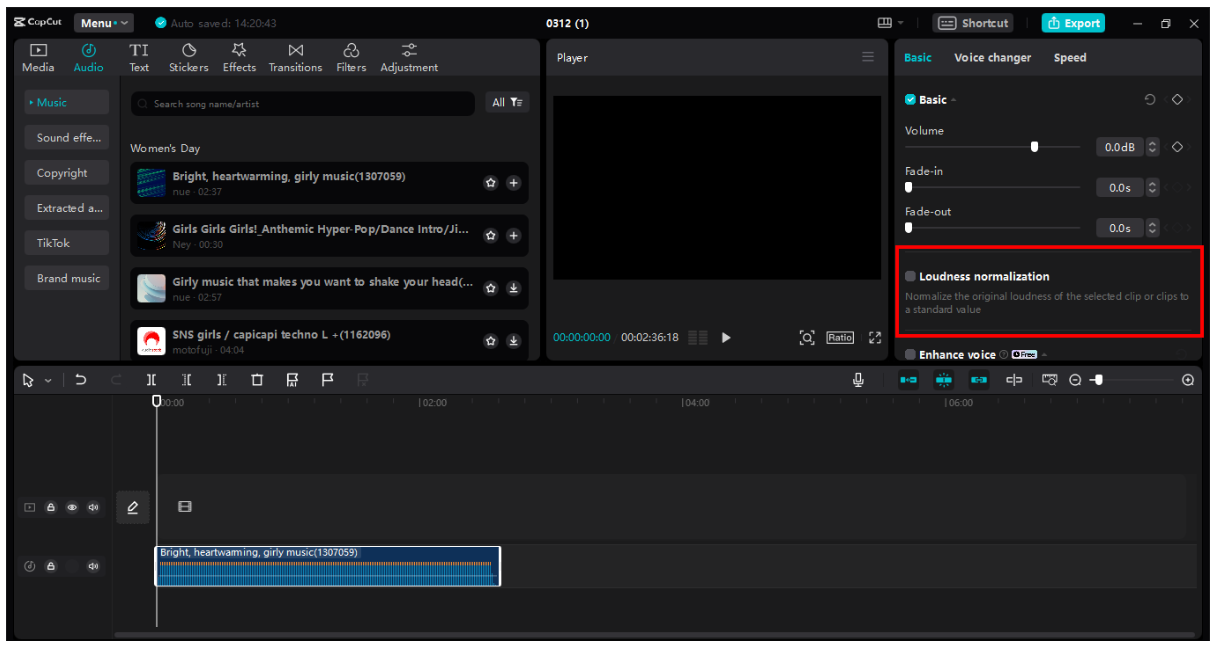
The normalization process begins by locating the “Loudness Normalization” option in the right-hand toolbar. Activating this feature automatically adjusts your audio to the standard -23 LUFS level, which is the industry norm for content distribution. This ensures your audio maintains consistent volume levels whether played through headphones, speakers, or mobile devices.
Beyond basic normalization, CapCut offers comprehensive editing tools including trimming, volume adjustment, fade effects, and noise reduction. The platform’s vocal isolation technology is particularly impressive, allowing creators to enhance voice clarity while minimizing background distractions.
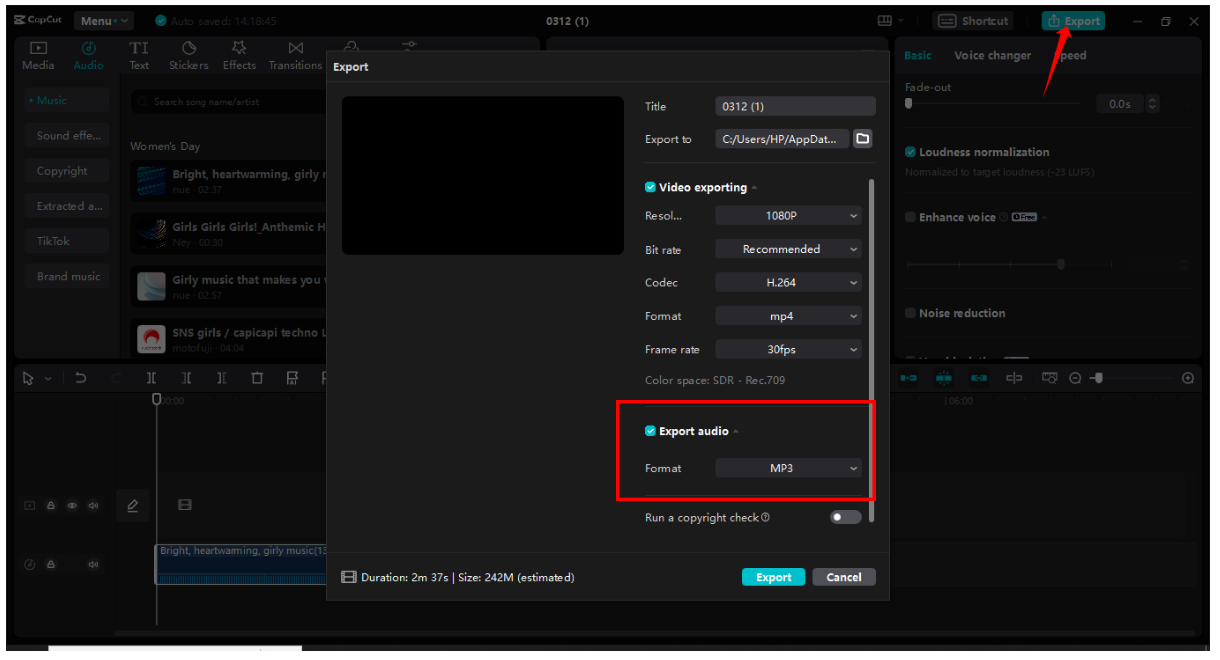
After perfecting your audio, export your project in your preferred format. CapCut supports multiple output options including MP3, WAV, AAC, and FLAC, ensuring compatibility with various platforms and devices.
Additional CapCut Features for Audio Perfection
CapCut’s audio capabilities extend far beyond simple normalization. The platform offers transformative features that cater to both beginner and professional content creators. The one-click audio normalization feature is particularly valuable for podcasters and interviewers who need to maintain consistent volume levels across extended recordings.
Transition effects between audio clips ensure smooth flow between different segments of your content. Fade-in and fade-out effects prevent abrupt audio changes, creating professional-quality transitions that enhance listener engagement and content quality.
Pitch adjustment tools allow for creative audio manipulation, enabling content creators to alter the mood and tone of their audio content. This feature is particularly valuable for music producers and content creators looking to add creative elements to their projects.
Background noise removal technology helps clean up recordings made in less-than-ideal environments. This feature identifies and eliminates unwanted background sounds while preserving vocal clarity, making it invaluable for creators working with field recordings or interviews conducted in noisy environments.
Audio extraction capabilities allow users to separate audio from video files for independent editing or repurposing. This is particularly useful for content creators who want to use audio elements across multiple projects or platforms.
The text-to-speech functionality converts written content into natural-sounding audio, complete with multiple voice options and stylistic variations. This feature enhances accessibility and provides additional content creation options for educators, marketers, and social media creators.
CapCut — Your all-in-one video & photo editing powerhouse! Experience AI auto-editing, realistic effects, a huge template library, and AI audio transformation. Easily create professional masterpieces and social media viral hits. Available on Desktop, Web, and Mobile App.
Download App | Sign Up for Free
Optimizing Your Overall Audio Experience
Whether you’re listening to music or creating content, understanding and utilizing audio normalization technology can significantly enhance your audio experience. Spotify’s built-in audio normalization feature provides excellent results for music listeners, while CapCut’s advanced tools offer professional-grade solutions for content creators.
The key to optimal audio experiences lies in understanding when to use normalization and when to preserve original dynamic range. For casual listening and playlist enjoyment, Spotify’s audio normalization typically provides the best experience. For content creation and professional projects, CapCut’s comprehensive toolset offers the control and precision needed for professional results.
Experimenting with both platforms’ settings will help you determine the optimal configuration for your specific needs and preferences. Remember that audio preferences are subjective, and the best settings are those that provide the most enjoyable and appropriate listening experience for your situation.
Frequently Asked Questions
What streaming quality provides the best Spotify experience? Premium subscribers can access 320 kbps streaming quality, which represents the highest quality audio available on the platform. This high-bitrate streaming combined with proper audio normalization settings ensures optimal listening quality across all your favorite tracks.
How can I further improve my Spotify audio quality? Beyond enabling audio normalization, ensure your streaming quality is set to “Very High” in the audio settings. Using quality headphones or speakers and taking advantage of Spotify’s equalizer settings can further enhance your listening experience. For advanced audio manipulation, consider using dedicated editing software like CapCut for additional enhancements.
What’s the simplest way to normalize volume across my Spotify library? The most straightforward method is enabling the “Enable Audio Normalization” option in your Spotify playback settings. This automatically adjusts all tracks to consistent volume levels. For more precise control over normalization parameters, professional tools like CapCut provide additional customization options for content creators.
Some images courtesy of CapCut