TOOL HUNTER
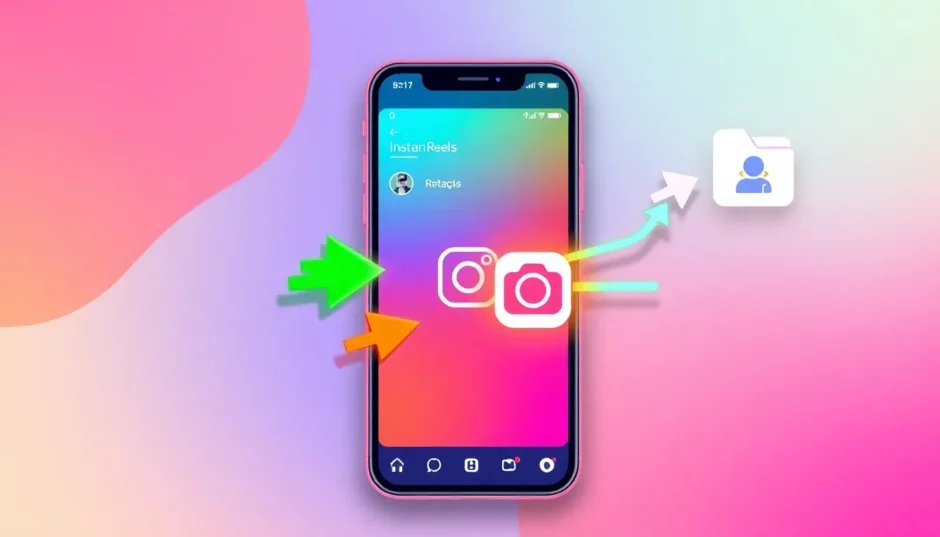

Ever spent hours crafting the perfect Instagram Reel only to realize you’re not quite ready to share it with the world? We’ve all been there. While Instagram does offer a draft feature, those drafts remain trapped within the app—vulnerable to disappearing if you switch devices or log out. But what if you could liberate your creations and store them safely in your phone’s gallery? Good news: it’s not only possible but easier than you might think.
In this comprehensive guide, I’ll show you multiple methods to rescue your draft reels from Instagram’s confines. You’ll learn how to preserve your videos without posting them, edit them at your leisure, and share them exactly when you feel they’re ready. Let’s dive into the world of Instagram Reel preservation!
Table of Contents
- Understanding Instagram Draft Reels
- The Benefits of Saving Draft Reels Externally
- The Direct Method: Save Reels Without Posting
- The Stories Workaround: Another Saving Method
- Screen Recording: The Universal Backup Plan
- Enhancing Your Saved Reels with Desktop Editing
- Best Practices for Saving and Organizing Draft Reels
- Quality Preservation Techniques
- Troubleshooting Common Saving Issues
- Creative Applications for Saved Draft Reels
- Legal and Ethical Considerations
Understanding Instagram Draft Reels
Yes, you can absolutely save your Instagram draft reels to your gallery! This might come as a surprise to many users who assume drafts are permanently locked within the app. However, there’s one crucial detail to remember: copyright restrictions mean any music from Instagram’s library won’t be included in your saved video. Your original audio or externally added music will remain intact, but those trending songs from Instagram’s collection will disappear.
This limitation actually works in your favor creatively. By learning how to save a reel draft to camera roll, you gain the freedom to edit your content outside Instagram’s ecosystem. The video portion remains perfect, and you can always add different music later either within Instagram or using external editing tools. It’s all about maintaining control over your creative process rather than being limited by platform restrictions.
The Benefits of Saving Draft Reels Externally
Learning how to save a draft reel to camera roll opens up a world of possibilities beyond Instagram’s walls. Here’s why taking this extra step is worth your time:
Your draft reels become permanent backups when stored in your gallery. Unlike Instagram’s internal drafts that can vanish with app updates, account issues, or device changes, gallery-saved videos remain secure regardless of what happens to your Instagram account.
The editing possibilities expand dramatically once your reel is freed from the app. You’re no longer limited to Instagram’s built-in tools—you can use professional editing software, add advanced effects, and truly make your content stand out. Want to learn how to download reel draft content for multi-platform use? This is your gateway. That same video can be repurposed for TikTok, YouTube Shorts, or Facebook without starting from scratch each time.
Accessibility improves significantly too. Instagram drafts require an internet connection and app access, but gallery-stored videos are available anytime, anywhere—perfect for editing on the go or when inspiration strikes unexpectedly. Plus, organizing becomes effortless when you can create dedicated folders for your draft reels, making content management a breeze.
The Direct Method: Save Reels Without Posting
Instagram actually provides a built-in method to download Instagram drafts directly to your device. Here’s how to save reel draft to camera roll using Instagram’s native feature:
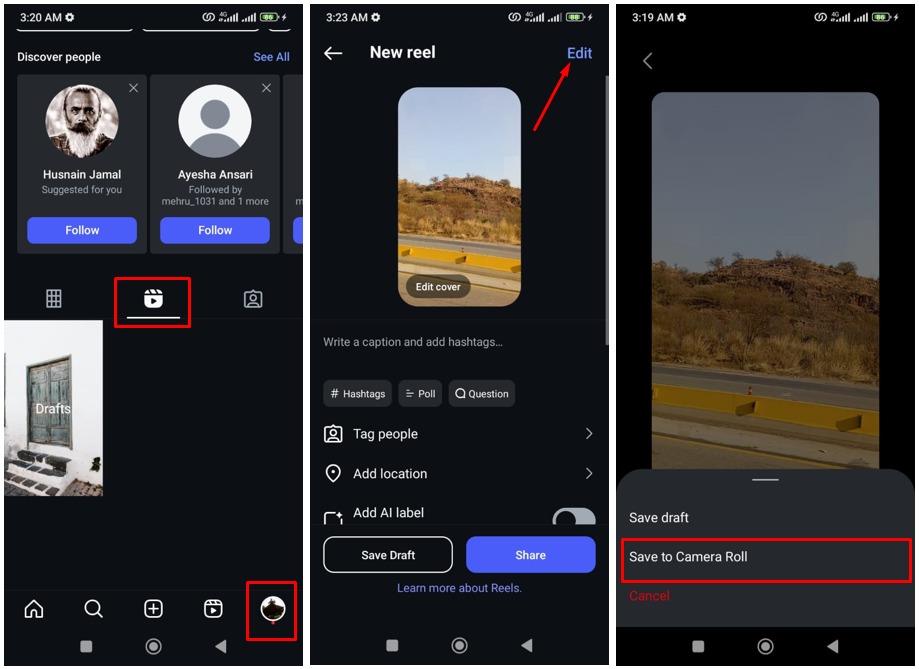
Begin by opening your Instagram app and tapping the “+” icon at the bottom. Select “Reel” from the options, then tap “Drafts” at the top of your screen. Browse through your saved drafts and select the one you wish to preserve.
On the editing screen, you’ll notice a menu bar at the bottom. Swipe left through these options until you find the “Save” button—it might be hiding among the other icons. Once located, tap it to reveal saving options.
Choose “Save to Camera Roll” and wait while Instagram processes your video. You’ll receive a “Video saved” confirmation once the process completes. Your reel is now safely stored in your phone’s gallery, ready for whatever you have planned next.
This method represents the most straightforward approach to download Instagram drafts while maintaining good quality without needing to share your content publicly.
The Stories Workaround: Another Saving Method
Instagram Stories provide an alternative pathway to preserve your draft reels while maintaining original quality. Here’s how to download reel drafts using this clever workaround:
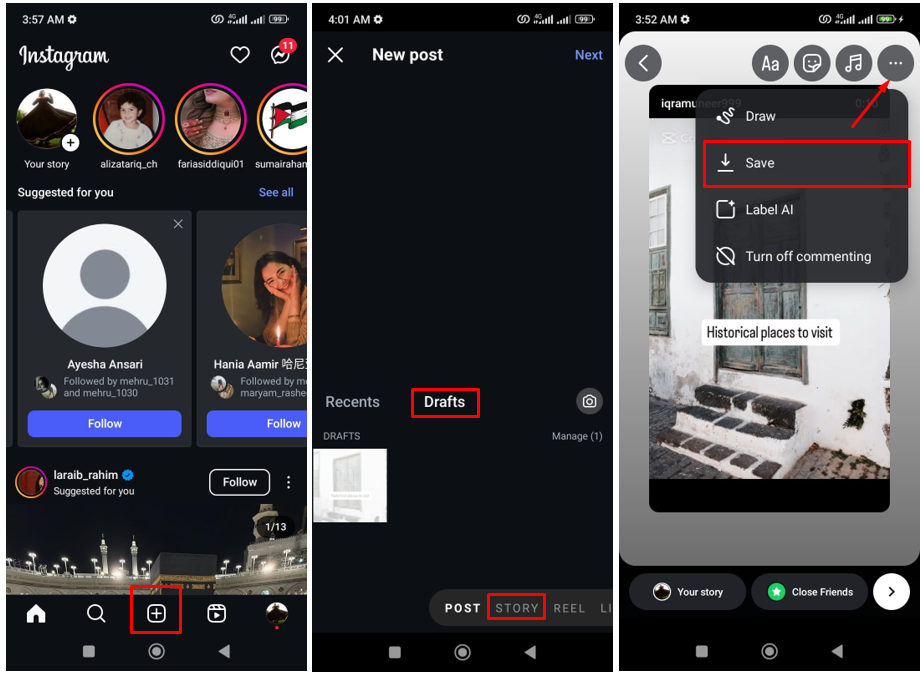
Navigate to your Reels drafts and select the video you want to save. Tap the share icon (which looks like a paper airplane) and choose “Add to Story.” This action moves your draft into the story editor without publishing it.
Before proceeding with posting, tap the three-dot menu in the top right corner and select “Save.” This action downloads your reel to your camera roll while keeping it private from your followers.
If you prefer to keep your stories clean, you can immediately delete the story after saving. Simply navigate to your story, open the video, access the three-dot menu at the bottom, and select “Delete.” The video disappears from your stories while the saved copy remains safely in your gallery.
This method offers a reliable alternative for those who prefer not to use the direct save option or want to ensure maximum quality preservation.
Screen Recording: The Universal Backup Plan
When other methods fail or seem unavailable, screen recording provides a reliable way to capture your draft reels. Here’s how to download the Instagram reel draft using this universal approach:
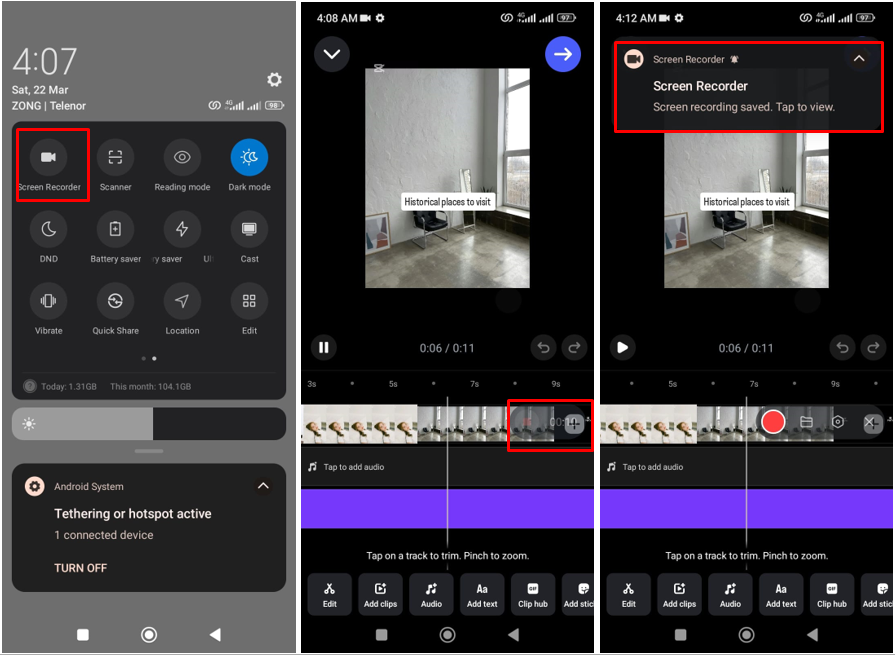
Activate your device’s screen recording function. On most smartphones, this feature resides in the control center or quick settings menu. Both iPhone and Android devices have built-in screen recording capabilities—just enable them before proceeding.
Open your Instagram Reels drafts and play the video you want to save in full-screen mode. Ensure you have adequate storage space and that your phone won’t interrupt the recording with notifications.
Start recording before playing your video and let the screen capture run until the reel completes. Stop the recording and find the captured video in your gallery. While this method might not preserve original quality perfectly, it ensures you never lose access to your creative work.
Screen recording serves as an excellent backup option when other methods aren’t working or when you need to quickly capture content without navigating through multiple menus.
CapCut — Your all-in-one video & photo editing powerhouse! Experience AI auto-editing, realistic effects, a huge template library, and AI audio transformation. Easily create professional masterpieces and social media viral hits. Available on Desktop, Web, and Mobile App.

Enhancing Your Saved Reels with Desktop Editing
Once you’ve mastered how to save a reel draft to camera roll, the real magic begins when you transfer your content to a computer for advanced editing. Desktop editors provide professional-grade tools that can transform your rough drafts into polished content ready for any platform.
Professional editing software offers precision controls that mobile apps simply can’t match. From color grading to advanced audio mixing, the desktop environment provides the tools needed to elevate your content quality significantly.
The larger screen space allows for more precise edits, better timeline navigation, and the ability to work with multiple tracks simultaneously. This expanded workspace makes complex edits more manageable and visually intuitive.
Export options become more versatile on desktop platforms. You can choose specific formats, codecs, and quality settings tailored to different social media platforms, ensuring optimal playback quality wherever you share your content.
Batch processing capabilities mean you can edit multiple reels simultaneously, applying consistent color grading, audio levels, and formatting across all your content efficiently.
Professional Editing with CapCut Desktop
CapCut’s desktop version transforms the editing experience with professional features accessible to creators of all skill levels. The interface balances advanced capabilities with user-friendly design, making complex edits approachable for beginners while providing depth for experienced editors.
The timeline editor supports multiple video and audio tracks, allowing for sophisticated layering of visuals, sound effects, and music. Precision editing tools ensure your cuts happen exactly where you want them, while the preview window shows real-time results of your adjustments.
Color correction tools go beyond basic filters, offering manual control over exposure, contrast, saturation, and color temperature. These adjustments can be applied to individual clips or across your entire project for consistent visual storytelling.
Audio editing capabilities include noise reduction, equalization, and volume normalization features that ensure your content sounds as good as it looks. The ability to separate audio from video clips provides additional creative flexibility.
Text and graphics tools allow for animated titles, lower thirds, and custom graphics that can be keyframed for dynamic movement. These elements help make your content more engaging and professional-looking.
Advanced Features for Professional Results
CapCut’s desktop editor includes several advanced features that set it apart from basic mobile editors. The keyframe animation system allows for precise control over movement, scaling, and effects over time, enabling smooth, professional-looking animations.
The chroma key (green screen) functionality opens up creative possibilities for replacing backgrounds or adding special effects that would typically require expensive software or equipment.
Multi-camera editing support lets you sync and switch between angles from different cameras, perfect for content creators who film with multiple devices simultaneously.
Advanced export options include custom resolution settings, bitrate control, and format selection, ensuring your final video meets the specific requirements of any platform or purpose.
Proxy editing capabilities allow for smooth playback and editing even with high-resolution footage by creating lower-resolution temporary files while maintaining full quality in the final export.
Exporting and Sharing Your Masterpiece
Once your editing is complete, CapCut provides robust export options to ensure your content looks its best wherever it’s shared. The export settings allow you to balance file size with quality, choosing the optimal settings for your specific needs.
Platform-specific presets can automatically configure your export settings for popular social media platforms, taking the guesswork out of technical specifications like aspect ratio, resolution, and file format.
Batch exporting capabilities allow you to process multiple videos simultaneously, saving time when working with content series or multiple client projects.
Direct sharing integration lets you upload your finished videos to platforms like YouTube and Vimeo right from the application, streamlining your workflow from edit to publication.
The render preview feature allows you to check how your final export will look before committing to the potentially time-consuming rendering process, ensuring no surprises in the final product.
CapCut — Your all-in-one video & photo editing powerhouse! Experience AI auto-editing, realistic effects, a huge template library, and AI audio transformation. Easily create professional masterpieces and social media viral hits. Available on Desktop, Web, and Mobile App.
Best Practices for Saving and Organizing Draft Reels
To ensure your saved draft reels remain organized and accessible, consider implementing these practical strategies for content management. A systematic approach will save you time and frustration when searching for specific content later.
Create a consistent naming convention for your saved videos. Include the date, content type, and version number in your filenames to make identification easier weeks or months later. For example: “2023-11-15_Reel_Tutorial_V2.mp4”
Establish a folder structure that makes sense for your content creation workflow. You might organize by project type, client name, or content category. The key is consistency—once you establish a system, stick to it religiously.
Implement a regular backup routine for your saved reels. While storing videos in your phone’s gallery is safer than keeping them solely in Instagram, additional backups to cloud storage or external drives provide extra security against device failure or loss.
Maintain a content log or spreadsheet tracking your saved reels. Note where they’re stored, when they were created, any editing status, and ideas for future use. This meta-organization helps you leverage your content library more effectively.
Periodically review and purge unnecessary content. While storage is increasingly affordable, digital hoarding can make finding important content more difficult. Schedule quarterly reviews to delete unused drafts and keep your library manageable.
Quality Preservation Techniques
Maintaining the highest possible quality when saving your draft reels requires attention to several technical considerations. These practices ensure your content looks its best regardless of how you choose to use it later.
Always ensure Instagram’s HD upload setting is enabled before saving your drafts. This setting affects both upload and download quality, making it essential for preserving visual fidelity when learning how to save draft reel to camera roll.
Consider the original recording quality when planning your content. Higher resolution source footage provides more flexibility during editing and better results when exported for different platforms. Whenever possible, record at the highest quality your device supports.
Understand the impact of different saving methods on quality. The direct save method typically preserves the best quality, while screen recording may introduce compression artifacts. Choose your method based on your quality requirements for each specific project.
When editing saved reels, work with the original saved file rather than re-compressed versions. Each export or conversion can degrade quality slightly, so maintaining an original master file ensures you always have the highest quality source available.
Monitor your storage space regularly. Low storage can cause saving errors or force your device to use more aggressive compression, potentially reducing video quality. Maintain at least 10-15% free space on your device for optimal performance.
Troubleshooting Common Saving Issues
Even with the best techniques, you may occasionally encounter problems when trying to download Instagram drafts. Understanding these common issues and their solutions will help you overcome obstacles quickly.
If the save option isn’t appearing in your Instagram app, try clearing the app cache or updating to the latest version. Sometimes outdated software or temporary files can cause features to malfunction temporarily.
When saved videos appear corrupted or won’t play, the issue may stem from interrupted saving processes. Ensure you have a stable internet connection throughout the saving process and avoid switching away from the Instagram app until the save completes completely.
If your saved videos lack sound, remember that Instagram’s copyrighted music won’t transfer to your gallery. This isn’t a technical error but rather a copyright protection feature. Consider this when planning your content—use original audio if you anticipate wanting to save drafts externally.
When screen recording produces poor quality results, check your device’s screen recording settings. Some devices allow you to adjust recording quality, which might be set lower than desired. Also ensure you’re recording in well-lit conditions with high-contrast visuals for best results.
If you’re consistently having trouble with one saving method, try alternatives. The three methods outlined in this guide provide options for virtually every scenario, so don’t hesitate to switch approaches if one isn’t working for you.
Creative Applications for Saved Draft Reels
Once you’ve mastered how to save a reel draft to camera roll, a world of creative possibilities opens up. Your saved reels become versatile assets that can be repurposed in numerous ways beyond their original Instagram intent.
Transform your best reel moments into promotional materials for other platforms. That perfect transition or compelling hook can become a Twitter video, YouTube channel trailer, or website background element with minimal additional editing.
Combine multiple saved reels into longer-form content. Several 15-30 second reels on a related topic can be edited together into a comprehensive tutorial or story-based content piece for platforms that favor longer videos.
Use your saved drafts as learning tools for improving your content creation skills. Review your unused content to identify patterns in what works and what doesn’t, helping you refine your creative approach over time.
Repurpose successful visual elements across different content types. That beautiful B-roll footage from an unused reel might become the perfect background for a podcast visualizer or text-based content piece.
Create behind-the-scenes or blooper content from your unused drafts. Sometimes the unplanned moments captured in drafts contain authentic, engaging content that resonates with audiences when shared intentionally.
Legal and Ethical Considerations
While learning how to download reel draft content provides creative freedom, it’s important to understand the legal and ethical boundaries surrounding content usage. Responsible practices protect both your rights and those of others.
Respect copyright laws when using music in your content. Instagram’s removal of copyrighted music from saved drafts isn’t a technical limitation but a legal requirement. When adding music to content you plan to save externally, use royalty-free tracks or original compositions to avoid issues.
Understand Instagram’s terms of service regarding content ownership. While you typically own the content you create, the platform’s terms may grant them certain usage rights. Familiarize yourself with these terms to understand your rights and limitations.
When collaborating with others on content, establish clear agreements about usage rights before saving and repurposing drafts. This prevents misunderstandings about how content can be used outside its original platform context.
If your content features identifiable people or private property, ensure you have appropriate releases or permissions before repurposing saved drafts for new contexts. What’s appropriate for Instagram might require additional clearance for other uses.
Attribute properly when incorporating elements from other creators into your repurposed content. Even if content is transformative, ethical practice includes acknowledging inspiration sources and collaborative contributions.
CapCut — Your all-in-one video & photo editing powerhouse! Experience AI auto-editing, realistic effects, a huge template library, and AI audio transformation. Easily create professional masterpieces and social media viral hits. Available on Desktop, Web, and Mobile App.