TOOL HUNTER

Ever wondered how those super smooth slow-motion shots in movies look so perfect? Or how travel vlogs have those buttery transitions between scenes? Well, let me tell you a secret—it’s all thanks to a cool tech called optical flow. And guess what? You don’t need to be a pro editor to use it. Apps like CapCut have made it super easy and fun!
In this guide, we’ll explore what optical flow is, how it works, and why it’s such a big deal—especially in CapCut. Whether you’re just starting out or have some experience, you’ll learn how to make your videos look more professional with smoother motion. Let’s get into it!
Table of Contents
- So, What Exactly is Optical Flow?
- How Does Optical Flow Actually Work?
- What Does Optical Flow Do in Video Editing?
- What is Optical Flow in CapCut?
- Key Features of Optical Flow in CapCut
- How to Use Optical Flow in CapCut
- What Types of Videos Work Best with Optical Flow?
- Optical Flow in CapCut vs. Other Methods
- Does Optical Flow Slow Down Exporting?
- Wrapping Up
- Frequently Asked Questions
So, What Exactly is Optical Flow?
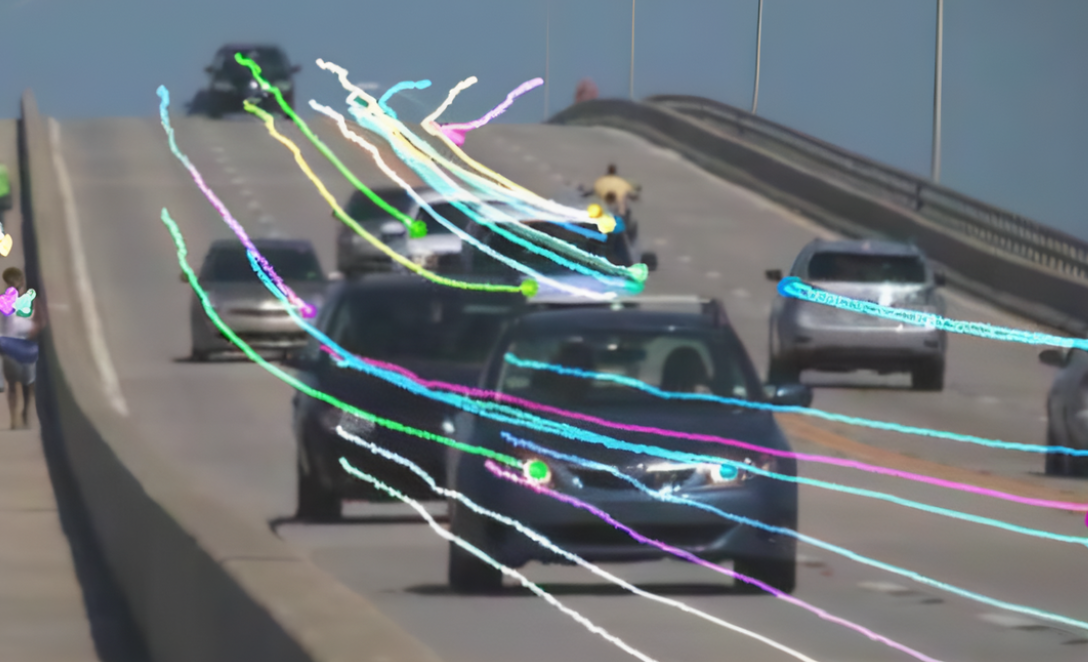
Okay, first things first—what is optical flow? In simple terms, optical flow is a technique used in video editing that tracks how pixels move from one frame to the next. By analyzing these tiny movements, it can generate new frames in between the existing ones, making motion appear much smoother. This is super handy for creating slow-motion effects, stabilizing shaky clips, and even making transitions look seamless.
Optical flow isn’t just one single method—it can be implemented in different ways depending on what you need. The two most common types are sparse optical flow and dense optical flow.
Sparse Optical Flow
Sparse optical flow focuses on tracking only specific key points in a video—things like corners, edges, or other noticeable features. It doesn’t bother with every single pixel, which makes it faster and less demanding on your computer or phone. This is great when you’re in a hurry or working with a device that isn’t super powerful.
But there’s a downside: because it doesn’t track everything, it might miss some details in fast or complex scenes. So if there’s a lot happening on screen, sparse optical flow might not be as accurate.
Dense Optical Flow
Dense optical flow, on the other hand, goes all out—it tracks every single pixel between frames. Yep, every! This makes it much more detailed and precise, which is perfect for detecting subtle or complicated movements. It’s often used in high-end video production or visual effects where accuracy is super important.
The catch? It requires a lot more processing power and time. So if you’re working with longer videos or higher resolutions, it might slow things down a bit.
How Does Optical Flow Actually Work?
To really understand what optical flow does, it helps to know the basic ideas behind it. Optical flow relies on a few key assumptions:
- Brightness Constancy: This means that a pixel should look the same from one frame to the next, even if it moves. So if something is bright in one frame, it should stay bright in the next—it’s just in a different spot.
- Small Motion: Optical flow works best when the movement between frames is small. Big, sudden jumps are harder to track and might not look as smooth.
- Spatial Consistency: Pixels that are close to each other usually move in similar ways. This helps keep the motion looking natural instead of chaotic or jumpy.
These principles help optical flow algorithms do their job properly, making your videos look amazing without weird blur or artifacts.
What Does Optical Flow Do in Video Editing?
So, what does optical flow do in CapCut and other video editors? Honestly, a lot! It’s not just one trick—it’s used in multiple ways to make your videos smoother and more professional.
First off, optical flow is awesome for slow motion. Normally, when you slow down a video, it can get choppy because you’re just showing the same frames for longer. But with optical flow, the editor creates new frames in between, so the motion stays fluid even when it’s super slow.
It’s also great for stabilization. If your footage is shaky—maybe you were walking while filming—optical flow can smooth out those bumps and jitters. It analyzes the motion and adjusts the frames to make everything look steadier.
Another cool use is frame interpolation. That’s a fancy way of saying it creates extra frames to make motion smoother or to change the frame rate of your video. So if you filmed in 30fps but want to export in 60fps, optical flow can help fill in the gaps naturally.
And let’s not forget transitions! Optical flow can make cuts between scenes feel seamless. Instead of a hard jump, you get a smooth flow from one shot to the next. This is especially useful in music videos, travel clips, or anything where you want a cinematic vibe.
So, what does optical flow do in CapCut? All of this and more. It’s a powerful tool that’s built right into the editor—and it’s way easier to use than you might think.
What is Optical Flow in CapCut?
Now, let’s talk about what is optical flow in CapCut specifically. CapCut is a super popular video editing app that’s completely free, and it comes with a built-in optical flow feature that’s both powerful and simple to use.
Optical flow in CapCut helps you create smoother motion in your videos without needing any advanced editing skills. Whether you’re slowing down an action sequence, stabilizing shaky footage, or just want that professional flow, CapCut’s optical flow tool has got you covered.
One of the best things about optical flow CapCut style is how seamlessly it’s integrated into the workflow. You don’t need to switch to another program or buy expensive plugins—it’s right there in the app.
CapCut optical flow is based on the same principles we talked about earlier, but it’s optimized for ease of use. You can apply it with just a few clicks, and it works on most computers and phones without slowing things down too much.
So, what is optical flow in CapCut in practical terms? It’s your shortcut to making your videos look way better.
CapCut — Your all-in-one video & photo editing powerhouse! Experience AI auto-editing, realistic effects, a huge template library, and AI audio transformation. Easily create professional masterpieces and social media viral hits. Available on Desktop, Web, and Mobile App.

Key Features of Optical Flow in CapCut
Wondering what makes CapCut’s optical flow stand out? Here are some of the key features you should know about.
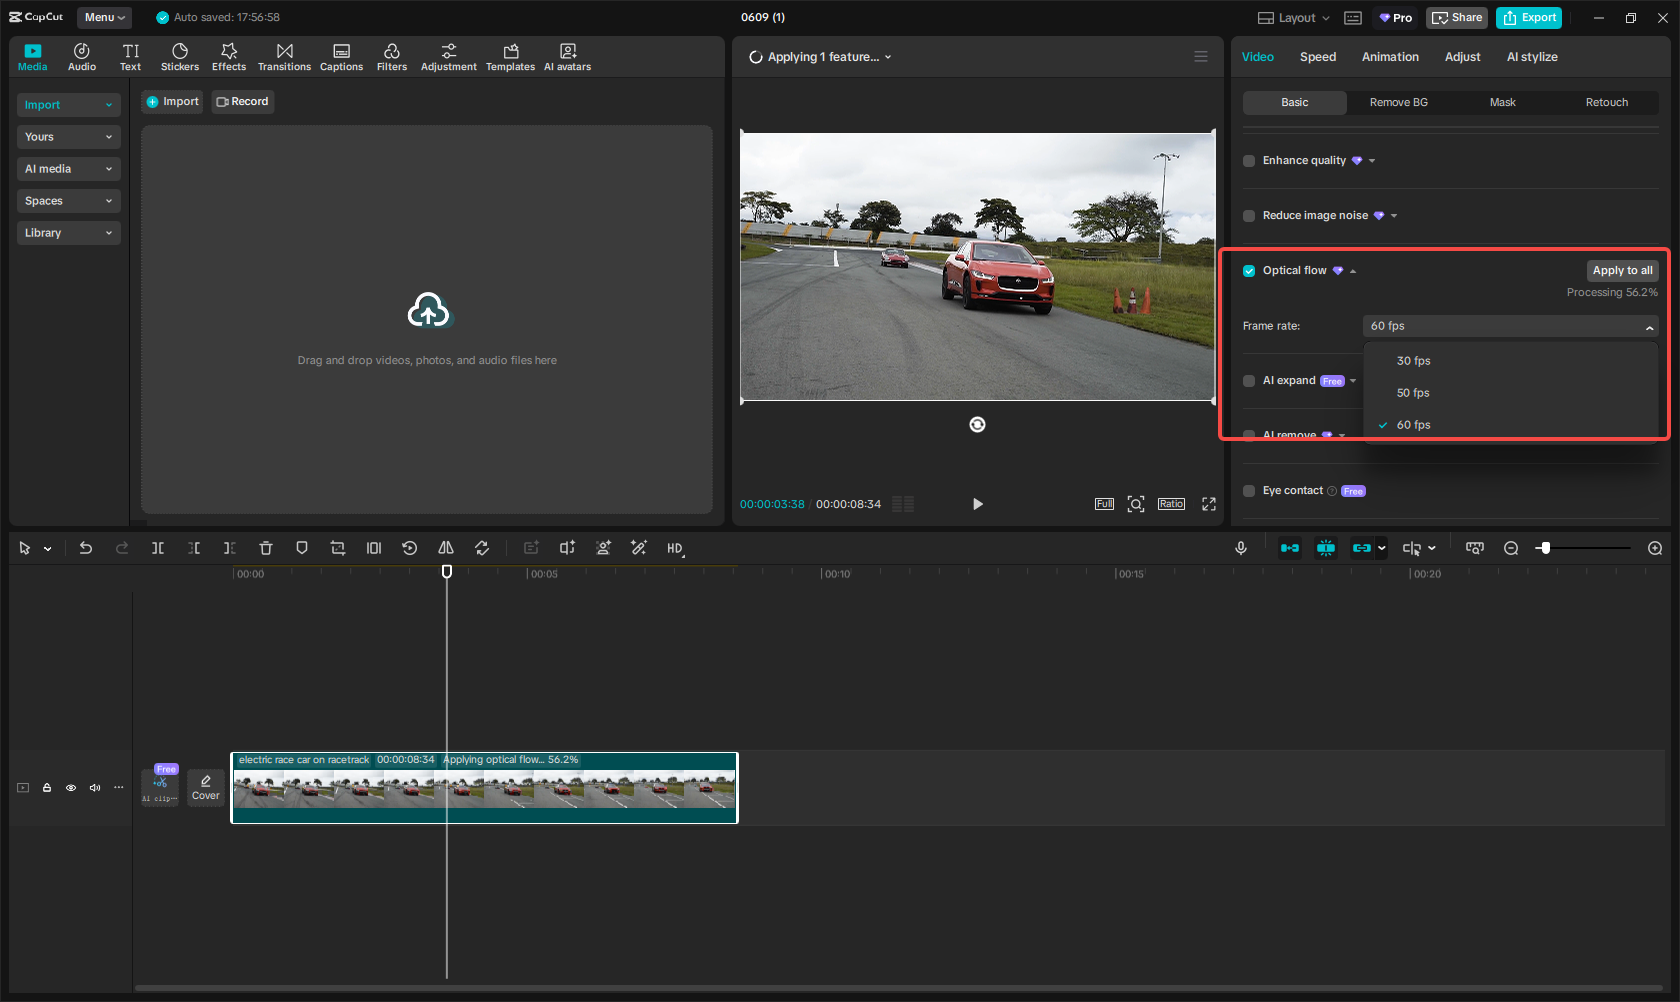
First, you can choose different frame rates. CapCut lets you apply optical flow at 30fps, 50fps, or 60fps, depending on how smooth you want your video to be. This is super helpful when you’re working with different types of footage or delivery formats.
You also get speed adjustment tools. Want to make a slow-motion scene? Or speed something up without losing quality? Optical flow CapCut features help keep motion looking clean at any speed.
Another great thing is that you can use optical flow alongside other effects. CapCut has stickers, filters, visual effects, and more—and they all work together with optical flow. That means you can make creative videos without having to choose between smooth motion and cool effects.
And the best part? It’s free. Unlike some professional editors that charge monthly fees, CapCut lets you use optical flow and all its other tools without paying a thing.
How to Use Optical Flow in CapCut
Using optical flow in CapCut is super simple. Here’s a step-by-step guide to help you get started.
Step 1: Import Your Video
First, open CapCut and import the video clip you want to edit. You can drag and drop it into the timeline to start working.
Step 2: Enable Optical Flow and Adjust Settings
Click on the video track in your timeline. On the right side, you’ll see a settings panel. Go to the “Video” tab and look for “Optical Flow.” Turn it on, and then choose your desired frame rate from the dropdown menu—30, 50, or 60fps. If you want the same settings for all clips, click “Apply to all.”
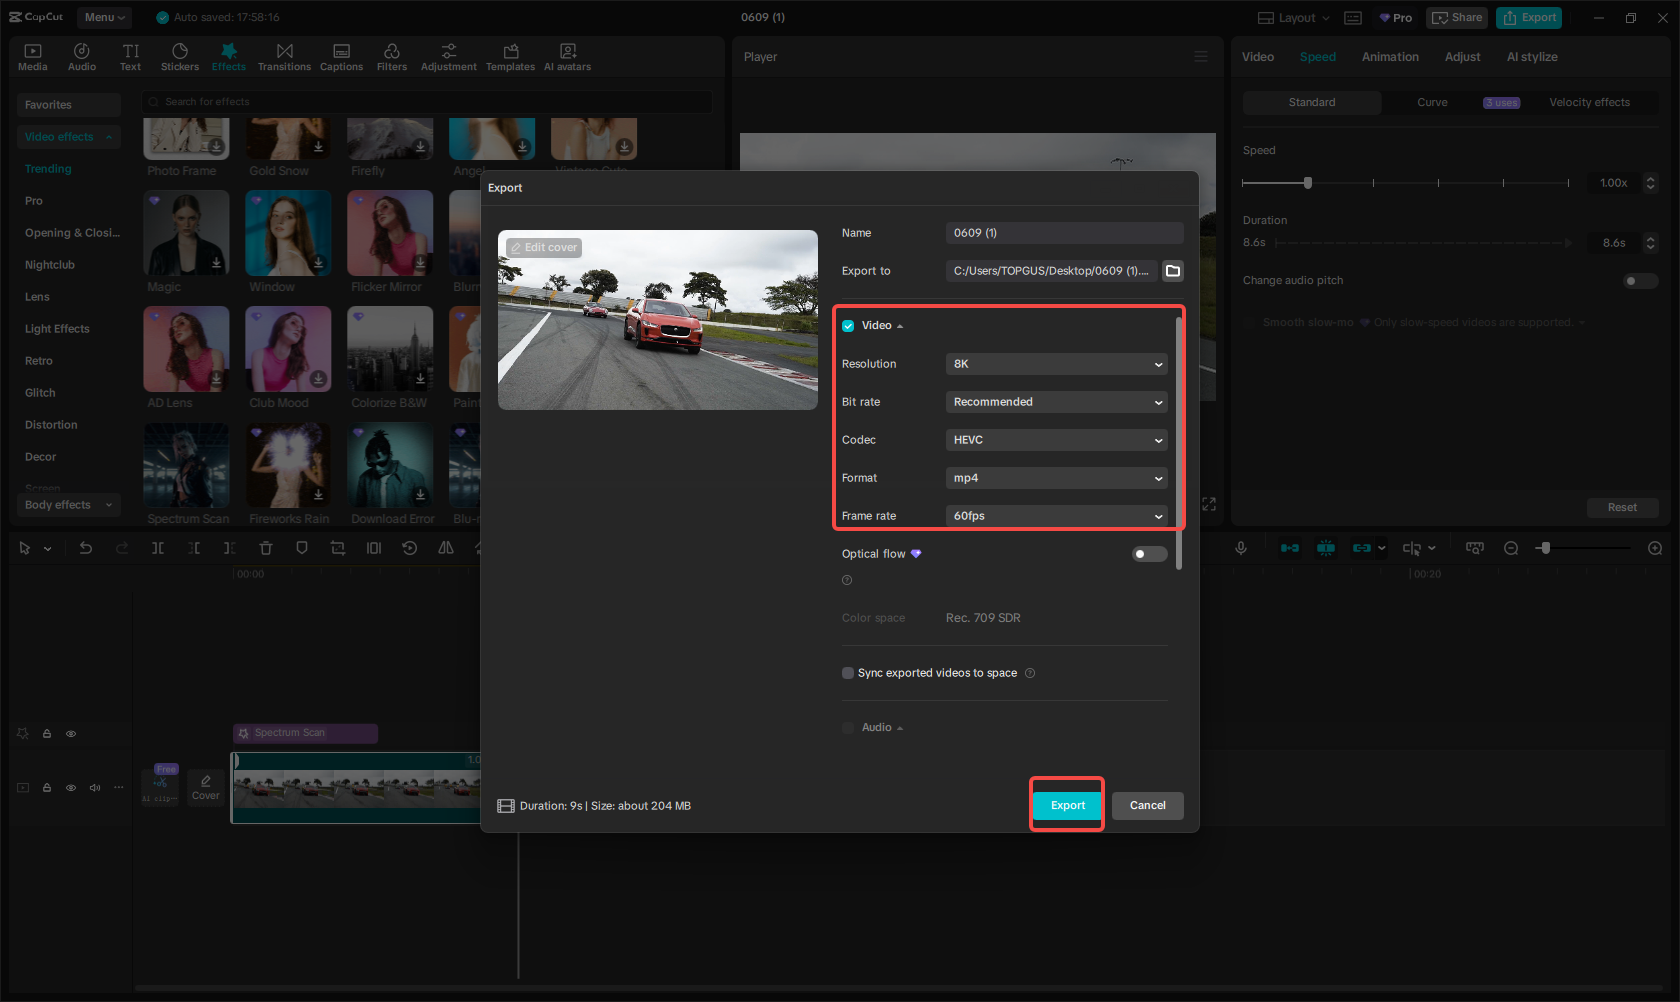
Step 3: Export Your Video
Once you’re happy with how it looks, click the export button. You can choose the resolution—up to 4K or even 8K if your computer can handle it—and save the video to your device.
And that’s it! In just three steps, you can use optical flow in CapCut to make your videos smoother and more professional.
What Types of Videos Work Best with Optical Flow?
You might be wondering—what does optical flow do best? Is it good for all types of videos? Well, mostly yes, but it really shines in certain situations.
For example, sports videos often have a lot of fast action. Optical flow can smooth out those movements so everything looks clear and dynamic—perfect for highlights and replays.
Music videos are another great use. With optical flow, you can sync motion to the beat, create dreamy slow-motion sequences, or just make transitions feel more rhythmic.
B-roll footage—those extra shots that set the scene—can also benefit a lot. Optical flow makes slow pans and subtle movements look ultra smooth, which adds to the overall quality of your video.
It’s also useful before adding visual effects. If your footage is shaky or has inconsistent motion, optical flow can stabilize it first so that your VFX blend in more naturally.
Even simple things like before-and-after demos can look better with optical flow. It helps create smooth transitions between states, making the change more impressive and easy to follow.
So whether you’re editing vlogs, short films, commercials, or social media clips, optical flow can probably help make it better.
CapCut — Your all-in-one video & photo editing powerhouse! Experience AI auto-editing, realistic effects, a huge template library, and AI audio transformation. Easily create professional masterpieces and social media viral hits. Available on Desktop, Web, and Mobile App.
Optical Flow in CapCut vs. Other Methods
You might have heard of other ways to smooth video—like frame blending. So what’s the difference?
Frame blending is a simpler technique that mixes two frames together to create a transition. It can work okay, but sometimes it causes ghosting or blurry artifacts. Optical flow, on the other hand, analyzes the actual motion between frames and creates new ones that match. That’s why it usually looks cleaner and more natural.
In CapCut, optical flow is the recommended method for high-quality results. It does take a bit longer to process, especially with high-resolution videos, but the difference in quality is often worth it.
Does Optical Flow Slow Down Exporting?
Yes, a little. Because optical flow creates new frames, it requires more processing power. If you’re working with 4K or 8K video, export times might be longer than with simpler methods.
But for most users, it’s still manageable. And if smooth motion is important for your project, it’s definitely a trade-off worth making.
Wrapping Up
So there you have it—optical flow is a total game-changer in video editing. It helps you create slow motion that doesn’t stutter, stabilize shaky footage, and make transitions look seamless. And with CapCut, it’s easier than ever to use.
What does optical flow do in CapCut? It turns good videos into great ones. Whether you’re a beginner or a seasoned editor, optical flow CapCut features are there to help you tell better stories with motion.
If you haven’t tried it yet, download CapCut and play around with the optical flow tool. It’s free, powerful, and a lot of fun. Who knows—it might just become your new favorite editing trick.
Frequently Asked Questions
What is the difference between optical flow and frame blending?
Optical flow creates new frames based on motion analysis, while frame blending just mixes two frames together. Optical flow usually looks smoother and more natural, with fewer artifacts.
Will using optical flow make exporting slower?
Yes, but only because it’s doing more work. For HD videos, it’s usually fast enough. For 4K or 8K, it might take a bit longer.
What is optical flow best used for?
It works great for slow motion, stabilization, and smooth transitions. It’s especially good with consistent motion like walking, flowing water, or camera pans.
What is optical flow in CapCut best suited for?
CapCut’s optical flow is very user-friendly and works well for a variety of videos—from social clips to short films. It’s especially handy if you want high quality without complicated software.
Is CapCut optical flow really free?
Yes! CapCut is totally free, including the optical flow feature. You can use it as much as you want without watermarks or subscriptions.
Some images sourced from CapCut.