TOOL HUNTER

Live streaming and video creation can be incredibly enjoyable, but many of us feel self-conscious about how we appear on camera. This is where beauty filters for OBS come into play—they’re fantastic tools that enhance your appearance during streams or recordings. Whether you’re just starting out or have been streaming for years, understanding how to use these filters can significantly elevate your content quality.
Looking your best on screen makes viewers more engaged and helps your stream appear more professional. The right filter for OBS can smooth your skin, brighten your eyes, and overall make you look more polished. It’s almost like having a personal makeup artist and lighting specialist working with you in real time.
I understand that all this technical information might seem overwhelming initially, but don’t worry—I’ll break it down into simple, manageable steps. By the end of this guide, you’ll know exactly how to implement and customize beauty filters to make your streams look absolutely fantastic.
Table of Contents
- Understanding OBS Beauty Filter Capabilities
- Why Beauty Filters Transform Your Streaming Experience
- Exploring Various Beauty Filter Options for OBS
- Setting Up Beauty Filters in OBS Studio
- Effective Tips for OBS Beauty Filter Usage
- Enhancing Recorded Videos with CapCut Beauty Filters
- Conclusion
- Frequently Asked Questions
Understanding OBS Beauty Filter Capabilities
Let’s start with the basics: OBS Studio doesn’t actually include built-in beauty filters, which surprises many people. OBS primarily functions as recording and streaming software. However, you can easily integrate beauty filters into your OBS setup using third-party applications.
Think of OBS as your main camera body, while these additional programs act as specialized lenses or filters that you attach. Popular options include FilterOnMe, Snap Camera, and ManyCam. These applications serve as virtual cameras that apply beautification effects before your video feed even reaches OBS.
These tools offer impressive capabilities: they can smooth skin texture, enhance eye appearance, and subtly adjust facial features. The best part is they work in real time, meaning the magic happens during your stream without any post-production editing required.
Setting up these filters might sound technical, but the process is actually quite straightforward. You simply install your chosen program, configure it as your camera source within OBS, and you’re ready to go. It might take some experimentation to find your perfect settings, but the results are definitely worth the effort.
Why Beauty Filters Transform Your Streaming Experience
You might wonder whether using beauty filters is truly necessary. Let me share the remarkable benefits that might make you never want to stream without them again.
First, they dramatically increase your stream’s professional appearance. When viewers click on your stream, their first impression is visual. Clear skin, bright eyes, and overall polished appearance make people more likely to stay and watch. We’re naturally drawn to visually appealing content.
These filters also significantly boost your confidence. Knowing you look good on camera helps you feel more comfortable and relaxed, which translates to better viewer engagement. When you’re not worried about your appearance, you can focus more on your content and interaction with your audience.
Viewer retention improves with beauty filters too. People tend to watch visually appealing streams for longer periods and are more likely to like, comment, and share your content. This creates a positive cycle where shares bring new viewers, who might then share your content further.
Time savings represent another major advantage. Instead of spending extensive time on makeup or perfect lighting setups, you can apply a filter and be ready within minutes. This means more time creating content and less time preparing to create content.
Finally, beauty filters help maintain consistent appearance across all your streams, which is crucial for building your personal brand. When viewers recognize your distinctive look, they’re more likely to remember you and return for future streams.
CapCut — Your all-in-one video & photo editing powerhouse! Experience AI auto-editing, realistic effects, a huge template library, and AI audio transformation. Easily create professional masterpieces and social media viral hits. Available on Desktop, Web, and Mobile App.

Exploring Various Beauty Filter Options for OBS
The world of beauty filters extends far beyond simple skin smoothing. Today’s options let you adjust virtually every aspect of your appearance. Let’s explore the most popular filter categories available.
Skin smoothing filters remain the most commonly used type. They reduce blemishes, wrinkles, and uneven skin tones, creating a soft, even complexion that makes you look refreshed and awake. Even after a sleepless night, these filters can make it appear you’ve had full eight hours of rest.
Eye filters offer remarkable transformation capabilities. They can change eye color, enhance eye shape, and add virtual makeup like eyeliner and eyeshadow. Some options make eyes appear larger and brighter, while specialized eyebrow filters help achieve that perfect arch.
Lip filters provide another popular enhancement category. They can change lip color to match any desired look—from bold red to natural pink. Some even create the appearance of fuller lips without injections or plumping products.
Contour filters work wonders for defining facial features. They enhance cheekbones, define jawlines, and add dimension to your face, similar to professional contouring without the makeup hassle. Blush filters add healthy color to your cheeks for a natural, vibrant look.
Teeth whitening filters serve as my secret weapon. Even while drinking coffee or tea during streams, these filters maintain a bright, white smile by removing yellow tones. A bright smile makes you appear more friendly and approachable to viewers.
Nose shaping filters provide subtle but effective enhancements. They help define nose shape without appearing obvious or artificial, making small but impactful improvements to your overall appearance.
Some filters combine multiple effects, such as skin smoothing with foundation application, creating a flawless base without actual makeup. Face thinning filters can subtly slim facial features according to your preference.
The beauty of these options lies in their combinability. You might use skin smoothing, eye brightening, and lip color filters simultaneously. Experimentation helps you discover what works best for your unique features and streaming style.
Setting Up Beauty Filters in OBS Studio
Now let’s dive into the practical aspects of setting up beauty filters. The process is simpler than it might initially appear, and I’ll guide you through each step.
First, ensure you have OBS Studio installed. If not, download it free from the official website. Installation is straightforward—just follow the on-screen instructions. Once installed, open the application to begin configuration.
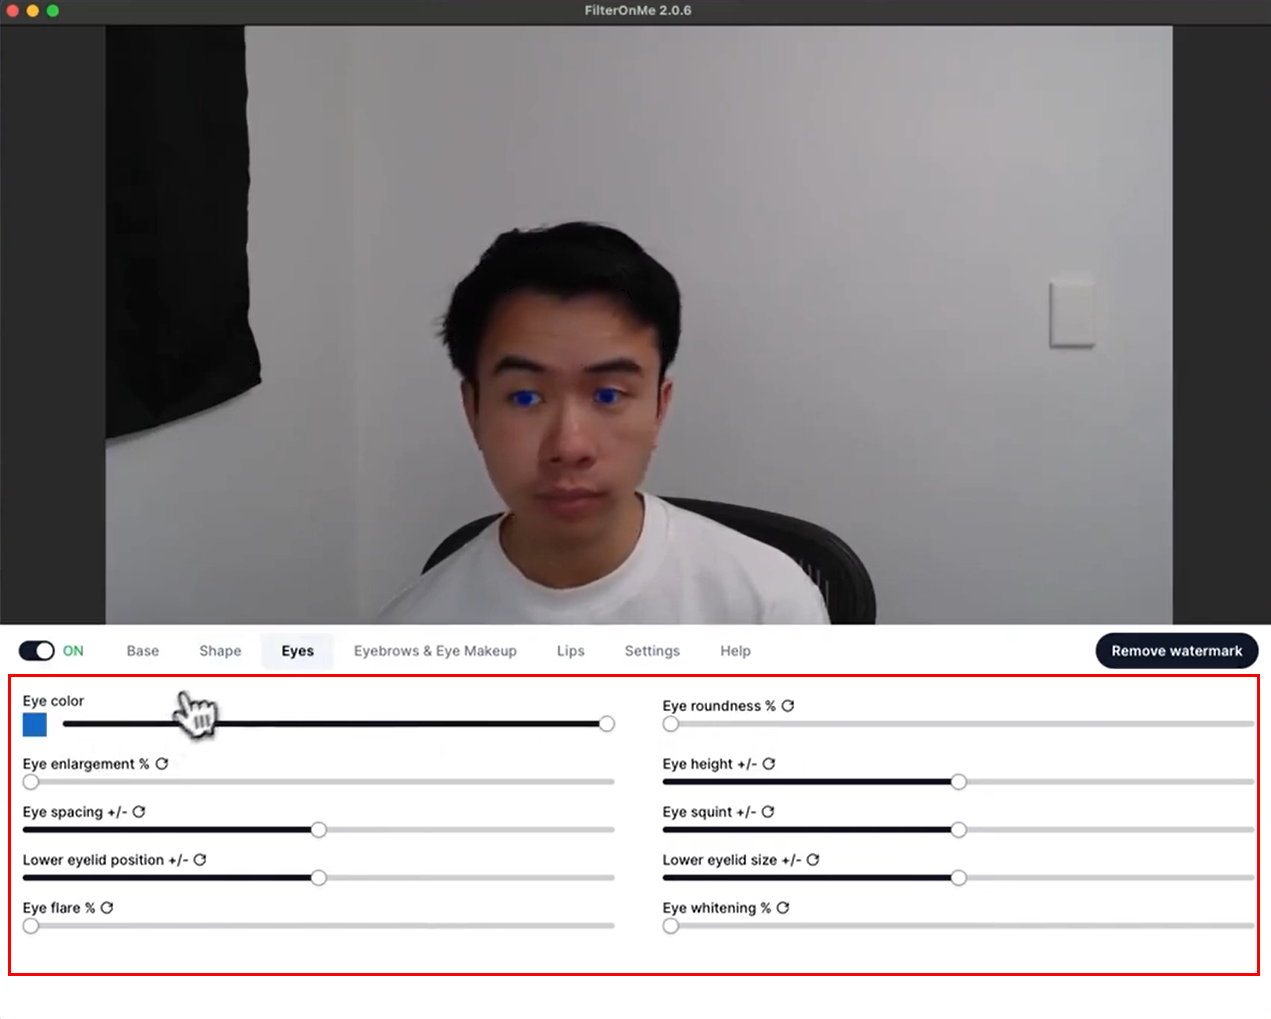
Next, select your preferred beauty filter application. For this guide, I’ll use FilterOnMe as an example, though Snap Camera and ManyCam work similarly. Visit the FilterOnMe website, download their program, and install it following their instructions.
Now comes the crucial part: open both OBS Studio and FilterOnMe. In OBS, locate the sources box at the bottom interface. Click the plus sign to add a new source, then select “Video Capture Device” from the menu. Choose to create a new source and name it appropriately.
A settings window will appear. Click the device dropdown menu and select “FilterOnMe Camera” (or whatever your filter program calls itself). This sets your filter application as the camera source. You might need to adjust resolution or FPS settings, though defaults usually work fine.
You should now see your filtered appearance in the OBS preview window. If nothing appears, ensure FilterOnMe is running in the background—some applications require being open to function properly.
With FilterOnMe active, explore the various filter options. Most applications provide sliders to adjust effect intensity. You might prefer subtle skin smoothing or more dramatic enhancements—the choice is yours. Experiment with different combinations to discover your preferred look.
Many filters also offer color adjustment options for lip color, eye makeup, and other features. Preset options are available, but custom colors can often be created. Don’t hesitate to experiment until you achieve your perfect appearance.
Once satisfied with your look, you’re ready to stream! Click “Start Streaming” in OBS as usual. Remember to keep your filter application running during your stream—closing it will disable the filters.
Always conduct a test recording before going live. This ensures everything appears and sounds correct. You might discover that some filters require slight adjustments once seen in action—better to identify these issues before facing a live audience.
Effective Tips for OBS Beauty Filter Usage
Now that you understand setup procedures, let’s discuss how to use filters effectively. Creating natural, professional-looking results involves some artistry. Here are tips I’ve gathered from personal experience.
The most crucial tip is avoiding overuse. It’s tempting to maximize all settings, but this typically creates unnatural results. The goal is enhancing your natural appearance, not completely altering it. Overly strong filters can make you look artificial or strange. Viewers appreciate when you still resemble yourself, just an improved version.
Always test settings before going live. This cannot be emphasized enough. What looks good in setup might appear differently during actual streaming. Record a short test video and review it carefully. Observe how filters look when you move, speak, and express emotions. Sometimes filters that work well when stationary appear odd during movement.
Lighting remains important even with filters. Good lighting enhances filter effectiveness. Use soft, diffused light that minimizes harsh facial shadows. Natural window light works wonderfully, but affordable ring lights are available online if that’s not possible. Proper lighting combined with well-adjusted filters creates amazing results.
Your background matters significantly too. Clean, uncluttered backgrounds help maintain focus on you. Busy backgrounds distract viewers, and some filters may not work optimally with complex backgrounds. Simple backdrops or tidy rooms typically work best.
Remember that everyone’s face is unique. What works for your favorite streamer might not suit you. Take time to adjust filter settings to complement your distinctive features. You might need more under-eye brightening or less skin smoothing. Customize until you find what works best for your appearance.
Experiment with different filter combinations. You might discover appealing looks by mixing effects you wouldn’t normally combine. Perhaps certain eye filters work wonderfully with specific lip colors. The more you experiment, the better you’ll understand what suits your style.
Invest in a decent webcam if possible. While filters improve appearance, they can’t perform miracles. Quality webcams provide better source material for filters. You needn’t spend excessively, but mid-range webcams significantly outperform cheaper alternatives.
Monitor your appearance during streams. Most streaming setups allow viewing yourself while broadcasting. Occasionally check your preview to ensure everything still looks good. Lighting conditions sometimes change throughout the day without notice, potentially affecting how your filters appear.
Enhancing Recorded Videos with CapCut Beauty Filters
Perhaps you focus more on recorded content than live streaming, or maybe you want to add extra polish to videos after recording. This is where CapCut shines—a video editor featuring excellent built-in beauty filters.
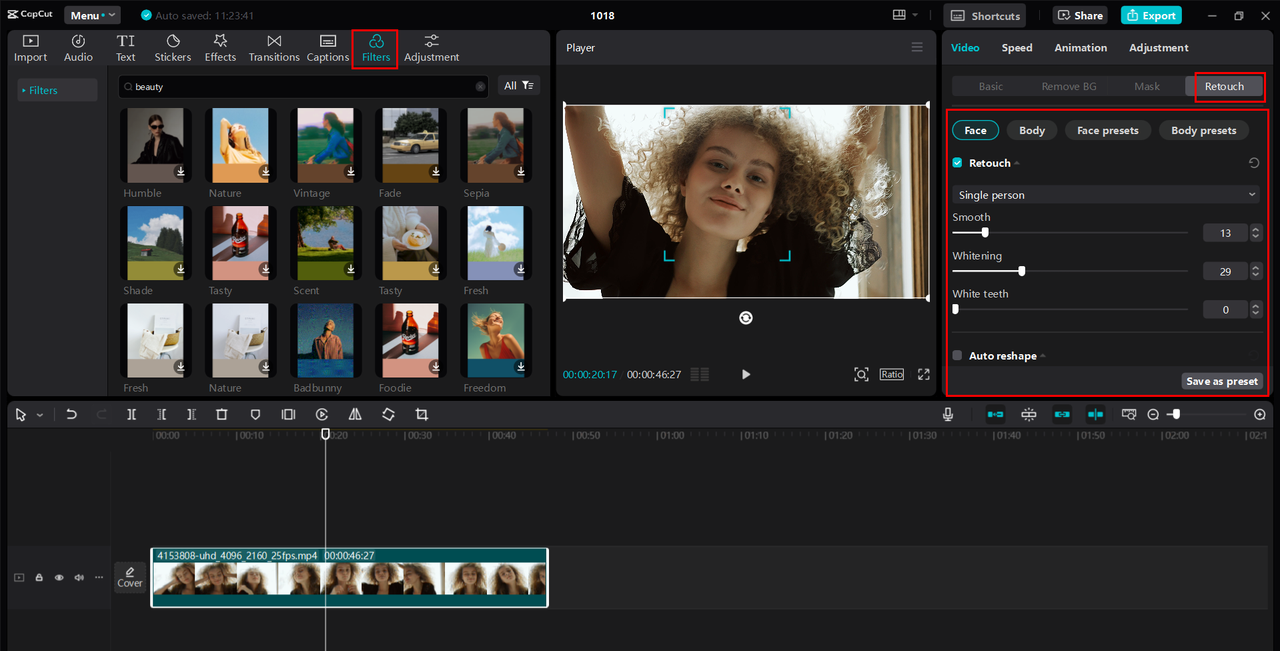
CapCut differs from OBS filter setups because it handles post-recording editing. This means you can take your time perfecting your appearance. The retouch features in CapCut are genuinely impressive, offering skin smoothing, blemish removal, eye brightening, and even virtual makeup application.
What I appreciate about CapCut is its user-friendliness. The interface is intuitive, so even video editing beginners can navigate it easily. Beauty filters are just clicks away, with adjustable intensity for each effect.
Beyond beauty features, CapCut includes all standard video editing tools: trimming, transitions, text addition, and audio adjustment. It’s a complete editing package enabling professional-looking videos without expensive software or advanced skills.

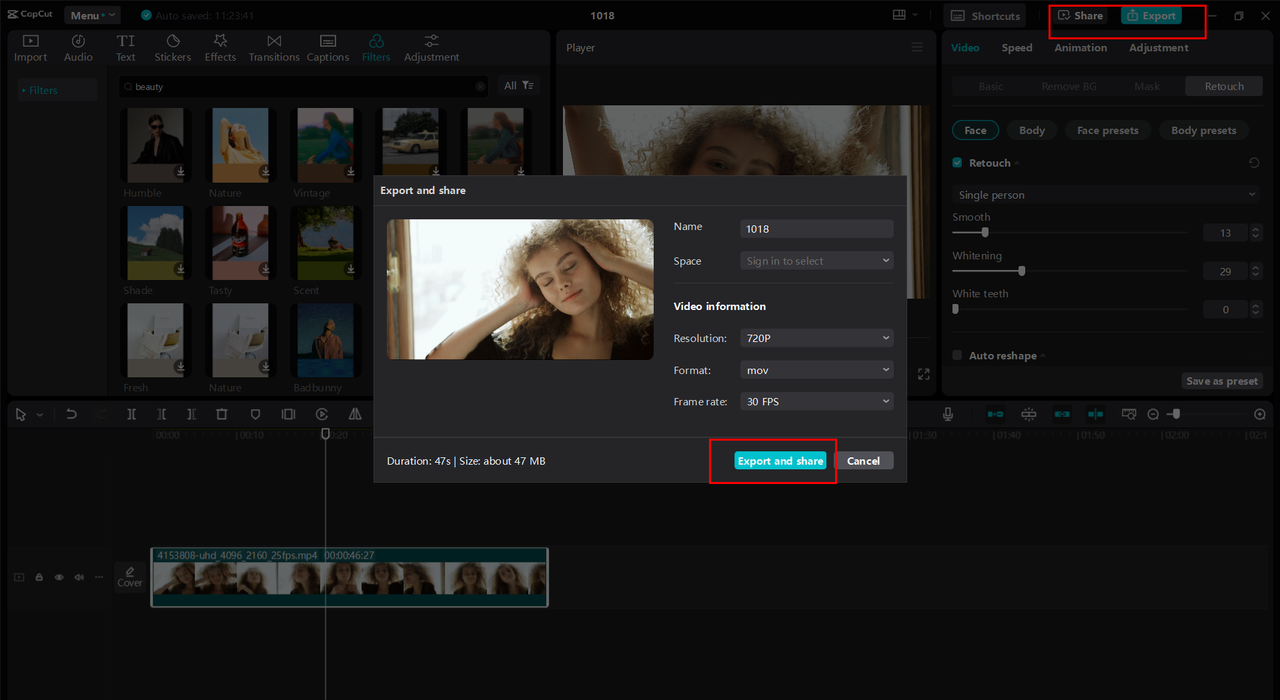
Implementing Beauty Filters in CapCut
Let me guide you through using CapCut’s beauty filters. The process becomes simple once familiar.
First, download and install CapCut—it’s free, which is fantastic. After installation, open the application and create a new project. You’ll find an option to import video files; click this and select the video you want to edit from your computer.
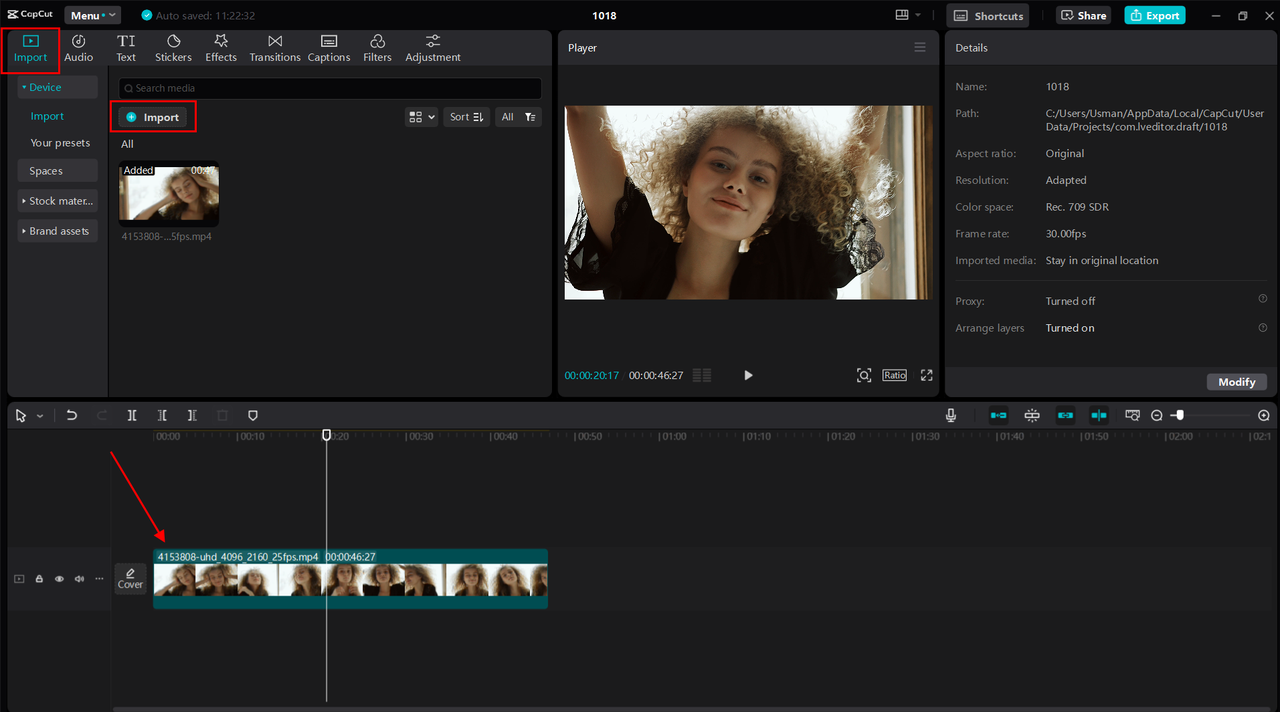
After importing your video, drag it to the timeline at the screen’s bottom. Select the video clip in the timeline, then locate the “Retouch” option on the right side. Clicking this reveals all available beauty filter options.
You’ll find tools for skin smoothing, face slimming, eye brightening, and virtual makeup. Each tool typically features sliders for effect intensity control. Start with subtle adjustments and observe results—you can always increase intensity later if desired.
Experiment with different effect combinations. Maybe you want smoothed skin with subtle lip color, or brightened eyes with light contouring. Take your time discovering the perfect look for your video.
When satisfied with results, export your video. Click the export button in the top right corner, choose quality settings and save location. After exporting, upload to YouTube, TikTok, or your preferred sharing platform.
Notable CapCut Features
CapCut boasts several standout features. Its beauty filters are versatile and offer numerous options, ranging from subtle touch-ups to dramatic transformations.
The makeup and retouch filters are particularly comprehensive. You can add foundation, blush, lipstick, eyeshadow, and more—like having a complete makeup counter within your computer. The best part is experimenting with different looks without purchasing or applying physical products.
I especially appreciate the detailed eye and lip adjustments. You can make eyes appear larger and brighter, or change lip colors to match outfits or moods. The precise controls help achieve exactly your desired look.
Beyond beauty features, CapCut lets you add various effects to videos: transitions between scenes, background music, and text overlays. These elements make videos more engaging and professional-looking.
CapCut — Your all-in-one video & photo editing powerhouse! Experience AI auto-editing, realistic effects, a huge template library, and AI audio transformation. Easily create professional masterpieces and social media viral hits. Available on Desktop, Web, and Mobile App.
Conclusion
Beauty filters can genuinely elevate your streaming and video content quality. Whether using OBS with third-party filter programs or editing with CapCut, these tools help present your best self to audiences.
Remember that the goal isn’t creating an artificial version of yourself, but enhancing natural features. When used properly, beauty filters boost confidence and help create more engaging content. Viewers appreciate professional appearance, and you’ll enjoy the creative process of perfecting your on-screen look.
Don’t hesitate to experiment with different filters and settings. Finding what works best might take time, but results are worth the effort. Whether live streaming or creating recorded videos, beauty filters are powerful tools for standing out in the crowded online content landscape.
Frequently Asked Questions
How can I achieve skin smoothing using OBS filters?
To smooth skin in OBS, you’ll need third-party software like FilterOnMe. After installation and OBS integration, locate skin smoothing options. Typically, a slider controls smoothing intensity—start with lower settings and gradually increase until achieving desired results. Remember that different lighting conditions might require adjustment, so periodic tweaking may be necessary.
Does OBS include built-in beauty filters?
No, OBS doesn’t feature built-in beauty filters. It’s designed primarily for recording and streaming functionality rather than appearance enhancement. However, you can easily incorporate beauty filters by combining OBS with external programs like FilterOnMe, Snap Camera, or ManyCam. These applications work seamlessly with OBS to provide comprehensive beauty effects. For native beauty features, consider CapCut for editing recorded videos.
Can I control beauty filter intensity in OBS?
Absolutely. When using third-party filter applications with OBS, you can almost always adjust effect intensity. Most programs provide sliders for each filter type, allowing subtle modifications or more dramatic changes. Experimenting with these settings helps find what appears most natural for your specific preferences. Since everyone’s tastes differ, investing time in customization ensures optimal results.
Some images courtesy of CapCut