TOOL HUNTER

Have you ever snapped a picture that looked almost perfect, but something just felt off? Maybe there was an unwanted object in the background, or the dimensions weren’t quite right for your needs. Learning how to crop images in CapCut can completely transform your photos from good to great. Cropping is one of those fundamental yet incredibly powerful editing techniques, and CapCut makes it wonderfully simple.
This guide is designed to walk you through everything you need to know about the CapCut crop image tools. Whether you’re aiming to perfect your Instagram feed, resize product photos for your online store, or simply enhance personal snapshots, we’ve got you covered. You’ll find easy-to-follow steps, practical tips, and answers to frequently asked questions. Let’s dive in and start making your photos shine effortlessly!
Table of Contents
- Why Cropping Your Photos Matters More Than You Think
- Complete Guide: How to Crop Images in CapCut
- Additional Powerful Tools in CapCut’s Arsenal
- Practical Applications: When to Use CapCut Crop Tools
- Maintaining Quality in Your Cropped Images
- Professional Tips for Perfect Cropping Results
- Frequently Asked Questions About CapCut Crop Image Tools
- Conclusion: Mastering Your Images with CapCut
Why Cropping Your Photos Matters More Than You Think
Before we jump into the step-by-step process, it’s worth understanding why cropping is such an essential skill. Consider your favorite social media platforms – each has its own preferred image dimensions. Instagram favors square or vertical images, while Facebook might work better with horizontal layouts. By mastering how to crop on CapCut, you gain complete control over how your images appear across different platforms.
A well-executed crop can dramatically alter a photo’s impact. It allows you to eliminate distractions, emphasize your main subject, and create better visual balance. It’s not just about making images smaller – it’s about making them more effective. With CapCut’s crop tools, you have all the power you need to transform your images.
Complete Guide: How to Crop Images in CapCut
Let’s get practical! Using the CapCut crop feature is straightforward whether you’re on desktop or mobile. Here’s your comprehensive guide to getting it right every time.
Start by opening CapCut on your preferred device. If you’re working on a computer, you can access the web version through your browser. Create a new project, specifically choosing an image editing project to get started with the right tools.
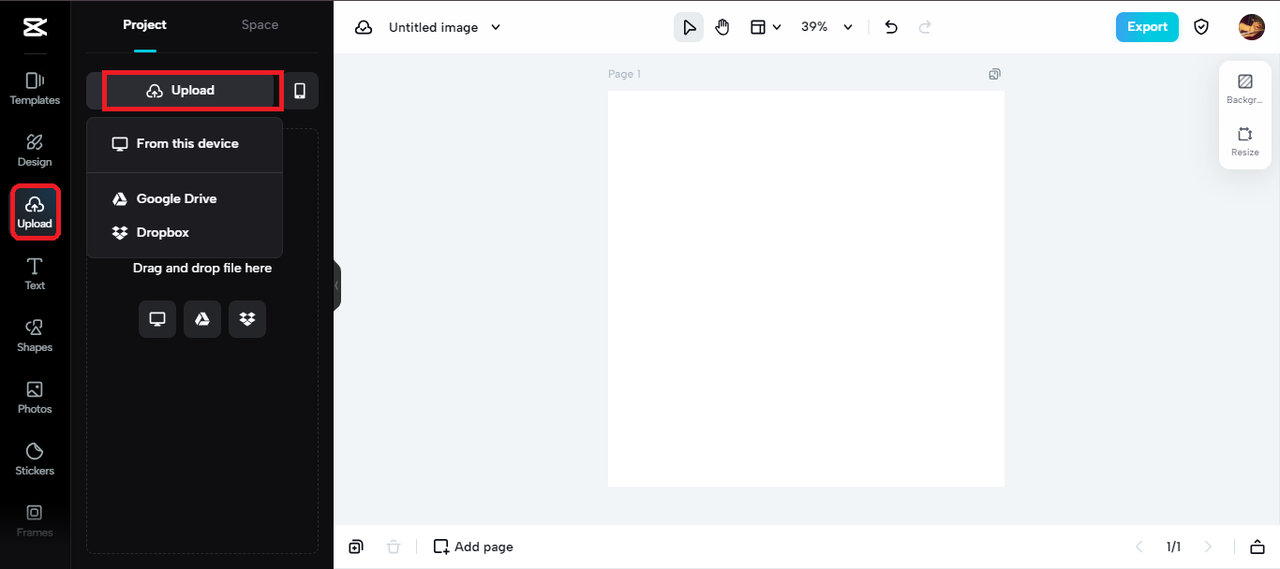
Once you’re in the workspace, you’ll need to import your photo. Look for the “Import” or “Upload” button – this will allow you to select the image you want to edit from your device’s storage. After selecting your file, it will appear in your workspace, ready for editing.
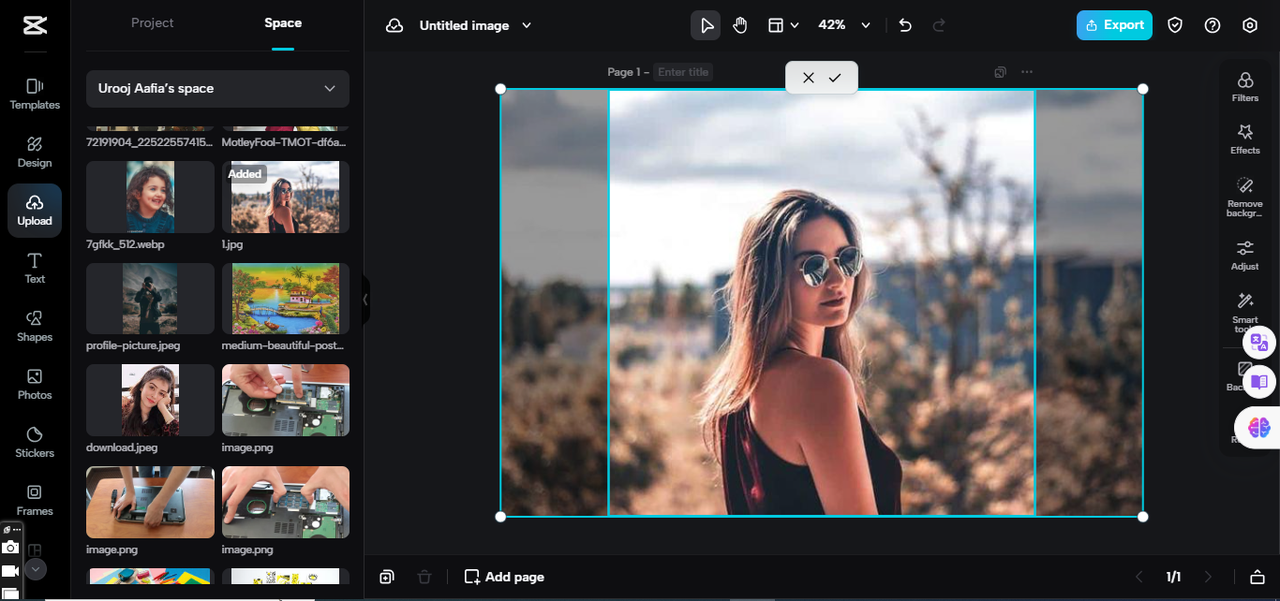
Now comes the main event: the actual cropping process. Click on your image to select it, and look for the crop tool in the editing toolbar. This might appear as two overlapping L-shapes or simply be labeled “Crop.” When you activate it, you’ll see a grid overlay appear on your image.
This grid is your cropping interface. For basic adjustments, you can click and drag the edges or corners of this grid to select the portion of the image you want to keep. Everything outside the selected area will be removed when you apply the crop.
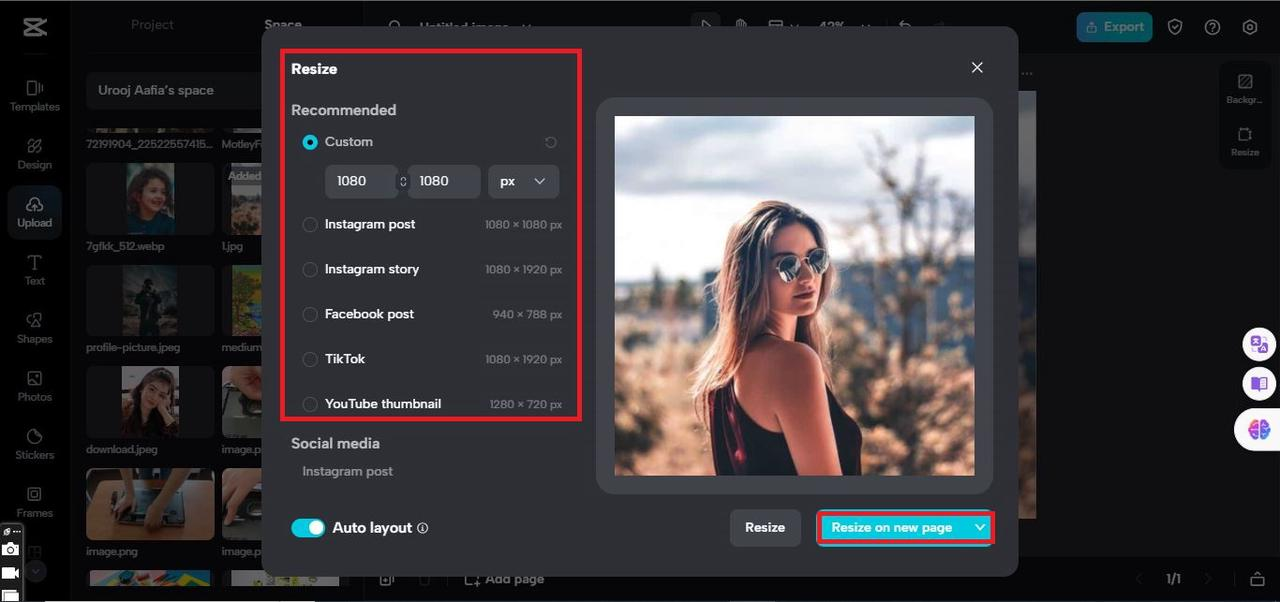
CapCut also offers preset aspect ratios that make cropping to specific dimensions incredibly easy. Need a perfect square for a profile picture? Choose the 1:1 ratio. Creating a banner? Select 16:9. The software automatically adjusts the grid to maintain these proportions, and you can then reposition the grid to frame your subject perfectly within these constraints.
There’s also a “Resize” function that works slightly differently from standard cropping. This feature allows you to change the actual canvas dimensions, automatically cropping your image to fit the new size parameters. You can input specific pixel dimensions, making it perfect for preparing images for websites or print materials where exact sizing matters.
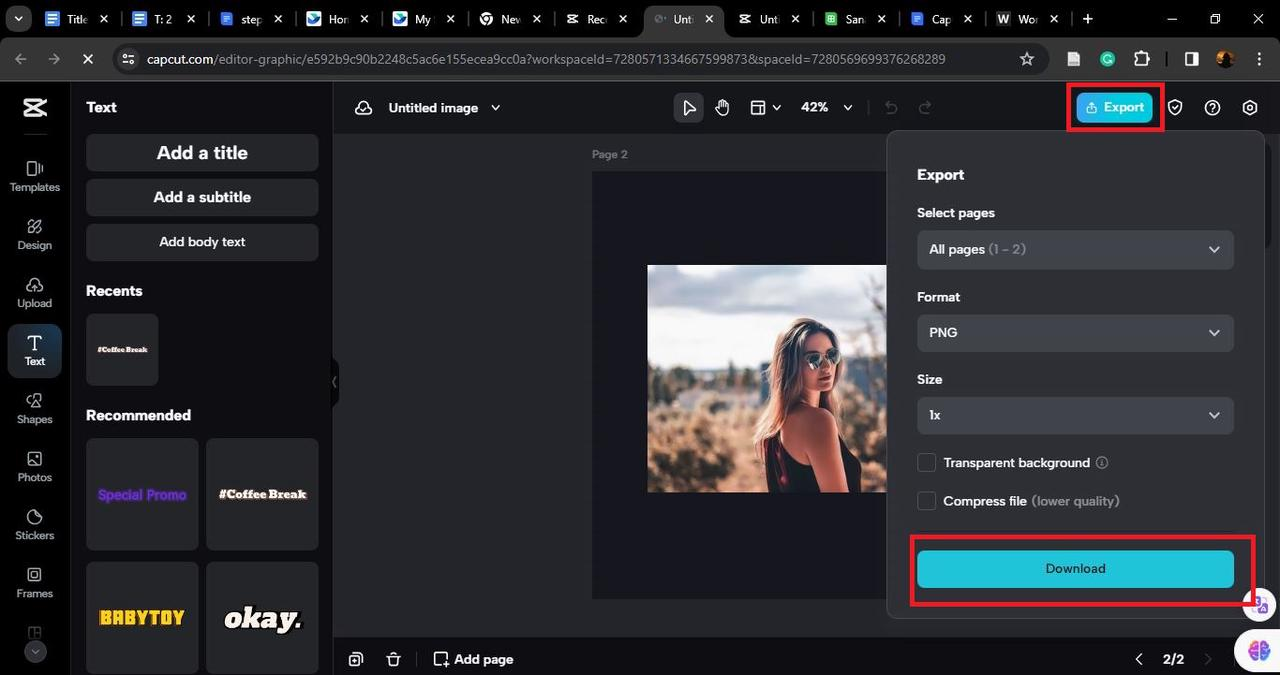
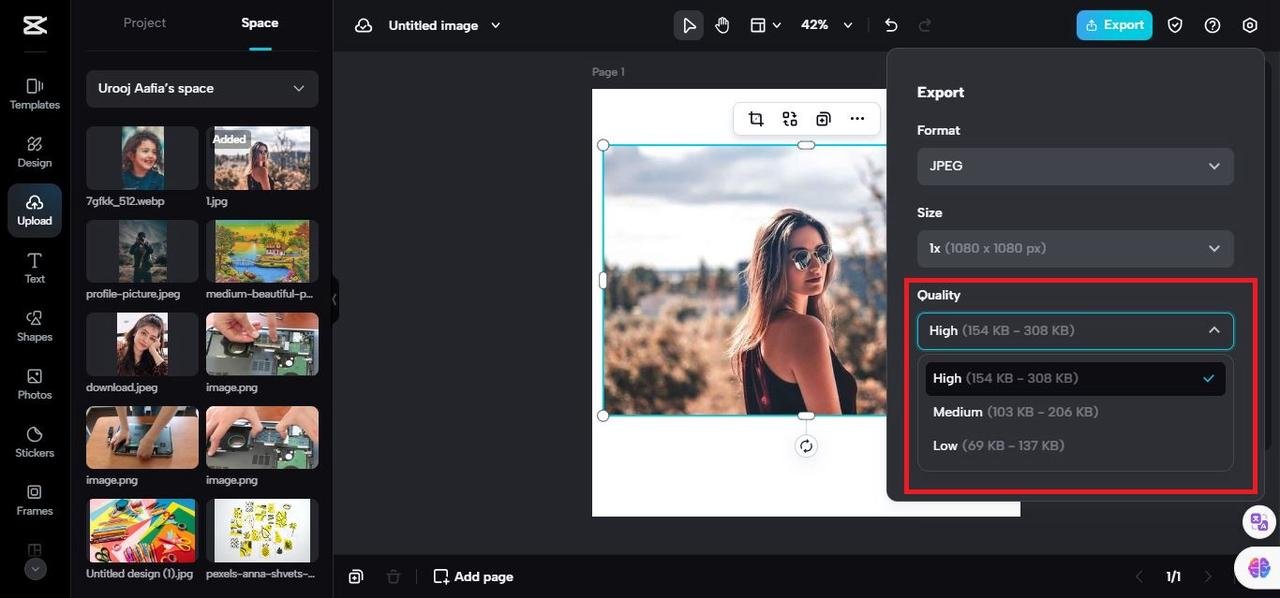
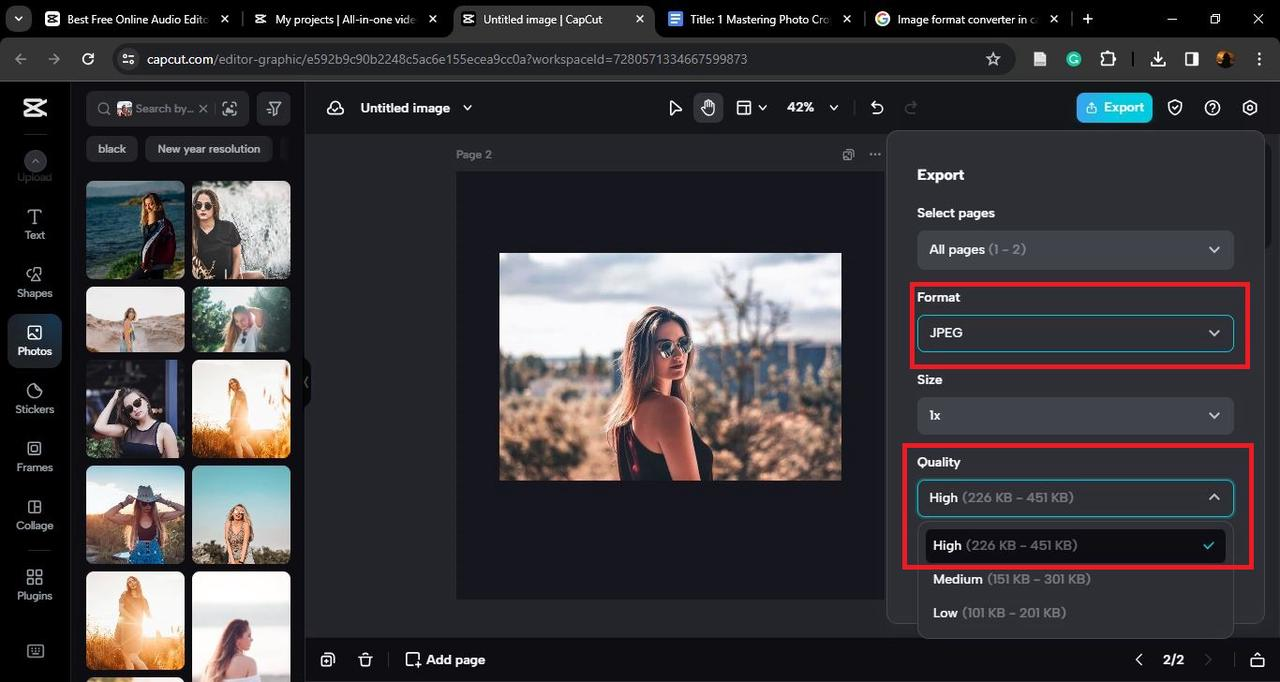
Once you’re satisfied with your cropping adjustments, it’s time to save your work. Locate the “Export” or “Download” button, choose your preferred file format (JPEG and PNG are most common), and save the edited image to your device. Congratulations – you’ve just mastered how to crop on CapCut!
CapCut — Your all-in-one video & photo editing powerhouse! Experience AI auto-editing, realistic effects, a huge template library, and AI audio transformation. Easily create professional masterpieces and social media viral hits. Available on Desktop, Web, and Mobile App.

Download App | Sign Up for Free
Additional Powerful Tools in CapCut’s Arsenal
While learning how to crop images in CapCut is incredibly useful, the platform offers so much more. Once you’re comfortable with cropping, you might want to explore these additional features that can further enhance your photos.
Have you ever tried to email a photo only to receive an error message about file size? CapCut’s “Image Compressor” tool solves this problem beautifully. It reduces file size without compromising visual quality, making it easier to share images online or save storage space on your devices.
Sometimes you need images in specific formats for different applications. If a website requires PNG files but you only have JPEGs, CapCut’s “Image Format Converter” makes switching between formats quick and painless. It’s a simple solution that can prevent countless headaches.
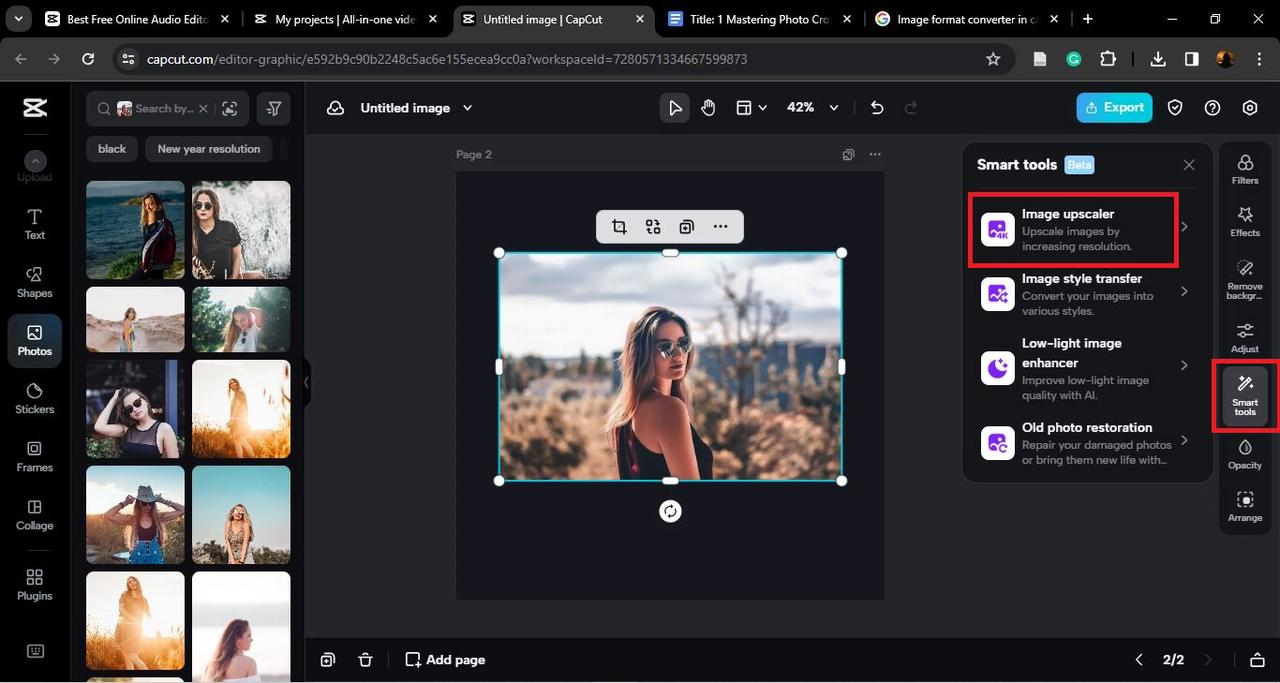
For those precious older photos that suffer from low resolution, CapCut’s “Image Upscaler” feels like magic. It can increase image resolution while maintaining clarity, transforming small, blurry photos into larger, sharper versions that you’ll be proud to display or share.
Practical Applications: When to Use CapCut Crop Tools
You might be wondering about the real-world applications of these skills. The truth is, knowing how to crop on CapCut proves useful in numerous everyday situations.
If you sell products online through platforms like eBay or Amazon, you know they have specific requirements for product images. Using CapCut crop tools, you can ensure all your product photos maintain consistent dimensions and professional appearance, making your listings more attractive to potential buyers.
For bloggers and website owners, properly sized images are crucial for both aesthetics and loading speeds. CapCut allows you to crop and resize images to fit perfectly within your content layout, ensuring your website looks polished and professional while maintaining optimal performance.
Creating photo collages becomes significantly easier when you can crop individual images to highlight their best elements before combining them. CapCut provides the tools to create professionally designed collages that beautifully showcase your memories.
Each social media platform has its own ideal image dimensions. Instead of hoping your photos will display correctly, use CapCut to pre-crop images for specific platforms. This ensures your social media feeds always look cohesive and professionally curated.
Official documents like passports and IDs have strict photographic requirements. CapCut’s precision cropping tools allow you to adjust your photos to meet these exact specifications, eliminating the stress of having application rejected due to improper photo dimensions.
Maintaining Quality in Your Cropped Images
While learning how to crop capcut images is relatively simple, maintaining quality requires some knowledge. Here’s how to ensure your cropped photos always look their best.
The most common mistake involves ignoring aspect ratios. The relationship between width and height significantly impacts how your image appears. If you crop without maintaining proportions, you risk distorting your image. Always use preset ratios or manually maintain proportionality when cropping.
Another frequent error involves excessive cropping. If you start with a low-resolution image and crop too aggressively, the remaining portion may appear pixelated or blurry. Always begin with the highest quality image possible to allow for cropping flexibility without sacrificing clarity.
Before finalizing your edits, always preview your cropped image. Zoom in to check edges and details, ensuring everything looks sharp and nothing important has been accidentally cut off. This simple step can prevent the need to redo your work later.
Professional Tips for Perfect Cropping Results
Cropping involves both technical skill and artistic judgment. These tips will help you achieve better results every time you use CapCut crop tools.
You’ve likely heard of this fundamental composition principle. Imagine dividing your image with two equally spaced horizontal and vertical lines, creating nine equal sections. Positioning key elements along these lines or at their intersections typically creates more dynamic and visually appealing compositions than centering subjects.
Before cropping, identify the main subject or focal point of your image. Your crop should enhance this element by eliminating distractions and creating a clear visual path for the viewer’s eye. A well-executed crop tells a better visual story.
While composition matters, never sacrifice technical quality for artistic effect. Always balance creative cropping with maintaining image integrity. Start with high-resolution images and be mindful of how much you’re removing to preserve quality.
Frequently Asked Questions About CapCut Crop Image Tools
As with any new skill, questions naturally arise. Here are answers to some common queries about using CapCut for image cropping.
Cropping serves multiple purposes beyond simple resizing. It helps remove unwanted elements, change image focus, emphasize subjects, and adapt images for specific platforms or uses. Understanding how to crop images in CapCut gives you control over all these aspects.
Social media platforms have specific dimension requirements. After importing your image into CapCut, select the crop tool and choose from preset ratios labeled for various platforms (Instagram Post, Story, Facebook Cover, etc.). Adjust positioning as needed, then export – your image will be perfectly sized for your chosen platform.
Absolutely! Beyond basic cropping, CapCut allows for angle adjustments to straighten horizons, zoom functionality for focusing on details, and various other composition enhancements. The CapCut crop tool is designed to help you create the most compelling images possible, not just resize them.
CapCut — Your all-in-one video & photo editing powerhouse! Experience AI auto-editing, realistic effects, a huge template library, and AI audio transformation. Easily create professional masterpieces and social media viral hits. Available on Desktop, Web, and Mobile App.
Download App | Sign Up for Free
Conclusion: Mastering Your Images with CapCut
You’ve now explored the comprehensive world of image cropping with CapCut. We began with understanding why cropping matters, moved through the practical steps of how to crop on CapCut, explored additional tools that complement cropping, and examined real-world applications where these skills prove invaluable.
Remember the key principles: always maintain aspect ratios, start with high-quality source images, use composition techniques like the rule of thirds, and always preview before finalizing your edits. Learning how to crop capcut images effectively gives you creative control over your photographs, allowing you to present them in their best possible light across any platform or medium.
The beauty of CapCut’s crop tools lies in their combination of simplicity and power. Whether you’re preparing images for professional use or enhancing personal photos, these tools put professional-level editing capabilities at your fingertips. So open CapCut, upload your images, and start experimenting with cropping – you might be surprised at how this simple skill can transform your photography.
Some images courtesy of CapCut