TOOL HUNTER

Ever wondered what’s really happening behind the scenes when you watch YouTube videos? There’s a hidden treasure trove of technical information that most people never see, and it’s called YouTube Stats for Nerds. This secret feature reveals all the behind-the-scenes data about your video playback, from connection speeds to video codecs and everything in between.
While it might look like a bunch of confusing numbers at first glance, learning to understand these stats can seriously upgrade your YouTube experience. Whether you’re trying to figure out why your videos keep buffering or you want to create better content yourself, Stats for Nerds gives you the inside information you need.
This complete guide will walk you through everything about YouTube’s Stats for Nerds feature. We’ll show you how to access it on different devices, break down what all those technical terms actually mean, and teach you how to use this information to solve common video playback problems. Plus, we’ll introduce you to CapCut, an amazing free video editor that helps you create professional-looking YouTube videos with all the right technical settings.
CapCut — Your all-in-one video & photo editing powerhouse! Experience AI auto-editing, realistic effects, a huge template library, and AI audio transformation. Easily create professional masterpieces and social media viral hits. Available on Desktop, Web, and Mobile App.

What Is YouTube Stats for Nerds?
YouTube Stats for Nerds is like having x-ray vision for your video playback. It’s a special hidden feature that shows you real-time technical information about whatever video you’re watching. When you turn it on, a little box pops up on your screen displaying all sorts of data that normally stays hidden behind the scenes.
This box shows you things like what resolution your video is actually playing at, how fast your internet connection is, how healthy your video buffer is, and which codecs are being used to compress and decompress the video and audio. It’s like having a dashboard that shows you exactly what’s happening with your video stream moment by moment.
Lots of different people find this feature super useful. Regular viewers can use stats for nerds YouTube to figure out why a video might be buffering constantly or looking all blurry and pixelated. Content creators love it because they can check how their videos are performing for different viewers under various conditions. Even network engineers sometimes use the stat for nerds feature to diagnose tricky connection issues that might be affecting video quality.
YouTube keeps this feature hidden by default because, let’s face it, most people don’t really care about all these technical details. They just want to watch their videos without a bunch of numbers cluttering up the screen. But if you’re the kind of person who likes to know how things work, or if you frequently have problems with video playback, learning about stats for nerds on youtube can be incredibly helpful.
The information from stats for nerds gives you real insights into why a video might not be playing perfectly. Whether you’re watching on your computer or your phone, these statistics tell you the real story about what’s happening with your video stream, helping you understand whether issues are caused by your device, your internet connection, or something else entirely.
How to Enable Stats for Nerds on Different Devices
Turning on Stats for Nerds is actually pretty simple, though the steps are slightly different depending on whether you’re using a computer or a mobile device. Let’s walk through how to access this feature on all types of devices.
Accessing Stats for Nerds on Computer
If you’re watching YouTube on a desktop or laptop computer—whether it’s running Windows, Mac, or Linux—through a web browser, here’s how you can enable the stats for nerds youtube feature:
- Open up your web browser (Chrome, Firefox, Safari, or whatever you prefer) and go to YouTube.com
- Pick any video and start playing it
- Right-click once anywhere on the video itself to bring up the context menu
- From the menu options that appear, choose “Stats for nerds”
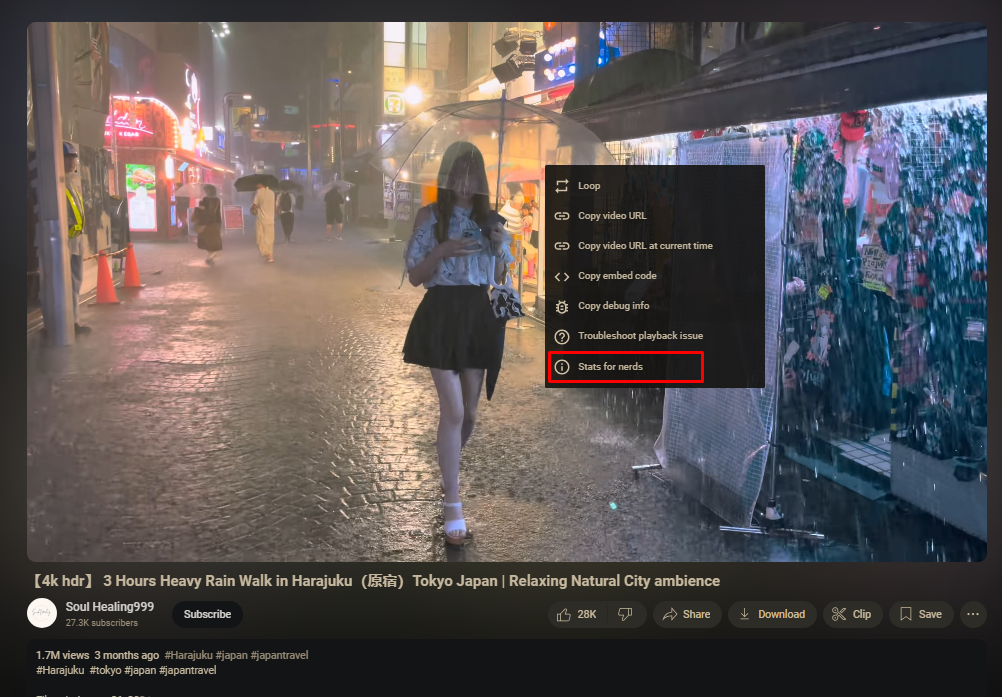
Once you select this option, a small information window will pop up on your screen showing all the technical data about your video playback. If this window happens to be blocking something you want to see on the video, no worries—you can simply click and drag it to move it anywhere else on your screen.
Enabling Stats for Nerds on Phones and Tablets
If you’re using the YouTube app on your Android or iOS mobile device, the process for accessing the stat for nerds feature works a bit differently:
- Open up the YouTube app on your smartphone or tablet
- Start playing any video you want to analyze
- Tap on the three little dots in the top right corner (that’s the settings menu)
- Tap on “Additional settings” in the menu that appears
- Select “Stats for nerds” from the list of options
The stats will show up right on top of your video while it plays. On mobile screens, the information usually appears in a more compact format to fit the smaller display, but it contains all the same important data points as the desktop version of stats for nerds.
Now that you know how to access this hidden technical information, let’s dive into what all those numbers and technical terms actually mean and how you can use them.
Understanding All the Metrics in Stats for Nerds
When you first open up Stats for Nerds, it might look like you’re staring at a complicated control panel with a bunch of numbers and abbreviations that don’t make much sense. Don’t worry—it’s not as complicated as it looks! Once you understand what each metric represents, you’ll be able to use this information to seriously improve your YouTube watching experience.
Let’s break down each part of the stats for nerds that YouTube provides:
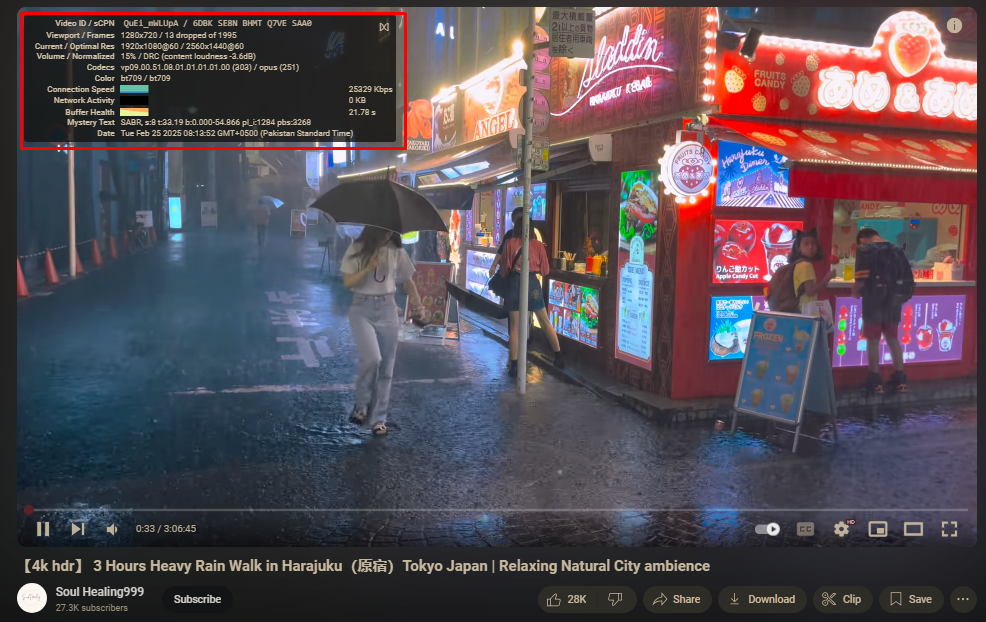
Video ID and sCPNEvery single YouTube video out there has its own unique identifier called the Video ID. Think of it like a fingerprint for that specific video. The sCPN is a session identifier that helps YouTube keep track of your particular playback session. If you’re running into problems with a video, these identifiers can help figure out whether the issue is with the video itself or with your specific device or internet connection.
Viewport and FramesThe viewport is basically the actual size of the video player on your screen right now. The frames section shows you how many frames have been dropped during playback. Dropped frames usually mean the video is stuttering, lagging, or playing choppily. If you notice a high number of dropped frames, it suggests your device might be struggling to keep up with playing the video smoothly.
Current Resolution vs. Optimal ResolutionYouTube automatically adjusts video quality based on your internet speed to give you the best possible experience without constant buffering. The current resolution shows you what quality you’re actually watching at this very moment, while the optimal resolution is what YouTube thinks your connection should be able to handle. If you see a big difference between these two numbers, it might indicate some network problems that need addressing.
Volume and Normalized Audio LevelsYouTube tries to keep audio levels consistent across all videos so you don’t have to constantly fiddle with your volume settings between videos. The normalized value shows you how YouTube has adjusted the audio of the video you’re watching. If a particular video seems unusually quiet or surprisingly loud, checking these values might explain what’s going on with the audio.
Codecs for Video and AudioCodecs are the technology used to compress and decompress video and audio files—they’re what make streaming possible without using insane amounts of data. YouTube uses different codecs like VP9, AV1, and H.264 for video, and typically AAC for audio. Newer codecs like AV1 generally provide better quality at smaller file sizes, which means less buffering and smoother playback for you.
Connection Speed and Network ActivityThis section shows your current internet speed and how it’s affecting your video playback right now. If you notice your connection speed jumping up and down like a yo-yo, it might explain why your video quality keeps changing or why you’re experiencing those annoying buffering interruptions.
Understanding these metrics is your first step toward using the stats for nerds feature like a true professional. When you know what each value represents, you can start troubleshooting playback issues effectively and even optimize your own video creation process.
CapCut — Your all-in-one video & photo editing powerhouse! Experience AI auto-editing, realistic effects, a huge template library, and AI audio transformation. Easily create professional masterpieces and social media viral hits. Available on Desktop, Web, and Mobile App.
How to Improve Your Viewing Experience Using Statistics for Nerds
Now that you understand what all those numbers and terms actually mean, let’s talk about how you can practically use YouTube Stats for Nerds to seriously improve your viewing experience. Here are some common problems people encounter and how to fix them using the data from Stats for Nerds.
Fixing Network Problems and Buffering Issues
If your videos keep pausing to buffer every few seconds, it’s usually a network-related issue. When this happens, the first thing you should check is the connection speed in your Stats for Nerds display. If the number is consistently low or keeps dropping dramatically, your internet connection might be too slow for the video quality you’re trying to watch.
Try moving closer to your Wi-Fi router if you’re using wireless connection, or better yet, switch to a wired Ethernet connection if possible. You can also try manually lowering the video quality by clicking on the settings gear icon and selecting a lower resolution. Sometimes just switching from 1080p to 720p can completely eliminate those annoying buffering issues.
The stats for nerds on YouTube give you real-time feedback on whether these changes are actually helping. Keep an eye on the connection speed and buffer health metrics after making adjustments to see if things improve.
Solving Frame Drop Problems
If your video looks choppy or stutters like it’s having a hard time playing smoothly, you might be experiencing frame drops. Check the frames section in Stats for Nerds to see how many frames have been dropped during playback. A high number here usually means your device is struggling to keep up with processing the video.
Try closing other applications running in the background, especially those using lots of memory or processing power like games or other video streams. Updating your graphics drivers can also help with frame drop issues. If you’re on a mobile device, make sure you don’t have too many apps running at the same time.
Sometimes, just like with buffering issues, reducing the video resolution can help with frame drops too. The lower resolution requires less processing power to play back smoothly, which can make a big difference on older devices.
Dealing with Network Fluctuations
If your video quality keeps changing randomly or the playback is inconsistent, you might be experiencing network fluctuations. Check the network activity section in Stats for Nerds to see if your connection speed is jumping up and down dramatically.
Try to avoid doing other bandwidth-intensive activities while watching videos, like downloading large files, playing online games, or having multiple video streams running simultaneously. If possible, connect your device directly to your router with an Ethernet cable instead of using Wi-Fi, as this typically provides a much more stable connection.
You might also try changing your DNS server settings, as sometimes this can improve connection stability. There are free public DNS services like Google DNS or Cloudflare DNS that you can try switching to.
Improving Overall Video Quality
If your videos always look blurry or pixelated, even when you’ve selected the highest quality option, Stats for Nerds can help you figure out why. Check the current resolution versus the optimal resolution. If they don’t match, your connection might not be stable enough to maintain higher quality playback.
Make sure you have a strong internet connection first and foremost. If you’re on Wi-Fi, try moving closer to your router or eliminating sources of interference. You can also try restarting your router or modem, as sometimes this simple step improves connection quality significantly.
The codec information can also be helpful here. Newer codecs like AV1 generally provide better quality at lower bitrates. If your device supports newer codecs, you might get better looking videos even with a mediocre connection.
Using the statistics for nerds effectively does take some practice, but once you get the hang of it, you’ll be able to diagnose and fix most playback issues on your own like a true tech expert.
How to Create Amazing YouTube Videos for Free Using CapCut
Now that you understand how to use YouTube Stats for Nerds to analyze video playback like a pro, let’s talk about the creation side of things. Whether you’re an aspiring content creator or just someone who wants to make nice videos for friends and family, having access to a good video editor is essential.
CapCut is a completely free video editing tool that lets you create professional-looking YouTube videos without spending any money. It packs all the features you need to edit videos, add cool effects, and optimize your content specifically for YouTube’s platform.
One of the best things about CapCut is that it lets you adjust all the technical aspects of your video that you now understand from Stats for Nerds. You can set the perfect resolution, frame rate, bit rate, and color space to make sure your videos look absolutely fantastic when uploaded to YouTube.
Awesome Features of CapCut
CapCut comes loaded with tons of features that make video editing both easy and enjoyable:
Video Settings AdjustmentYou can fine-tune all the technical settings of your video to match YouTube’s recommendations perfectly. This includes frame rate, resolution, color space, and much more. Getting these settings right means your videos will look their best when people watch them on various devices.
Visual and Audio ElementsCapCut offers a huge collection of filters, stickers, and effects that you can add to your videos to make them more engaging and professional-looking. You can also add music from their extensive library or use your own audio files to personalize your content.
AI-Powered FeaturesThe software includes artificial intelligence features that save you tons of time. For example, it can automatically generate accurate captions for your videos, create unique AI stickers, and even help with writing video descriptions and titles.
YouTube IntegrationWhen you’re done editing, you can export your video directly to YouTube right from within CapCut. This makes the whole process from editing to uploading completely seamless and hassle-free.
Easy Step-by-Step Guide to Creating YouTube Videos with CapCut
Making videos with CapCut is surprisingly straightforward, even if you’ve never edited videos before. Here’s how to do it:
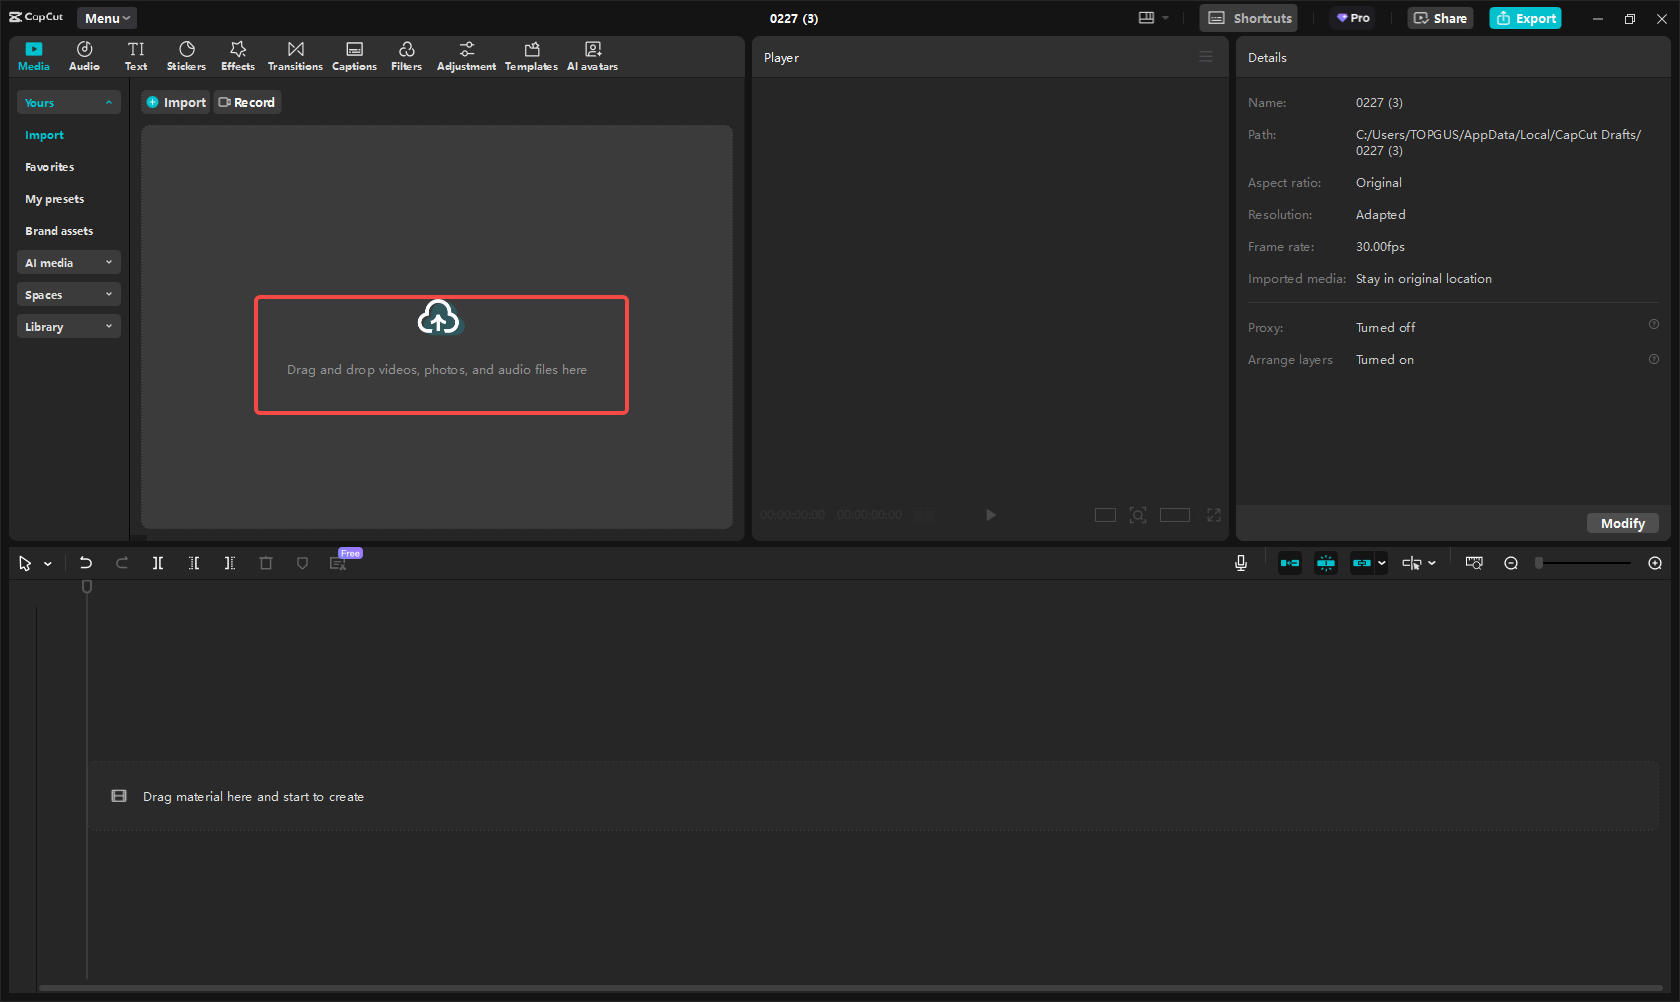
Import Your ClipsFirst, open CapCut and click the “Import” button to bring in your video files, images, and audio clips. You can also drag and drop files directly from your computer if you prefer. After importing, simply add them to the timeline where you’ll do all your editing work.
Edit and Enhance Your VideoNow comes the really fun part—making your video look amazing! Add filters, cool effects, and text overlays to make your video more engaging and professional. You can search for perfect background music in CapCut’s audio library and add it to your timeline with just a few clicks.
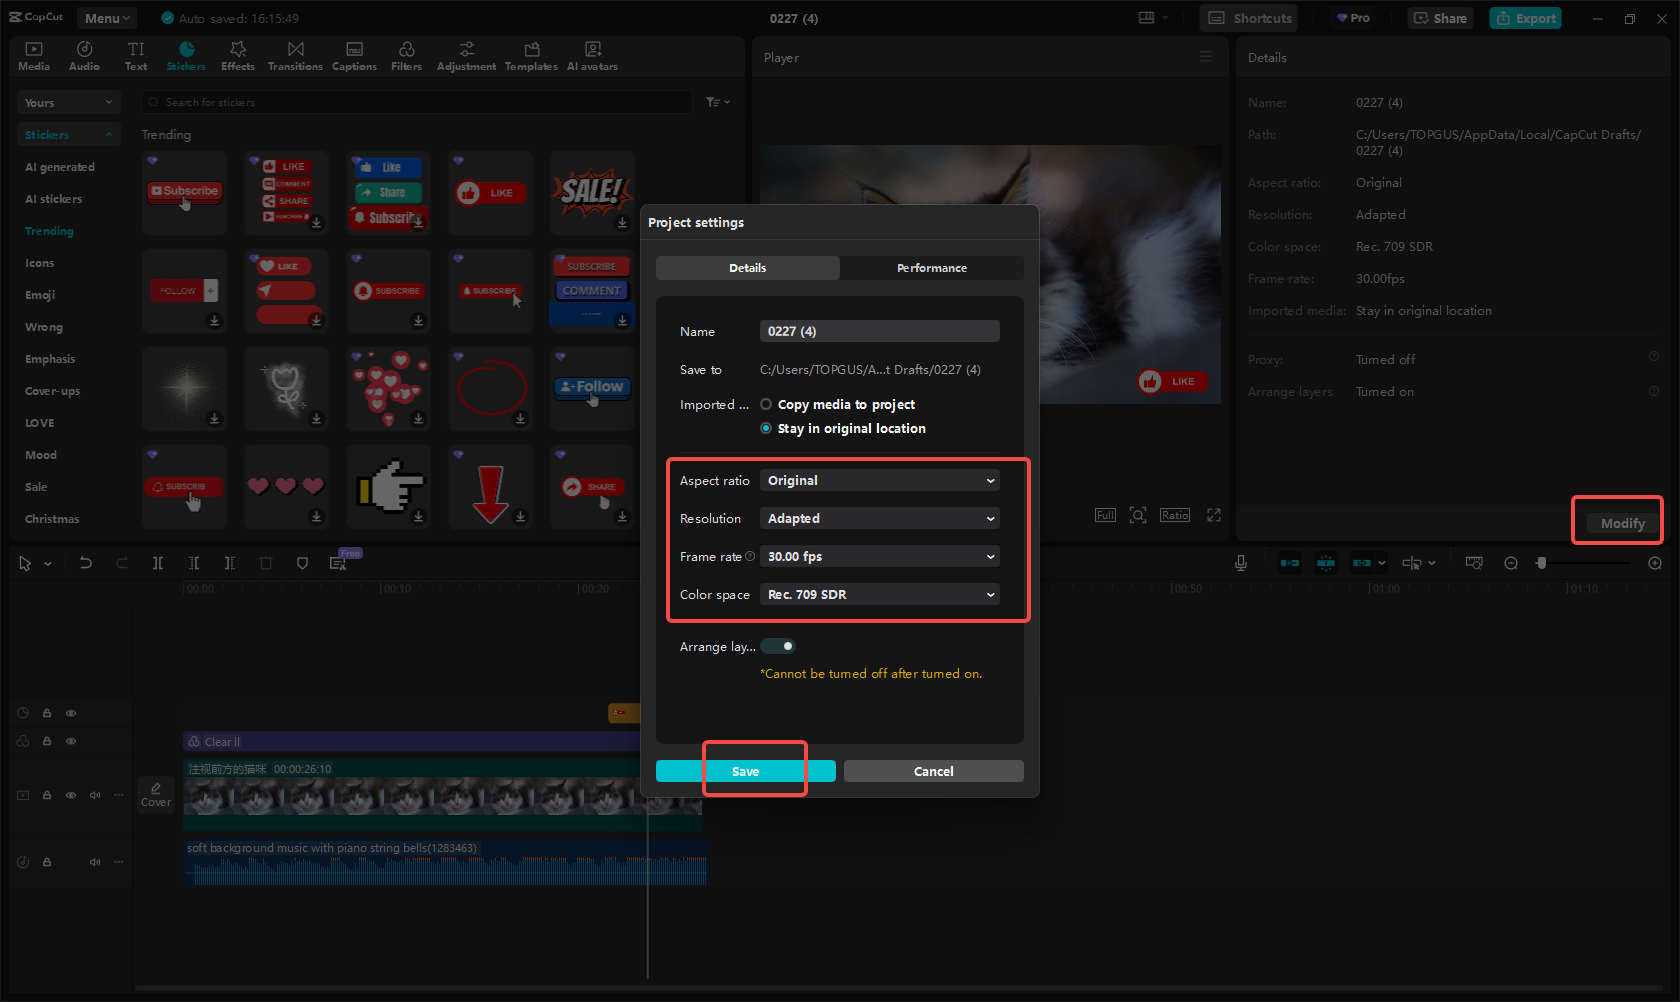
If you want to adjust technical settings like frame rate or resolution based on what you’ve learned from Stats for Nerds, just click the “Modify” button. This is where you can make sure your video is perfectly optimized for YouTube playback.
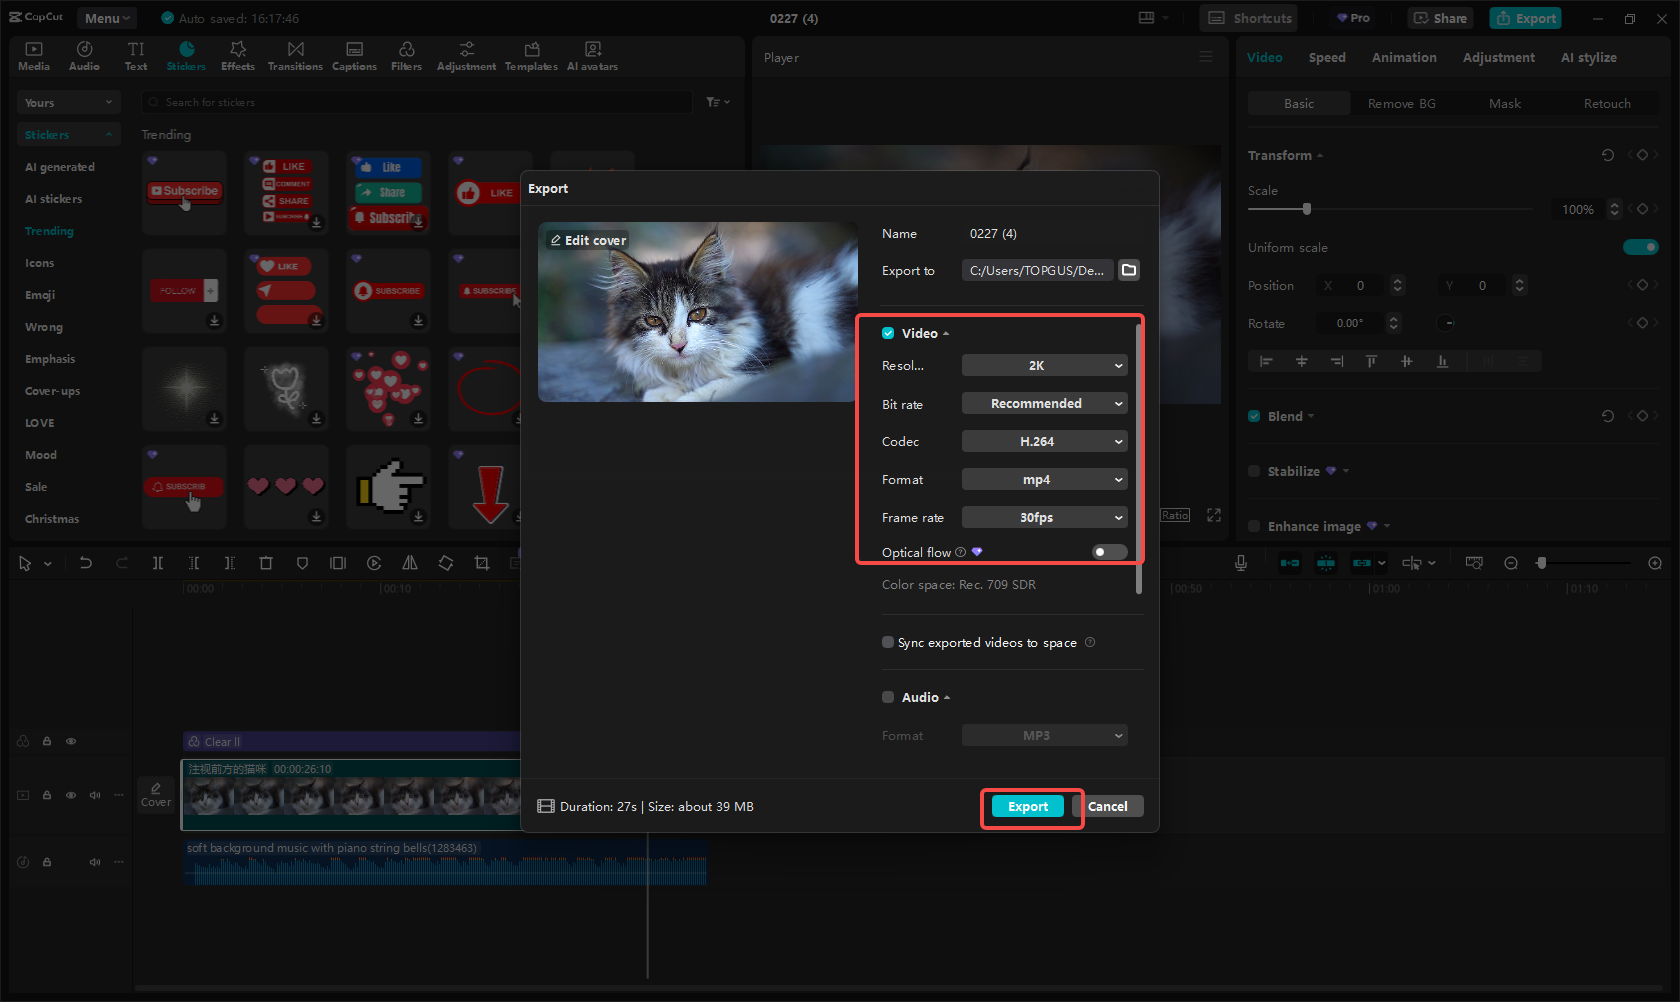
Export and Share Your VideoWhen you’re completely happy with your video, click the “Export” button. You can adjust the format and codec settings before exporting to ensure the best possible quality. Once everything is set perfectly, click export again and you can share directly to YouTube if you want.
CapCut is completely free to download and use, with no hidden costs or watermarks. It’s available for both desktop and mobile devices, so you can edit videos wherever you are, whenever inspiration strikes.
CapCut — Your all-in-one video & photo editing powerhouse! Experience AI auto-editing, realistic effects, a huge template library, and AI audio transformation. Easily create professional masterpieces and social media viral hits. Available on Desktop, Web, and Mobile App.
Wrapping Up
YouTube Stats for Nerds is an incredibly powerful tool that gives you insider knowledge about what’s really happening behind the scenes when you watch videos. By understanding metrics like resolution, dropped frames, and connection speed, you can troubleshoot playback issues effectively and enjoy a significantly better viewing experience.
Enabling Stats for Nerds is quick and easy on both desktop and mobile devices. Once you turn it on, you’ll have access to