TOOL HUNTER

If you’re looking to create awesome videos on your phone, KineMaster is probably one of the first apps that comes to mind. It’s super popular for a reason – it packs a ton of editing power into a mobile-friendly package. But figuring out how to use KineMaster effectively can feel a bit overwhelming at first. Don’t worry though, I’m going to walk you through everything you need to know about this powerful video editor.
Getting Started with KineMaster
The first time you open KineMaster, you’ll notice the interface looks pretty familiar if you’ve used other mobile editing apps. There’s a big plus button right in the center that lets you start new projects, plus various icons for settings, effects, and other tools around the edges. The layout is almost identical on both iPhone and Android, which makes switching between devices pretty seamless.
How to Use KineMaster Step by Step
Setting Up Your First Project
Starting your editing journey with KineMaster is straightforward. Here’s how to get going:
Step 1: Tap that prominent + symbol on the main screen to create a new project. This is your gateway to all the creative possibilities ahead.
Step 2: Choose your video’s aspect ratio. You’ve got several options here – vertical (9:16) for platforms like TikTok and Instagram Stories, horizontal (16:9) for YouTube and traditional videos, or square (1:1) for Instagram feeds. Stick with these standard ratios to ensure all effects and filters work properly.
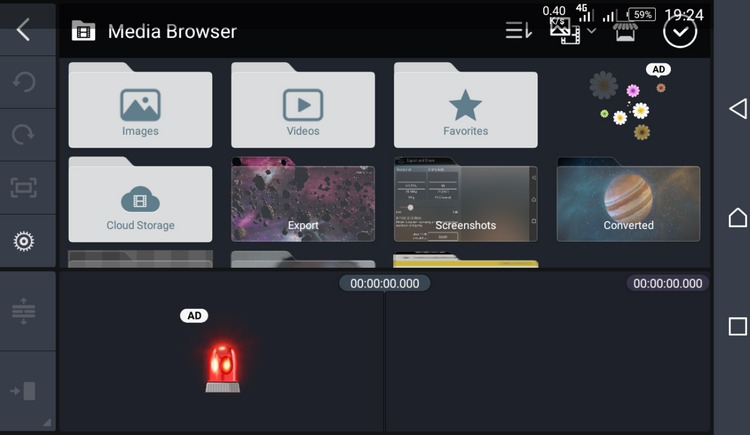
Step 3: Select the Media option to import your clips and photos. KineMaster doesn’t have its own media library, so it pulls directly from your device’s storage and any connected cloud services. Just navigate to where your files are stored and tap to add them to your project.
Once you’ve got your media imported, you’re ready to start the real fun – actually editing your video!
How to Trim or Split Video Clips
One of the most basic but essential editing skills is trimming and splitting your footage. Here’s your kinemaster tutorial for managing clip length:
Step 1: Tap on your video track in the timeline. You’ll know it’s selected when you see a yellow border around it.
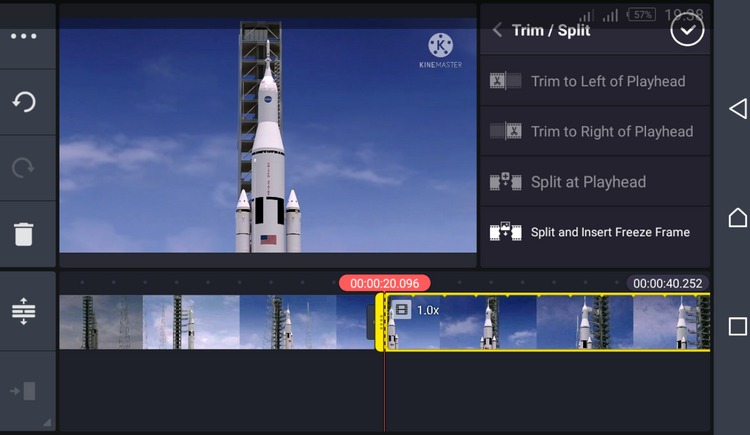
Step 2: Look above the timeline near the preview window for editing options. You’ll see tools for trimming to the left or right of your playhead, splitting clips at the current position, and even inserting freeze frames.
Step 3: After making your edit, you can immediately preview the result using the play button. If you don’t like how it turned out, just tap the undo arrow on the left sidebar.
Learning how to trim and split effectively is crucial for removing unwanted sections and organizing your footage into the perfect sequence.
Adding Smooth Transitions Between Clips
When you have multiple clips in your timeline, transitions help them flow together naturally. Here’s kine master how to use transition effects:
Step 1: Look for the small + symbol where two clips meet in your timeline. Tapping this reveals the transition menu.
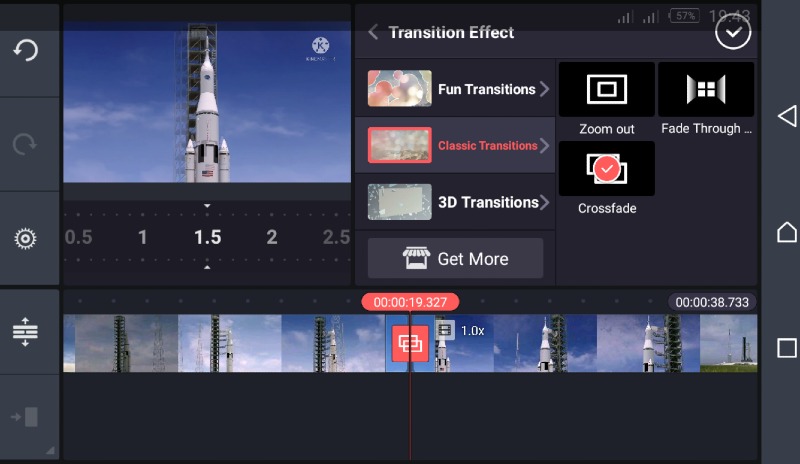
Step 2: Scroll through the available transition effects and tap the one you want to use. Each transition has its own settings you can adjust for duration and style.
Step 3: To preview your transition, just move the playhead slightly before the transition point and hit play. This lets you fine-tune the timing until it looks just right.
You can use different transitions between different clips to create varied pacing and visual interest throughout your video.
Adding Text and Titles
Text overlays are perfect for titles, captions, or emphasizing key points. Here’s how to use kinemaster for adding text:
Step 1: Move your playhead to where you want text to appear, then tap the Layer option in the media panel.
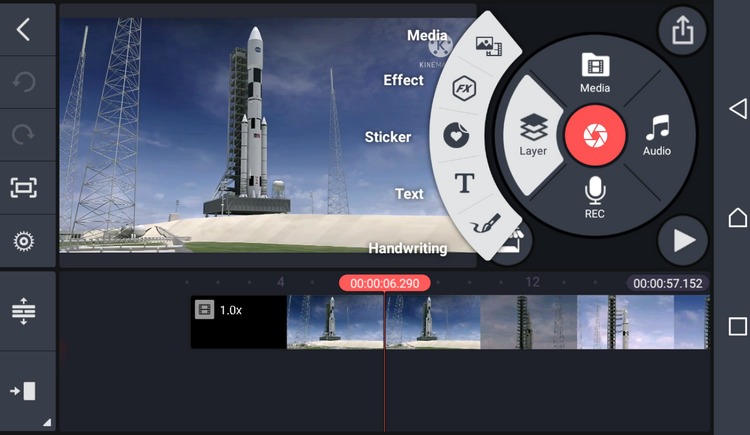
Step 2: Select the Text icon (it looks like a capital T) to open the text editor.
Step 3: Type your text in the field that appears and confirm when you’re done.
Step 4: You can reposition your text by dragging it around the screen, and resize it using the corner handles.
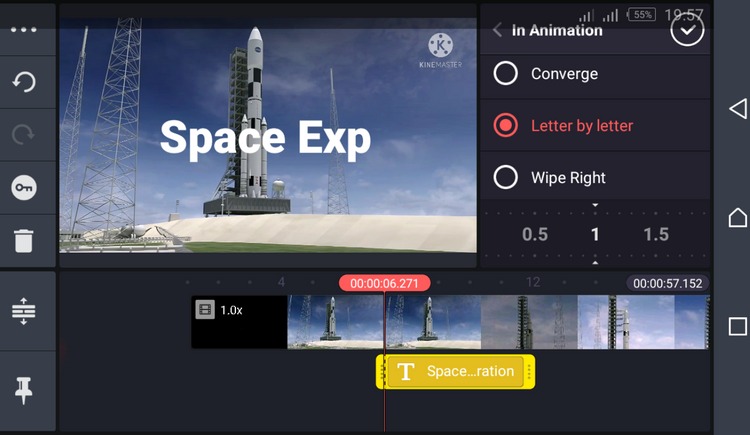
Step 5: With the text selected, you’ll see options for changing fonts, colors, and adding animations. Experiment with different styles until you find the perfect look, then tap the checkmark to apply your changes.
The text tools in KineMaster are surprisingly powerful for a mobile app, giving you lots of creative control over how your words appear on screen.
Incorporating Background Music and Audio
The right audio can completely transform your video’s mood and impact. Here’s kinemaster how to use the audio features:
Step 1: Position your playhead where you want audio to begin, then select Audio from the media panel.
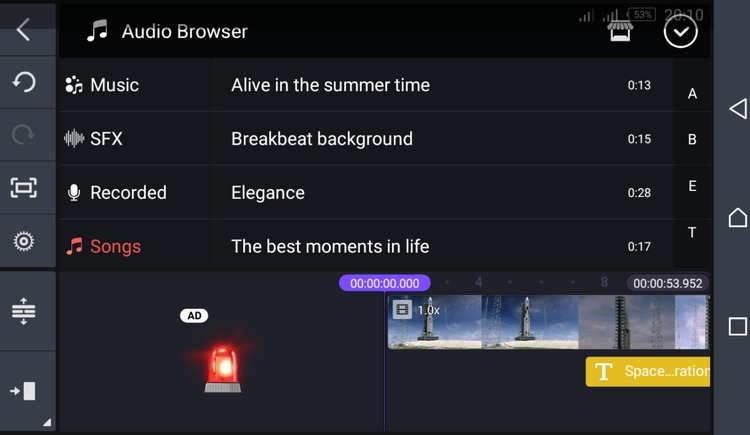
Step 2: Choose from Music, Sound Effects, Recorded audio, or Songs from your device. You can also record voiceovers directly within the app.
Step 3: Tap the red + button to add your selected audio to a separate audio track in your timeline.
Step 4: Tap the audio track to trim its length or adjust volume levels. This helps you sync the audio perfectly with your video content.
Once you’re happy with your edited video, tap the export icon in the top right corner. You can choose your output quality settings – higher resolution and bitrate mean better quality but larger file sizes. Then you’re ready to share your creation with the world!
Pro Tips for Better KineMaster Videos
Now that you know the basics of how to use KineMaster, let’s talk about some strategies for making your videos really stand out.
Audio selection is crucial. If your video includes dialogue or voiceover, consider using subtle instrumental music in the background rather than vocal tracks that might compete for attention. The music should enhance your content, not overwhelm it.
For videos without narration, adding a voiceover can make them much more engaging. Viewers often appreciate hearing explanations or commentary, even when the visuals are pretty self-explanatory.
If you’re planning to share your videos on platforms like YouTube, be super careful about copyright. Using popular songs without permission can get your video taken down, even if it’s just playing quietly in the background. Stick to royalty-free music or KineMaster’s built-in audio library to stay safe.
Filme – Best Video Editor for Beginners.Explore Your Creativity, Limitless

Check More Details | Download Now! | Check All Deals
Why Consider Desktop Editing Options?
While KineMaster is fantastic for mobile editing, there are times when a desktop editor might serve you better. Working on a larger screen with a mouse and keyboard can be more precise, especially for detailed editing work. Desktop software also tends to offer more advanced features and better performance for longer, more complex projects.
If you find yourself wanting more editing power or just prefer working on a computer, it might be worth exploring desktop options alongside your mobile editing workflow.
Common KineMaster Questions Answered
Can I Use KineMaster on My Computer?
KineMaster is primarily designed for mobile devices, but there are a couple of workarounds if you really want to use it on a computer. There’s a Chrome extension available that lets you do basic editing through your web browser, though it’s not as full-featured as the mobile app. If you have a Chromebook that supports Android apps, you can also install the Android version of KineMaster directly.
How Do I Remove the KineMaster Watermark?
The watermark that appears on exported videos is KineMaster’s way of encouraging users to upgrade to their premium version. To remove it, you’ll need to subscribe to KineMaster Pro. Pricing varies between iOS and Android, with monthly and annual plans available. The subscription not only removes the watermark but also unlocks additional premium features and assets.
Expanding Your Editing Horizons
As you become more comfortable with how to use KineMaster, you might start wondering about other editing options available to you. While KineMaster is an excellent mobile solution, sometimes having access to desktop editing software can complement your mobile workflow perfectly.
Desktop editors typically offer more precise control, better performance with high-resolution footage, and access to more advanced features. They’re particularly useful for longer projects or when you need to do detailed color grading, audio mixing, or complex effects work.
The good news is that skills you learn in KineMaster transfer well to other editing platforms. Understanding concepts like timeline editing, layering, transitions, and audio mixing will serve you well no matter what software you use.
Filme – Best Video Editor for Beginners.Explore Your Creativity, Limitless
Check More Details | Download Now! | Check All Deals
Final Thoughts on Mobile Video Editing
KineMaster really is one of the most powerful mobile video editors out there. Its combination of professional features and mobile-friendly interface makes it perfect for creating high-quality content on the go. Whether you’re making videos for social media, personal projects, or even semi-professional work, learning how to use KineMaster effectively can open up a world of creative possibilities.
The key is to start with the basics we’ve covered here – importing media, trimming clips, adding transitions, incorporating text, and working with audio. As you become more comfortable with these fundamental tools, you can explore KineMaster’s more advanced features like chroma key, blending modes, and animation tools.
Remember that great video editing is as much about practice and experimentation as it is about knowing which buttons to push. Don’t be afraid to try new techniques, watch tutorial videos, and learn from other creators. Every video you make will teach you something new and help you develop your unique editing style.
So grab your phone, fire up KineMaster, and start creating! The more you use it, the more you’ll discover just how much you can accomplish with this powerful pocket-sized studio.
Some images courtesy of iMyFone