TOOL HUNTER

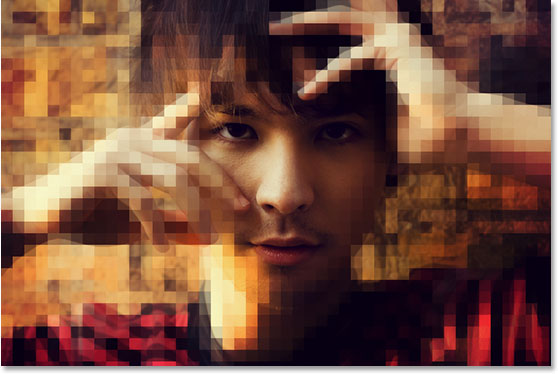
Ever opened a photo and found it all blocky and blurry? That weird mosaic-like pattern can really ruin an otherwise great picture. You might be wondering—how do you actually fix something like that? Well, you’re in luck. This guide is all about how to unpixelate pictures and bring back that smooth, clean look you love.
A lot of people ask, “Is it really possible to unpixelate a photo?” And the answer is a clear yes! Thanks to modern tools, it’s easier than you think. Whether you’re just getting started or you’ve been editing for years, there are straightforward ways to remove pixels from photos and make them look crisp again.
In this article, we’ll first explore why photos get pixelated in the first place. Then, we’ll walk through step-by-step methods to unpixelate image files—using everything from free online tools to pro-level software. We’ll also share some handy tips to help you avoid pixelation down the road. Ready to dive in? Let’s go!
Why Do Images Get Pixelated?
Before we jump into how to unpixelate an image, it helps to understand what causes pixelation. Simply put, pixelation happens when you start seeing the tiny squares (pixels) that make up a digital image. Instead of a smooth, continuous picture, you get these annoying little blocks.
There are a few common reasons this happens:
Low resolution is a big one. Image resolution refers to the number of pixels in an image. The fewer pixels there are, the less detail the image holds. When you try to enlarge a low-res image, those pixels stretch out and become more visible.
Too much zooming is another culprit. Zoom in far enough on any digital image, and eventually you’ll see those pixels getting bigger and blockier.
Limited color depth can also cause pixelation. Color depth determines how many colors an image can display. If it’s too low, there aren’t enough color variations to create smooth transitions, making edges and gradients look rough and pixelated.
Heavy or improper compression is another common issue. Many apps and websites compress images to save space or speed up loading. But if they overdo it, or use the wrong type of compression, it can introduce artifacts and pixelation—especially in detailed areas.
Enlarging an image beyond its original size can also lead to pixelation. Software uses a process called interpolation to guess what new pixels should look like, and that often results in a blocky, mosaic-like effect.
Finally, trying to focus on something that was blurry or out of focus in the original shot can make pixelation worse. If the detail wasn’t captured clearly to begin with, no software can magically invent it.
The good news? All of these issues can be improved—and often totally fixed. Now that we know what causes the problem, let’s look at how to unpixelate pictures using different tools and techniques.
How to Unpixelate Image Files Online for Free
If you’re looking for a quick, no-download way to clean up your images, online tools are a great place to start. These browser-based platforms let you unpixelate image files right from your web browser—and most are totally free.
One of the top tools out there is CapCut’s image upscaler. It’s part of a full creative suite that includes photo, audio, and video editing—available on mobile, desktop, and web. Their AI-powered image upscaler is built specifically to help you unpixelate pictures in just a few clicks.
So what makes CapCut a good choice?
For starters, it’s free and web-based. The interface is clean and intuitive, so even if you’re new to photo editing, you’ll find it easy to use. You don’t need any special skills to unpixelate image files here.
The process is super simple: upload your image, adjust your settings, and let the AI take over. Most of the time, you’re just three steps away from a cleaner, clearer photo.
But CapCut’s tool does more than just remove pixels from photos. It also enhances resolution, sharpens soft details, reduces noise, and improves color balance. You can upscale low-quality images all the way to 4K UHD while keeping the original feel of the photo.
Another cool thing—after you unpixelate your image, you can keep editing it right inside CapCut. The platform offers background removal, old photo restoration, colorization, and more. It’s a full toolkit, not just a one-trick pony.
It’s especially good at cleaning up noise and adding subtle detail to blurry areas. It reduces grain and distortion without going overboard, so your photos still look natural—just better.
Ready to see how it works?
Steps to Unpixelate Image Files Using CapCut
Using CapCut to fix pixelated images is straightforward. Here’s how it works:
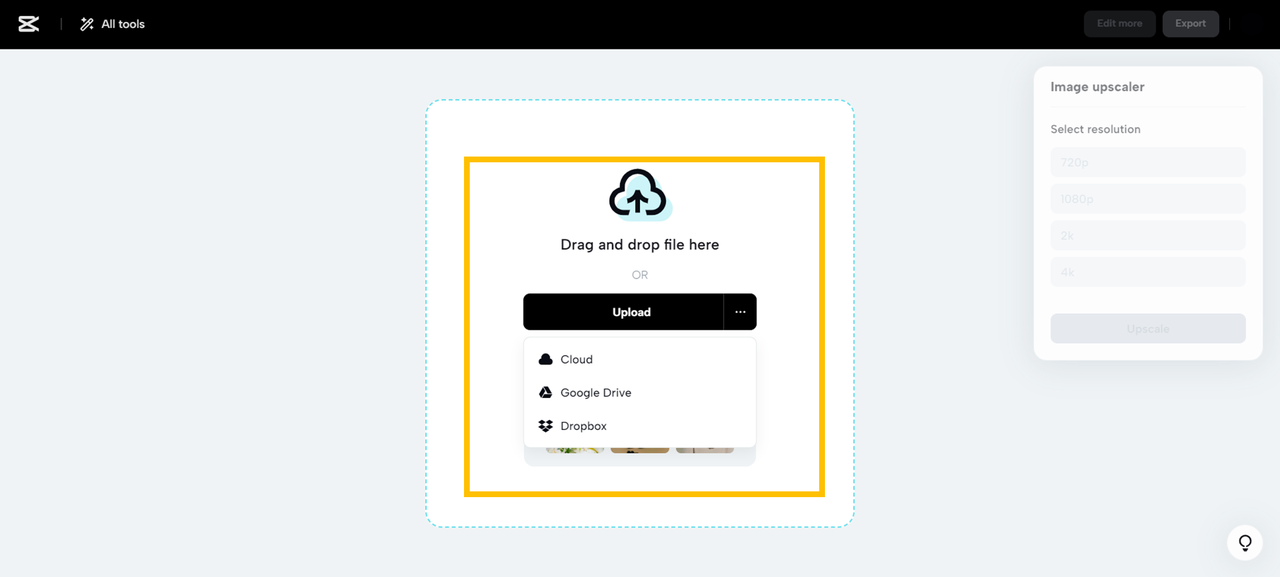
First, you’ll need to sign up for a free account. Just go to their website and register—it only takes a minute. Once you’re in, find the image upscaler tool.
Now, upload your pixelated image. Click the upload button and pick the file from your computer. You can also import from cloud services like Google Drive or Dropbox. Or, if you prefer, just drag and drop your file straight into the browser.
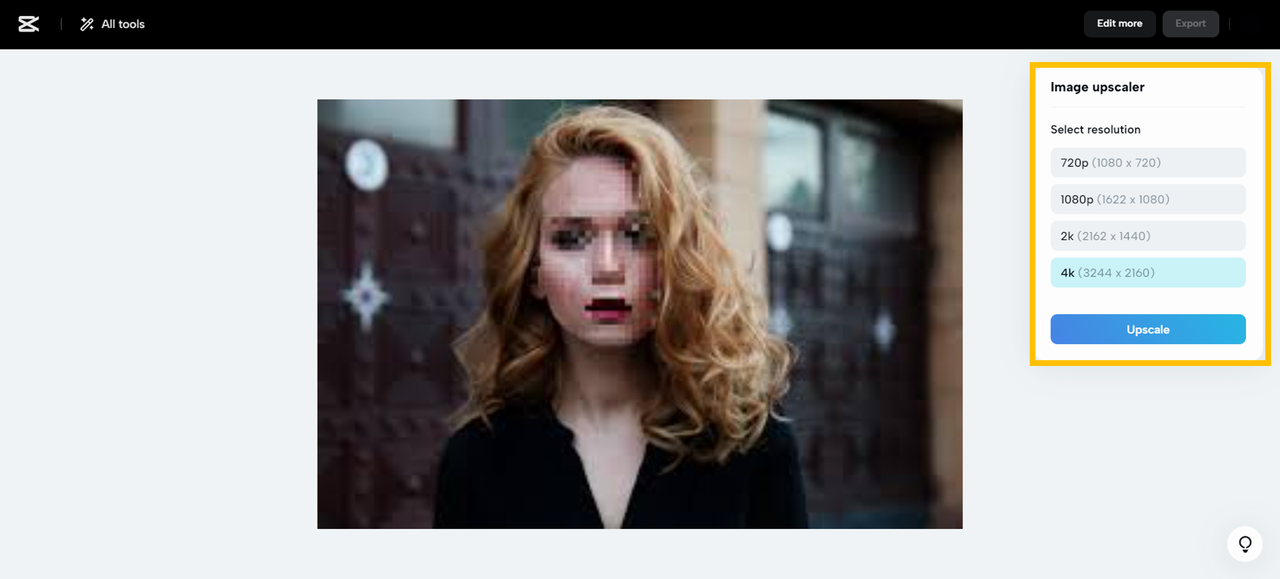
Once your image is uploaded, it’s time to unpixelate it. Select your image from the media panel, then choose your desired resolution. Higher resolutions usually give better results but may take a bit longer. Hit the “Upscale” button, and let the AI do its thing. It’ll analyze your photo and rebuild it with better detail and less pixelation.
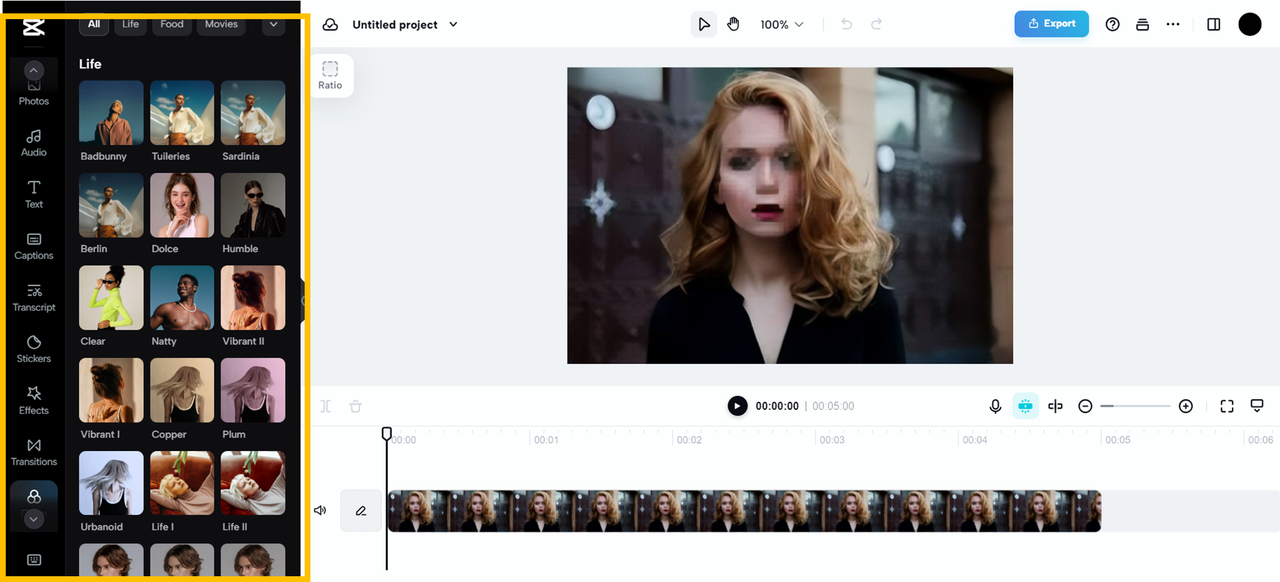
When upscaling is done, you can do more edits if you want. CapCut offers an “Edit more” option where you can tweak colors, remove the background, or play with filters until you’re totally happy with how it looks.
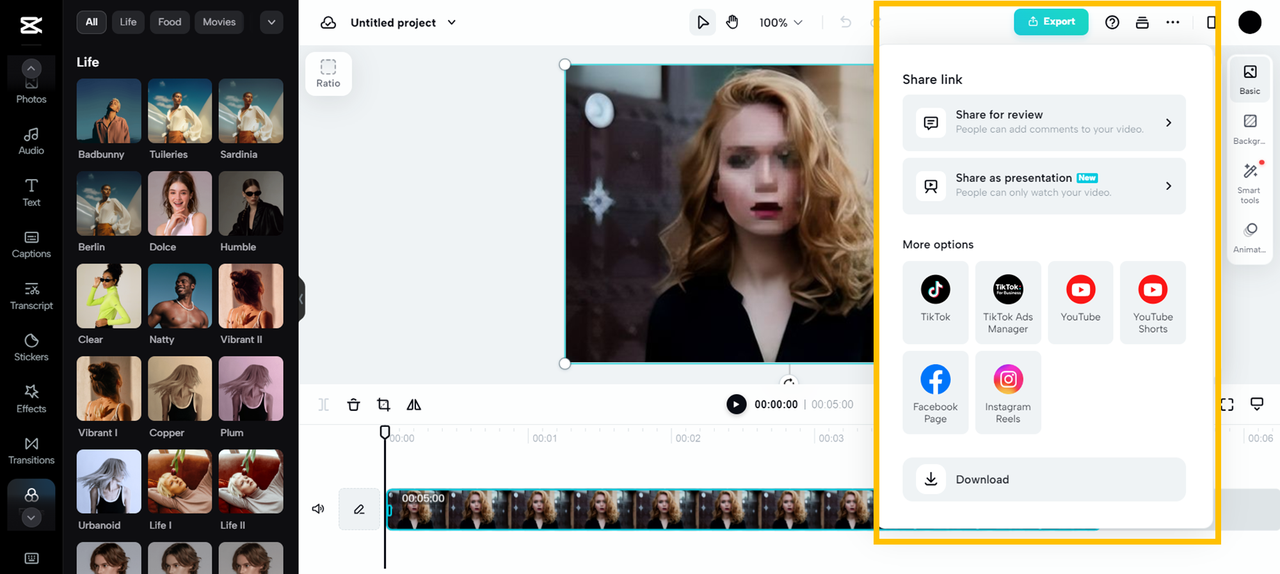
Once everything looks good, it’s time to save and share. Click export to download your improved image to your device. You can also share it directly to social platforms like TikTok, Instagram, Facebook, or YouTube.
And that’s it! In just a few clicks, you’ve learned how to unpixelate an image—no technical experience needed.
CapCut — Your all-in-one video & photo editing powerhouse! Experience AI auto-editing, realistic effects, a huge template library, and AI audio transformation. Easily create professional masterpieces and social media viral hits. Available on Desktop, Web, and Mobile App.

How to Unpixelate an Image Using Photoshop
If you prefer more control or already use professional software, Adobe Photoshop has powerful tools to help you unpixelate pictures. It’s been the industry standard for decades for a reason—it’s packed with features that tackle everything from noise to pixelation.
With Photoshop, you can manually reduce pixelation, smooth out edges, increase resolution, and improve overall clarity. It uses advanced algorithms to help denoise, deblur, and depixelate images while keeping the original texture intact.
That said, Photoshop has a learning curve. It’s more complex than online tools, but it offers precision that pros often need. Here’s a basic way to unpixelate an image using Photoshop:
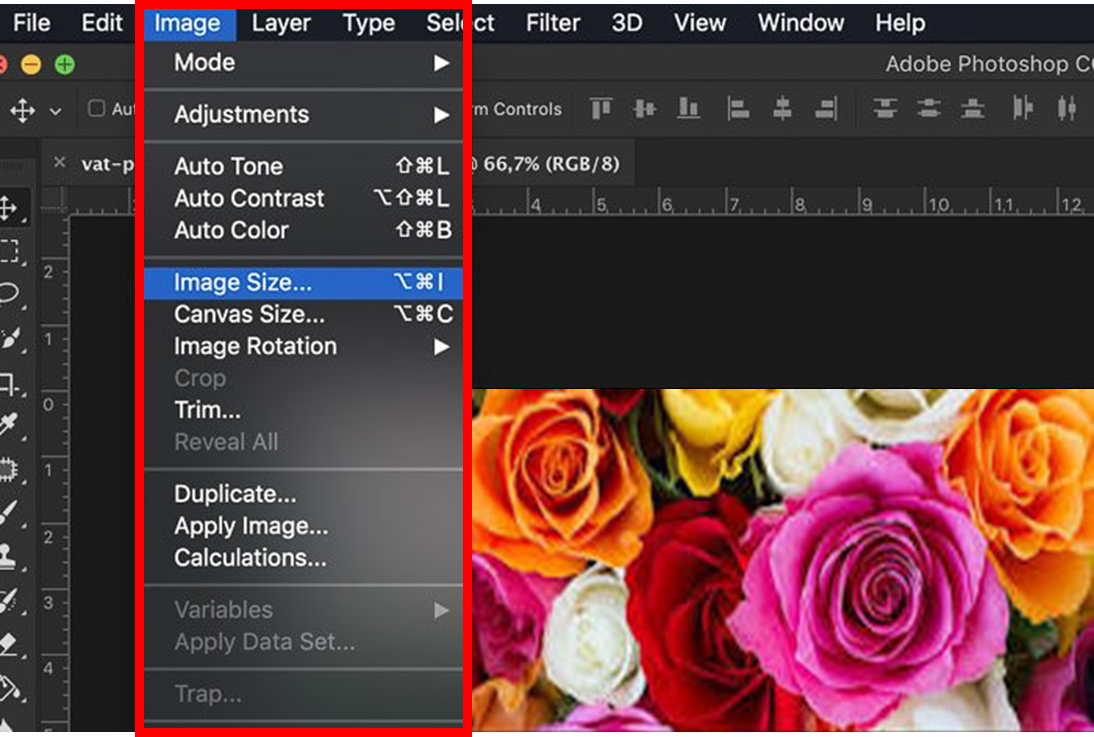
Start by opening your image in Photoshop. Go to the “Image” menu in the top toolbar and select “Image Size.” A dialog box will pop up where you can adjust the dimensions and resolution.
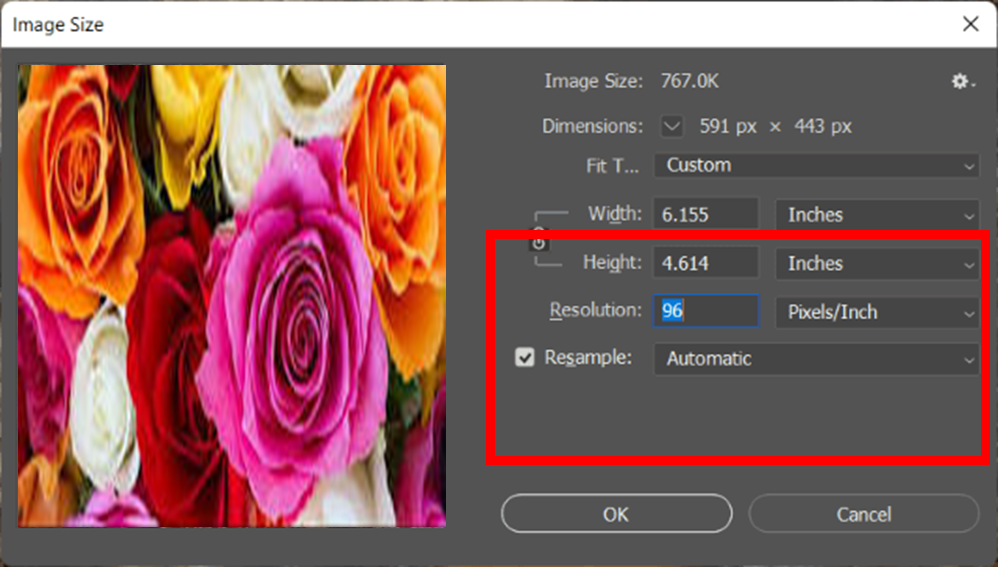
In the Image Size dialog, increase the resolution value. Make sure the “Resample” box is checked, and choose an interpolation method. For reducing pixelation, “Preserve Details 2.0” is usually your best bet—it’s designed to enlarge images with minimal quality loss.
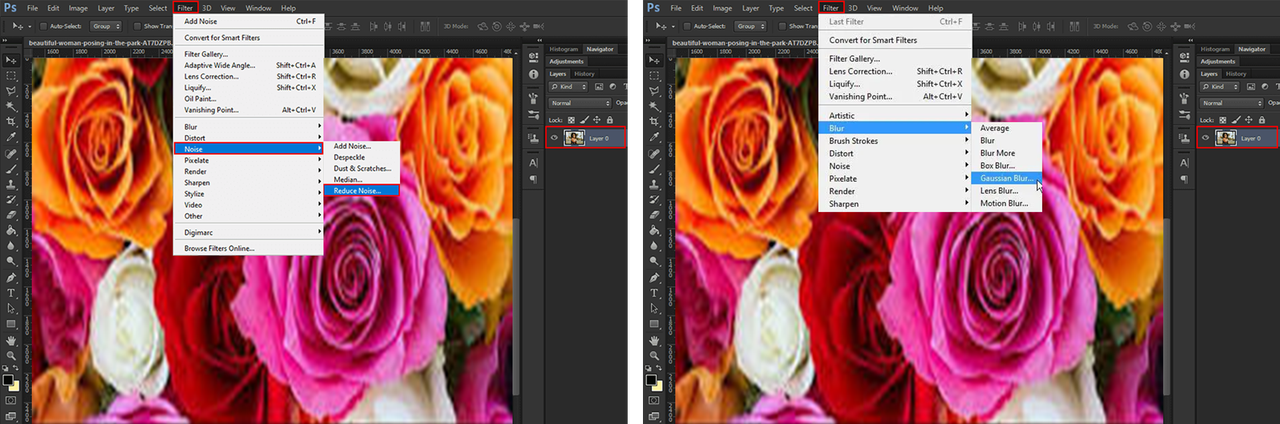
After resizing, apply a couple of filters to smooth things out. Go to “Filter” > “Noise” > “Despeckle” to reduce graininess. You can also try a light Gaussian Blur (“Filter” > “Blur” > “Gaussian Blur”) to soften pixel edges and blend them better.
Finally, sharpen the image to bring back definition. Go back to “Filter,” choose “Sharpen,” and then “Unsharp Mask.” Be careful not to over-sharpen—adjust the sliders until the image looks crisp but natural.

Photoshop is extremely powerful, but it’s not for everyone. It can be overwhelming if you’re new to editing, and it’s a paid software—which might not be worth it if you only need to unpixelate a photo once in a while.
For most people, free online tools like CapCut are more than enough. But if you’re a designer, photographer, or someone who loves having full control, learning how to unpixelate an image in Photoshop is a valuable skill.
How to Avoid Getting Pixelated Images in the First Place
Now that you know how to unpixelate pictures, let’s talk about how to avoid the problem altogether. A little prevention can save you a lot of time later!
Start by always shooting in high resolution. The more pixels your image has to begin with, the less likely it is to pixelate when you crop or enlarge it. Use the highest quality setting your camera or phone allows.
Choose the right file format. For images with text or sharp edges, use PNG—it doesn’t lose quality when saved. For logos and graphics, SVG is great because it’s vector-based and scales perfectly. For photos, JPEG is still a good option, but be mindful of compression levels.
When resizing images, use the right method. Most editing tools offer different algorithms. “Bicubic Smoother” is good for making images smaller, and “Bicubic Sharper” can work well for enlarging. Avoid “Nearest Neighbor”—it often makes images look blocky.
Always maintain the original aspect ratio when resizing. Stretching an image unevenly distorts the pixels and can make pixelation worse.
Go easy on the sharpening. A little sharpening can make details pop, but too much can create ugly halos and artifacts that look like pixelation.
Be careful with compression—especially when uploading to the web. Social media platforms and content management systems often compress images automatically. Where you can, choose higher quality upload settings or use plugins that optimize images without sacrificing clarity.
And one of the best tips of all: always keep a copy of the original, high-resolution image. Once an image is pixelated, you can’t fully get back what wasn’t there. Having the original means you can always start over.
By keeping these tips in mind, you’ll find you rarely need to unpixelate image files. Good habits beat fixing problems every time!
CapCut — Your all-in-one video & photo editing powerhouse! Experience AI auto-editing, realistic effects, a huge template library, and AI audio transformation. Easily create professional masterpieces and social media viral hits. Available on Desktop, Web, and Mobile App.
Wrapping Up
Knowing how to unpixelate pictures is super useful—whether you’re restoring old family photos, prepping images for print, or just want your Instagram feed to look its best.
We’ve walked through several ways to unpixelate image files, from beginner-friendly web tools like CapCut to pro-level editing in Photoshop. Each has its own strengths, so you can pick what works best for your skill level and needs.
For most folks, free online tools are the way to go. They’re simple, fast, and don’t require any technical know-how. You can unpixelate a photo in minutes, not hours.
We also talked about how to avoid pixelation from the get-go. Using the right formats, resolutions, and editing habits can help you prevent problems before they start. And always—always—keep your originals.
So, can you unpixelate a photo? Yes, absolutely! You might not recover every single detail, but you can make a huge difference. Even heavily pixelated images can look dramatically better with the right approach.
Why not grab a pixelated image and give it a try? You might be surprised what you can do.
Frequently Asked Questions
What’s the easiest tool to unpixelate pictures?
CapCut’s image upscaler is one of the easiest and most effective tools out there. It’s free, works right in your browser, and doesn’t require any special skills. Just upload, upscale, and download. Plus, it includes extra features like denoising and sharpening.
Can I make a pixelated picture clear for free?
Definitely! There are several free tools available online. CapCut’s image upscaler is a great example—it can enhance resolution, reduce noise, and remove pixels from photos without costing a thing.
Is it possible to completely remove pixelation?
It depends on how pixelated the image is. You can almost always make it better, but if the original detail is missing, AI can only do so much. In most cases, though, you can achieve a very noticeable improvement.
Do these tools work on all kinds of photos?
They work best on images with mild to moderate pixelation. Photos with clear subjects, faces, or text tend to improve more than overly complex or random patterns. But most images can be enhanced to some degree.
What’s the best way to avoid pixelation?
Shoot in high resolution, use the right file formats, avoid heavy compression, and always keep original files. A little attention when shooting and saving can prevent most pixelation issues down the line.
Some images in this article are sourced from CapCut.