TOOL HUNTER

TL;DR: If you are trying to figure out how do you turn off restrictions on iPhone, the process largely depends on your iOS version, found either in Screen Time or General settings. If you have forgotten the passcode, you may need to use your Apple ID for a reset or explore third-party tools to successfully disable restrictions on iPhone.
Ever found yourself wondering “how do you turn off restrictions on iPhone”? You’re certainly not alone. Many iPhone users hit this wall when they suddenly need full access to their device’s capabilities and content. Perhaps you set those limits ages ago and now need them gone, or maybe you acquired a second-hand device that came pre-configured with annoying parental controls. Rest assured, learning how to turn restrictions off on iPhone is generally a straightforward process, even if the exact steps vary slightly by iOS version.
Table of Contents
- Understanding iPhone Restrictions and Their Purpose
- The Evolution of iPhone Restrictions: iOS 12 and Beyond
- How to Turn Off Restrictions on iPhone: Step-by-Step Guide
- What to Do When You’ve Forgotten Your Restrictions Passcode
- Using iMyFone LockWiper to Bypass Forgotten Restrictions Passcode
- Additional Considerations When Disabling iPhone Restrictions
- Troubleshooting Common Issues When Turning Off Restrictions
- Preventive Measures for Future Restriction Management
- Comparing Restriction Management Across iPhone Models
- When to Seek Professional Help
- Conclusion
Understanding iPhone Restrictions and Their Purpose
What exactly are these restrictions we’re talking about? In Apple’s ecosystem, this functionality is now broadly managed under Screen Time settings, though older versions referred to them simply as ‘Restrictions’ or ‘Parental Controls.’ Essentially, it’s a robust, built-in system designed to help users manage and limit access to specific content, applications, and certain device functions.
For parents, this feature is invaluable. It creates a necessary digital safety net, allowing guardians to restrict access to mature content, prevent unauthorized in-app purchases, or enforce manageable screen time limits. When restrictions are activated, the device requires a specific passcode—the Screen Time passcode—to bypass or modify these settings. This ensures that only the authorized user (usually the parent or the device owner) can make changes.
The scope of these limitations is quite broad, covering several key device areas:
- App downloads and usage limits.
- Content filtering for music, movies, TV shows, and books (based on explicit ratings).
- Adjustments to privacy settings, including location services.
- Controls over in-app purchases and external downloads.
- Website restrictions and content filtering for Safari browsing.
However, situations change. Children grow up, device ownership transfers, or maybe you realize you set limits too strictly on your own phone. That’s when the burning question arises: how to turn restrictions off on iPhone?
The Evolution of iPhone Restrictions: iOS 12 and Beyond
The way you disable restrictions has evolved alongside iOS updates. Before iOS 12, these options were tucked away in a more generic location. With the introduction of iOS 12, Apple significantly overhauled the system, consolidating content and usage controls under the comprehensive umbrella of Screen Time.
This distinction is crucial because the path to removing limitations differs based on your operating system version. If you are running an older system, like iOS 11 or prior, you’ll look under Settings > General > Restrictions. For modern iPhones running iOS 12 or newer, you must venture into the Screen Time section to find Content & Privacy Restrictions.
The move to Screen Time was more than just a location change; it integrated usage tracking with content limitations, offering a more holistic approach to device management. This unified system gives a clearer picture of device engagement while keeping firm control over what can be accessed.
How to Turn Off Restrictions on iPhone: Step-by-Step Guide
To successfully answer how do you turn off restrictions on iPhone, you must first identify your iOS version. Follow the relevant guide below for disabling these controls.
Disabling Restrictions on iOS 12 and Newer Versions
If your iPhone is running iOS 12, iOS 13, iOS 14, iOS 15, or any subsequent version up to the latest, follow these steps to figure out how to turn restrictions off on iPhone:
Step 1: Unlock your phone and navigate to the Settings app.
Step 2: Scroll down a bit and tap on Screen Time. This is where all the modern control settings reside.
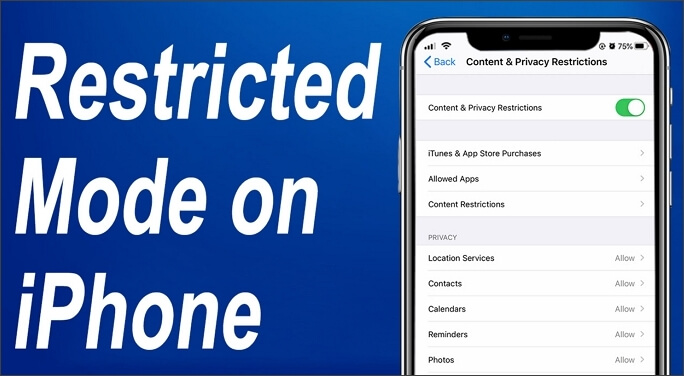
Step 3: Within the Screen Time menu, locate and select Content & Privacy Restrictions.
Step 4: You will be required to enter your specific Screen Time passcode here. This is the designated key to unlocking modifications.
Step 5: At the very top of the Content & Privacy Restrictions screen, you will see a toggle switch labeled Content & Privacy Restrictions. Simply tap this switch to turn it off. When successful, the switch will turn from green (On) to gray (Off). Congratulations! You now know how to turn restrictions off on iPhone for current operating systems.
Once that main toggle is disabled, all previously restricted features and content become instantly available again, bypassing the need for a passcode. If you ever wish to reinstate limits, you just retrace these steps and flip the toggle back on.
Removing Restrictions on iOS 11 and Earlier Versions
If your device is rocking an older operating system, like iOS 11 or earlier, the path to learn how to remove restrictions on iPhone is thankfully still very direct, though the location is different:
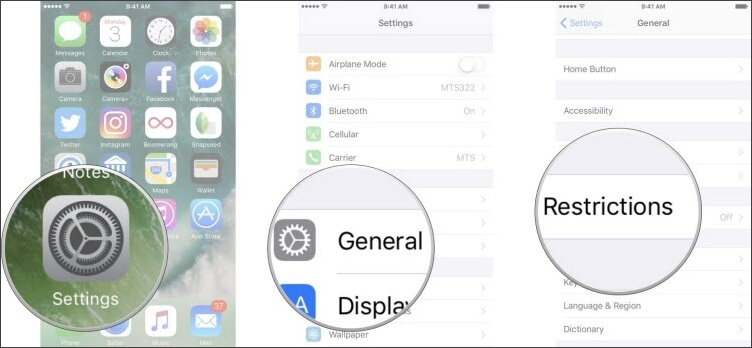
Step 1: Launch the Settings app.
Step 2: Scroll down and select General.
Step 3: Within the General menu, tap Restrictions.
Step 4: Tap Disable Restrictions located prominently near the top of the screen.
Step 5: You will be prompted to enter your restrictions passcode. Enter the correct four or six-digit code.
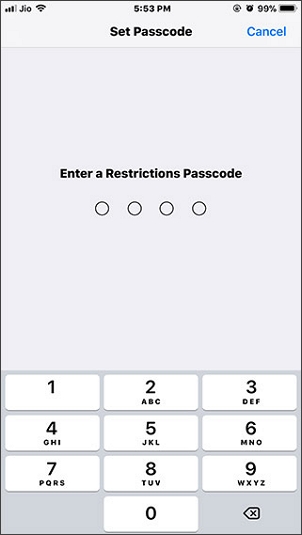
Step 6: Re-enter the passcode when prompted to confirm the deactivation, which acts as a final security check. This verification step is key to ensuring only authorized changes are made when you turn restrictions off on iPhone.

Following these steps successfully removes all content and privacy restrictions, restoring the iPhone/iPad to its unrestricted state. This knowledge on how to turn restrictions off on iPhone puts you back in complete command of your device’s functionality.
What to Do When You’ve Forgotten Your Restrictions Passcode
Inevitably, the biggest speed bump when users try to figure out how to turn restrictions off on iPhone is a forgotten passcode. Since this specific passcode is the gatekeeper for all restriction changes, forgetting it can feel like hitting a brick wall. Take a deep breath—there are recognized methods to help you move forward, even without the original code.
Attempt Common Passcodes
Before diving into deeper solutions, it’s always worth trying the usual suspects first. People often use predictable patterns for convenience:
- Common sequences like 1234, 0000, or 1111.
- Significant dates, such as family birthdays or anniversaries.
- Any previous device passcodes you might have used.
Use Your Apple ID to Reset Screen Time Passcode
For modern devices running iOS 13.4 and newer, Apple included a fantastic recovery option into the Screen Time feature itself. This is the go-to solution if you happen to remember your associated Apple ID credentials:
- Navigate to Settings → Screen Time.
- Select Change Screen Time Passcode.
- Choose the option Forgot Passcode?
- You will be asked to sign in using your Apple ID and password to authorize the reset.
This recovery option is dependent on having linked your Apple ID to the Screen Time setting when you initially set the restrictions.
iMyFone LockWiper.All-in-One iPhone Unlock Tool.Unlock all types of screen locks, including 4/6 digit passcode, Face ID, Touch ID.Remove iPhone Apple ID within a few minutes without password.Bypass MDM and remove MDM profile without needing credentials.Recover and reset Screen Time passcode without losing data.Support all iPhone models and iOS versions including iPhone 17 & iOS 26.Unlock the device only with user’s permission.
Check More Details | Download Now! | Check All Deals
Using iMyFone LockWiper to Bypass Forgotten Restrictions Passcode
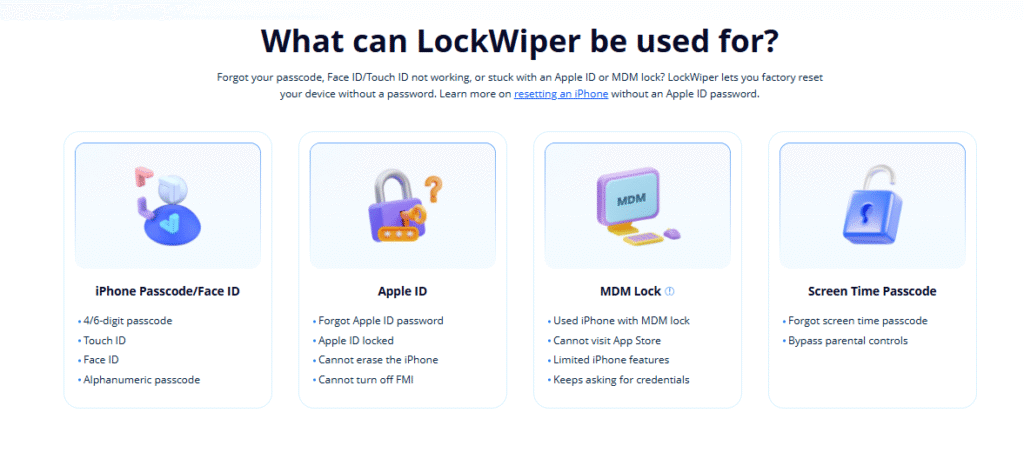
When the built-in recovery options fall short, or if you’re on an older iOS version where the Apple ID reset isn’t available, specialized unlocking software often becomes the most direct solution to learn how to remove restrictions on iPhone without the passcode. Tools like iMyFone LockWiper are specifically engineered to manage a variety of iPhone lock scenarios, including forgotten Screen Time and restrictions passcodes, often preserving your data in the process.
Here’s why many turn to iMyFone LockWiper when needing to know how to turn restrictions off on iPhone:
- It specifically aids in removing the Screen Time/restrictions passcode, often without erasing all your data.
- It boasts broad compatibility across virtually all iOS versions, even the very latest ones.
- The interface is generally designed to be user-friendly, requiring minimal technical know-how.
- It provides a high success rate for bypassing forgotten lock codes.
Step-by-Step Guide to Using LockWiper
If you opt for this route to disable restrictions, here’s the general flow:
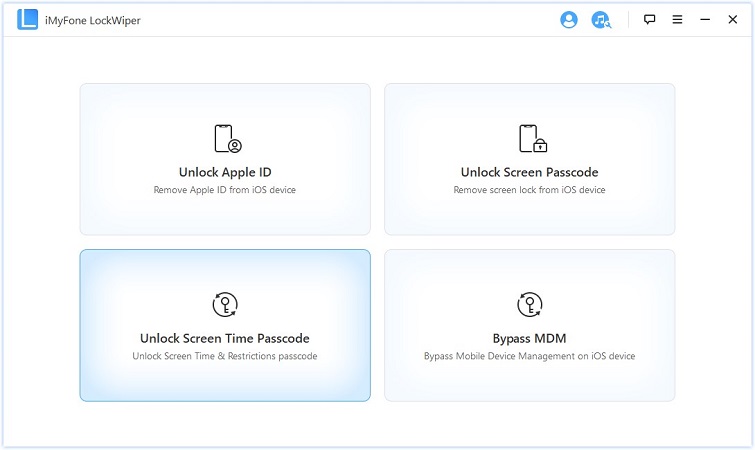
Step 1: Get iMyFone LockWiper installed on your computer (PC or Mac) and launch the application. From the main screen, select the option related to unlocking Screen Time Passcode.
Step 2: Establish a physical connection between your iPhone and the computer via a USB cable. Carefully follow the prompts displayed on the screen; this often involves putting your device into a specific recovery or DFU mode, which may differ slightly based on your iPhone’s model.
Step 3: For devices running iOS 12 and subsequent versions, LockWiper will typically proceed directly to attempt removing the restrictions passcode.
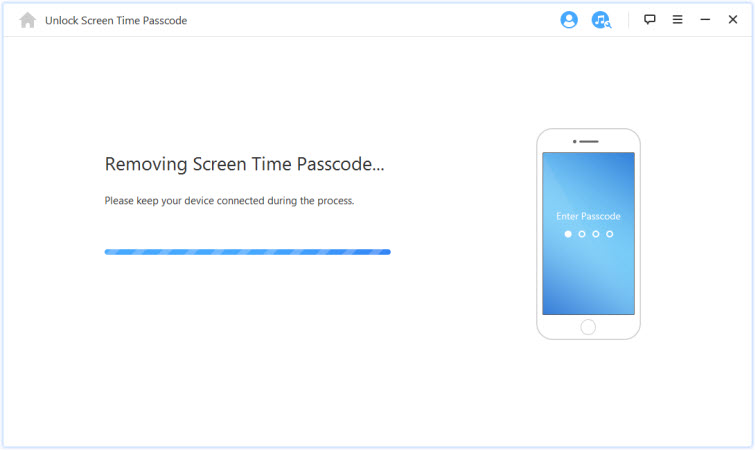
If your device is running an older system like iOS 11 or below, the software often focuses first on recovering the existing passcode, which you can then immediately use to manually disable restrictions through the standard Settings path.

Typically, this entire procedure is quite quick, usually taking just a few minutes. Once completed, you’ll have successfully learned how to turn restrictions off on iPhone even when the original passcode is lost to memory.
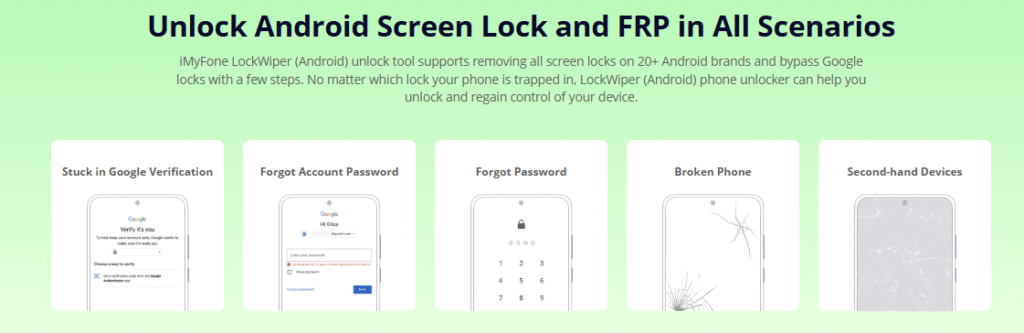
iMyFone LockWiper (Android).Android Unlocker forScreen Lock & FRP.Remove all types of Android screen passcodes: PIN, pattern, password, fingerprints, face ID.Bypass FRP & Google account verification for Samsung, Xiaomi, Redmi, and Oneplus without password.Unlock Samsung screen lock without losing data.Factory reset Android Phones & tablets in 5 minutes.Support 6,000+ Android phones, tablets including devices running on Android 15.0.iMyFone LockWiper (Android) is intended for use only with the informed consent of the device’s lawful owner.
Check More Details | Download Now! | Check All Deals
Additional Considerations When Disabling iPhone Restrictions
Before you jump in and follow the steps on how to turn restrictions off on iPhone, it’s wise to pause and consider the implications of suddenly removing all controls:
Data Accessibility
The moment restrictions are off, all previously blocked content becomes fair game. If these settings were in place to protect younger users, make sure this removal aligns with your current supervision strategy.
App Downloads and Purchases
Disabling these settings immediately allows users to download any application from the App Store and make unrestricted in-app purchases. If your device has payment methods linked, this newfound freedom could lead to unexpected expenses.
Privacy Settings
Certain restrictions can lock down privacy toggles, like location sharing. Lifting these restrictions means specific apps might gain broader access to your real-time location data.
Web Content
Content blockers and specific website exclusions are lifted. Browsing will become entirely open, so be conscious of what kind of web content the user might encounter next.
Troubleshooting Common Issues When Turning Off Restrictions
Even when you follow the perfect guide on how to turn restrictions off on iPhone, sometimes technical quirks pop up. Here are fixes for typical roadblocks:
Restrictions Option Grayed Out or Missing
If you go to the Settings menus but the Restrictions or Screen Time option seems unchangeable or vanishes altogether, it usually points to one of two things:
- The device is enrolled in a Mobile Device Management (MDM) profile (common for work or school phones), which rigidly controls these settings.
- You might be signed in under a subordinate user profile that lacks administrative privileges.
Restrictions Passcode Not Working
If the system keeps rejecting your input when you try how to turn restrictions off on iPhone:
- Be certain you are entering the Screen Time Passcode and not your general device unlock passcode (which are separate).
- Confirm that Caps Lock is not active, as passcodes are case-sensitive if alphanumeric.
- Enter the code deliberately, slowly, to avoid input errors.
Restrictions Automatically Re-enabling
If you successfully disabled them but they seem to pop back on later:
- Check if settings are being synced across an active Family Sharing group where another organizer has re-enabled them.
- An MDM profile might be sending a remote policy update, overriding your local changes.
- Rarely, a software glitch can cause settings to revert; a simple restart often clears this.
Preventive Measures for Future Restriction Management
To make future adjustments to how do you turn off restrictions on iPhone smoother, establishing good habits now is vital:
- Securely store your Screen Time passcode in a reliable password manager.
- Choose a passcode that is memorable for you but complex enough to deter guesswork.
- Make it a habit to periodically review your restriction settings, adjusting them as your needs (or your child’s age) evolve.
- Keep a physical or encrypted record of crucial passcodes in a safe, private location.
Comparing Restriction Management Across iPhone Models
While we focused heavily on the modern Screen Time approach needed for how to turn restrictions off on iPhone, older hardware might operate slightly differently:
iPhone 14/15/16 Series and Newer
These models operate on the latest versions of iOS, meaning restrictions are managed exclusively within the detailed Screen Time menu system.
Older iPhone Models
For devices that might still be using operating systems prior to iOS 12 (like iPhone 7 if not updated), you will find the older ‘Restrictions’ menu located directly under Settings > General.
iPad Considerations
It’s worth noting that the methodology for how to turn restrictions off on iPhone is virtually mirrored on iPads. The specific menu path you follow is dictated solely by the iOS version running on the device.
When to Seek Professional Help
In the vast majority of cases, one of the known methods above will resolve your quest for how do you turn off restrictions on iPhone. However, there are times when external assistance is prudent:
- If you have attempted the Apple ID reset and still cannot regain access.
- If you strongly suspect the device is under a persistent MDM lock imposed by a larger entity (like a corporation).
- If you are uncomfortable performing technical troubleshooting steps.
- If you suspect unauthorized access or believe the device might be compromised by malware.
For intricate issues that seem beyond simple settings toggles, reaching out to official Apple Support or an Authorized Service Provider can offer advanced diagnostic help.
Conclusion
Mastering how to turn restrictions off on iPhone is a fundamental piece of device management knowledge for any user. Whether you are currently using the newest iPhone or keeping an older model running smoothly, understanding the specific path—Screen Time versus General settings—based on your iOS version is the first key step. For those frustrating moments when the passcode is elusive, third-party utilities like iMyFone LockWiper present a viable option to regain access to your device’s features without resorting to a full data wipe, respecting the data you already have.
It is crucial to remember that restrictions are intentionally put into place for a reason, often for safety or organizational compliance. Before proceeding with disabling them, take a moment to consider if a full removal is truly necessary, or if fine-tuning specific limitations might better suit your immediate needs. Regardless of your final decision, you are now equipped with the procedural knowledge to confidently manage all levels of your iPhone’s restriction settings.
Some images in this article are sourced from iMyFone.