TOOL HUNTER

VLC Media Player stands as one of the most widely used free multimedia solutions globally. Many users are curious whether it’s possible to trim video with VLC, given its primary function as a player rather than an editor. This comprehensive guide will walk you through how to trim video in VLC on both Windows and macOS platforms, while also exploring the tool’s limitations and presenting a more powerful alternative for complex tasks.
Available across platforms like the Google Play Store, Apple App Store, and Microsoft Store, VLC requires minimal system resources. Beyond playing virtually any media format, it offers basic editing capabilities including video cutting and merging. Let’s explore how to trim a video with VLC step-by-step.
Convert DVDs to over 1000 video and audio file formats such as MP4, MKV, and MP3. A disk of about 2 hours can be converted in about 5 minutes, allowing you to enjoy it comfortably on each mobile device and home theater.
Get Windows Version | Get Mac Version | Use the Time-limited Promotional Campaign

How to Trim Video in VLC on Windows
It’s important to understand that VLC doesn’t feature a dedicated trim function like professional editors. Instead, you’ll utilize its recording capability to capture specific segments. Think of it as recording a live broadcast of your desired clip. Follow this process to trim video in VLC on Windows:
Step 1: Install the Latest VLC Version
Begin by visiting the official VideoLAN website to download and install the newest VLC release on your computer.
Step 2: Open Your Target Video
Launch VLC and open your video file using one of these methods:
- Drag-and-drop the file directly into VLC’s interface
- Navigate to Media > Open File from the menu bar
- Use the keyboard shortcut Ctrl+O to browse for your file
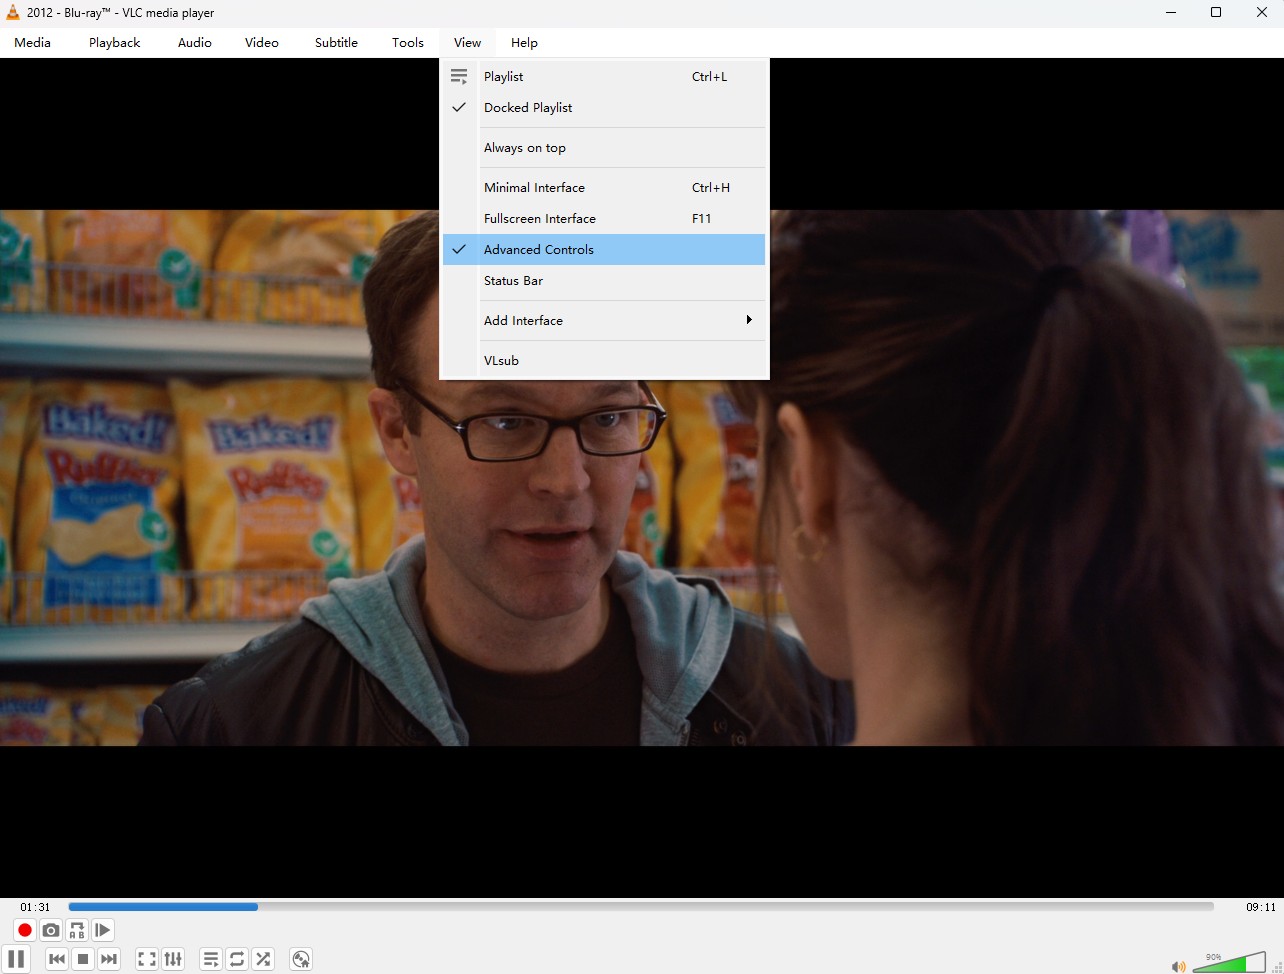
Step 3: Activate Advanced Controls
Access the recording feature by enabling Advanced Controls. Click View in the menu bar, then select Advanced Controls. Additional buttons will appear near the standard playback controls.
Step 4: Set Start Point and Begin Recording
Play your video and pause precisely where your trimmed segment should begin. Click the red circular Record button in the Advanced Controls panel. The button’s appearance typically changes to indicate active recording.
- Keyboard shortcut: Press Shift+R to initiate recording
Step 5: Designate End Point and Stop Recording
Resume playback until reaching your desired endpoint. Click the Record button again or press Shift+R (sometimes Ctrl+R) to stop. For frame-accurate precision, utilize the Frame by Frame button adjacent to playback controls.
Step 6: Locate Your Trimmed Video
VLC automatically saves recordings to your Videos folder. The default path is typically: C:\Users[YourUsername]\Videos. Find your newly created clip there.
How to Trim a Video Using VLC on Mac
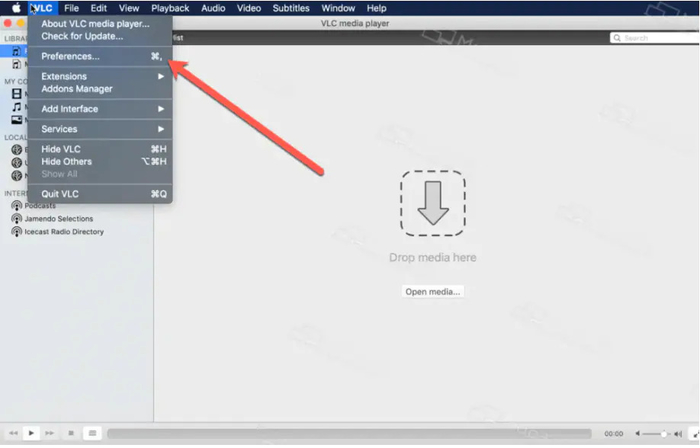
The process to trim a video using VLC differs slightly on macOS. Before starting, configure your save location: Open VLC > Preferences > Show All (bottom-left) > Input/Codecs > navigate to ‘Record directory or filename’ > select your preferred folder.
Step 1: Launch VLC Media Player
Open VLC on your Mac, ensuring you have the latest version installed.
Step 2: Import Your Video
Drag your video file from Finder directly onto the VLC window. The file will appear in the left playlist panel. Double-click it to begin playback.

Step 3: Initiate Trimming Process

- Pause playback at your desired starting point using the Spacebar
- Navigate to Playback > Record in the menu bar (a checkmark indicates activation)
- Resume playback with Spacebar
- Pause again precisely at your endpoint
- Deactivate recording via Playback > Record (checkmark disappears)
Step 4: Retrieve Your Trimmed File
Locate your saved clip in the designated output folder (default is usually your Movies directory).
Understanding VLC’s Video Trimming Limitations
While learning how to trim video with VLC is valuable, recognizing its constraints is equally important. The VLC media player trim video approach works for basic tasks but has significant limitations:
- Single-File Processing: You can only trim a video with VLC individually. Batch processing multiple files isn’t possible.
- Precision Challenges: Removing small, specific segments from a video’s middle section proves difficult with the recording method.
- No Splitting Functionality: VLC doesn’t support dividing long videos into smaller segments.
- Endpoint Trimming Only: The technique essentially removes unwanted beginning and ending portions without supporting complex internal edits.
These trim video VLC player limitations demonstrate that while VLC media player trim video capabilities offer a free solution for straightforward cuts, they remain quite basic. For advanced needs, dedicated software becomes necessary.
Enhanced Video Trimming Solutions
While trimming a video with VLC serves for quick edits, its recording-based approach feels restrictive. For direct trimming control, superior quality, and expanded features—particularly with DVDs—DVDFab DVD Ripper presents a compelling alternative.
Convert DVDs to over 1000 video and audio file formats such as MP4, MKV, and MP3. A disk of about 2 hours can be converted in about 5 minutes, allowing you to enjoy it comfortably on each mobile device and home theater.
Get Windows Version | Get Mac Version | Use the Time-limited Promotional Campaign
DVDFab DVD Ripper extends beyond DVD handling to support various video files. It efficiently processes both homemade and commercial DVDs (including protected ones), converting them to popular formats like MP4, MKV, and MOV. Its integrated editor enables trimming, cropping, rotation, watermarking, color adjustment, and more—all while maintaining high output quality.
Advantages of DVDFab DVD Ripper:
- Effortlessly removes DVD copy protection
- Preserves exceptional video/audio quality for home theater viewing
- Compresses files efficiently without noticeable quality loss
- Supports conversion to 1000+ video/audio formats
- Accelerates processing up to 50x faster using GPU hardware
- Allows simultaneous ripping and editing workflows
Streamlined Video Trimming with DVDFab DVD Ripper
Step 1: Install and Launch the Application After downloading DVDFab DVD Ripper, install it on your Windows PC or Mac and launch the program.

Step 2: Select Ripper Module and Import Media Navigate to the top menu and select the Ripper module. Click the prominent ‘+’ button or drag your video file, DVD folder, or ISO directly into the interface.
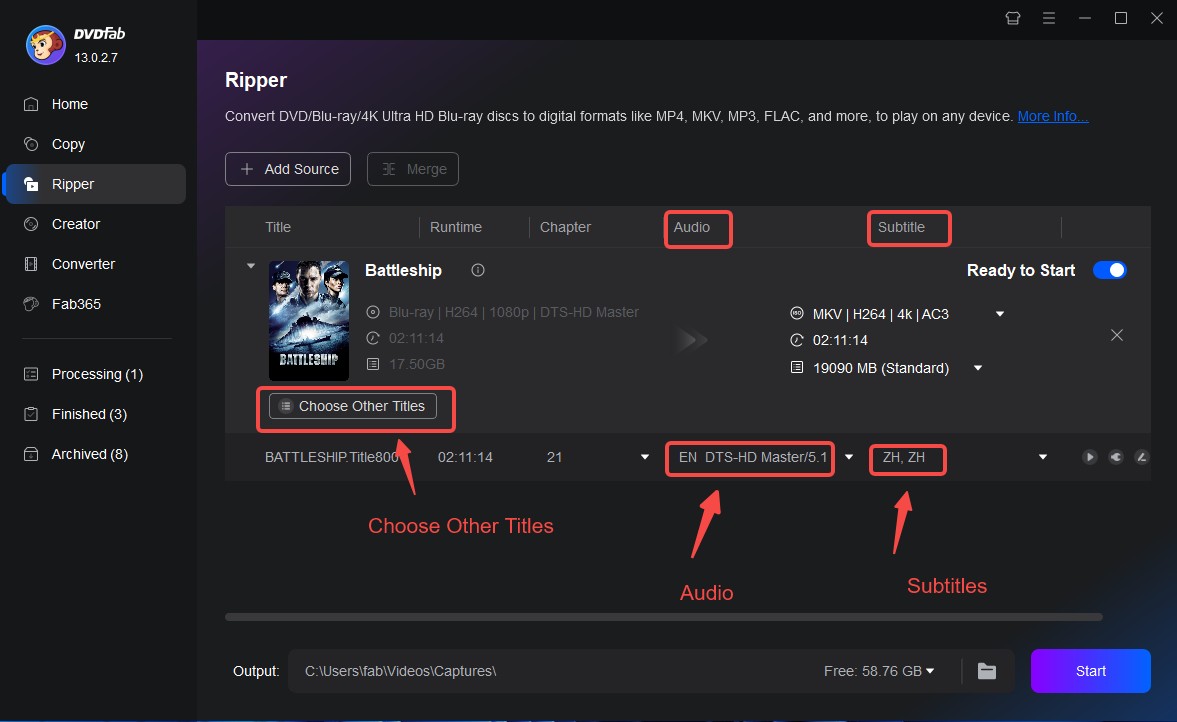
Step 3: Choose Output Format Access the Profile Switcher panel on the right. Browse the extensive format list (MP4, MKV, AVI) and device presets (iPhone, Android, etc.). Select your preferred output format—MP4 is recommended for broad compatibility.
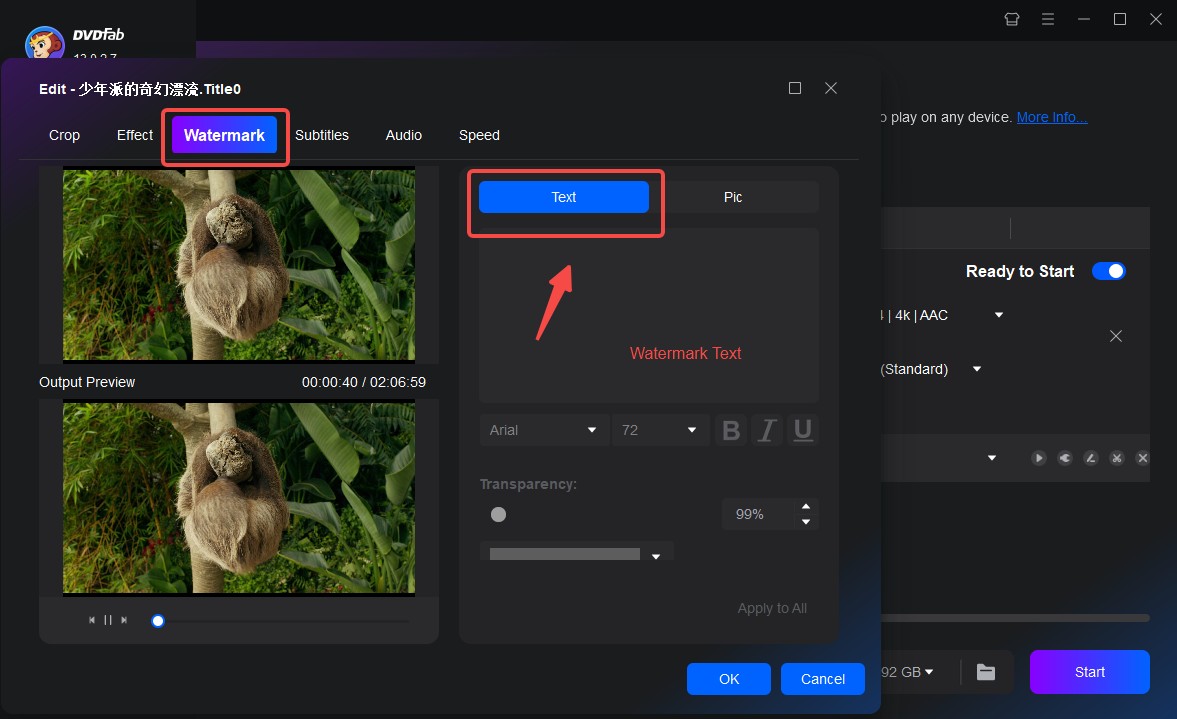
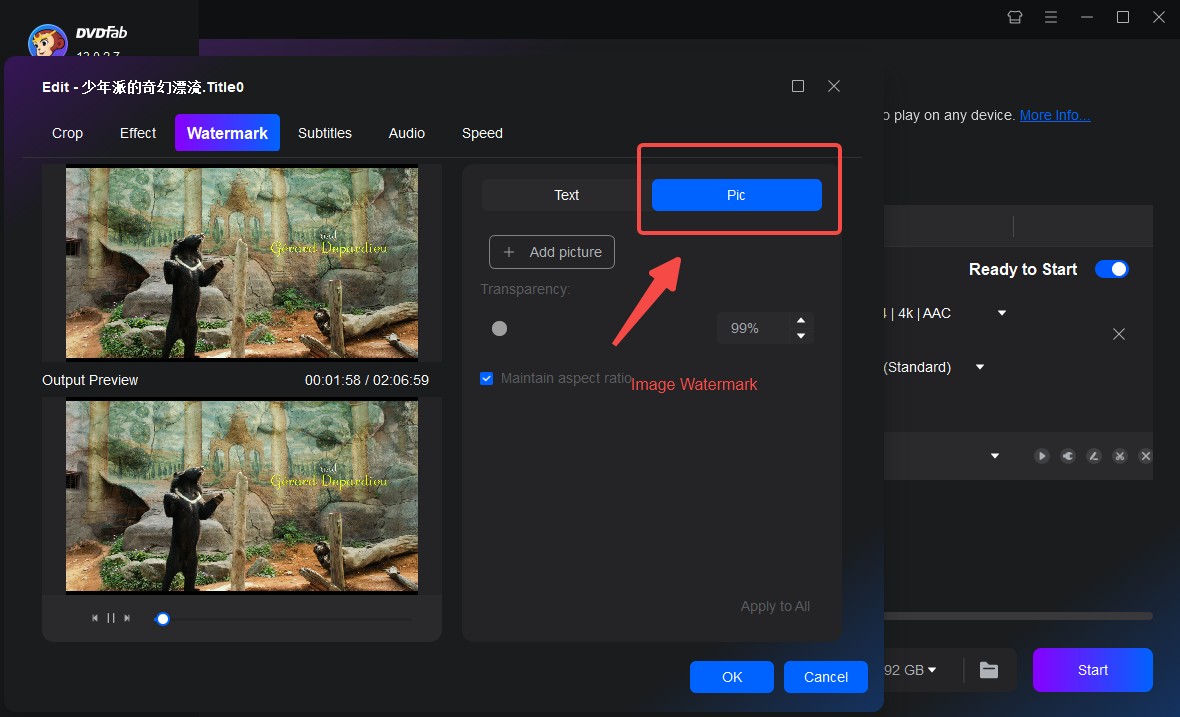
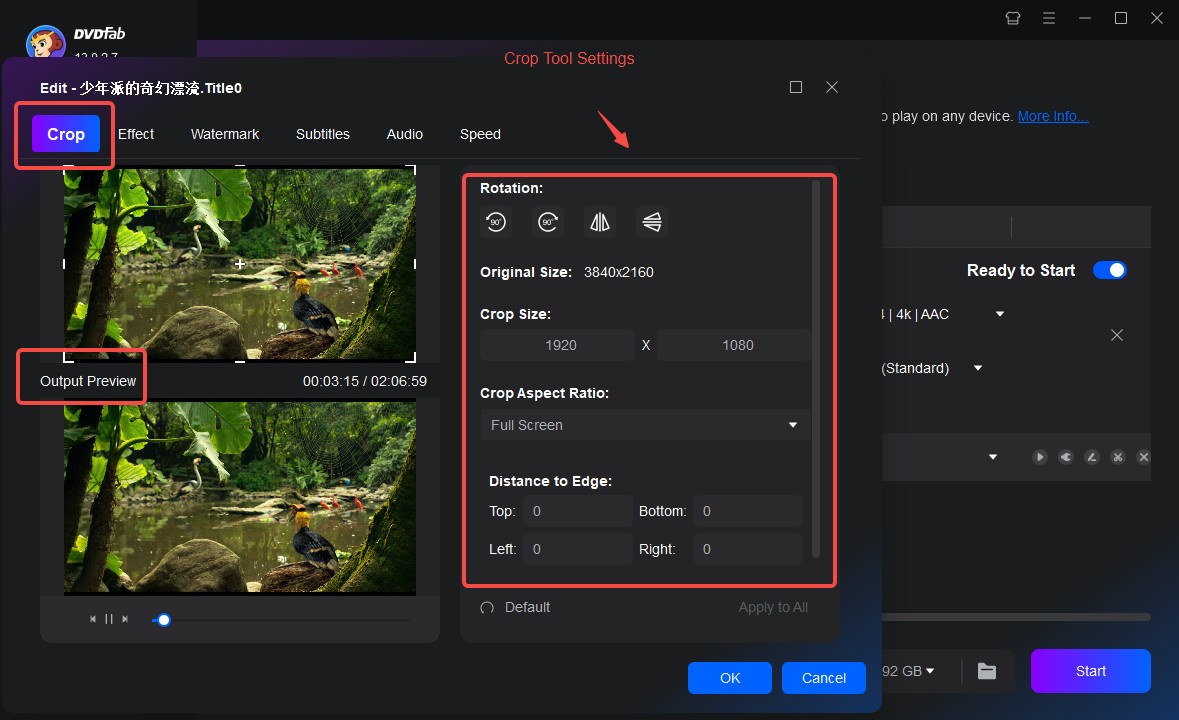
Step 4: Access Editor and Trim Your Video Click the Advanced Settings button (often symbolized by a gear or pencil) to open the comprehensive editor. Locate the Trim tool (typically scissors icon).
- Trimming Functionality: Click Trim Tool to activate a blue selection bar on the timeline. Adjust the start and end markers to define your desired segment. For multiple segments, move the cursor outside the current selection and click Trim Tool again to add additional sections.
- Additional Editing Features: While editing, explore these tools:
- Text Watermarks: Position customizable text overlays with font, size, color, and transparency controls.
- Image Watermarks: Add logos or images with adjustable size, placement, and opacity.
- Cropping Tool: Eliminate black bars or focus on specific areas by dragging the preview edges.
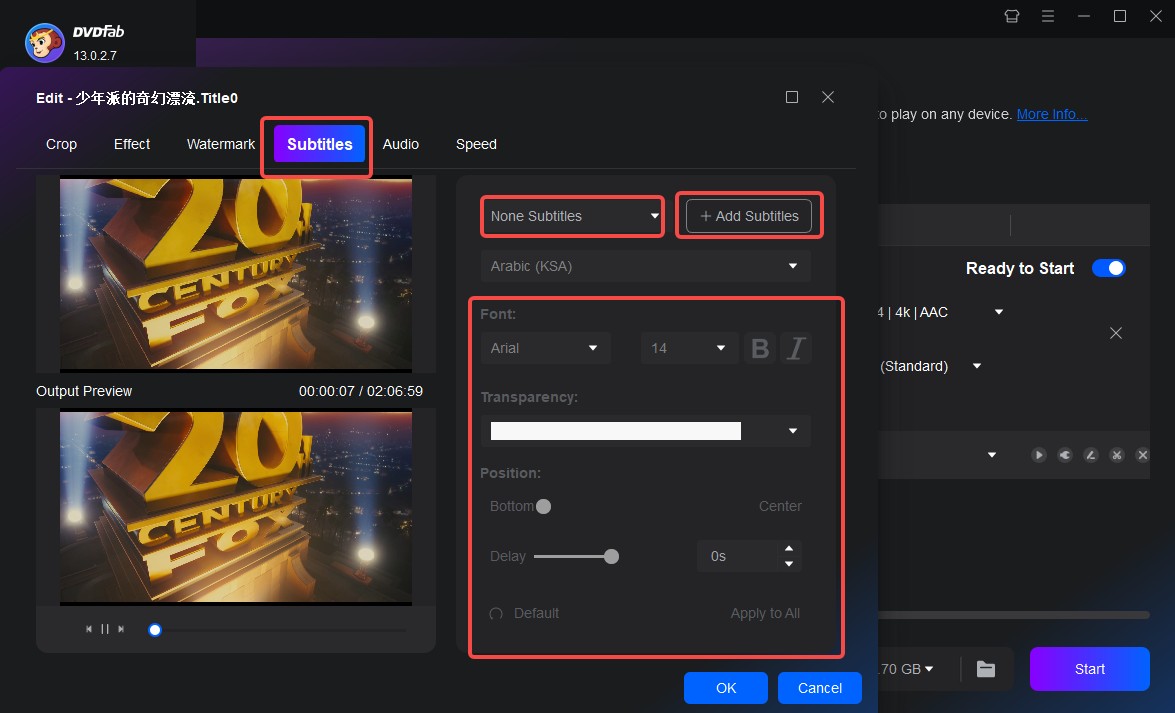
- Subtitle Management: Add or customize subtitles including appearance settings.
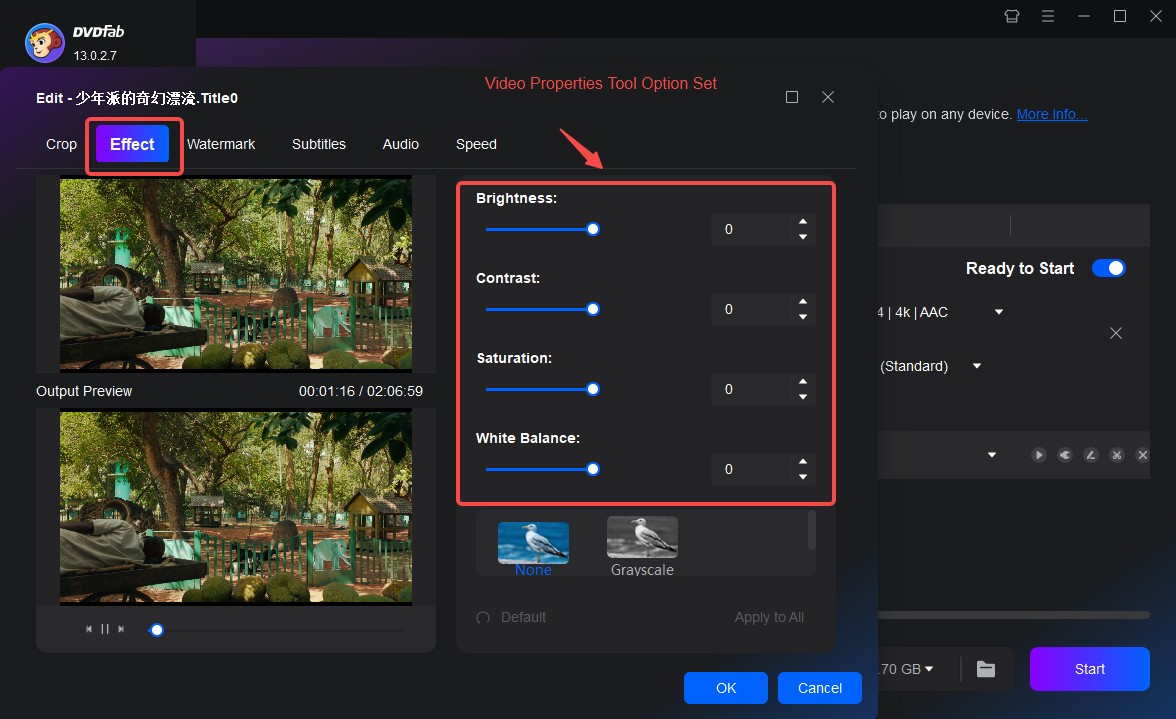
- Video Adjustments: Modify brightness, contrast, saturation, and correct orientation issues.
- Text Watermarks: Position customizable text overlays with font, size, color, and transparency controls.
Step 5: Configure Output and Begin Processing Return to the main interface. Near the bottom, locate the output destination button. Select your preferred save location (e.g., specific folder, desktop, or direct device transfer). Click Start to initiate the process—DVDFab handles decryption, applies your edits, converts, and saves the final file.
Convert DVDs to over 1000 video and audio file formats such as MP4, MKV, and MP3. A disk of about 2 hours can be converted in about 5 minutes, allowing you to enjoy it comfortably on each mobile device and home theater.
Get Windows Version | Get Mac Version | Use the Time-limited Promotional Campaign
Frequently Asked Questions About VLC Trimming
Can VLC media player perform advanced video editing tasks?
No. While capable of basic operations like cropping and filter application, VLC lacks professional editing features such as effects libraries, granular audio/video controls, or transitions. It functions primarily as a media player with supplementary editing capabilities.
Can I trim video using VLC on a mobile device?
No, mobile VLC applications (Android/iOS) focus exclusively on playback and omit the desktop version’s trimming functionality. Mobile video trimming requires dedicated editing apps.
Final Recommendations
Trimming video clips to remove unnecessary segments is a common need. Mastering how to trim video with VLC provides a cost-free method for accomplishing this on computers. The VLC media player trim video approach via recording suffices for quick edits, and you can certainly share these trimmed results.
However, VLC’s limitations in precision, DVD handling, and advanced editing tools are significant. For enhanced efficiency, superior quality, and broader control—especially with DVD content—DVDFab DVD Ripper offers a robust solution. It streamlines trimming and comprehensive editing into a single, efficient workflow, making it an excellent choice for more demanding projects.
Some images courtesy of DVDFab