TOOL HUNTER

Knowing how to stop recording in PowerPoint is just as important as knowing how to start one. We’ve all been there—you’re in the middle of a presentation, things are going great, and then you realize you should have ended the recording a minute ago. Or maybe something unexpected happens on screen that you don’t want in your final video. That’s when you need to know exactly how to stop ppt screen recording quickly and efficiently.
Stopping your PowerPoint recording at the right moment ensures your final video isn’t longer than necessary. It keeps your presentation clean and professional, without any awkward pauses or off-topic content at the end. Whether you’re creating training materials, recording a lecture, or making a business presentation, controlling when your recording ends is crucial for quality results.
Table of Contents
- Understanding PowerPoint’s Screen Recording Feature
- How to Stop Screen Recording in PowerPoint Step by Step
- Common Issues When Trying to Stop PowerPoint Recording
- Alternative Method: Using Filme for Screen Recording
- How to Stop Recording Using Filme
- Comparing PowerPoint and Filme for Screen Recording
- Advanced Tips for Professional Screen Recordings
- Troubleshooting Recording Problems
- Creating Engaging Presentations with Screen Recordings
- Best Practices for Screen Recording Workflow
- Conclusion
Understanding PowerPoint’s Screen Recording Feature
Before we dive into how to stop recording in PowerPoint, it’s helpful to understand what you’re working with. PowerPoint’s built-in screen recording tool lets you capture your screen activity directly within your presentation. This is super convenient because you don’t need to switch between different programs or learn complicated new software.
The recording feature captures everything happening on your selected screen area, including mouse movements, clicks, and by default, any audio from your microphone. This makes it perfect for creating demonstrations, tutorials, or walking through processes step-by-step. The recording becomes a video object that you can place right on your slide, resize, and format just like any other media in PowerPoint.
One thing to remember is that PowerPoint isn’t primarily designed as screen recording software—it’s a presentation tool first. This means while the recording feature is handy and integrated, it might not have all the advanced options you’d find in dedicated screen recording programs. But for quick, simple recordings directly within your presentation, it gets the job done well.
How to Stop Screen Recording in PowerPoint Step by Step
So you’ve started recording and now need to stop. Here’s exactly how to stop screen recording PowerPoint using both on-screen controls and keyboard shortcuts.
When you begin recording, a small control panel appears on your screen. This is your command center for managing the recording. To temporarily pause your recording, look for the pause button on this panel—it’s usually represented by two vertical lines. Clicking this will halt the recording without ending it completely. This is perfect if you need to take a quick break, gather your thoughts, or deal with an interruption.
When you’re ready to stop recording entirely, look for the square stop button. This is typically red or prominently colored to make it easy to identify. Clicking this button will end your recording session and save the video to your current PowerPoint slide.
But what if the control panel isn’t visible or you prefer using keyboard shortcuts? Microsoft has you covered with some handy key combinations:
- Press Win+Shift+R to pause and resume your recording
- Use Win+Shift+Q to stop recording completely
These shortcuts are especially useful if the recording controls are covering something important on your screen, or if you want to stop recording without having to search for the right button with your mouse.
After you stop recording, PowerPoint processes the video and places it on your current slide. You can then move it, resize it, or apply formatting just like any other video in your presentation. The recording includes both visual and audio elements (unless you disabled audio before starting).
Remember that once you stop recording, you can’t add to that particular recording session. If you need to capture more content, you’ll have to start a new recording. That’s why it’s important to make sure you’ve captured everything you need before hitting that stop button.
Common Issues When Trying to Stop PowerPoint Recording
Sometimes things don’t go as smoothly as planned. You might click the stop button and nothing happens, or the recording continues even though you thought you ended it. This can be frustrating, especially if you’re trying to stop recording PowerPoint quickly.
One common issue is accidentally clicking outside the recording control panel, which can make the controls disappear. If this happens, don’t panic—just move your mouse around and the controls should reappear. If they don’t, try pressing the Windows key or moving your mouse to the edge of the screen where the controls might be hiding.
Another problem occurs when the stop command doesn’t register properly. This can happen if your computer is running slowly or if there are too many programs open simultaneously. If clicking the stop button doesn’t work, try using the keyboard shortcut Win+Shift+Q instead. Sometimes the keyboard command is more reliable than mouse clicks.
There’s also the possibility that PowerPoint has frozen or crashed during recording. If none of the controls are responding and keyboard shortcuts aren’t working, you may need to use Task Manager (Ctrl+Shift+Esc) to force close PowerPoint. Unfortunately, this usually means you’ll lose your recording, but it’s sometimes the only option when the program becomes unresponsive.
To avoid these issues, make sure you have enough free memory and processing power before starting your recording. Close unnecessary programs and browser tabs, and save your PowerPoint presentation right before you begin recording. This way, if anything goes wrong, you won’t lose too much work.
Alternative Method: Using Filme for Screen Recording
While PowerPoint’s built-in recorder is convenient, sometimes you need more control and flexibility. That’s where dedicated screen recording software like iMyFone Filme comes in handy. It’s designed specifically for capturing and editing screen content, which means it often works more smoothly than trying to stop recording in PowerPoint.
Filme – Best Video Editor for Beginners.Explore Your Creativity, Limitless

Check More Details | Download Now! | Check All Deals
Filme makes the process of starting and stopping recordings much more straightforward. The controls are always clearly visible and responsive, so you don’t have to worry about them disappearing or not working when you need them most. Plus, you get the added benefit of being able to edit your recording right within the same program.
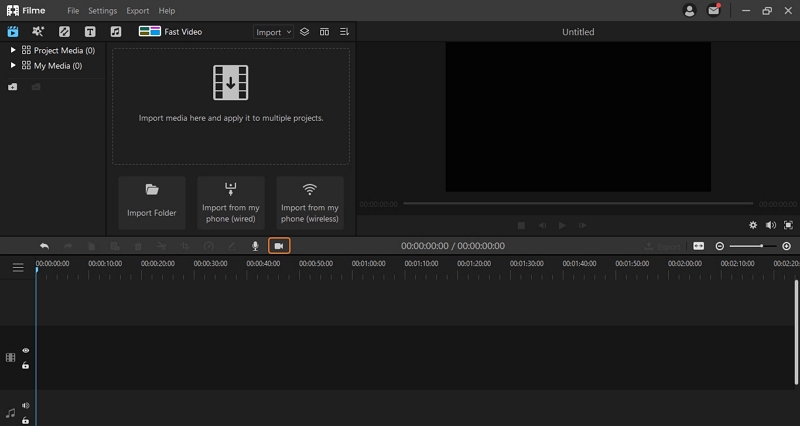
The process with Filme is simple: you select the area of your screen you want to record, press the record button, and when you’re done, you press stop. The recording then appears in your timeline where you can trim it, add effects, or make other edits before exporting it as a finished video that you can then import into your PowerPoint presentation.
One of the biggest advantages of using Filme instead of PowerPoint’s built-in recorder is that you can easily re-record sections if you make a mistake. With PowerPoint, if you mess up a recording, you have to delete it and start over completely. With Filme, you can just record the specific part you need and edit it into your existing video.
How to Stop Recording Using Filme
Stopping a recording in Filme is incredibly straightforward. The controls are designed to be intuitive and always accessible, so you never have to wonder how to stop your screen recording.
When you’re ready to begin recording with Filme, you’ll first set up your recording parameters. You can choose to record your entire screen, a specific window, or a custom region. You can also decide whether to include system audio, microphone audio, or both. Once you’ve got everything configured, clicking the record button starts the capture.
During recording, Filme displays a simple control panel that stays visible but unobtrusive. This panel includes both a pause button and a stop button, so you have full control over your recording session. If you need to take a break or collect your thoughts, just hit pause. When you’re ready to continue, hit resume. And when you’ve captured everything you need, hit stop.
After you stop the recording, Filme doesn’t just save the file and call it done. Instead, it places your recording directly into the editing timeline where you can immediately start working with it. This seamless transition from recording to editing is one of Filme’s biggest strengths.
If you realize after stopping that you forgot to record something, you can easily add additional recordings to the same project. This modular approach to screen recording is much more flexible than PowerPoint’s all-or-nothing recording sessions.
Comparing PowerPoint and Filme for Screen Recording
When deciding between using PowerPoint’s built-in recorder or a dedicated tool like Filme, it helps to understand the strengths and limitations of each approach.
PowerPoint’s screen recording is fantastic for quick, simple captures that you want to include directly in your presentation. Since it’s built right into the program you’re already using, there’s no need to switch between applications or learn new software. The recording becomes part of your slide, so you don’t have to worry about managing separate video files or linking to external content.
However, PowerPoint’s recording capabilities are somewhat basic. You don’t get advanced features like webcam picture-in-picture, detailed audio controls, or the ability to easily edit your recording after the fact. If you make a mistake, you typically have to re-record the entire segment. Learning how to stop recording in PowerPoint is just one part of the process—dealing with the limitations is another.
Filme, on the other hand, is designed specifically for screen recording and video editing. This means you get more control over every aspect of the process. You can easily trim out mistakes, combine multiple clips, add annotations or effects, and fine-tune your audio. The process of how to stop screen recording PowerPoint replacements like Filme is just the beginning—you then have a full suite of editing tools at your disposal.
Another key difference is reliability. Because screen recording is Filme’s primary function, it tends to be more stable and consistent than PowerPoint’s added feature. You’re less likely to encounter issues with controls disappearing or commands not registering when you need to stop recording.
Filme – Best Video Editor for Beginners.Explore Your Creativity, Limitless
Check More Details | Download Now! | Check All Deals
Advanced Tips for Professional Screen Recordings
Whether you’re using PowerPoint’s built-in tool or a dedicated program like Filme, there are several techniques that can help you create more professional-looking screen recordings.
First, always plan your recording session in advance. Know exactly what you want to demonstrate and have any necessary applications or files open and ready. This minimizes awkward pauses and reduces the need to stop and start multiple times. When you know your material well, you’re less likely to make mistakes that force you to stop recording PowerPoint sessions prematurely.
Second, consider your audio quality. Poor audio can ruin an otherwise great screen recording. If you’re using a microphone, test it beforehand to make sure your voice is clear and there’s no background noise. In PowerPoint, you can disable audio recording if you don’t need it, which might be preferable for some types of demonstrations.
Third, be mindful of your screen resolution and recording area. Recording at very high resolutions can create large files that are difficult to work with. Similarly, recording your entire screen when you only need a small portion wastes resources and may capture distracting elements. Both PowerPoint and Filme allow you to select specific regions to record, so use this feature to focus on what’s important.
Finally, practice makes perfect. The more screen recordings you create, the more comfortable you’ll become with the process of starting, pausing, and stopping your recordings smoothly. Don’t be discouraged if your first few attempts aren’t perfect—even experienced creators often need multiple takes to get things right.
Troubleshooting Recording Problems
Even when you know exactly how to stop recording in PowerPoint, sometimes technical issues can interfere. Here are some common problems and how to solve them.
If your recording controls disappear during a PowerPoint recording, try moving your mouse to the top center of the screen where they typically hide. If that doesn’t work, pressing the Windows key sometimes brings them back. As a last resort, remember the keyboard shortcuts—Win+Shift+R to pause and Win+Shift+Q to stop—since these will work even if the on-screen controls aren’t visible.
If PowerPoint becomes unresponsive during recording, you might need to use Task Manager to force quit the program. Press Ctrl+Shift+Esc to open Task Manager, find Microsoft PowerPoint in the list of applications, and select “End Task.” Unfortunately, this usually means you’ll lose your current recording, but it’s better than having your entire system locked up.
For performance issues like laggy recording or dropped frames, try closing other applications to free up system resources. Also consider reducing the recording quality in PowerPoint’s settings—sometimes a slightly lower quality recording is better than a stuttering high-quality one.
If you’re having trouble with audio sync—where the audio doesn’t match up with the video—this is often a processing power issue. Again, closing other programs can help. With Filme, you can manually adjust audio sync in the editing timeline, which is much easier than trying to fix it in PowerPoint.
Creating Engaging Presentations with Screen Recordings
Screen recordings can transform ordinary presentations into engaging, dynamic experiences. Instead of just describing a process or software feature, you can actually show it in action. This is especially valuable for training materials, software demonstrations, or any situation where visual examples enhance understanding.
When incorporating screen recordings into your PowerPoint presentations, think about how they fit into the overall flow. A recording that’s too long might cause your audience to lose interest, while one that’s too short might not adequately demonstrate the point you’re trying to make. Typically, keeping recordings between 30 seconds and 2 minutes works well for maintaining engagement.
Consider using screen recordings to break up slides of text and static images. Our brains process visual information much faster than text, so a well-placed recording can reinforce your message more effectively than paragraphs of explanation. Just make sure each recording has a clear purpose and directly supports the content on the slide.
If you’re using Filme to create your recordings, you can add professional touches like introductory titles, transition effects, or highlight effects to draw attention to specific areas of the screen. These small enhancements can make your recordings look more polished and help guide your viewers’ attention to what’s most important.
Remember that you don’t always need to show every single step of a process. Sometimes it’s better to record the key parts and verbally explain the simpler steps. This keeps your recordings concise and focused on the most important information.
Best Practices for Screen Recording Workflow
Developing a consistent workflow for your screen recordings can save you time and frustration. Here’s a process that works well whether you’re using PowerPoint or dedicated recording software.
Start by outlining what you want to record. Write down the key points you need to cover and the steps you’ll demonstrate. This helps you stay focused and avoid rambling during your recording. Knowing exactly what you want to say and show makes it easier to deliver a smooth, professional recording.
Prepare your recording environment before you begin. Close unnecessary applications and browser tabs to reduce distractions and improve performance. If you’re recording audio, do a quick test to check your microphone levels and eliminate background noise. In PowerPoint, make sure you’ve selected the correct screen area to record.
When you’re ready, start recording and work through your planned content. If you make a minor mistake, it’s often better to pause briefly and continue rather than stopping completely. Small flubs can usually be edited out later, whereas constantly stopping and restarting can disrupt your flow and create more work.
Once you’ve finished recording, review your work before moving on. In PowerPoint, you can play back the recording right on the slide to make sure it captured what you intended. In Filme, you can scrub through the timeline to check for issues. If something needs to be re-recorded, it’s better to discover this immediately rather than after you’ve moved on to other work.
Filme – Best Video Editor for Beginners.Explore Your Creativity, Limitless
Check More Details | Download Now! | Check All Deals
Finally, save your work frequently. There’s nothing worse than spending time on a perfect recording only to lose it to a crash or power outage. Both PowerPoint and Filme have auto-save features, but it’s still good practice to manually save your progress regularly.
Conclusion
Knowing how to stop screen recording PowerPoint sessions is a fundamental skill for creating effective presentations. Whether you’re using PowerPoint’s built-in tool or a dedicated program like Filme, understanding the stopping process ensures you can capture exactly what you need without unnecessary content at the beginning or end.
PowerPoint’s screen recording feature is convenient for quick captures directly within your presentation, while Filme offers more control and editing capabilities for professional results. Both have their place in a content creator’s toolkit, and often the best approach is to use the tool that best fits your specific needs for each project.
Remember that practice improves both your recording technique and your comfort with the software. The more screen recordings you create, the more natural the process will feel—from setting up your recording to knowing precisely when and how to stop recording in PowerPoint or whatever tool you’re using.
With the information in this guide, you should feel confident tackling any screen recording project, whether it’s a simple software demonstration or a complex multi-part tutorial. So fire up your recording software of choice and start capturing—you’ve got this!
Some images courtesy of iMyFone