TOOL HUNTER

Ever wondered how to shorten a video on PC without losing quality or spending hours learning complicated software? Whether you’re a student making class presentations, a content creator editing for social media, or just someone who wants to share better videos with friends, learning how to clip a video on PC is an essential skill in today’s digital world.
There are so many reasons why you might need to shorten your videos. Maybe you recorded a long lecture but only need a specific segment. Perhaps you want to remove awkward pauses or mistakes from your recording. Or you might need to fit your video within time limits for platforms like Instagram or TikTok. Whatever your reason, knowing how to clip movies in windows can save you time and make your content much more engaging.
The best part? You don’t need expensive software or advanced technical skills. In this comprehensive guide, we’ll show you exactly how to shorten videos on laptop and desktop computers using various methods. We’ll cover everything from built-in Windows tools to free third-party software, ensuring you can find the method that works best for your needs. Plus, we’ll answer that burning question: can you clip a video on windows without compromising quality?
Let’s dive into the wonderful world of video editing and discover how easy it can be to create shorter, more impactful videos!
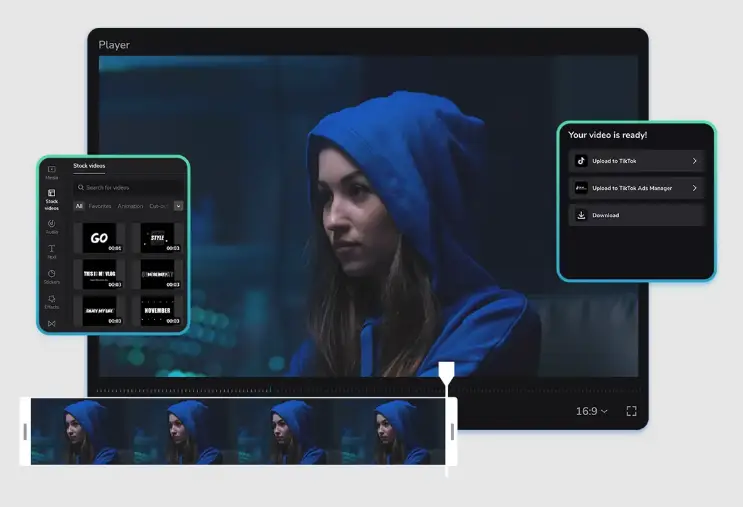
Table of Contents
- Why Learning How to Shorten Videos on PC Matters
- How to Shorten Videos Using Microsoft Photos App
- How to Shorten Videos on Laptop with CapCut Desktop Editor
- How to Clip Movies in Windows with VLC Media Player
- Maintaining Video Quality When Shortening Clips
- Professional Tips for Shortening Videos Effectively
Why Learning How to Shorten Videos on PC Matters
Understanding how to shorten a video on PC isn’t just about making files smaller—it’s about creating better content that people actually want to watch. Think about it: when was the last time you watched a 10-minute video that could have been 2 minutes? Probably not recently, because most people prefer concise, well-edited content.
Learning how to clip a video on PC helps you remove all the unnecessary parts that make viewers lose interest. Those awkward silences, the “umms” and “ahs,” the moments where nothing really happens—all gone! What remains is the good stuff that keeps people engaged from start to finish.
There are practical benefits too. Shorter videos load faster, take up less storage space, and are easier to share through messaging apps or email. If you’re creating content for social media, each platform has different length requirements, and knowing how to shorten videos on laptop means you can adapt your content for anywhere you want to post it.
Plus, when you know how to clip movies in windows properly, you can keep your original footage intact while creating shorter versions for different purposes. This is perfect for content creators who might want to use the same footage for a YouTube video, an Instagram reel, and a TikTok clip—all by making different edits of the same original video.
How to Shorten Videos Using Microsoft Photos App
If you’re using Windows 10 or 11, you already have a basic video editing tool right on your computer—the Microsoft Photos app. Most people think of it as just a photo viewer, but it actually has a pretty decent video trimming feature that’s perfect for simple edits.
The Photos app comes pre-installed on all Windows devices, so you don’t need to download anything extra. It’s completely free and surprisingly easy to use, even if you’ve never edited videos before. This makes it a great starting point for anyone learning how to shorten a video on PC for the first time.
While it’s not as powerful as dedicated editing software, the Photos app handles basic trimming tasks well. It’s perfect for quick edits where you just need to remove the beginning or end of a video, or cut out a single section from the middle. The interface is straightforward, with clear buttons and sliders that make the process intuitive.
However, it’s important to know the limitations too. The Photos app might struggle with very large video files, and it doesn’t offer advanced features like adding text, transitions, or effects. The quality might also decrease slightly, especially if you’re working with high-resolution footage. But for simple jobs, it gets the work done!
Step-by-Step Guide to Shortening Videos with Photos App
Let’s walk through exactly how to clip a video on PC using the Microsoft Photos app. Don’t worry—it’s much easier than it might seem!
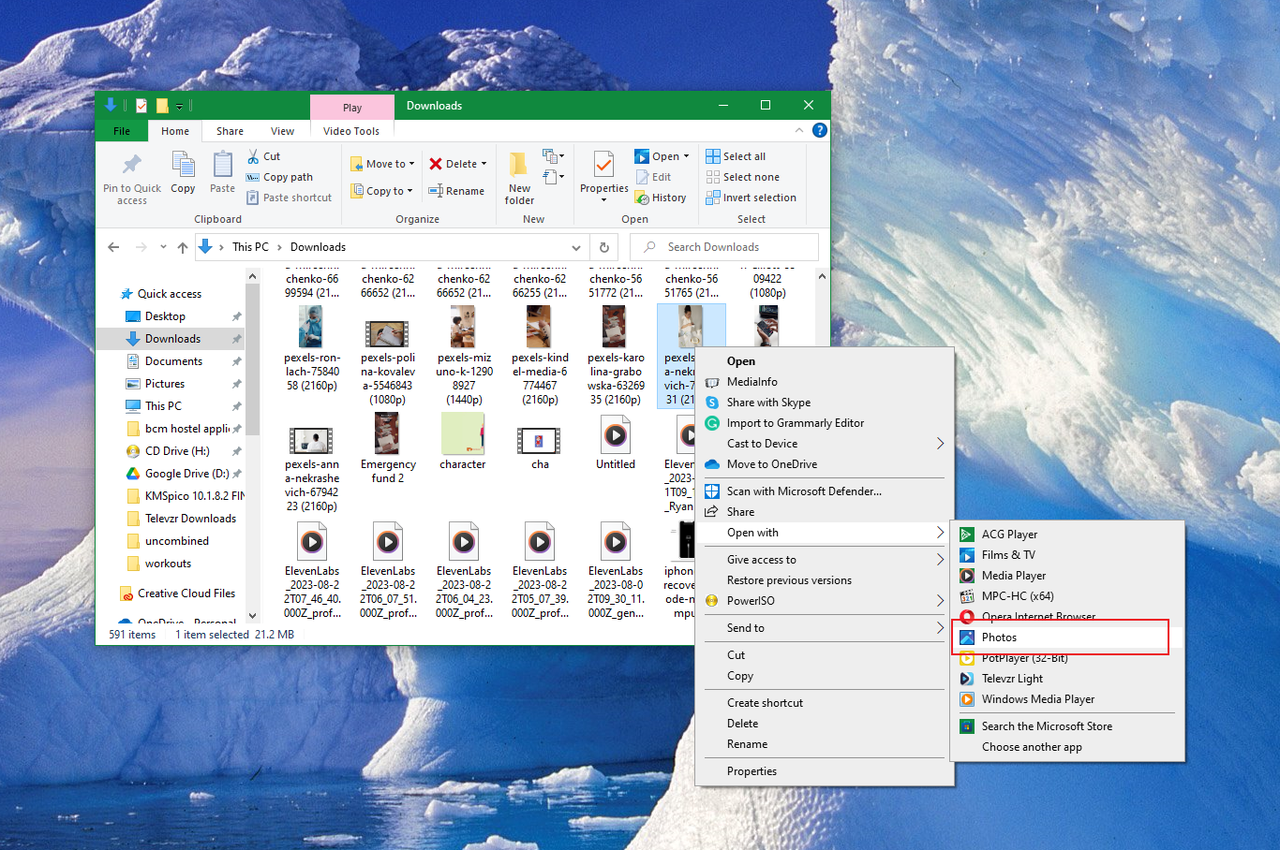
First, locate the video file you want to edit on your computer. Right-click on it, select “Open with” from the menu that appears, and then choose “Photos” from the list of applications. This will open your video in the Photos app where you can begin editing.
Once your video is open, look at the top of the screen for the editing options. You’ll see a button labeled “Trim”—click on this to open the trimming tool. Alternatively, you can press Ctrl+E on your keyboard as a shortcut to access the same feature.
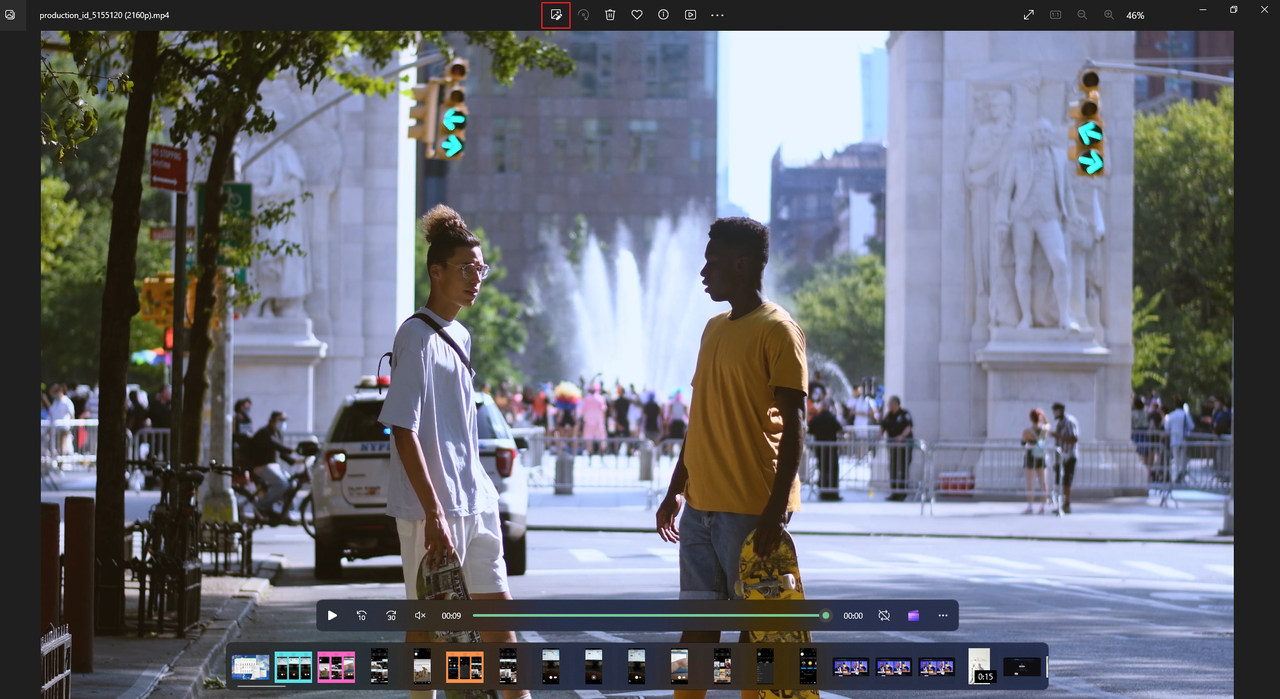
Now you’ll see a timeline with sliders beneath your video. These sliders control where your shortened video will begin and end. Drag the left slider to where you want your video to start, and the right slider to where you want it to end. The section between the sliders is what will be kept—everything outside will be removed.
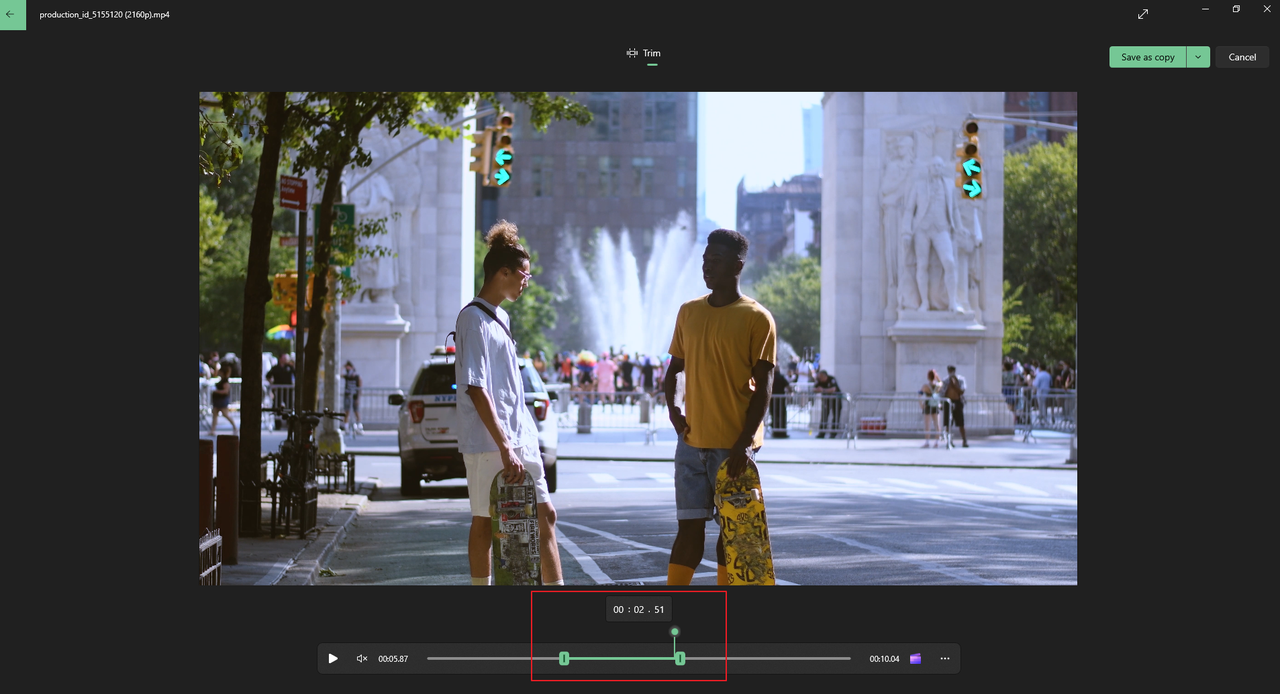
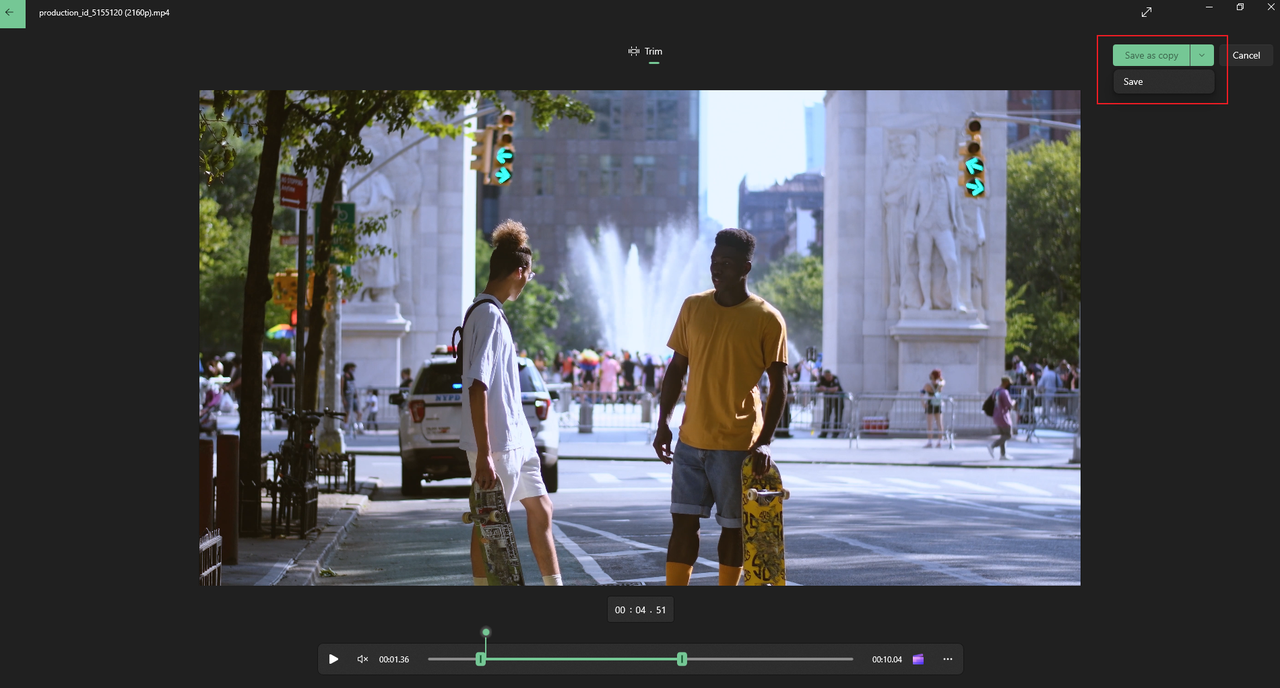
After you’ve selected the portion you want to keep, it’s time to save your work. Click “Save as copy” to create a new file with your shortened video while keeping the original intact. If you’re sure you won’t need the original anymore, you can click “Save” to replace it, but I usually recommend saving a copy just in case.
Advantages and Disadvantages of Microsoft Photos
The Photos app is super convenient because it’s already on your computer—no downloads or installations needed. It’s really simple to use, with a clean interface that doesn’t overwhelm beginners. Since it’s a Microsoft product, it integrates well with Windows, and it’s completely free with no hidden costs.
But there are some downsides to consider. The editing capabilities are pretty basic—you can trim videos, but that’s about it. No adding text, no transitions, no effects. The quality might not be as good after editing, especially with high-resolution videos. It also doesn’t handle very large files well, and the processing can be slow sometimes.
For quick, simple edits where you just need to remove parts from the beginning or end, the Photos app is perfect. But if you need more control or want to do more advanced editing, you might want to try a different tool.
CapCut — Your all-in-one video & photo editing powerhouse! Experience AI auto-editing, realistic effects, a huge template library, and AI audio transformation. Easily create professional masterpieces and social media viral hits. Available on Desktop, Web, and Mobile App.

How to Shorten Videos on Laptop with CapCut Desktop Editor
If you’re looking for more features than the Photos app offers, CapCut is an excellent choice. It’s a free video editing software that’s surprisingly powerful yet easy to use, even for beginners. CapCut lets you do much more than just shorten videos—you can add text, transitions, effects, and even use AI tools to enhance your content.
What makes CapCut special is its balance between simplicity and functionality. The interface is clean and intuitive, so you don’t feel overwhelmed, but it has all the features most people need for creating great videos. It’s perfect for anyone learning how to shorten videos on laptop without sacrificing quality or creative options.
CapCut supports high-resolution videos and offers various export settings, so you can maintain quality while making your files smaller. You can also resize videos for different social media platforms, which is super helpful if you’re creating content for multiple channels.
One of the best things about CapCut is that it’s available for Windows, macOS, and even has mobile versions, so you can edit anywhere. The cloud collaboration features are great if you’re working with others, and the regular updates mean the software keeps getting better.
Step-by-Step Guide to Shortening Videos with CapCut
Ready to learn how to shorten a video on PC with CapCut? Let’s walk through the process step by step.
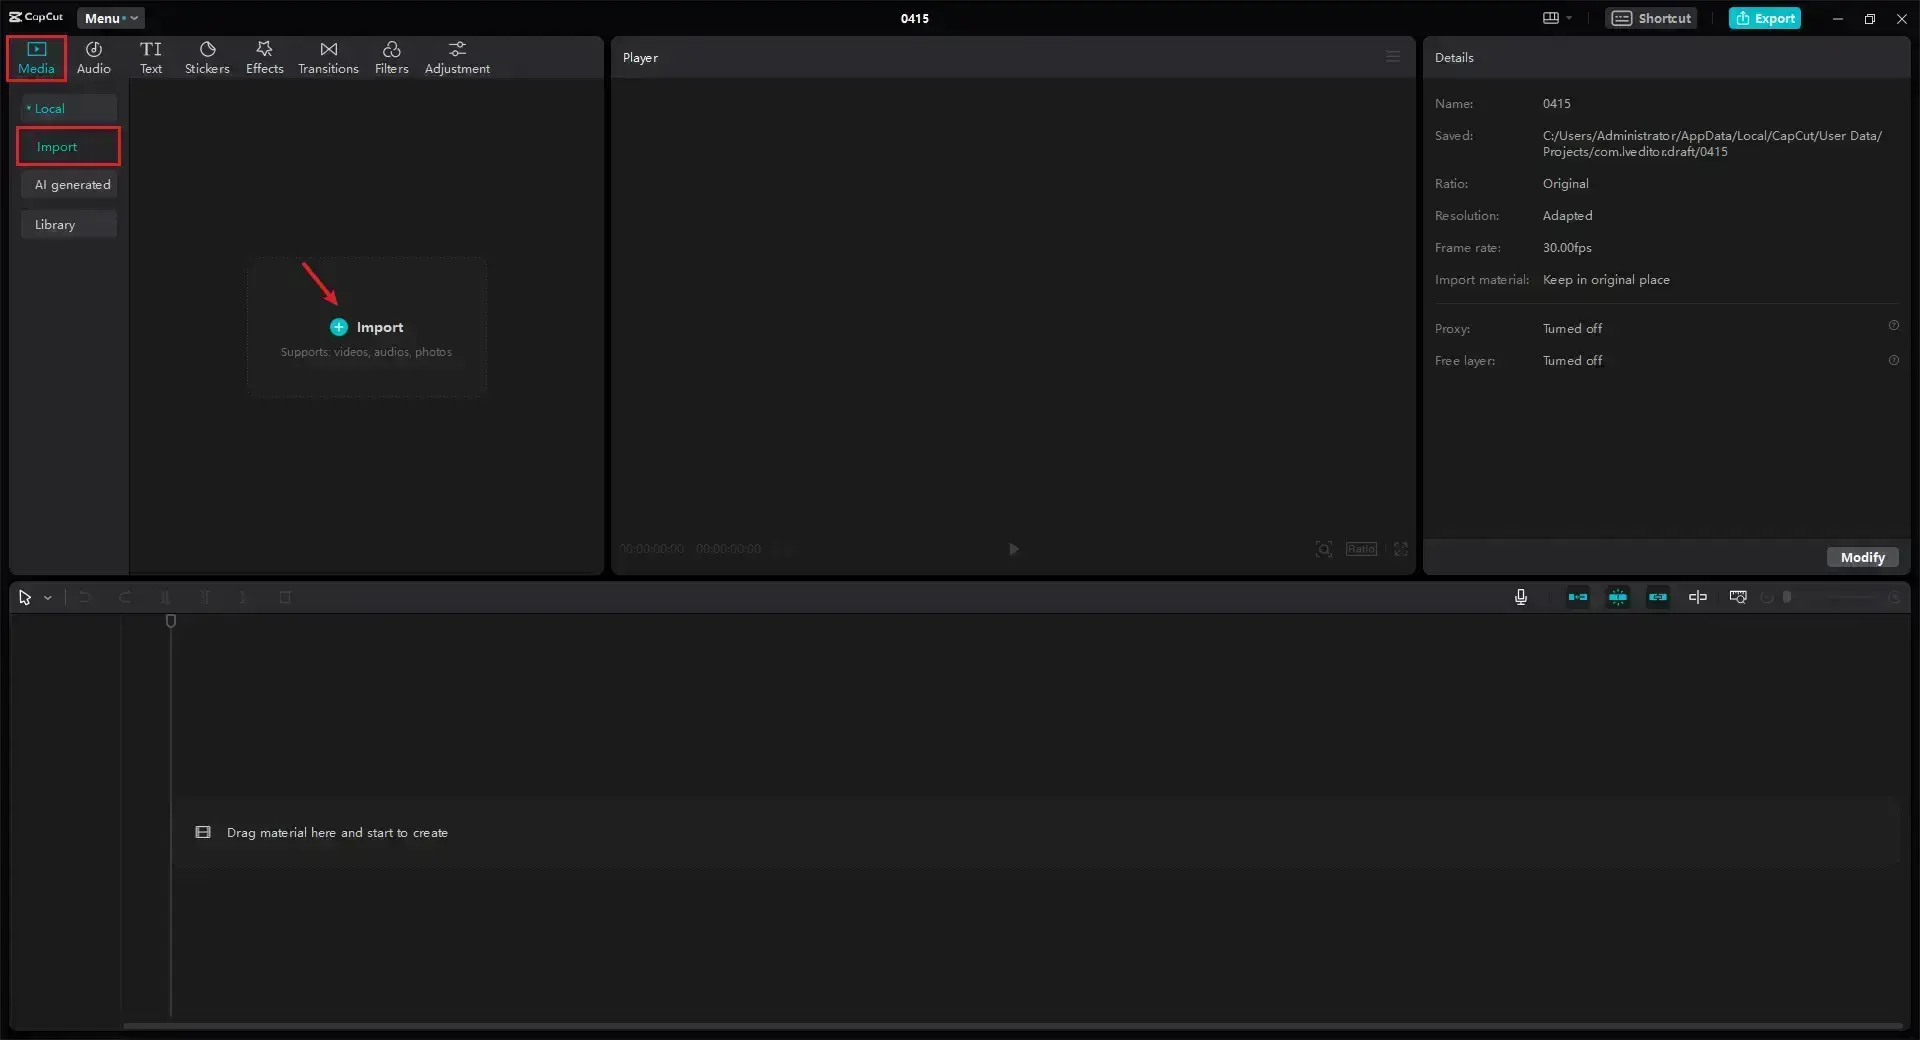
First, you’ll need to download and install CapCut from their official website. The installation process is straightforward—just follow the prompts. Once installed, open the application and sign in using your TikTok, Facebook, or Google account. This helps sync your projects across devices if you use CapCut on multiple platforms.
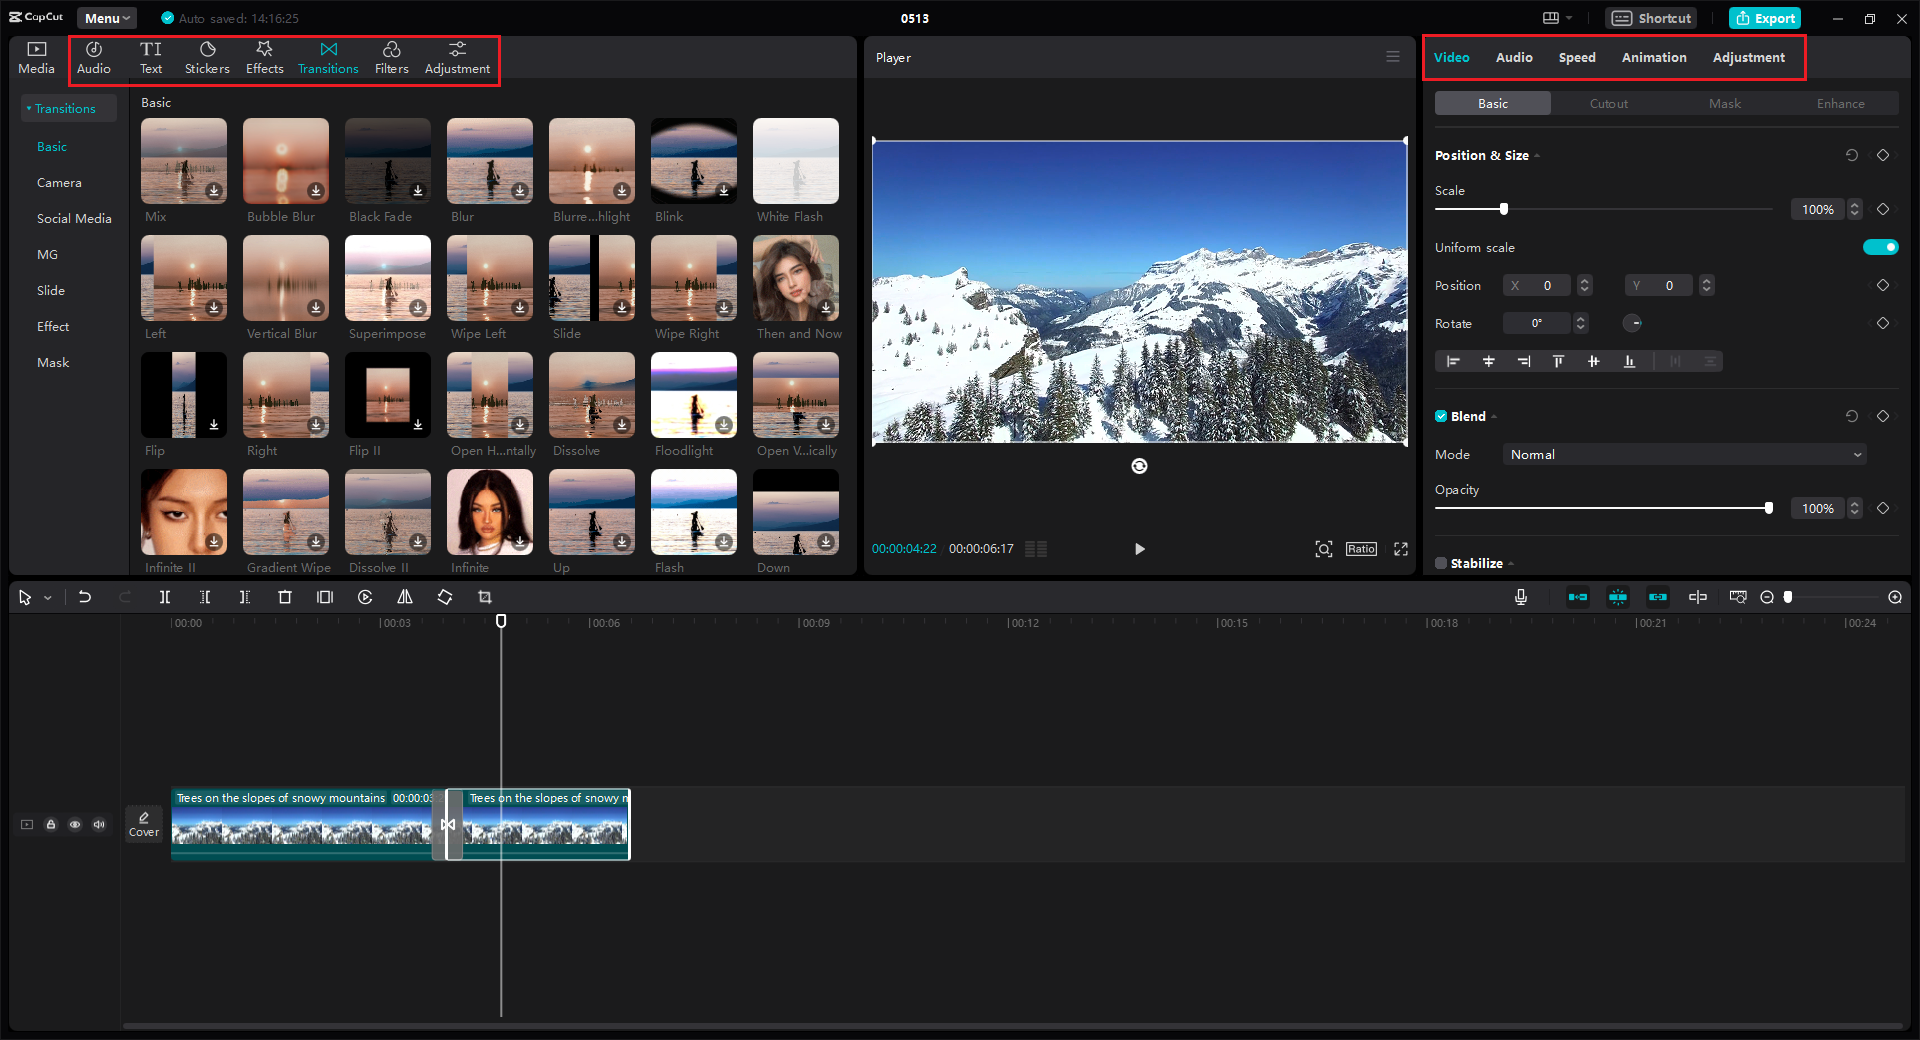
Start a new project by clicking “New Project.” Then import your video by clicking the “Import” button and selecting the video file from your computer. Once imported, drag your video from the media library down to the timeline at the bottom of the screen. This is where all your editing will happen.
Now it’s time to trim your video. Click on the scissors icon in the toolbar to open the trimming tools. You’ll see handles at the beginning and end of your video clip on the timeline—drag these to set your new start and end points. CapCut also lets you split your video into multiple segments, which is great if you want to remove sections from the middle while keeping both the beginning and end.
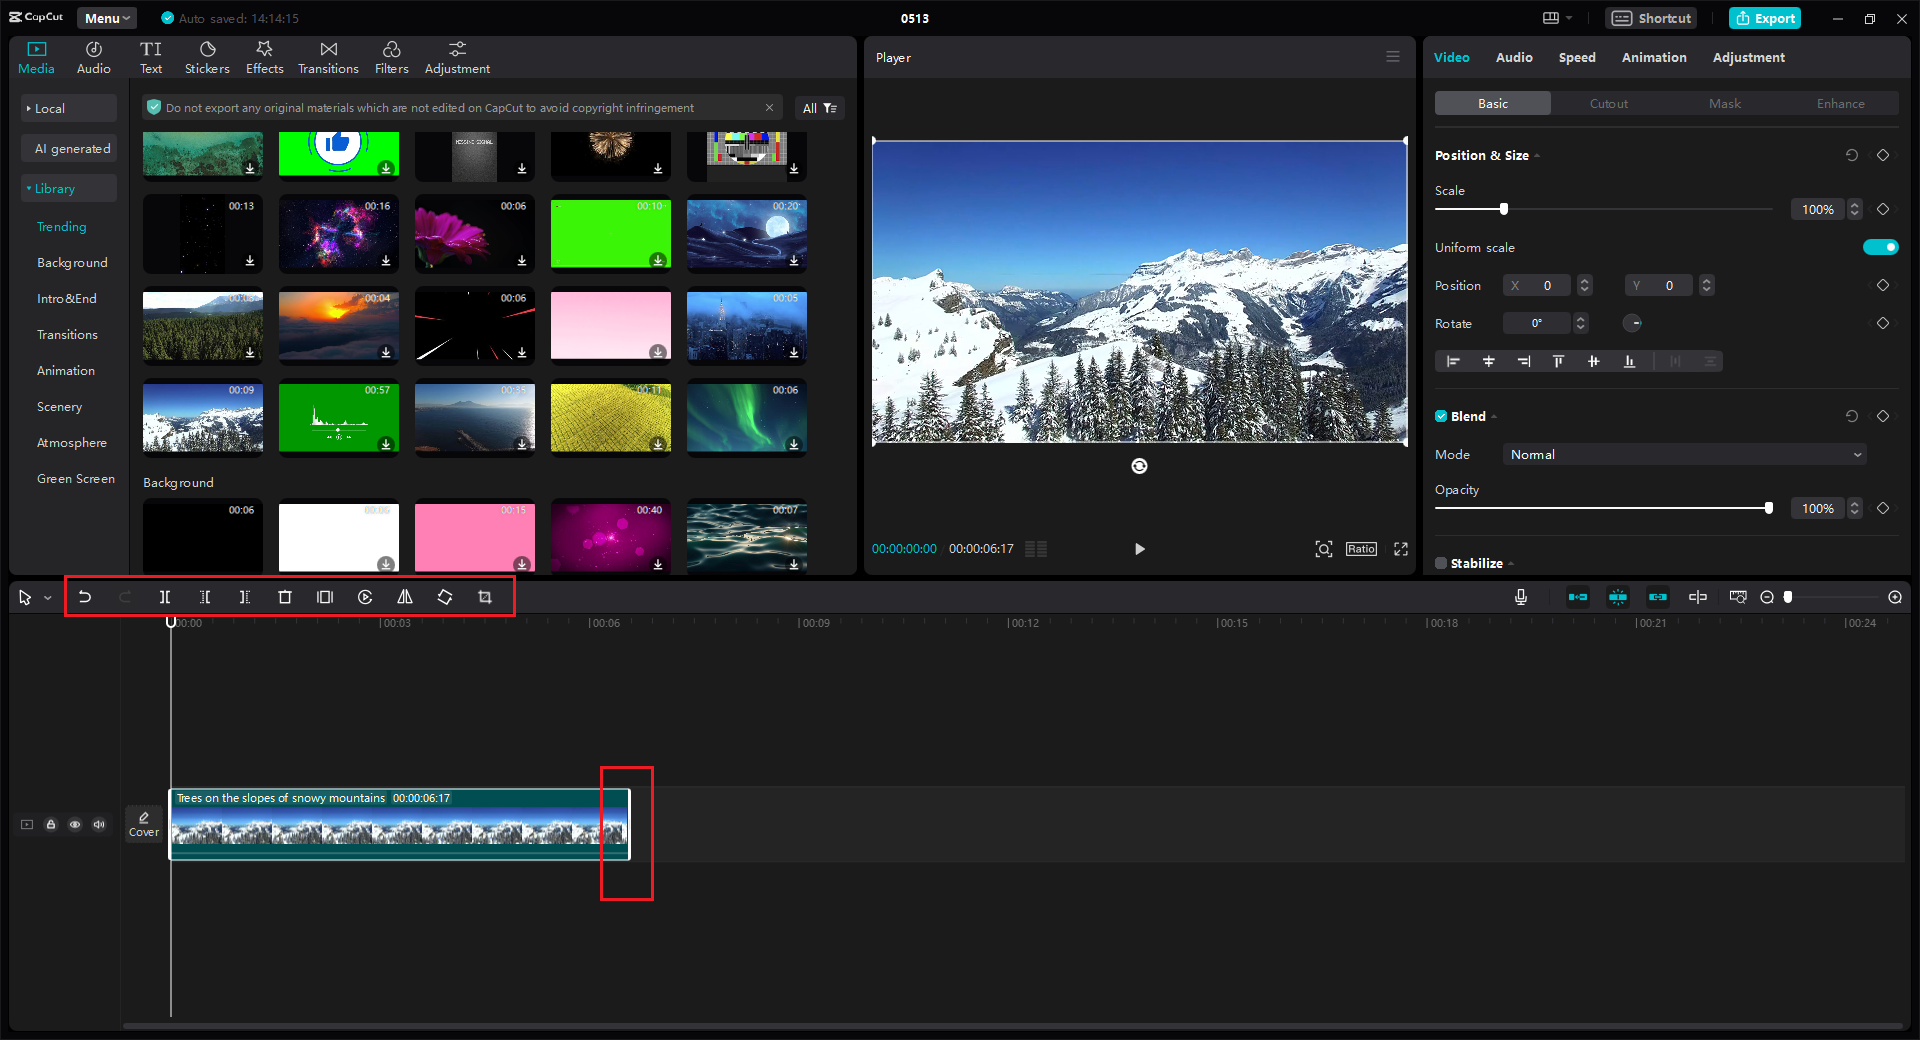
While you’re at it, you might want to enhance your video further. CapCut offers tons of editing features—you can add text, transitions, filters, adjust speed, stabilize shaky footage, and much more. The preview window lets you see your changes in real time, so you can perfect your video before exporting.
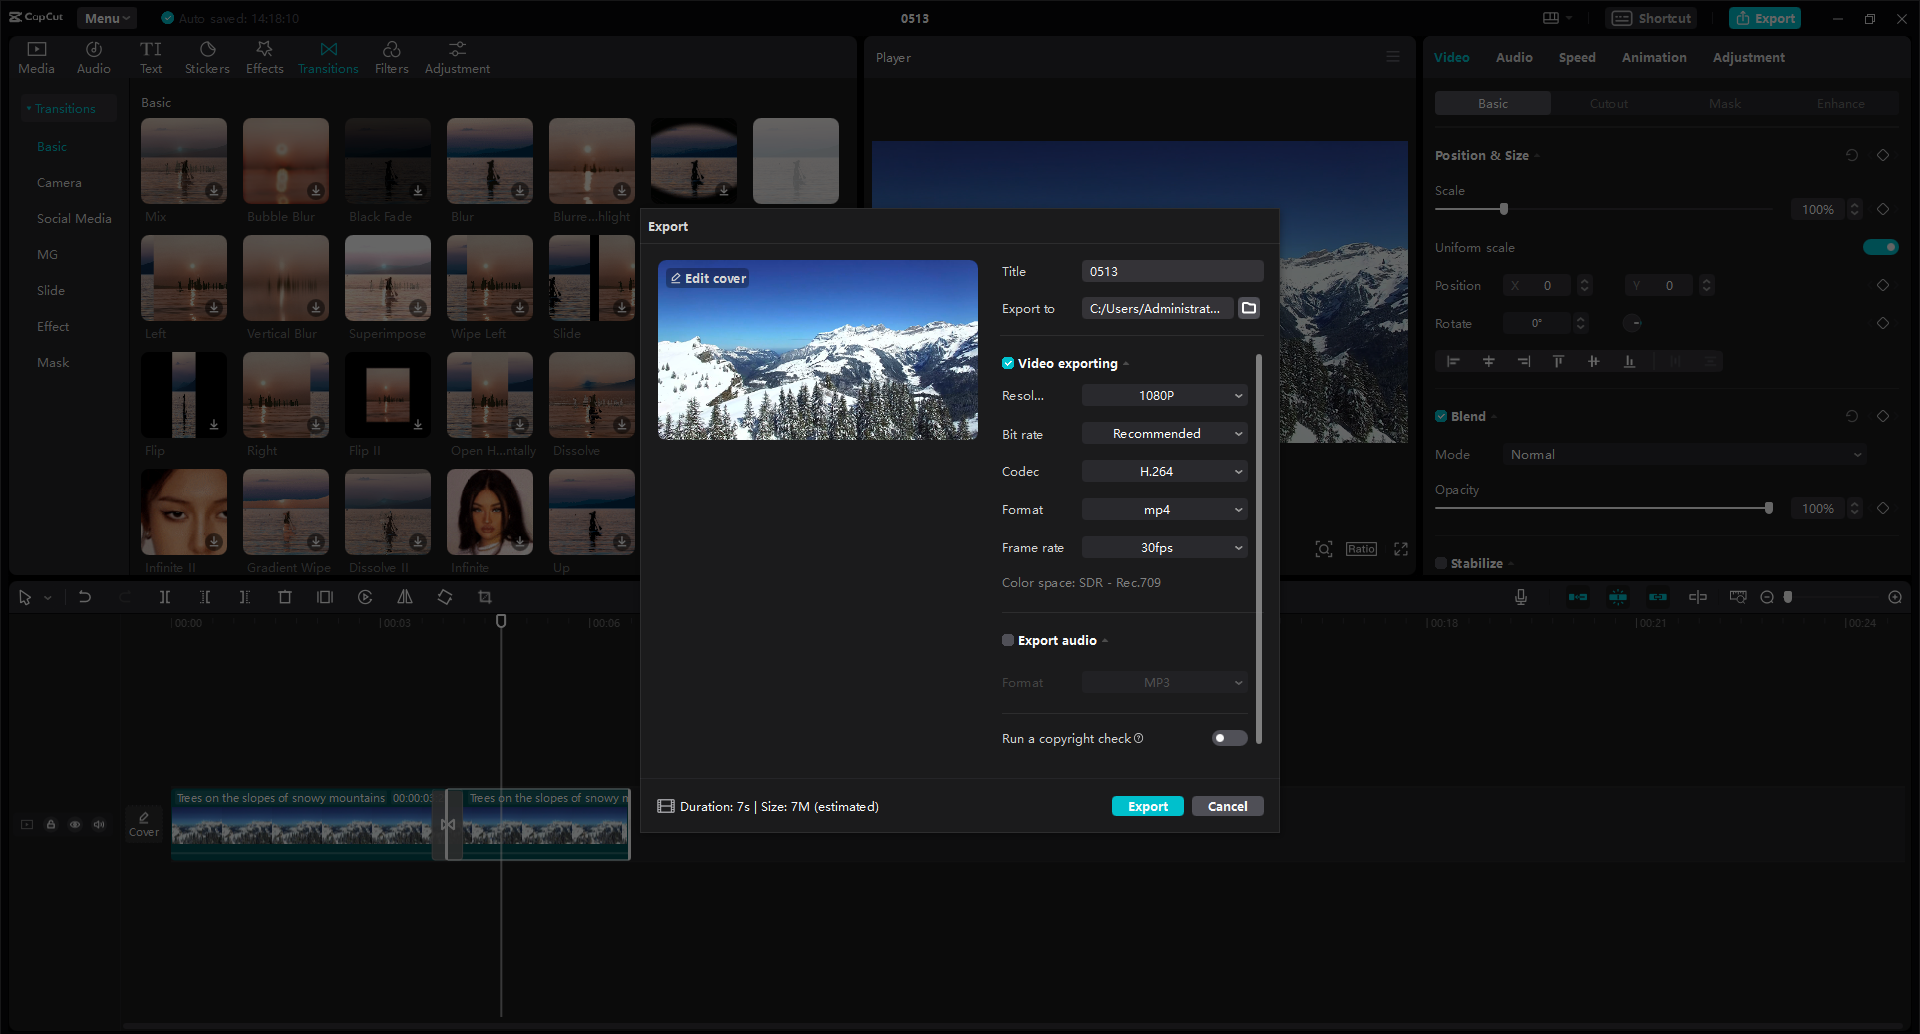
When you’re happy with your shortened video, click the “Export” button to save it. You can choose your preferred resolution, format, and quality settings. CapCut offers options for different platforms, so you can optimize your video for YouTube, Instagram, TikTok, or other sites. Once you’ve selected your settings, click export, and your video will be saved to your computer.
Why CapCut Is Excellent for Video Shortening
CapCut is completely free to use, which is amazing considering how many features it offers. The interface is user-friendly, with clear tools and helpful tutorials built right in. You get precision editing capabilities that let you make frame-accurate cuts, which is essential for professional-looking results.
The software supports high-quality exports, so you don’t have to worry about losing video quality when shortening your clips. The additional editing features mean you can do more than just trim—you can truly enhance your videos with text, effects, and adjustments.
On the downside, CapCut does require an internet connection for some features, and it might run slowly on computers with lower graphics capabilities. But for most users, it’s an excellent tool that makes learning how to clip a video on PC both easy and enjoyable.
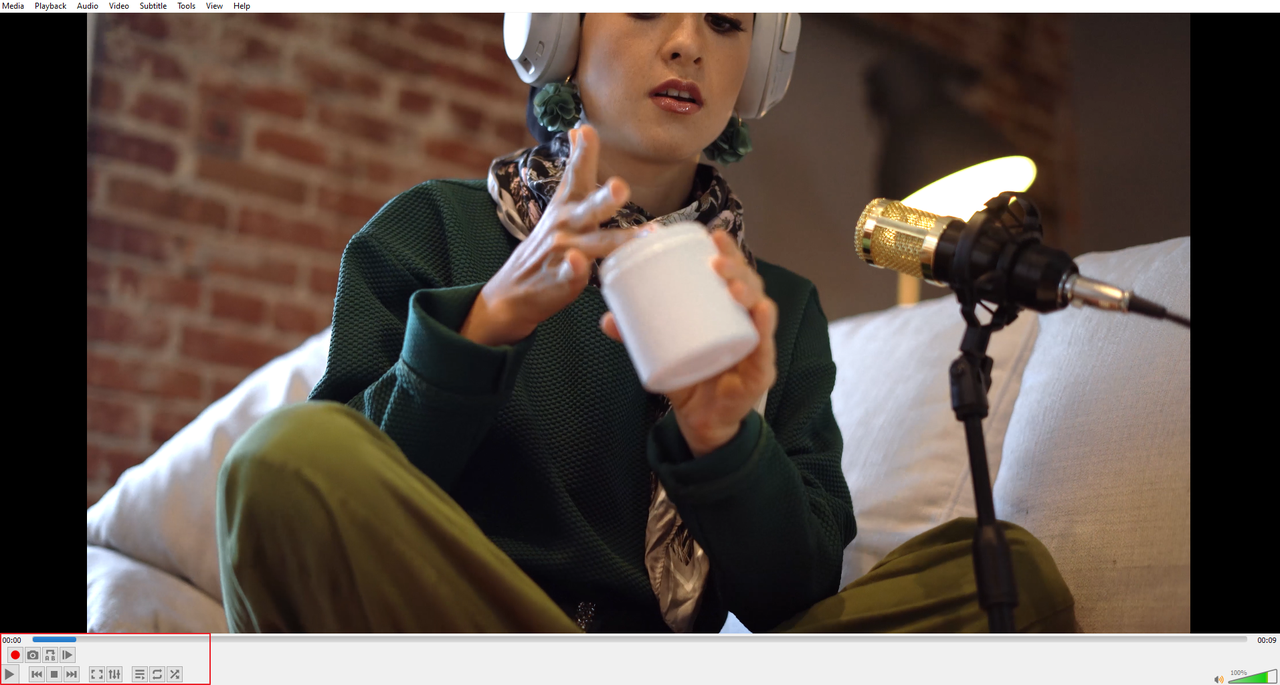
How to Clip Movies in Windows with VLC Media Player
You might know VLC as that handy media player that can open almost any video format, but did you know it can also help you shorten videos? It’s not the most intuitive method, but if you already have VLC installed, you might not need to download additional software.
VLC is free, open-source software that works on Windows, macOS, Linux, and other operating systems. It’s primarily designed for playing media files, but it has some basic editing capabilities hidden within its advanced features.
The video trimming function in VLC isn’t as straightforward as in dedicated editing software. It works by recording portions of your video as you play it, which can be a bit imprecise compared to proper editing tools. But for quick cuts when you don’t want to install new software, it can get the job done.
Step-by-Step Guide to Shortening Videos with VLC
Let’s go through how to clip movies in windows using VLC media player. The process is a bit different from other methods, but once you know where to look, it’s manageable.
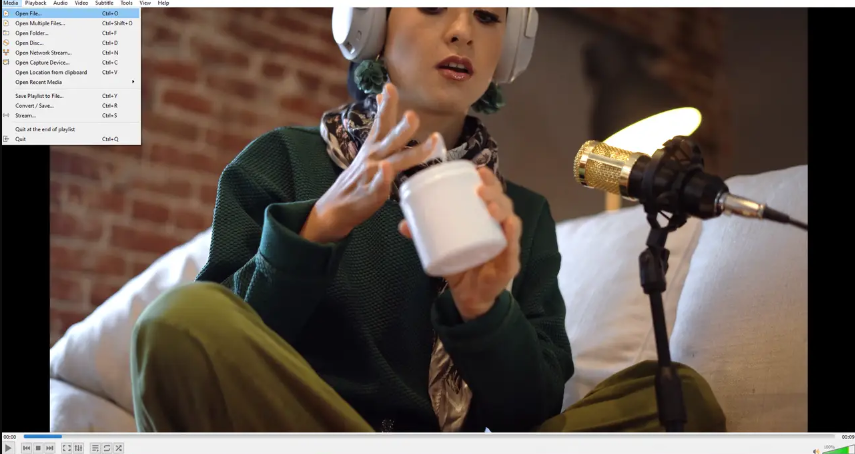
First, open VLC media player on your computer. Click the “Media” menu at the top left corner and select “Open File” from the dropdown. Navigate to and select the video file you want to shorten.
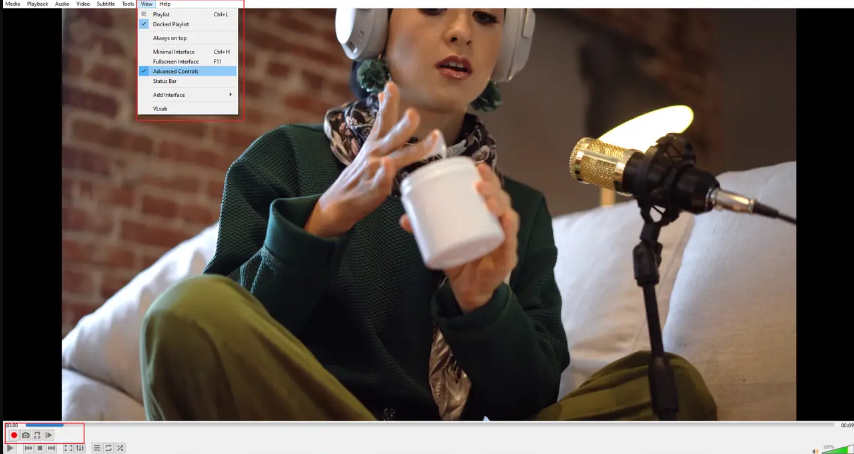
Before you can trim your video, you need to enable some hidden controls. Go to the “View” menu and select “Advanced Controls.” This will add new buttons to your player interface, including a record button that looks like a red circle.
Now play your video and pause it exactly where you want your shortened version to begin. Click the record button (the red circle) to start recording. Play the video until you reach the point where you want it to end, then click the record button again to stop. VLC will save the recorded portion as a new video file in your designated folder.
Pros and Cons of Using VLC for Video Shortening
The biggest advantage of using VLC is that it’s completely free and many people already have it installed. It can handle pretty much any video format you throw at it, and it’s available on multiple operating systems.
However, the trimming process is not very precise—it’s hard to get exact start and end points. VLC can become slow or even crash when working with large video files, and the recording method isn’t ideal for making multiple cuts within a single video.
VLC is okay for quick, simple trims when you don’t have other options available, but for anything more serious, you’re better off with proper editing software like CapCut or even the Photos app.
Maintaining Video Quality When Shortening Clips
A common concern when learning how to shorten videos on laptop or desktop is whether the process will reduce quality. The good news is, yes, you can clip a video on windows without noticeable quality loss if you use the right tools and settings.
The key is to use software that allows you to control export settings. Programs like CapCut let you choose your output resolution, bitrate, and format, so you can ensure your shortened video looks just as good as the original. Always export at the same resolution as your source video when possible.
Some compression is inevitable when editing and re-encoding videos, but with modern codecs and sufficient bitrate settings, the quality loss should be minimal and unnoticeable to most viewers. Avoid saving over your original file—always keep a copy just in case.
If you’re using the Photos app, you might notice some quality reduction, especially with high-resolution footage. For the best results, use software like CapCut that’s designed specifically for video editing and offers quality preservation features.
CapCut — Your all-in-one video & photo editing powerhouse! Experience AI auto-editing, realistic effects, a huge template library, and AI audio transformation. Easily create professional masterpieces and social media viral hits. Available on Desktop, Web, and Mobile App.
Professional Tips for Shortening Videos Effectively
Now that you know how to shorten a video on PC using different methods, here are some tips to help you create better results, whether you’re using basic tools or advanced software.
Always keep a backup of your original video before you start editing. This way, if you make a mistake or aren’t happy with the results, you can start over without losing your source material. It’s better to have it and not need it than need it and not have it!
Plan your edits before you start cutting. Watch through your video and make notes of where you want to make cuts. You can even write down timestamps to make the process more precise. Planning ahead saves time and helps you avoid making unnecessary cuts.
Use software with preview features so you can see how your edits will look before finalizing them. This helps you catch mistakes and make adjustments without having to export multiple versions. Most dedicated editing software includes this feature.
Don’t be afraid to experiment with different tools and techniques. Video editing is a skill that improves with practice, so try different approaches to see what works best for your specific needs. You might discover techniques that make your workflow more efficient.
Remember that sometimes less is more. It’s tempting to cut out everything that isn’t perfect