TOOL HUNTER
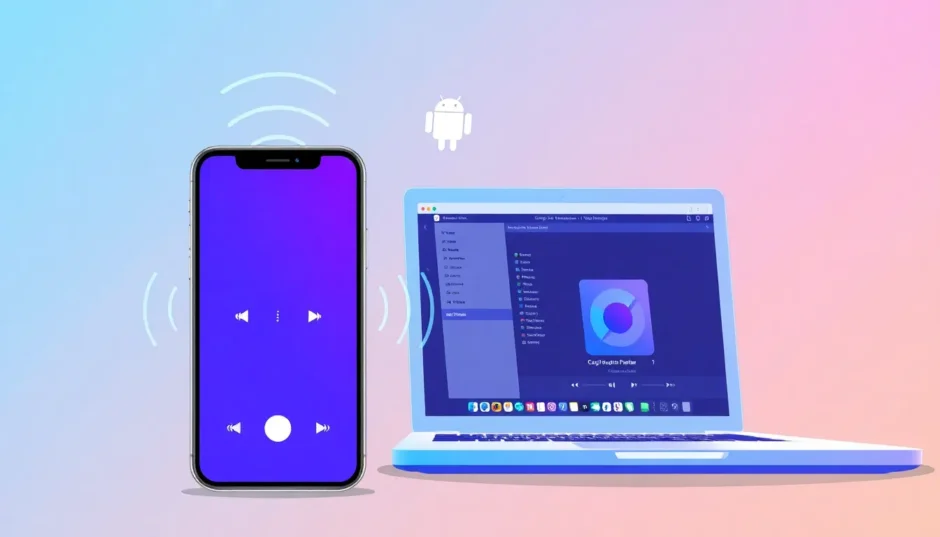

Screen recording has become an essential skill in today’s digital world. Whether you’re creating tutorials, recording gameplay, capturing online meetings, or making presentations, knowing how to record your screen with audio can be incredibly valuable. Many people wonder about the best methods and tools available, especially when it comes to mobile screen recording options. In this comprehensive guide, we’ll explore various screen recording methods, with special attention to how to screen record on CapCut mobile, and compare different approaches to help you find the perfect solution for your needs.
Table of Contents
- Understanding Screen Recording Basics
- QuickTime Screen Recording on Mac Computers
- Mobile Screen Recording with QuickTime
- Limitations of QuickTime for Screen Recording
- Introduction to CapCut as a Screen Recording Solution
- How to Screen Record on CapCut Mobile
- Desktop Screen Recording with CapCut
- Advanced CapCut Features for Enhanced Recordings
- Practical Applications of Screen Recording
- Comparing Recording Options: QuickTime vs. CapCut
Understanding Screen Recording Basics
Before diving into specific tools, it’s important to understand what screen recording involves. Screen recording captures everything that happens on your device’s display, including movements, clicks, and visual changes. When combined with audio recording, it becomes a powerful tool for creating content that demonstrates processes, shares information, or preserves digital experiences.
The quality of your screen recording depends on several factors: the recording tool you use, your device’s capabilities, and the settings you choose. Most modern screen recording tools offer options to capture system audio, microphone input, or both, giving you flexibility depending on your recording needs.
QuickTime Screen Recording on Mac Computers
QuickTime Player comes pre-installed on all Mac computers and offers built-in screen recording functionality. Many users ask, “Does QuickTime screen recording record audio?” The answer is yes, but it requires proper configuration. Here’s how to set up QuickTime record screen with audio on your Mac:
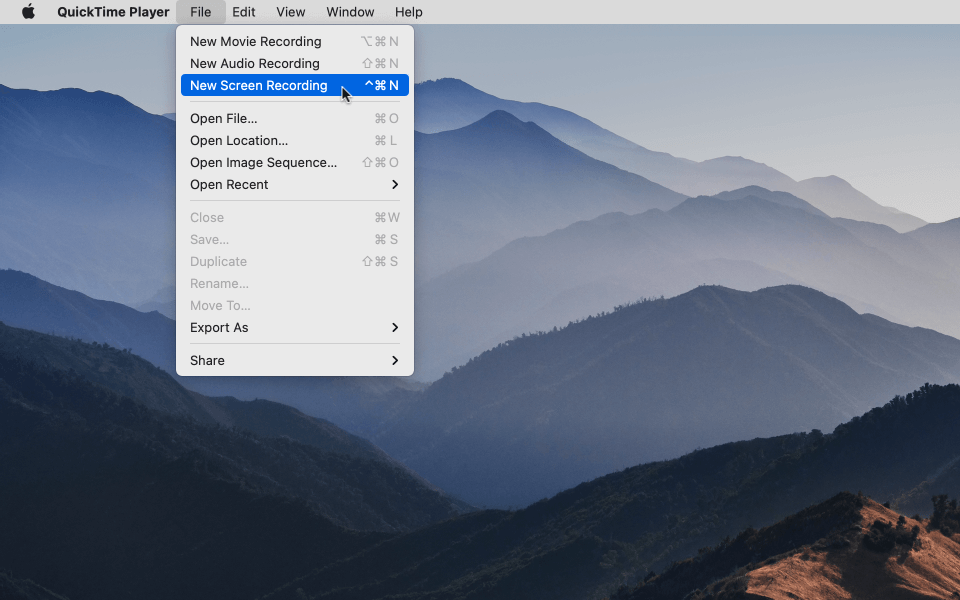
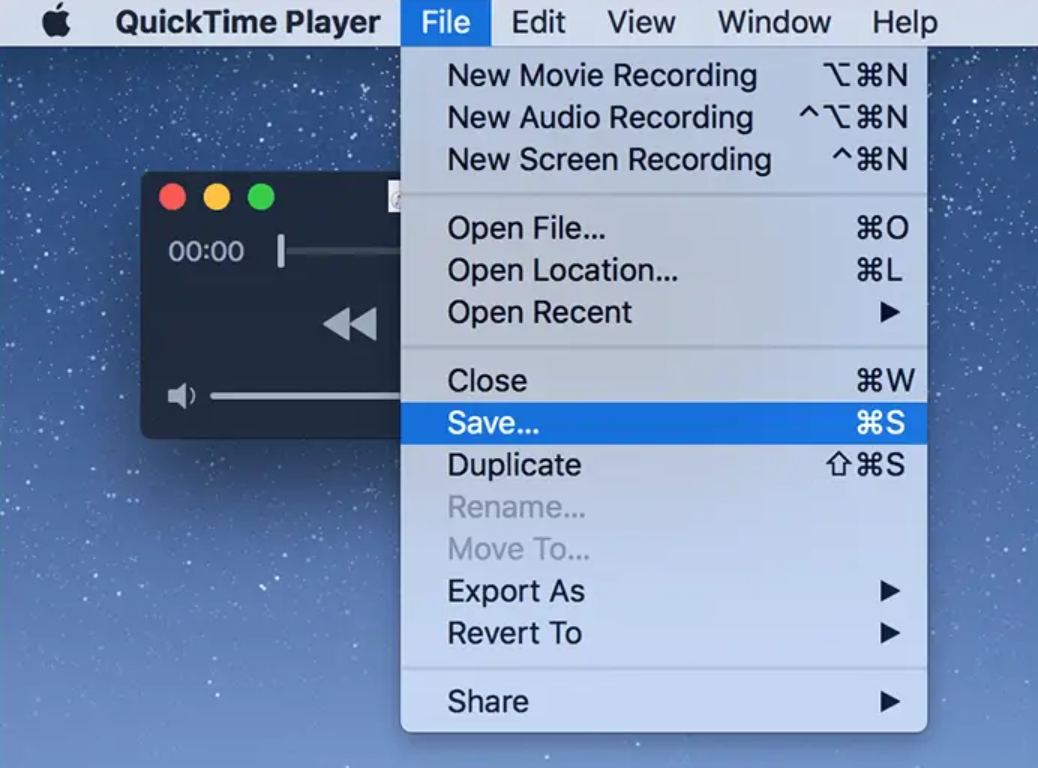
Begin by opening the application or content you want to record. This could be a software demonstration, a video presentation, or any other on-screen activity. Launch QuickTime Player from your Applications folder, Dock, or using Spotlight search. From the menu bar at the top of your screen, select “File” and then choose “New Screen Recording.”
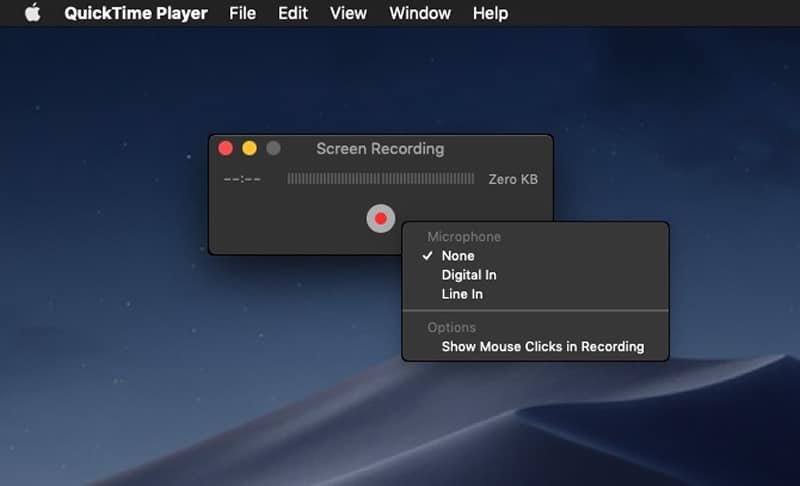
A recording interface will appear with a red record button and a downward arrow. Click the arrow to access audio settings where you can select your preferred microphone input. For those wondering “does QuickTime screen recording record audio” properly, this is where you ensure your audio sources are correctly configured. You can choose to record internal audio, external microphone audio, or both, depending on your needs.
Click the red record button to begin. You’ll be prompted to choose between recording the entire screen or selecting a specific portion. After making your selection, QuickTime will start capturing your screen activity. The software will record everything happening within your chosen area while simultaneously capturing the audio sources you selected.
When you’re finished recording, click the stop button in the menu bar. Your recording will automatically open in QuickTime Player for preview. If you’re satisfied with the results, save the file to your preferred location. This process demonstrates how QuickTime record screen with audio can be straightforward for Mac users.
It’s worth noting that QuickTime screen recording functionality may vary depending on your macOS version. Newer systems might redirect you to the Screenshot Toolbar instead of the traditional QuickTime interface. This is an important consideration for users who specifically want to use QuickTime for their recording needs.
Mobile Screen Recording with QuickTime
Many people don’t realize that QuickTime can also help you record your iPhone or iPad screen. This feature is particularly useful for creating app demonstrations, recording mobile gameplay, or capturing iOS-specific content. The process requires connecting your mobile device to a Mac computer and using QuickTime as an intermediary.
To begin, connect your iOS device to your Mac using a compatible cable. Open QuickTime Player on your Mac and select “File” from the menu bar, then choose “New Movie Recording.”
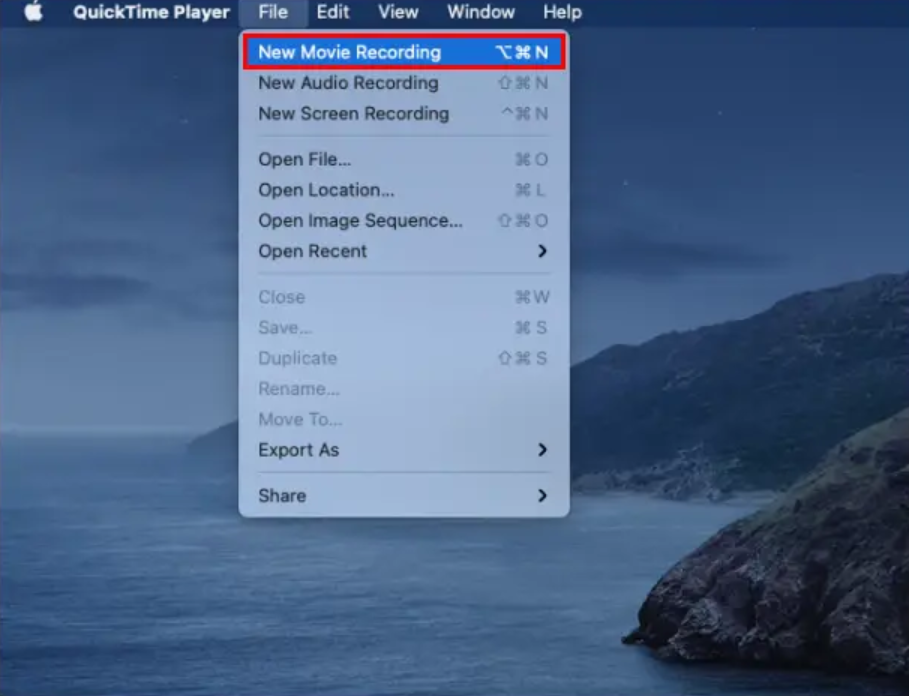
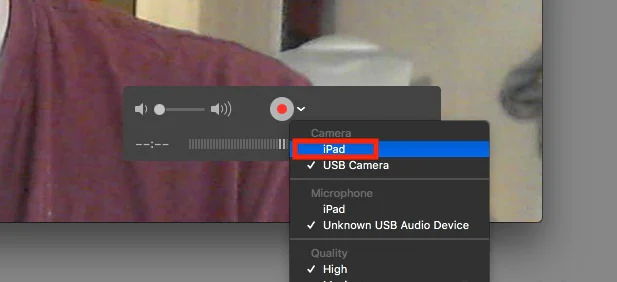
In the recording window that appears, click the dropdown arrow next to the record button. Here you’ll select your connected iOS device as both the video and audio source. This setup allows QuickTime to capture both the visual display and audio from your mobile device, providing a comprehensive recording solution.
Once configured, click the record button to begin capturing your mobile device’s screen. You can record in either portrait or landscape orientation, depending on your content needs. The recording process can be paused and resumed as needed, offering flexibility during longer recording sessions.
This method provides a reliable way to record mobile screen content, but it does require a physical connection to a Mac computer. For users seeking more mobile-friendly solutions, learning how to screen record on CapCut mobile might offer more convenience and flexibility.
Limitations of QuickTime for Screen Recording
While QuickTime offers convenient screen recording capabilities for Apple users, it does come with several limitations that might affect your recording experience. Understanding these limitations can help you decide whether QuickTime meets your needs or if you should explore alternatives.
The first significant limitation is file storage. QuickTime only saves recordings locally on your computer’s hard drive. This can quickly consume storage space, especially if you regularly create lengthy or high-quality recordings. Unlike cloud-based solutions, there’s no option to automatically save recordings to online storage.
Editing capabilities represent another area where QuickTime falls short. While it offers basic trimming functionality, it lacks advanced editing features that content creators often need. You won’t find options for adding transitions, text overlays, multiple audio tracks, or special effects within QuickTime itself.
File format restrictions also present challenges. QuickTime exclusively saves recordings in MOV format, which may not be compatible with all devices or platforms. This often requires additional conversion steps if you need to use your recordings with certain software or share them with users who have different device preferences.
Platform availability is perhaps the most significant limitation for many users. QuickTime is exclusively available for macOS, with Windows support having been discontinued. This makes it inaccessible for users who work across different operating systems or who primarily use Windows computers.
These limitations have led many users to seek alternative screen recording solutions that offer greater flexibility, more features, and cross-platform compatibility. This is where tools like CapCut become particularly valuable for those looking to enhance their screen recording capabilities.
CapCut — Your all-in-one video & photo editing powerhouse! Experience AI auto-editing, realistic effects, a huge template library, and AI audio transformation. Easily create professional masterpieces and social media viral hits. Available on Desktop, Web, and Mobile App.

Introduction to CapCut as a Screen Recording Solution
CapCut has emerged as a powerful alternative to traditional screen recording tools like QuickTime. This comprehensive online video editor offers robust screen recording capabilities alongside extensive editing features, making it an excellent choice for content creators, educators, and professionals alike.
One of CapCut’s most significant advantages is its web-based nature. Unlike software that requires downloading and installation, CapCut operates directly through your web browser. This means you can access it from any device with an internet connection, regardless of whether you’re using Windows, macOS, or even ChromeOS.
The screen recording functionality within CapCut is remarkably versatile. You can choose to record your entire screen, specific application windows, or individual browser tabs. This flexibility allows you to focus precisely on the content that matters most for your recording, reducing the need for extensive cropping or editing afterward.
Audio recording options are equally comprehensive. CapCut enables you to capture system audio, microphone input, or both simultaneously. This is particularly valuable for creating tutorials where you might need to record both computer sound and your voice narration. The ability to screen record with audio effectively makes CapCut suitable for various recording scenarios.
Cloud integration represents another standout feature. All your CapCut projects and recordings are automatically saved to cloud storage, eliminating concerns about local storage limitations. This also enables seamless collaboration, as you can share projects with team members who can then access and edit them from their own devices.
How to Screen Record on CapCut Mobile
Mobile screen recording has become increasingly important as smartphones and tablets handle more of our daily computing needs. Learning how to screen record on CapCut mobile opens up numerous possibilities for creating content directly from your mobile device.
The process begins with downloading the CapCut app from your device’s app store. It’s available for both iOS and Android devices, ensuring broad accessibility. After installation, open the app and either sign in to your existing account or create a new one if you’re a first-time user.
Once you’re logged in, navigate to the screen recording feature within the app. The interface is designed to be intuitive, with clear labels and options. Before starting your recording, take a moment to configure your settings based on your specific needs.
Audio settings are particularly important when learning how to screen record on CapCut mobile. You can choose to record device audio, microphone audio, or both. This flexibility allows you to create different types of content—from silent app demonstrations to narrated tutorials with voice explanations.
Video quality options let you balance file size against recording quality. Higher quality settings produce better-looking recordings but consume more storage space and processing power. For most purposes, the default settings provide an excellent balance, but you can adjust based on your specific requirements.
When you’re ready to begin, simply tap the record button. CapCut will start capturing everything displayed on your screen. A countdown timer gives you a moment to prepare before recording actually begins. During recording, you’ll see controls that allow you to pause, stop, or access additional options.
After completing your recording, the video is saved within the CapCut app where you can immediately begin editing if desired. The mobile editing interface offers surprisingly robust capabilities, including trimming, adding text overlays, inserting music, and applying filters. This seamless transition from recording to editing makes CapCut particularly efficient for mobile content creation.
The ability to screen record on CapCut mobile directly addresses the growing need for mobile-first content creation tools. Whether you’re creating social media content, educational materials, or product demonstrations, having this capability on your mobile device provides tremendous flexibility and convenience.
Desktop Screen Recording with CapCut
While mobile recording is valuable, many users still prefer the precision and control offered by desktop screen recording. CapCut’s web-based platform provides excellent desktop recording capabilities that rival dedicated screen recording software.
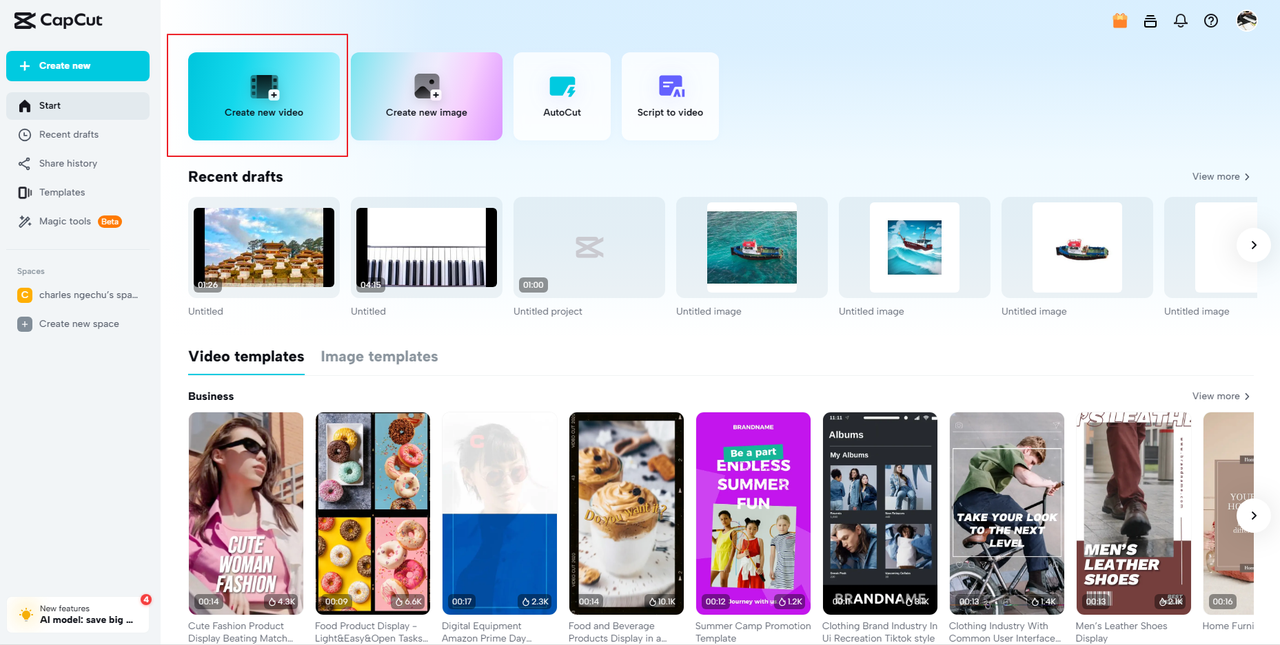
To begin desktop recording with CapCut, visit their website and sign in to your account. The interface is clean and intuitive, with clear navigation to all major features. Click on the “Create new video” button to start a new project, where you’ll first select your preferred canvas size and aspect ratio.
Navigate to the Media section and locate the screen recording option, typically represented by a camcorder icon. Here you’ll find several recording choices: full screen, specific window, browser tab, or webcam recording. Each option serves different purposes, allowing you to select the most appropriate method for your content.
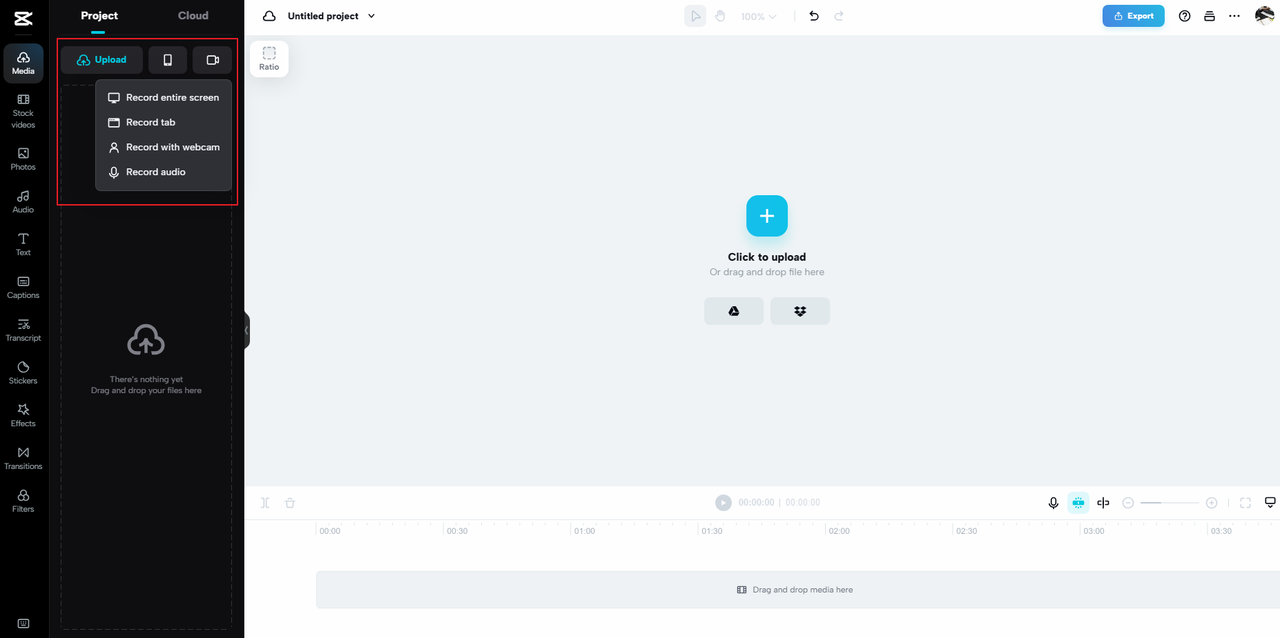
Before starting your recording, configure your audio settings. CapCut allows you to record system audio, microphone input, or both simultaneously. This flexibility is crucial for different types of content. For software tutorials, you might want system sounds; for presentations, you’ll likely need microphone audio; and for comprehensive demonstrations, both might be necessary.
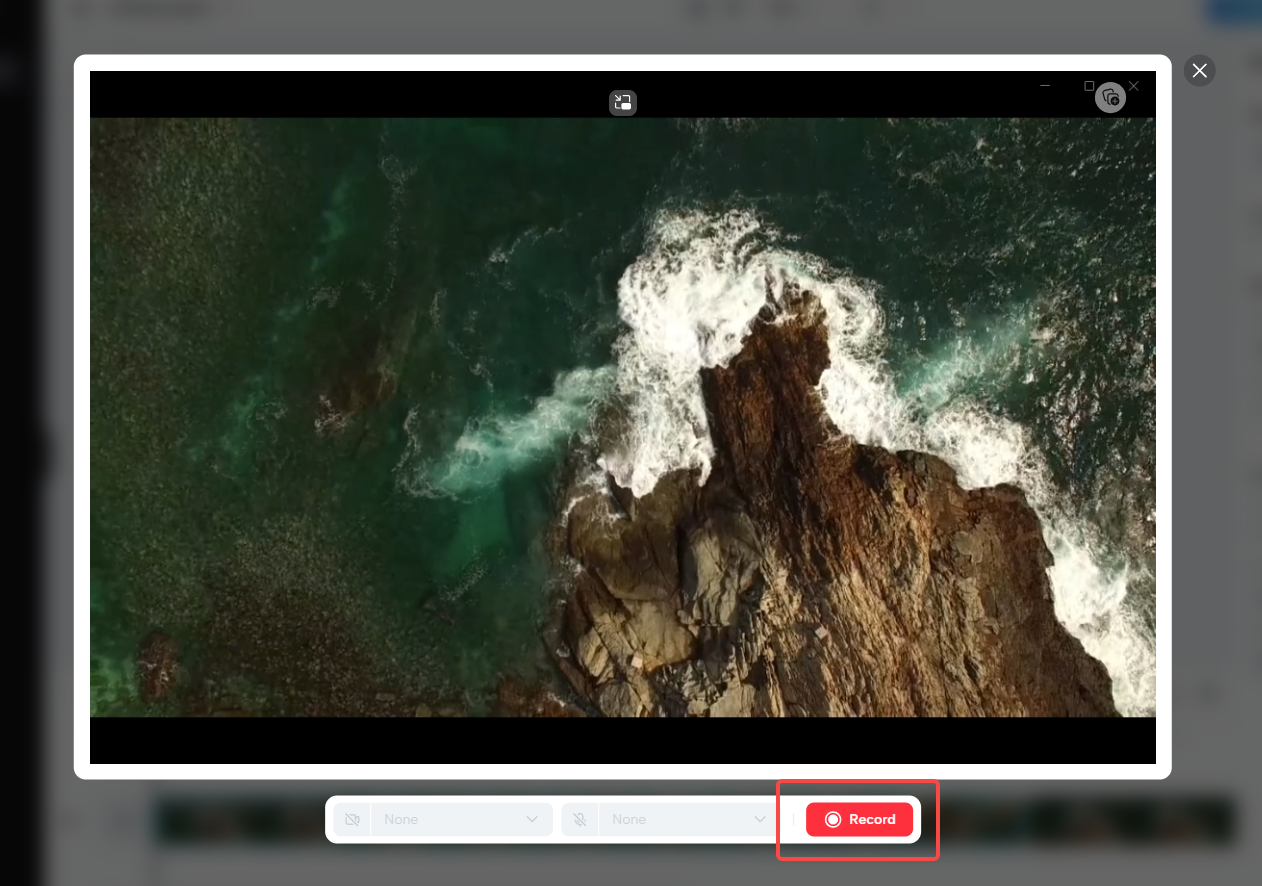
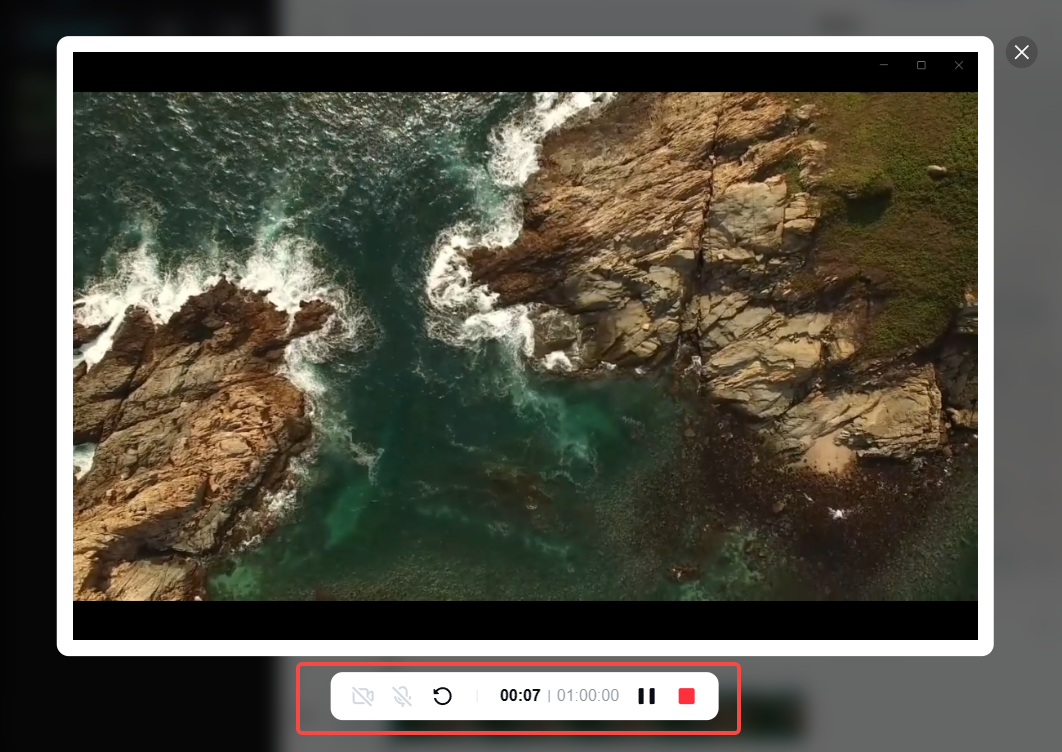
Once you’ve configured your settings, click the record button to begin. CapCut will capture everything within your selected area while recording the audio sources you’ve chosen. During recording, you have controls to pause, resume, or stop the session as needed.
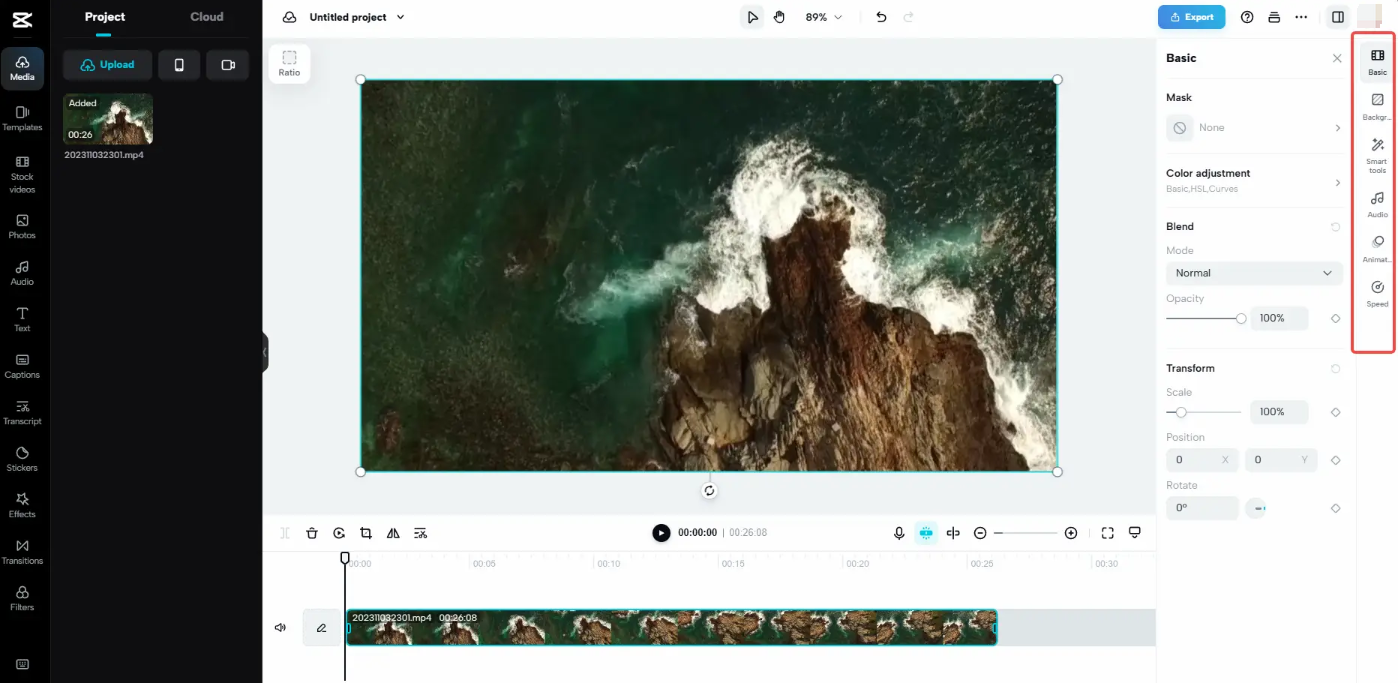
After finishing your recording, CapCut automatically imports the footage into your project timeline. This immediate access to your recorded content streamlines the editing process significantly. You can quickly trim unwanted sections, add additional elements, or apply enhancements without switching between different applications.
The editing capabilities within CapCut are particularly impressive. Beyond basic trimming, you can add text annotations, incorporate additional media files, apply transitions, and even use advanced features like picture-in-picture effects. These tools help transform basic screen recordings into polished, professional-looking content.
Export options provide flexibility for different use cases. You can choose from various formats and quality settings depending on where you plan to share your content. Whether you’re uploading to YouTube, embedding in a presentation, or archiving for future reference, CapCut offers appropriate export settings.
Advanced CapCut Features for Enhanced Recordings
Beyond basic screen recording, CapCut offers numerous advanced features that can significantly enhance your recorded content. These tools help transform simple screen captures into professional-quality productions without requiring extensive technical knowledge or additional software.
Keyframe animation represents one of CapCut’s most powerful features. This allows you to create smooth animations and movements within your recordings by setting specific points where changes occur. For example, you can gradually zoom in on important details, pan across wide content, or create dynamic transitions between different screen areas. This feature is particularly valuable for tutorial content where you need to direct viewer attention to specific elements.
Speed control options provide creative flexibility for your recordings. You can speed up boring sections to maintain viewer engagement or slow down complex processes to ensure understanding. The speed curve feature offers particularly precise control, allowing you to create gradual accelerations or decelerations rather than simple uniform speed changes.
Masking tools enable you to isolate specific portions of your screen recordings. This is invaluable for focusing attention, hiding sensitive information, or creating special effects. You can use masks to blur out personal data, highlight important interface elements, or create custom-shaped focus areas within your recordings.
Background removal capabilities leverage AI technology to automatically detect and isolate subjects from their backgrounds. While traditionally associated with webcam recordings, this technology can also be applied to screen content in creative ways. You might use it to remove distracting background elements from software demonstrations or create composite images showing multiple applications simultaneously.
Audio enhancement features ensure your recordings sound as good as they look. Noise reduction technology can clean up background hum, keyboard clicks, or other unwanted sounds from your recordings. Audio normalization ensures consistent volume levels, while equalization tools let you fine-tune the frequency balance of your recorded audio.
Text and annotation tools make it easy to add explanations, labels, and instructions to your screen recordings. You can add animated text, callout boxes, arrows, and highlights to direct viewer attention and provide additional context. These elements are essential for creating effective educational and tutorial content.
Transition effects help create smooth connections between different segments of your recordings. Rather than jarring cuts between different screen sections or applications, you can use fades, wipes, or other transitions to maintain visual continuity and professional presentation.
CapCut — Your all-in-one video & photo editing powerhouse! Experience AI auto-editing, realistic effects, a huge template library, and AI audio transformation. Easily create professional masterpieces and social media viral hits. Available on Desktop, Web, and Mobile App.
Practical Applications of Screen Recording
Understanding how to effectively record your screen opens up numerous practical applications across different contexts. Whether for professional, educational, or personal use, screen recording capabilities can enhance how you communicate, teach, and preserve digital experiences.
In educational settings, screen recording revolutionizes how instructors create learning materials. Teachers can record software demonstrations, create tutorial videos, or capture online resources for later review. Students can record their own problem-solving processes for assignments or create presentations that incorporate digital elements. The ability to screen record with audio allows for narrated explanations that enhance understanding.
Professional environments benefit significantly from screen recording capabilities. Customer support teams can create visual guides to common problems, reducing repetitive explanations. Software developers can record bug reproduction steps to help quality assurance teams understand issues. Project managers can create visual status reports that show progress through dashboards or management tools.
Content creation represents another major application area. YouTubers and social media creators use screen recording for software reviews, gameplay content, tutorial videos, and digital art demonstrations. The flexibility to screen record on CapCut mobile extends these possibilities to smartphone-based content, which is increasingly important for platforms like TikTok and Instagram.
Personal use cases abound as well. You might record video calls with distant family members, preserve memorable gameplay moments, or create visual instructions for relatives learning to use new technology. The ability to capture both visual and audio elements makes these recordings much more valuable than simple screenshots or written instructions.
Accessibility applications should not be overlooked. Screen recordings can help individuals with different learning preferences by providing visual demonstrations alongside audio explanations. They can also serve as valuable reference materials for people who benefit from reviewing processes multiple times at their own pace.
Documentation and preservation represent yet another valuable application. Businesses can create standard operating procedure videos, researchers can record experimental processes using specialized software, and individuals can preserve digital experiences that might otherwise be lost to technological changes.
Comparing Recording Options: QuickTime vs. CapCut
When deciding between QuickTime and CapCut for your screen recording needs, several factors deserve consideration. Each platform offers distinct advantages depending on your specific requirements, technical environment, and intended use cases.
QuickTime’s