TOOL HUNTER

Have you ever shot a video and realized it’s sideways or completely upside down? Or maybe you’re just looking to add some creative flair to your project with cool rotation effects? Don’t worry—you’re not alone, and there’s an easy fix!
DaVinci Resolve is one of the most powerful and popular video editing platforms out there, perfect for both beginners and professionals. It comes loaded with tools that help you correct, enhance, and transform your videos with precision. In this guide, we’ll explore everything you need to know about rotating videos in DaVinci Resolve—whether you’re making a simple 90-degree adjustment or animating a full spin.
We’ll also share some handy tips and introduce you to a fantastic alternative—CapCut Desktop—for those times when you need a quicker, simpler editing solution. Let’s dive in!
Table of Contents
- Why Would You Want to Rotate a Video in DaVinci Resolve?
- Two Easy Ways to Rotate a Video in DaVinci Resolve
- How to Animate Rotation Using Keyframes
- Helpful Tips for Rotating Videos in DaVinci Resolve
- What If You Prefer Something Simpler? Try CapCut Desktop
- Wrapping It All Up
- Frequently Asked Questions
Why Would You Want to Rotate a Video in DaVinci Resolve?
We’ve all been there—you record a video holding your phone vertically, but later realize you need it in horizontal format. Or maybe your camera was accidentally tilted during filming. That’s where knowing how to rotate a video with DaVinci Resolve becomes essential.
But rotation isn’t just for fixing errors. Creative projects often use rotation effects for transitions, dynamic openings, or simply to make content more engaging. DaVinci Resolve makes all of this possible without compromising your video’s quality.
Best of all, you don’t need to be an expert to get great results. The interface is clean, the tools are intuitive, and there’s plenty of help available online.
Two Easy Ways to Rotate a Video in DaVinci Resolve
There are two primary methods to rotate video in DaVinci Resolve: using the Inspector Panel and using the Transform Tool. Both are effective—you can choose whichever feels more comfortable or fits your workflow.
Using the Inspector Panel to Rotate Your Video
The Inspector Panel is your best friend when it comes to making precise adjustments. Here’s how to use it to rotate a video clip in DaVinci Resolve:
Start by importing your video into DaVinci Resolve. You can do this by dragging your file directly into the media pool or timeline.
Once your clip is on the timeline, click on it to select it. On the right side of your screen, you’ll find the Inspector Panel. If you don’t see it, you can enable it from the “View” menu.
Inside the Inspector Panel, look for the “Video” tab and find the “Rotation” parameter. Here, you can either type in a specific value (like 90, 180, or 270 degrees) or use the dial to make finer adjustments.
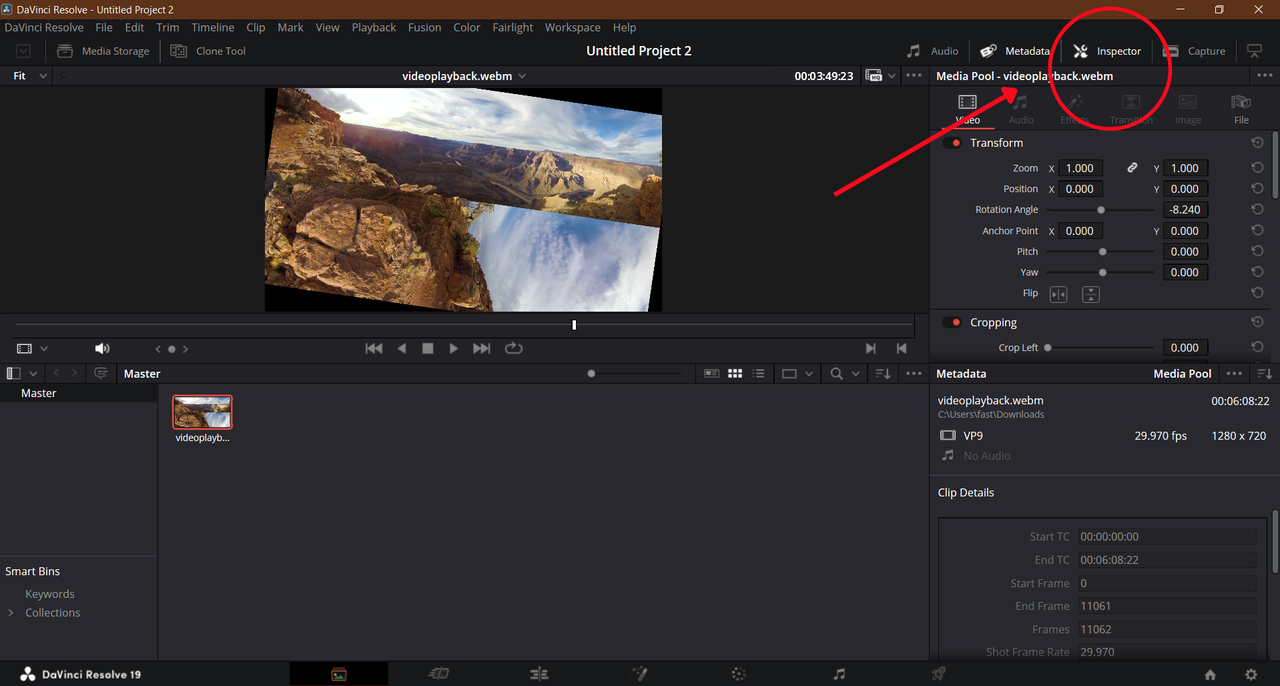
This method is perfect when you need accuracy—for example, if you want to rotate a video exactly 90 degrees in DaVinci Resolve for Instagram.
Using the Transform Tool for More Visual Control
If you prefer a more hands-on approach, the Transform Tool might be your go-to. It lets you click and drag directly on the video in the viewer.
Just like before, import your video and place it on the timeline. Then, locate the small rectangular button above the timeline—it’s usually near the top-left corner of the viewer. Click it and choose “Transform.”
A bounding box will appear around your video. You can click and drag the circular rotation handle (usually at the top or corner) to freely rotate the clip. Alternatively, you can enter a numeric value for more precision.
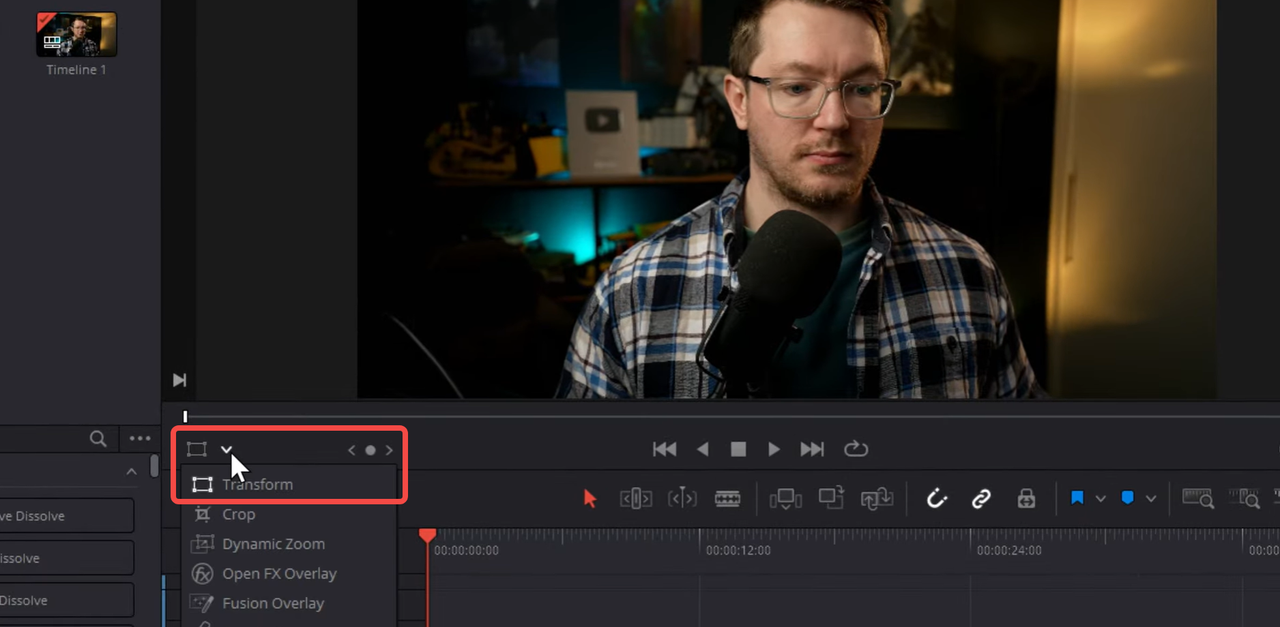
This method is awesome for experimenting. You can quickly see how different angles look and make adjustments on the fly.
How to Animate Rotation Using Keyframes
What if you don’t just want a static rotation? What if you want your video to spin slowly or flip during a transition? That’s where keyframing comes in.
First, select the clip on your timeline. Open the Inspector Panel and find the Rotation parameter.
Click the diamond-shaped icon next to the rotation value—this sets your first keyframe. Move the playhead to where you want the rotation to end, change the rotation value, and set another keyframe.
DaVinci Resolve will automatically create a smooth animation between those two points. You can even adjust the easing to make the movement feel more natural.
This technique is perfect for creating stylish intros, dynamic B-roll, or just adding a bit of life to your social media videos.
Helpful Tips for Rotating Videos in DaVinci Resolve
Rotating a video isn’t just about turning it—it’s about doing it right. Here are some tips to help you get the best results.
Use the “Snap to Grid” feature if you’re aligning multiple clips. This ensures everything lines up perfectly and looks clean.
Combine rotation with other effects. Try scaling your video while rotating it for a more dramatic look. Or flip it horizontally for a mirror effect.
Always check for distortion. If you rotate a video too far, the edges might look warped. If that happens, try scaling up the video slightly to crop out the distorted areas.
Save your presets. If you often use the same rotation settings—like always rotating videos 90 degrees for Instagram—save those settings as a preset. You can apply them with one click later.
Don’t be afraid to experiment. Sometimes a slight tilt (known as a Dutch angle) can make a shot more dramatic. Or a full 180 flip can create a cool, disorienting effect.
CapCut — Your all-in-one video & photo editing powerhouse! Experience AI auto-editing, realistic effects, a huge template library, and AI audio transformation. Easily create professional masterpieces and social media viral hits. Available on Desktop, Web, and Mobile App.

What If You Prefer Something Simpler? Try CapCut Desktop
DaVinci Resolve is incredibly powerful, but it can also be overwhelming—especially if you’re new to video editing or just need to make a quick fix. That’s where CapCut Desktop comes in.
CapCut is a free, user-friendly video editor that makes it easy to rotate videos, apply filters, add text, and more—all without a steep learning curve.
One of the best things about CapCut is its real-time preview. You can see exactly how your video will look as you edit, which makes the whole process faster and more intuitive.
Plus, CapCut integrates rotation with other editing tools. You can adjust brightness, contrast, saturation, and more—all in the same window.
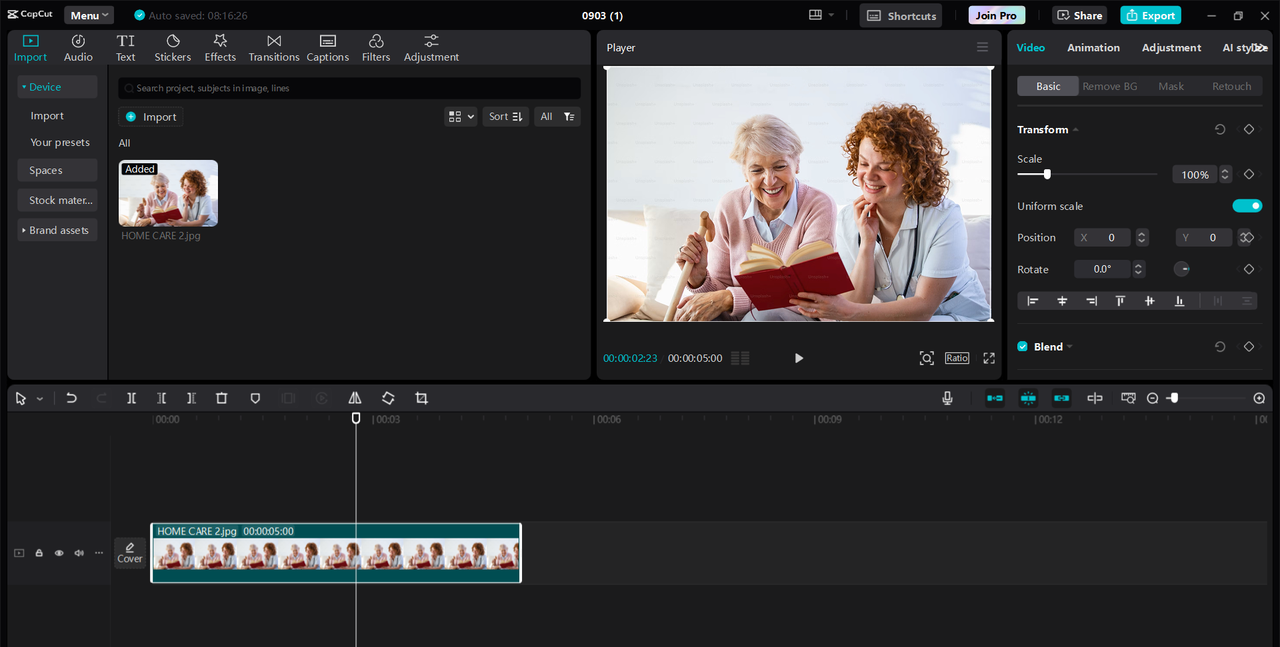
How to Rotate a Video in CapCut Desktop
Getting started with CapCut is super simple. First, download and install the software. Open CapCut and create a new project.
Click “Import” to upload your video, then drag it down to the timeline.
On the right side, you’ll see editing options. Click “Basic,” and you’ll find the rotation controls. You can type in an exact angle or use the dial to rotate freely.
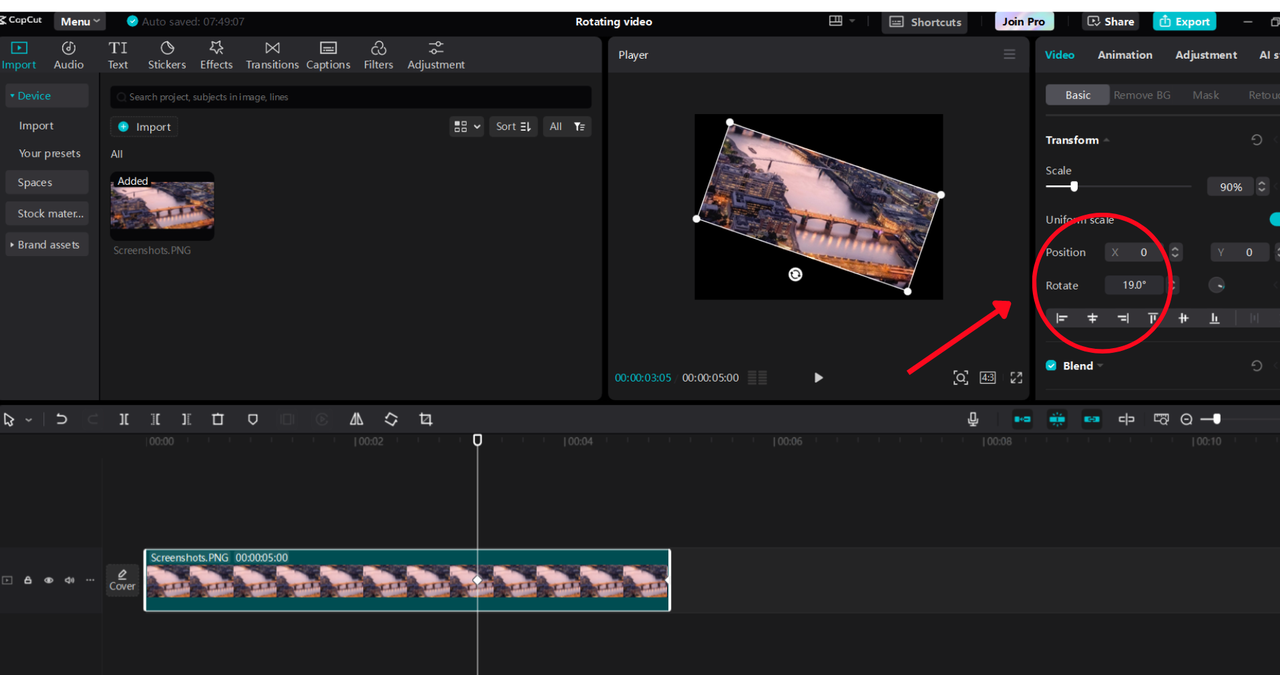
When you’re done, hit “Export” and choose your preferred format and quality. It’s that easy!
CapCut — Your all-in-one video & photo editing powerhouse! Experience AI auto-editing, realistic effects, a huge template library, and AI audio transformation. Easily create professional masterpieces and social media viral hits. Available on Desktop, Web, and Mobile App.
Wrapping It All Up
And there you have it—a full guide on how to rotate video in DaVinci Resolve! Whether you’re fixing a mistake, editing for social media, or trying out creative effects, rotating your video is a simple but powerful way to improve your content.
DaVinci Resolve gives you professional-level control, especially with keyframing and the Inspector Panel. But if you want something faster and easier, CapCut Desktop is a great alternative that still delivers high-quality results.
Remember: the more you practice, the better you’ll get. Don’t hesitate to play around with different angles, keyframes, and effects until you’re happy with your video.
Frequently Asked Questions
How do I rotate a video with DaVinci Resolve by 90 degrees?
You can use the Inspector Panel and enter “90” in the rotation field, or use the Transform Tool and drag until it’s at a 90-degree angle.
Can I rotate an image in DaVinci Resolve the same way?
Yes! The process is identical. Just import the image into your timeline and use the same rotation tools.
How do I flip footage in DaVinci Resolve?
In the Inspector Panel, you’ll find flip options—horizontal and vertical. Just click the one you need.
Is DaVinci Resolve good for rotating videos for Instagram?
Definitely. Lots of people use it to rotate clips shot in portrait mode so they fit better on Instagram.
What should I do if my rotated video looks distorted?
Try scaling the video up a little to crop out the edges. You can also reduce the rotation angle.
Some images used in this article are sourced from CapCut.