TOOL HUNTER

Ever noticed how some Snapchat videos just grab your attention? They might show water flowing upwards, someone jumping backwards, or a simple action that looks totally magical when played in reverse. That’s the power of reversing your videos! It’s not just a fun trick—it’s a creative way to make your content stand out.
Whether you’re looking to add some flair to your Stories or just want to experiment with new ideas, learning how to put Snapchats in reverse is definitely worth your time. The best part? You don’t need to be a tech expert to do it. Snapchat actually has built-in tools that make reversing videos super simple, and there are other options like CapCut if you want more advanced features.
In this guide, we’ll cover everything from why reversing videos is so cool to step-by-step instructions on how to do it. We’ll also share some tips to make your reversed videos even better and answer common questions like does Snapchat still have reverse filters in 2024. Let’s dive in and start creating some amazing content!
Table of Contents
- Why Reverse Videos on Snapchat?
- How to Use Snapchat’s Built-in Reverse Filter
- Reversing Existing Videos on Snapchat
- Using CapCut to Reverse Videos for Snapchat
- Tips for Creating Amazing Reverse Videos
- Does Snapchat Still Have Reverse Features in 2024?
- Fixing Common Reverse Video Issues
- Advanced Reverse Video Techniques
- FAQs About Reversing Snapchat Videos
Why Reverse Videos on Snapchat?
Reversing videos isn’t just about making things look backwards—it’s about transforming ordinary moments into something extraordinary. When you learn how to put Snapchats in reverse, you’re opening up a whole new world of creative possibilities.
First, reversing clips boosts your creativity in ways you might not expect. Simple actions like walking down the street, pouring a drink, or even just turning around become fascinating when played backwards. It gives your content an artistic touch that regular videos just can’t match. People love seeing familiar things from a completely different perspective.
Another great reason to reverse videos is that it helps your content stand out. Let’s face it—everyone’s posting similar stuff on social media these days. When you post a reversed video, you’re offering something unique that catches people’s attention and makes them stop scrolling. It’s a great way to increase engagement and get more views on your Stories.
Reversed videos are also perfect for highlighting special moments. Maybe something funny happened really quickly, or there was a dramatic moment that passed in a blink. Playing it in reverse lets people appreciate details they might have missed the first time. It’s like giving your audience a chance to re-experience the best parts of your video.
And let’s not forget the pure fun factor! There’s something genuinely entertaining about watching water flow upwards, seeing someone “un-jump” into a pool, or watching objects magically return to their original positions. These playful effects create lighthearted content that people love to share.
Whether you’re a casual Snapchat user or someone who creates content regularly, learning how to put Snapchats in reverse can seriously upgrade your social media game. It’s one of those skills that’s both useful and enjoyable to master.
How to Use Snapchat’s Built-in Reverse Filter
The easiest way to reverse videos is right within the Snapchat app itself. The platform has a built-in reverse filter that makes the whole process incredibly simple. Here’s exactly how to put Snapchats in reverse using this feature:
Start by opening your Snapchat app like you normally would. When you’re ready to record, just tap and hold the circular button at the bottom of the screen. Keep holding it until you’ve captured everything you want in your video, then release the button to stop recording.
Once your video is recorded, the magic happens. Swipe left on your screen to browse through all the available filters. Keep swiping until you find the one with a curved arrow pointing backwards—that’s the reverse filter! Tap on it, and watch as your video instantly starts playing in reverse. It’s that simple.
After applying the reverse effect, you can still add all your favorite Snapchat enhancements. Feel free to include text, draw on your video, add stickers, or even use voice filters to make it more entertaining. Make it truly yours with these personal touches.
When you’re happy with how everything looks, tap the blue “Send to” button in the bottom right corner. From here, you can share your reversed video to your Story, send it to specific friends, or save it to your camera roll for later use.
The best part about using Snapchat’s built-in reverse filter is that you don’t need any additional apps or tools. Everything happens right within the app, making it super convenient for quick edits and shares. Now that you know how to put Snapchats in reverse using the built-in filter, you can start experimenting with this fun feature whenever inspiration strikes.
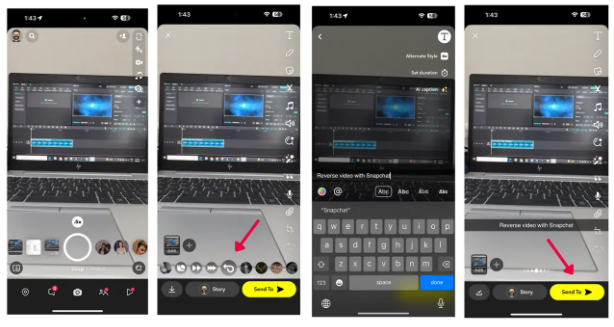
Reversing Existing Videos on Snapchat
What if you want to reverse a video you already recorded? Maybe you have an old clip in your memories that would look amazing backwards, or perhaps you saved something from your camera roll that deserves the reverse treatment. Good news—Snapchat lets you apply the reverse filter to existing videos too!
Here’s how to put Snapchats in reverse when working with videos you’ve already captured:
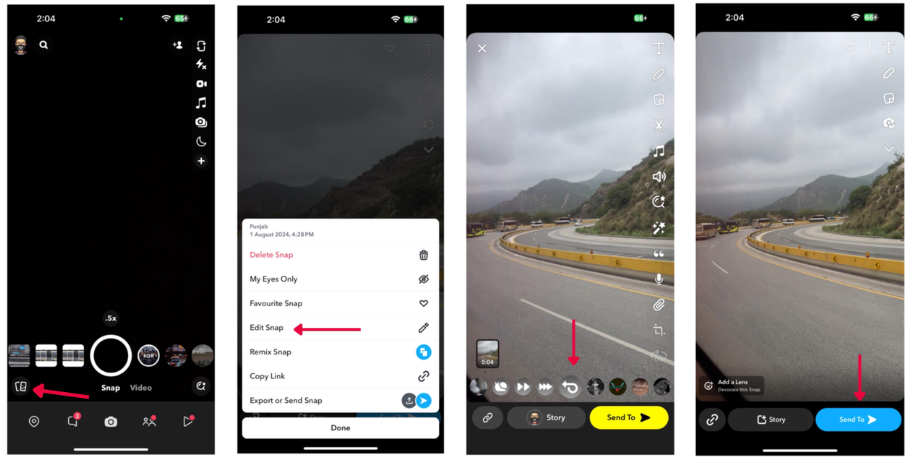
First, open your Snapchat app and look for the small image icon located right next to the record button. Tapping this will open your Memories, where all your saved content lives. From here, you can browse through your Snaps, Camera Roll, or Stories sections to find the video you want to reverse.
Once you’ve found your video, tap on it to open it fully. Now look for the three dots in the top right corner (this is the expand icon). Tap those dots, then select “Edit Snap” from the menu that appears. This will open up the editing interface where you can access filters.
Just like with new videos, swipe left through the filters until you find that familiar curved arrow symbol—the reverse filter. Tap it, and your existing video will immediately flip to play backwards. It’s the same simple process whether you’re working with something new or old.
Sometimes you might run into a small issue. If your video is longer than 10 seconds, the reverse filter might not appear. This is a common limitation, but there’s an easy fix. Just trim your video down to under 10 seconds by dragging the ends of the clip, save your changes, and then try applying the reverse filter again.
Once your video is successfully reversed, you can save it to your device or share it directly with friends and followers. This method is perfect for breathing new life into old videos or working with clips you’ve saved from other places. Now you know how to put Snapchats in reverse even when working with existing content!
CapCut — Your all-in-one video & photo editing powerhouse! Experience AI auto-editing, realistic effects, a huge template library, and AI audio transformation. Easily create professional masterpieces and social media viral hits. Available on Desktop, Web, and Mobile App.

Using CapCut to Reverse Videos for Snapchat
Sometimes you need more control than what Snapchat’s built-in tools offer. Maybe your video is longer than 10 seconds, or you want to add special effects before reversing. This is where CapCut comes in—a free desktop video editor that’s both powerful and user-friendly.
Wondering how to put Snapchats in reverse using CapCut? The process is straightforward and gives you way more editing options than the basic Snapchat tools.
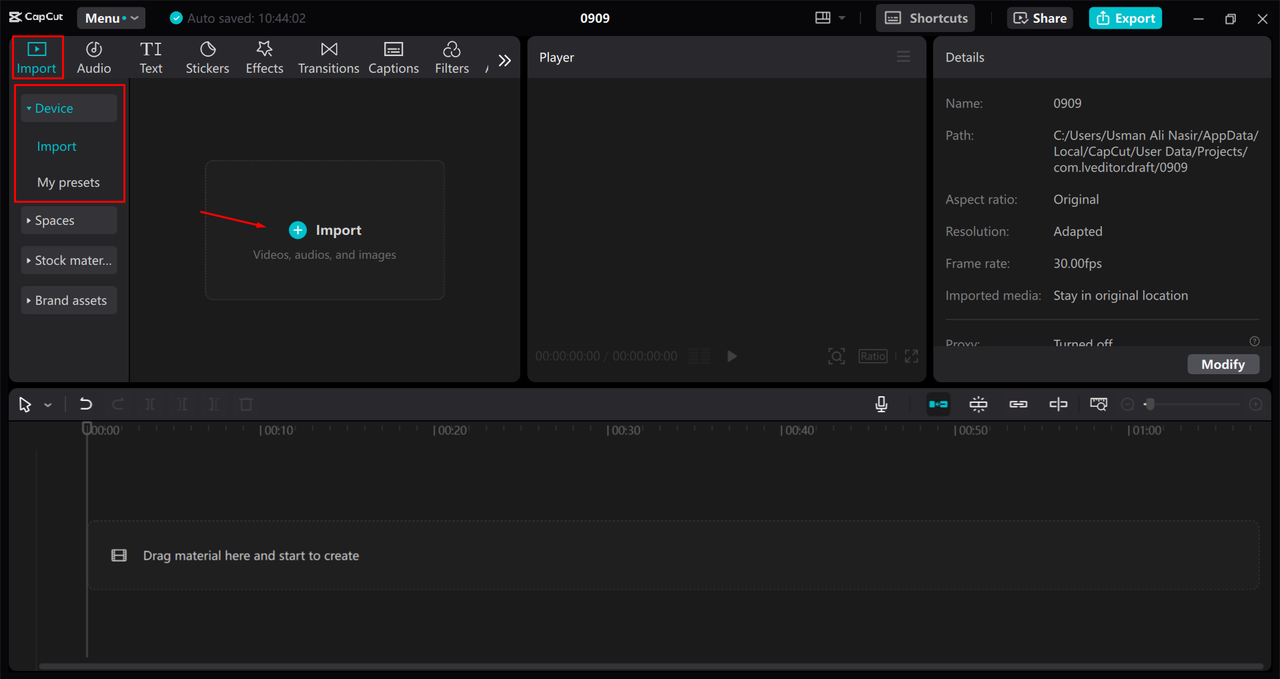
First, you’ll need to download and install CapCut on your computer. It’s completely free, which is great news for anyone on a budget. Once installed, open the program and start a new project to begin working on your video.
Click the “Import” button to upload the video you want to reverse. CapCut supports multiple video formats like MP4, MOV, and AVI, so you don’t have to worry about compatibility issues. Whether your clip comes from your phone, another app, or a camera, CapCut can probably handle it.
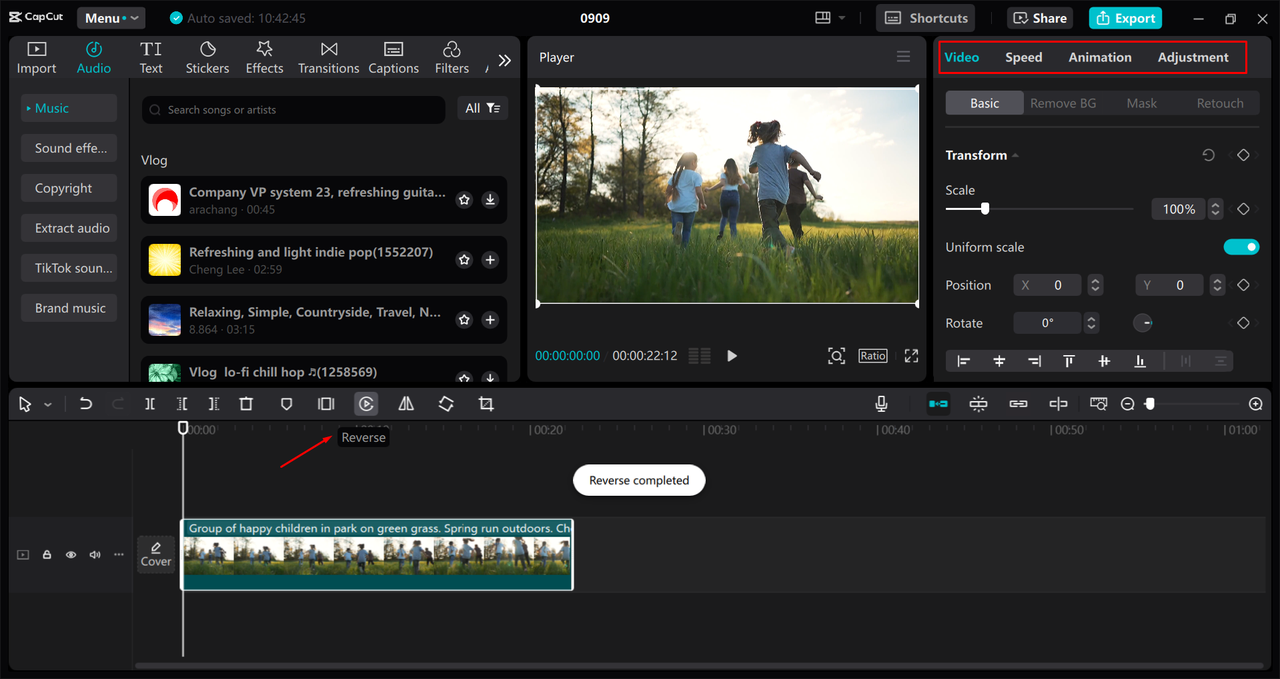
After importing your video, drag it down to the editing timeline at the bottom of the screen. Now for the fun part: look for the “Reverse” button at the top left of the timeline. With just one click, your video will instantly start playing backwards. It’s that simple!
But CapCut offers so much more than just reversing. You can trim your video with precision, cutting out any parts you don’t want. You can add filters, adjust the speed, include background music, or even use keyframe animation for smooth transitions between scenes. The editing possibilities are pretty much endless.
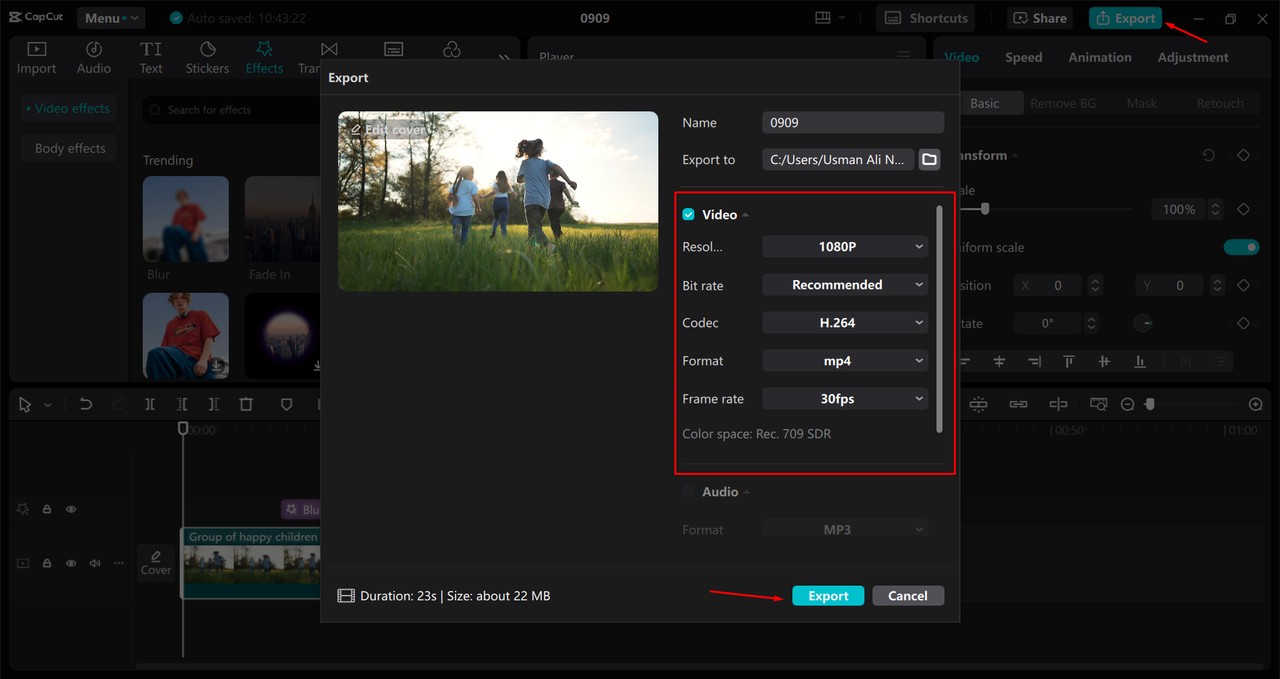
Once you’re happy with your reversed video, hit the “Export” button. You can choose your preferred format and quality settings before saving the final product to your computer. From there, you can easily upload it to Snapchat or any other social media platform.
Using CapCut is especially helpful if you’re creating content on a computer or want to make more polished videos before sharing them on Snapchat. Now you know how to put Snapchats in reverse using a more advanced tool that gives you creative control over every aspect of your video.
Tips for Creating Amazing Reverse Videos
Knowing how to put Snapchats in reverse is one thing, but creating truly standout reverse videos takes a little extra effort. Here are some tips to help your reversed content really shine and capture your audience’s attention.
Try adding slow motion to parts of your video before reversing it. This technique emphasizes movements like jumps, splashes, or throws, making the reverse effect even more dramatic and eye-catching. The combination of slow motion and reversal can create some truly mesmerizing visuals.
Music can completely transform the vibe of your reversed video. Choose tracks that match the mood you’re trying to create—upbeat songs for fun moments, calm music for dreamy sequences, or dramatic scores for impactful scenes. The right background music can turn a good reverse video into a great one.
Don’t forget about filters and overlays! Even after reversing your video, you can add color filters, special effects, or text overlays to make it more visually interesting. Experiment with different combinations to see what works best with your reversed footage. Sometimes a simple color adjustment can make all the difference.
Adjusting the speed of your reversed video is another neat trick to try. Sometimes speeding up a reversed clip makes it funnier, while slowing it down can add drama or mystery. Play around with different speed settings to find what works best for your specific video.
If you’re feeling ambitious, try combining multiple reversed clips into one video. This works great for storytelling—imagine a sequence showing several related actions happening in reverse order. This technique can create a fascinating narrative flow that keeps viewers engaged from start to finish.
These tips are all easy to try and can make a significant difference in the quality of your reversed Snapchats. The key is to experiment and have fun with the process. Now that you know how to put Snapchats in reverse and enhance them with these techniques, you’re ready to create some truly amazing content!
Does Snapchat Still Have Reverse Features in 2024?
This is a common question many users have, especially those who remember when Snapchat first introduced reverse filters. The good news is yes, Snapchat still has reverse capabilities in 2024! The reverse filter is still available in the app and works just as well as it always has.
Whether you’re recording new videos or editing old ones, you can find and use the reverse filter exactly like before. The process hasn’t changed—record your video, swipe through filters until you find the curved arrow symbol, and tap to apply the reverse effect. It’s reassuring to know that this popular feature remains available for everyone to enjoy.
Some users specifically wonder: does Snapchat still have reverse 2019 version filters? While Snapchat has undergone many updates and changes since 2019, the reverse feature has remained consistent. It might look slightly different due to interface updates, but the functionality is the same. You can still achieve those cool backward-playing videos that everyone loves.
The consistency of this feature is great news for content creators who have come to rely on reverse videos as part of their creative toolkit. Whether you’re new to Snapchat or have been using it for years, you can continue to create reversed content without worrying about the feature disappearing.
So no need to worry—you can still put Snapchats in reverse whenever inspiration strikes. The feature is alive and well in 2024, ready to help you create engaging, attention-grabbing content for your followers.
Fixing Common Reverse Video Issues
Even when you know how to put Snapchats in reverse, sometimes things don’t go exactly as planned. Don’t worry—most issues have simple solutions that’ll get you back to creating amazing reverse videos in no time.
What if you accidentally trim too much of your video? This happens to everyone eventually. If you’re editing in Snapchat and trim too much, you can usually undo it by tapping the undo button (if available) or simply exiting without saving and starting over. It’s a good idea to make small trimming adjustments and check how they look before finalizing your edits.
In CapCut, you have even more flexibility when it comes to fixing mistakes. Since you’re working with a copy of your original video, you can undo edits step by step or revert to the original clip entirely. This makes CapCut a great option if you’re worried about making irreversible changes to your precious footage.
Another common question is about audio in reversed videos. When you reverse a video in Snapchat, the audio reverses too, which can create some interesting (and sometimes weird) sound effects. If you’d prefer not to have reversed audio, you can remove the original sound before applying the reverse filter and add music or a voiceover afterwards.
CapCut gives you even more control over audio in reversed videos. You can choose to reverse the video while keeping the audio normal, or adjust audio settings separately to create exactly the effect you want. This level of control is perfect for content creators who want everything to be just right.
Remember, most issues with reverse videos have simple solutions. Whether you’re using Snapchat’s built-in tools or CapCut’s advanced features, there’s almost always a way to fix problems and create the perfect reversed video. Don’t be afraid to experiment—that’s how you learn new tricks and improve your content creation skills!
CapCut — Your all-in-one video & photo editing powerhouse! Experience AI auto-editing, realistic effects, a huge template library, and AI audio transformation. Easily create professional masterpieces and social media viral hits. Available on Desktop, Web, and Mobile App.
Advanced Reverse Video Techniques
Once you’ve mastered the basics of how to put Snapchats in reverse, you might want to try some advanced techniques to make your content even more impressive. These methods can help you create truly unique videos that stand out from the crowd.
Consider combining reversed footage with normal playback in the same video. This creates a fascinating contrast that can highlight specific moments or actions. For example, you could show an action happening normally, then immediately show it in reverse—this technique often creates a cool, surreal effect that viewers love.
Experiment with different transition effects when moving between reversed and normal footage. A smooth fade or creative wipe can make the shift between forward and backward playback feel intentional and professional rather than jarring or random.
Try using reverse videos to create “magic” effects. For instance, you can film yourself “catching” objects that were actually thrown to you, or “un-pouring” drinks back into their containers. When played in reverse, these actions look like incredible feats of magic that are sure to impress your audience.
Another advanced technique involves using reverse footage to create seamless loops. If you carefully plan your action and reversal, you can create videos that loop perfectly without any visible beginning or end. These endless loops are highly engaging and often get shared widely because people can’t look away.
Don’t forget about the power of storytelling with reverse videos. You can create fascinating narratives by showing events in reverse order—like someone undoing their entire day from evening to morning. This reverse chronology can be used for comedy, drama, or just to create something thought-provoking and different.
Remember that the best way to discover advanced techniques is through experimentation. Play around with different ideas, combine multiple effects, and don’t be afraid to try something unusual. Some of the most viral reverse videos came from creators who were willing to think outside the box and try something new.
Now that you know how to put Snapchats in reverse and have some advanced techniques to try, you’re well on your way to creating content that could potentially go viral. The key is to keep experimenting and having fun with the process!
FAQs About Reversing Snapchat Videos
Even after learning how to put Snapchats in reverse, you might still have some questions. Here are answers to some of the most frequently asked questions about reversing videos on Snapchat.
Does Snapchat still have reverse video capability?Yes! Snapchat still has the reverse filter available. You can find it by swiping left after recording a video or when editing an existing video. The feature remains popular and functional in 2024.
What should I do if the reverse filter is missing?If your video is longer than 10 seconds, the reverse filter might not appear. The solution is to trim your video to under 10 seconds, then try applying the filter again. This length limitation is consistent across the platform.
Can I reverse a video without using the filter?If you prefer more control over the reversal process, you can use a video editor like CapCut. This allows you to reverse longer videos and add other effects that aren’t available in Snapchat’s built-in tools.
How do I save a reversed video?After reversing your video, tap the save button