TOOL HUNTER

If you’ve ever found yourself staring at a Windows 7 locked screen, unable to access your computer because you’ve forgotten the password, you’re not alone. This frustrating situation can happen to anyone, but the good news is that there are several effective ways to regain control of your system. Whether you’re dealing with performance issues, malware infections, or simply need to wipe your computer clean before passing it on to someone else, learning how to reset the laptop Windows 7 is an essential skill for any computer user.
When your computer is locked and you can’t remember the password, it might feel like you’re permanently locked out. However, with the right techniques and tools, you can successfully reset Windows 7 to factory settings and start fresh. This comprehensive guide will walk you through three different strategies to help you understand exactly how to reset the computer Windows 7, even when you can’t log in normally.
Table of Contents
- Understanding Your Reset Options for Windows 7
- Strategy 1: Using Advanced Boot Options to Reset Your Locked Computer
- Strategy 2: Removing Password Protection Before Resetting
- Strategy 3: Performing a Hard Reset on Your Windows 7 Computer
- How to Factory Reset Windows 7 After Password Removal
- Additional Considerations for Resetting Windows 7
- Troubleshooting Common Reset Issues
- Preventive Measures for Future Lockouts
- Conclusion
Understanding Your Reset Options for Windows 7
Before we dive into the specific methods, it’s important to understand that there are different types of resets available for Windows 7. A factory reset will restore your computer to its original state, just like when you first bought it. This process removes all your personal files, applications, and settings. If you’re planning to sell or donate your computer, or if you’re dealing with serious system issues, this is usually the best option.
On the other hand, sometimes you might just need to remove the password protection to access your files before performing a reset. This approach is ideal if you have important data that you want to backup before wiping the system clean. We’ll explore both scenarios in detail, giving you multiple pathways to regain access to your locked Windows 7 computer.
Strategy 1: Using Advanced Boot Options to Reset Your Locked Computer
One of the most reliable methods for how to reset the laptop Windows 7 when you’re locked out involves using the Advanced Boot Options menu. This approach is particularly useful because it doesn’t require a Windows installation disk, which many users no longer have readily available.
The Advanced Boot Options menu contains several troubleshooting tools that can help you access your system even when you can’t log in normally. Here’s a step-by-step guide on how to reset a locked computer on Windows 7 using this method:
Start by turning on your computer. As soon as you see the initial boot screen, begin pressing the F8 key repeatedly. This needs to be done before Windows starts loading. If you time it correctly, you’ll see the Advanced Boot Options screen appear.
From the list of options available, use your arrow keys to select “Safe Mode with Command Prompt” and press Enter. Your computer will then boot into a special mode that loads only essential system files and displays a command prompt window.
At the command prompt, type “cd restore” (without quotes) and press Enter. This command changes your directory to the restore folder where system restoration tools are located.
Next, type “rstrui.exe” and press Enter. This command launches the System Restore utility, which allows you to restore your computer to an earlier point in time when it was working properly.

The System Restore window will open. Click “Next” to continue. You’ll then see a list of available restore points. These are snapshots of your system taken at different times, usually before significant system changes like software installations or updates.
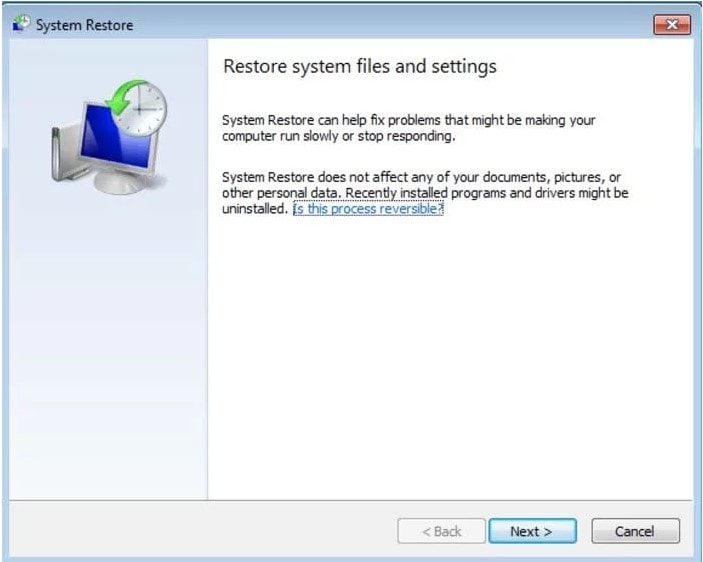
Select an appropriate restore point from before you started experiencing problems with your computer. If you’re unsure which one to choose, look for the most recent restore point that predates your lockout issue. Click “Next” to continue, then confirm your selection on the final screen. The restoration process will begin, and your computer will restart once it’s complete.
This method of how to reset the computer Windows 7 using System Restore is particularly effective for resolving software-related issues that might be preventing you from accessing your system. However, it’s worth noting that this approach won’t remove your personal files – it only restores system files and settings to an earlier state.
iMyFone Passper Pro.Ultimate 6-in-1 File Password Remover.1-click to remove Excel/Word/PDF/RAR/ZIP/PowerPoint passwords.Unlock file passwords to read, edit or print easily.Remove read-only file protection permanently.Break file locks with up to 99% sucessful rate.
Check More Details | Download Now! | Check All Deals
Strategy 2: Removing Password Protection Before Resetting
If you need to access your files before performing a full reset, removing the password protection is your best bet. This approach to how to reset the laptop Windows 7 involves using specialized software to bypass or remove the password, giving you temporary access to your system so you can backup important data before performing a factory reset.
While there are several tools available for this purpose, it’s important to choose one that’s reliable and secure. The software should be able to remove the password without damaging your system or compromising your data. Here’s how the process typically works:
First, you’ll need access to a second computer where you can download and install the password removal software. Once installed, the software will guide you through creating a bootable USB drive or CD that you can use on your locked computer.
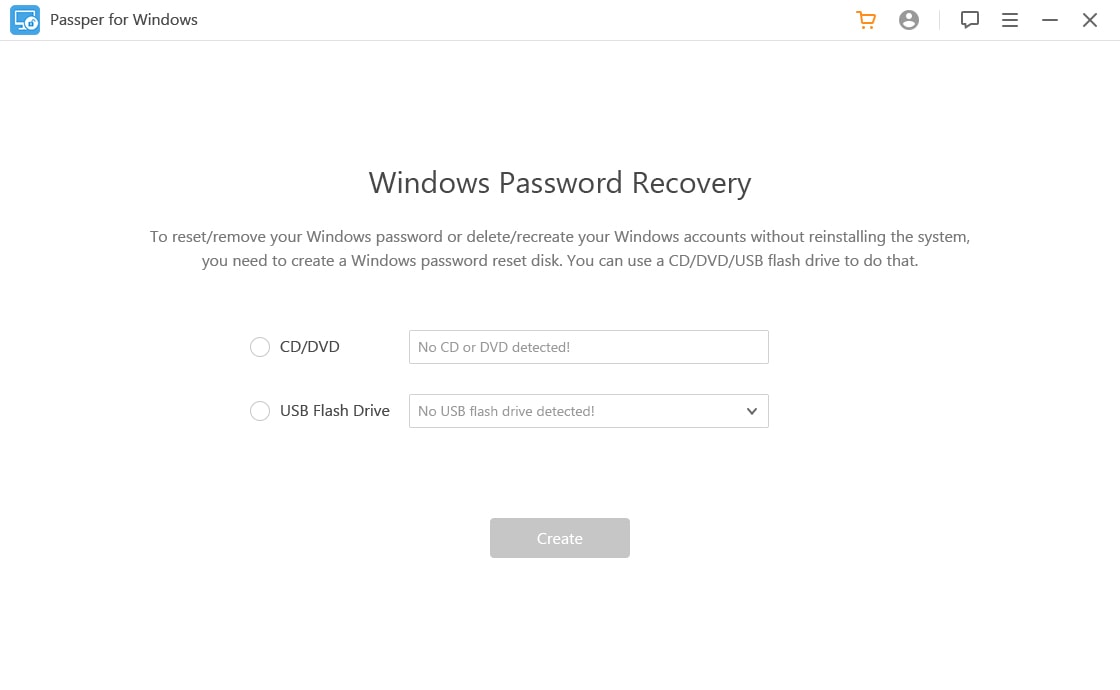
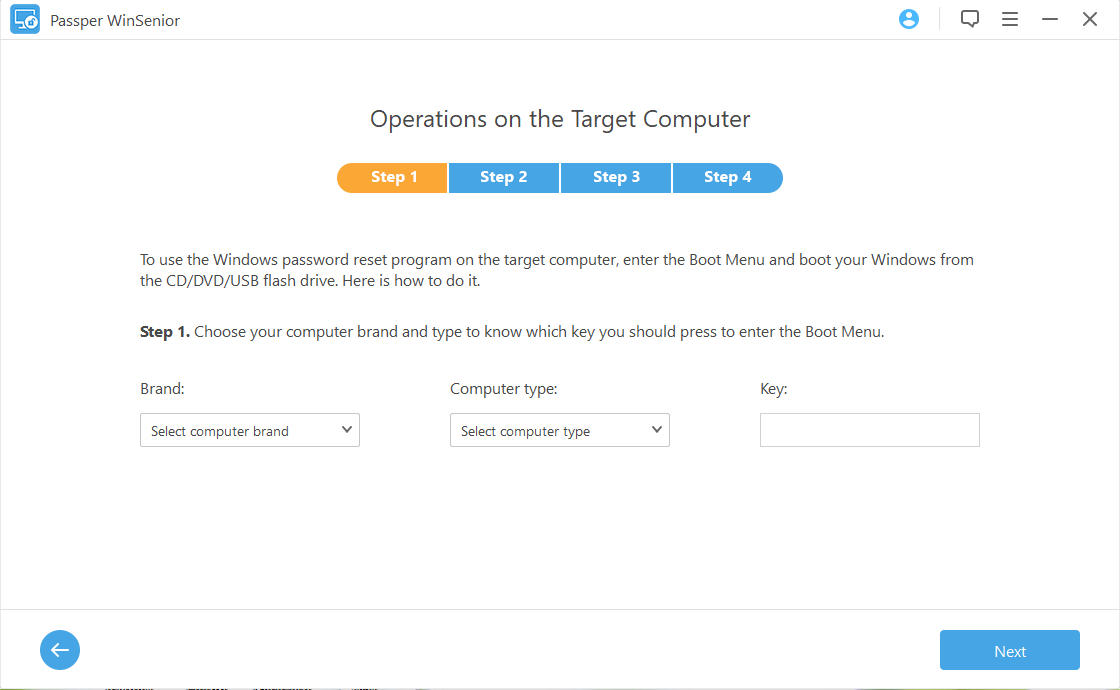
Insert this bootable media into your locked computer and restart it. As the computer boots up, you’ll need to press the appropriate key to enter the boot menu – this is typically F12, ESC, or another function key depending on your computer manufacturer.
From the boot menu, select the USB drive or CD as your boot device. The password removal tool will load, presenting you with an interface where you can select the user account whose password you want to remove. After selecting the appropriate account, initiate the password removal process. The software will work to remove the password protection, which typically takes just a few minutes.
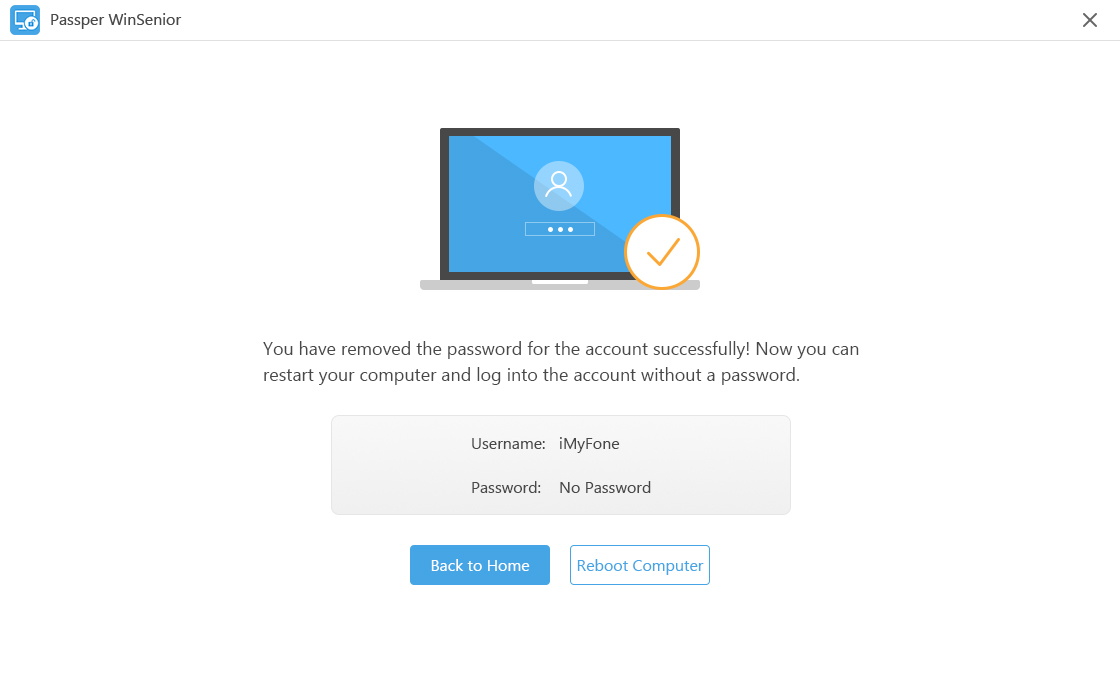
Once the process is complete, restart your computer without the bootable media. You should now be able to log into Windows 7 without entering a password. This gives you the opportunity to backup your important files before proceeding with a full system reset.
This method of how to reset a locked computer on Windows 7 is ideal when you have important documents, photos, or other files that you need to preserve before wiping the system. It provides a temporary solution that bridges the gap between being locked out and performing a complete reset.
Strategy 3: Performing a Hard Reset on Your Windows 7 Computer
When you need a completely fresh start or when other methods have failed, performing a hard reset is the most comprehensive solution. This approach to how to hard reset computer Windows 7 involves completely reinstalling the operating system, which will erase all your files, applications, and settings. It’s the digital equivalent of starting with a brand new computer.
Before proceeding with a hard reset, it’s crucial to understand that this process will permanently delete all data on your computer. If you have any important files that haven’t been backed up, you should attempt one of the previous methods to recover them first. If that’s not possible, you’ll need to accept that those files will be lost.
To perform a hard reset, you’ll need a Windows 7 installation disc or a bootable USB drive with the Windows 7 installation files. If you don’t have one, you may be able to download an ISO file from Microsoft’s website, though availability may vary since Windows 7 is no longer supported.
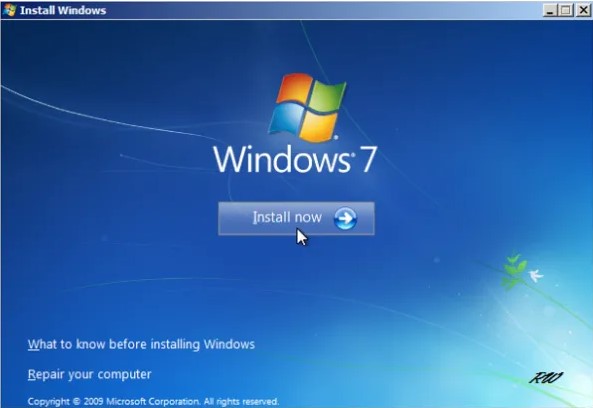
Insert the Windows 7 installation media into your computer and restart it. As the computer boots, you may need to press a key (usually F12, ESC, or DEL) to access the boot menu and select your installation media as the boot device.
Once the Windows 7 installation screen appears, select your language, time and currency format, and keyboard input method, then click “Next.” On the following screen, click “Install Now” to begin the installation process.
You’ll be prompted to accept the Microsoft Software License Terms. Read through the terms, check the box indicating your acceptance, and click “Next.” On the next screen, select “Custom (advanced)” installation type.
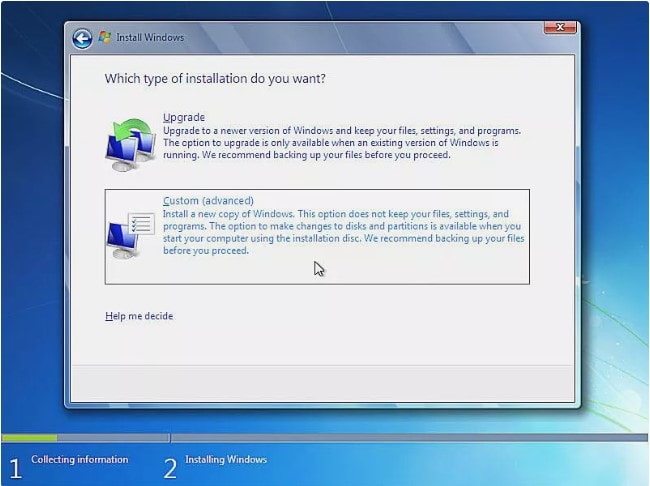
You’ll now see a list of partitions on your hard drive. This is where you’ll need to make an important decision about how to hard reset computer Windows 7. To perform a complete reset, you should delete all existing partitions and then create new ones. Select each partition and click “Delete” until only unallocated space remains.
After deleting all partitions, select the unallocated space and click “Next.” Windows will automatically create the necessary partitions and begin installing a fresh copy of Windows 7. The installation process may take 20-40 minutes, during which your computer will restart several times.
Once the installation is complete, you’ll go through the initial Windows 7 setup process, creating a new user account and configuring basic settings. Your computer will now be running a fresh installation of Windows 7, completely free of any previous issues, malware, or performance problems.
This method of how to reset Windows 7 to factory settings is the most thorough solution available. It’s particularly useful when dealing with persistent malware infections, severe system corruption, or when preparing a computer for a new owner.
How to Factory Reset Windows 7 After Password Removal
If you’ve successfully used the second strategy to remove your Windows password, you might now be wondering how to reset Windows 7 to factory settings while preserving your access to the system. This process is slightly different from a hard reset because you’re already logged into Windows, giving you more options and control over the process.
Before proceeding with a factory reset, it’s absolutely essential to backup any important files. Even though you’ve regained access to your system, a factory reset will still erase all your personal data. Take this opportunity to copy important documents, photos, and other files to an external hard drive, USB flash drive, or cloud storage service.
Once your files are safely backed up, you can proceed with the factory reset. Windows 7 includes a built-in feature that allows you to restore your computer to its original factory condition. Here’s how to reset the laptop Windows 7 using the recovery partition:
Open File Explorer by clicking the Windows logo in the bottom left corner of your screen and selecting “Computer” from the menu. Alternatively, you can press the Windows key + E on your keyboard.
In the File Explorer window, right-click on “Computer” in the left navigation pane and select “Manage” from the context menu. This will open the Computer Management console.
In the Computer Management window, look for “Storage” in the left pane and click on “Disk Management” underneath it. This will display a visual representation of the partitions on your hard drive.
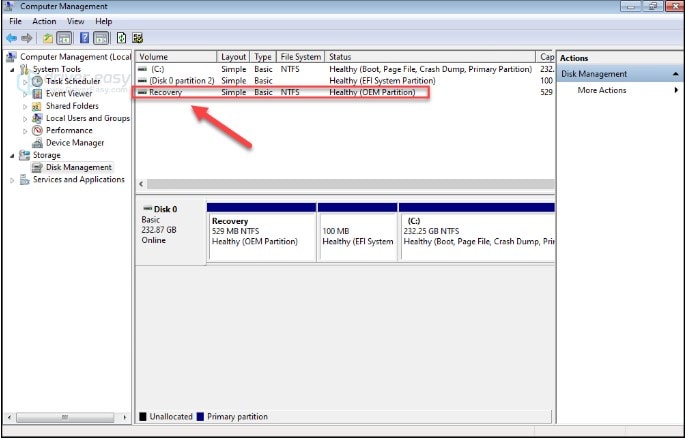
Look for a partition labeled “Recovery” or something similar. Most manufacturers include a hidden recovery partition on Windows 7 computers that contains the necessary files to restore the system to its factory state. If you can see such a partition, you can proceed with the factory reset using the built-in recovery tools.
Close the Computer Management window and restart your computer. As it boots up, press the appropriate key to launch the recovery environment. This key varies by manufacturer but is typically F10, F11, Alt+F10, or Ctrl+F11. You may need to consult your computer’s documentation or try several keys to find the correct one.
Once the recovery environment loads, follow the on-screen instructions to initiate the factory reset process. The exact steps will vary depending on your computer manufacturer, but generally, you’ll have the option to restore your system while preserving your files (if available) or performing a complete reset that removes everything.
This method of how to reset the computer Windows 7 is often the easiest approach for users who simply want to start fresh without going through a complete Windows reinstallation. It’s particularly useful when your computer came with pre-installed software that you’d like to preserve, as the factory reset will typically restore these applications along with the operating system.
Additional Considerations for Resetting Windows 7
Regardless of which method you choose for how to reset the laptop Windows 7, there are several important factors to keep in mind. First, understand that resetting your computer is a significant action that will have lasting consequences. While it can resolve many issues, it should generally be considered a last resort after other troubleshooting methods have failed.
If you’re resetting your computer due to performance issues, consider whether simpler solutions might help. Cleaning up temporary files, running disk defragmentation, uninstalling unnecessary programs, and scanning for malware can sometimes resolve performance problems without the need for a full reset.
Another important consideration is software licensing. After resetting Windows 7 to factory settings, you’ll need to reinstall any applications that didn’t come pre-installed with your computer. Make sure you have access to installation files and product keys for software you need to use. This is particularly important for expensive applications like Microsoft Office or Adobe Creative Suite.
If you’re planning to continue using Windows 7 after the reset, be aware that Microsoft ended official support for this operating system in January 2020. This means you won’t receive security updates, leaving your computer vulnerable to new threats. Consider upgrading to a newer version of Windows if possible, or at least take extra precautions with your online security.
For those who need to reset Windows 7 to factory settings on a regular basis – perhaps in an educational or business environment – it might be worth creating a custom system image after setting up the computer perfectly. This image can then be deployed to multiple computers or used for quick restoration in the future.
Troubleshooting Common Reset Issues
Sometimes, the process of how to reset a locked computer on Windows 7 doesn’t go as smoothly as planned. You might encounter error messages, the process might freeze, or the reset might fail to complete. If you run into problems, don’t panic – there are usually solutions available.
If the Advanced Boot Options menu doesn’t appear when you press F8, try tapping the key more rapidly or holding it down as soon as you power on the computer. Some systems are particularly sensitive about timing. If it still doesn’t work, your computer might have Fast Boot enabled, which skips certain startup processes. Check your BIOS settings for an option to disable Fast Boot.
When using password removal software, ensure you’re using a compatible version for Windows 7. Software designed for newer versions of Windows might not work correctly with Windows 7. Similarly, make sure your bootable USB drive or CD is properly created – a faulty creation process is a common reason for password removal tools to fail.
If you’re attempting a hard reset using a Windows 7 installation disc and receive errors about missing drivers, particularly when dealing with newer hardware, you may need to load additional drivers during the installation process. These drivers are typically available from your computer manufacturer’s website.
For factory resets using the recovery partition, if the process fails or the partition is missing or corrupted, you may need to use recovery discs instead. Many manufacturers provide the option to create these discs when you first set up your computer. If you don’t have them, you might be able to order them from the manufacturer for a fee.
iMyFone Passper Pro.Ultimate 6-in-1 File Password Remover.1-click to remove Excel/Word/PDF/RAR/ZIP/PowerPoint passwords.Unlock file passwords to read, edit or print easily.Remove read-only file protection permanently.Break file locks with up to 99% sucessful rate.
Check More Details | Download Now! | Check All Deals
Preventive Measures for Future Lockouts
Once you’ve successfully learned how to reset the laptop Windows 7 and have your computer running properly again, it’s wise to take steps to prevent similar situations in the future. Creating a password reset disk is one of the most effective preventive measures. This allows you to reset your password easily if you forget it again. You can create one using a USB flash drive through the User Accounts section in Control Panel.
Regularly backing up your important files is another crucial practice. Whether you use an external hard drive, cloud storage, or both, having recent backups means you won’t panic if you need to perform another reset in the future. Windows 7 includes built-in backup tools that can automate this process.
Consider creating a system repair disc as well. This bootable CD or DVD contains troubleshooting tools that can help you fix startup problems without needing to perform a full reset. You can create one through the Backup and Restore section in Control Panel.
For users who frequently forget passwords, using a password manager can help you keep track of your login credentials securely. These applications store your passwords in an encrypted database, protected by a single master password that you need to remember.
If security isn’t a major concern – for example, on a computer that only you use in a secure location – you might consider setting up automatic login. This bypasses the password prompt entirely when starting your computer. While not recommended for shared or portable computers, it can be convenient for dedicated home systems.
Conclusion
Being locked out of your Windows 7 computer can be a frustrating experience, but as we’ve seen, there are multiple effective strategies for how to reset a locked computer on Windows 7. Whether you choose to use the Advanced Boot Options, remove the password protection first, or perform a complete hard reset, each method has its own advantages and considerations.
The key is to assess your specific situation and choose the approach that best meets your needs. If you have important files to preserve, removing the password protection first is likely your best option. If you’re dealing with serious system issues or preparing to dispose of the computer, a hard reset might be more appropriate. And if you simply need to troubleshoot startup problems, the Advanced Boot Options provide several useful tools.
Remember to take preventive measures once you’ve regained access to your system. Create password reset disks, maintain regular backups, and consider your security needs to avoid similar situations in the future. With these strategies and tips, you’ll be well-equipped to handle any Windows 7 lockout scenario that comes your way.
Some images in this article are sourced from iMyFone.