TOOL HUNTER

Ever opened a photo or video and found that annoying mosaic blur ruining your perfect shot? You know, those pixelated squares that cover up parts of the image or video, making it look like something’s been censored. Whether it’s an accidental camera setting, a technical glitch, or intentional censorship, mosaic blur can be really frustrating. But don’t worry – there are actually several ways to remove mosaic from video and photo content.
The good news is that you don’t need to be a professional video editor to fix this problem. With today’s software tools, both beginners and experts can learn how to remove mosaic from videos and photos with relative ease. In this comprehensive guide, we’ll walk you through multiple methods to help you understand mosaic censorship meaning and show you practical solutions for cleaning up your media files.
Table of Contents
- Understanding Mosaic Censorship and Why It Happens
- How to Remove Mosaic from Photo with AI Technology
- Removing Mosaic Blur with Photoshop
- Enhancing Video Quality with iMyFone Filme
- Professional Video Mosaic Removal with Premiere Pro
- Online Solutions for Mosaic Removal
- Common Questions About Mosaic Removal
Understanding Mosaic Censorship and Why It Happens
Before we dive into the solutions, let’s quickly talk about what mosaic censorship actually means. Mosaic censorship refers to the practice of obscuring parts of an image or video with pixelated squares or blur effects. This is commonly done to hide sensitive information, protect identities, or comply with content regulations. Sometimes it’s intentional, but other times it’s the result of camera malfunctions or incorrect settings.
The mosaic effect occurs when image data is compressed or altered in a way that creates those blocky, pixelated areas. When you’re trying to remove mosaic from picture or video content, you’re essentially attempting to reconstruct the missing or altered image information. This can be challenging, but with the right tools and techniques, it’s definitely achievable.
How to Remove Mosaic from Photo with AI Technology
When it comes to removing mosaic from photos quickly and effectively, AI-powered tools have revolutionized the process. These smart applications use advanced algorithms to analyze the pixelated areas and reconstruct what the original image likely looked like beneath the mosaic.
One of the most user-friendly options for this task is iMyFone MarkGo, which functions as an efficient mosaic remover online and offline. What makes this tool stand out is its intelligent approach to image restoration. Instead of just applying a generic blur or smudge effect, it actually analyzes the surrounding image data to make educated guesses about what should be in the mosaic-covered areas.
The process of how to remove mosaic from videos and photos with MarkGo is surprisingly straightforward. The AI does most of the heavy lifting, which means you don’t need extensive photo editing experience to get good results. This makes it an excellent choice for people who want to remove mosaic from picture files without spending hours learning complicated software.
Step by Step Guide to Remove Mosaic from Photos
Step 1: Upload Your Image
Start by launching the MarkGo application and selecting the “Remove image watermark” option. From there, you’ll want to upload the photo that has the mosaic blur you’re trying to eliminate. The software supports various image formats, so you don’t need to worry about compatibility issues.
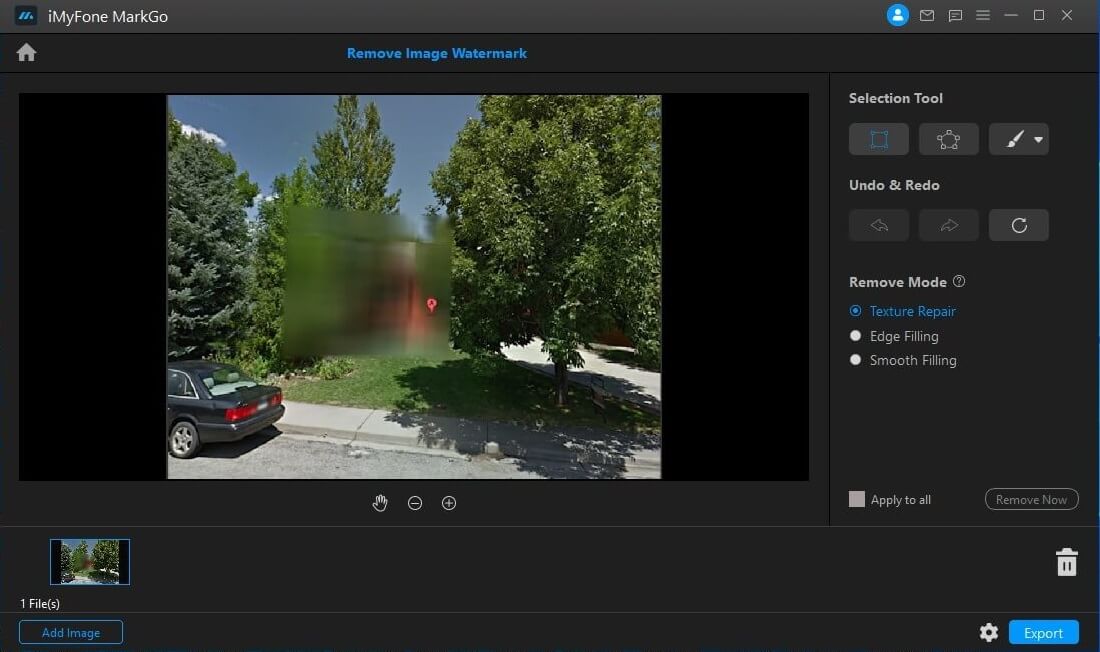
Step 2: Select the Mosaic Area
Choose the selection tool from the toolbar and carefully outline the mosaic-blurred section of your image. Make sure to be as precise as possible with your selection. Once you’ve selected the area, choose the “Texture Repair” removal mode, which is specifically designed for handling mosaic patterns.
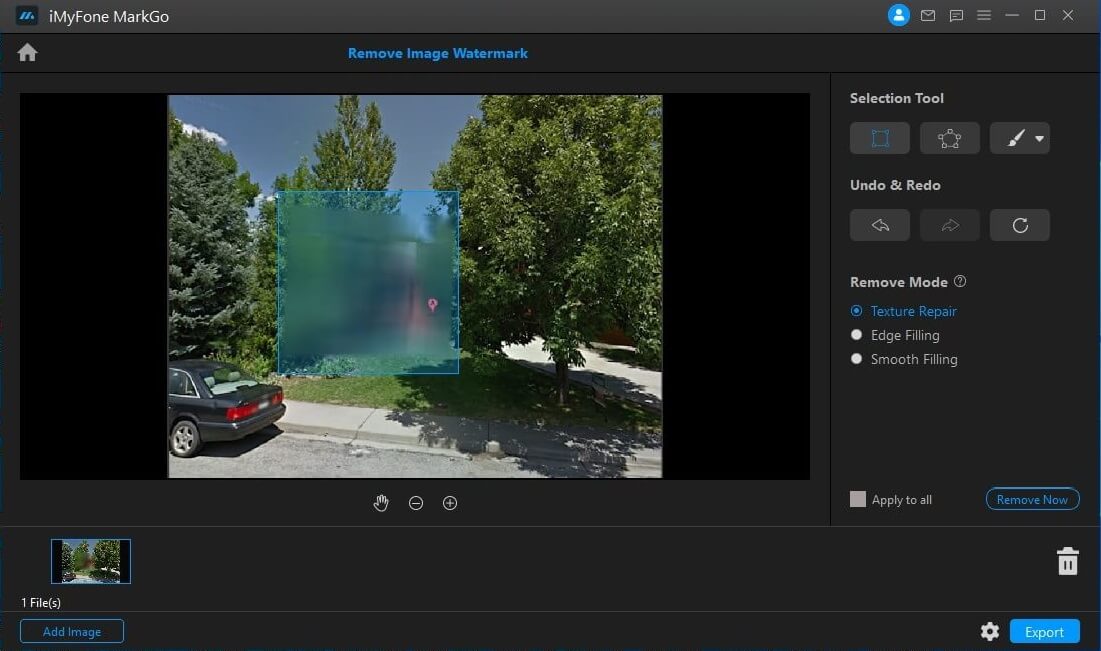
Step 3: Initiate the Removal Process
After making your selection, simply click the “Remove Now” button. The AI will then process the selected area, analyzing the surrounding pixels to reconstruct what the image should look like without the mosaic effect. The time this takes can vary depending on the size and complexity of the selection.
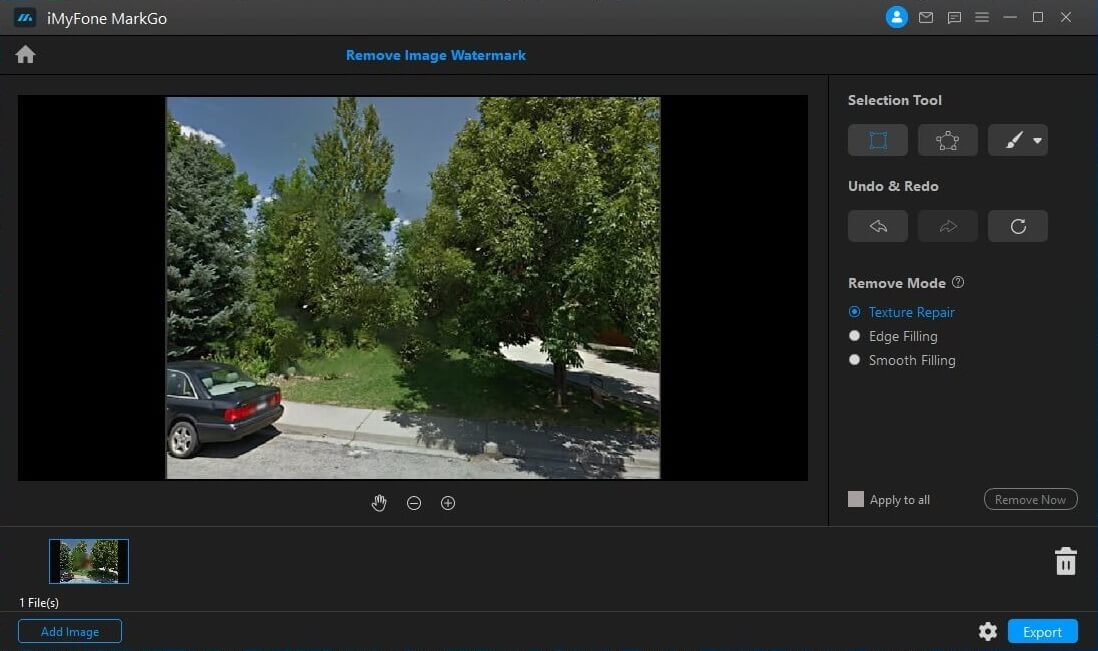
Step 4: Save Your Cleaned Image
Once the process is complete, you can preview the result to make sure you’re happy with it. If everything looks good, export the photo to save your newly cleaned image without the mosaic blur. Now you’ve successfully learned how to remove mosaic from picture files using AI technology!
iMyFone MarkGo.AI Video & Image Watermark Remover.Remove watermark from video and photo without blur.Remove logo from video/picture selectively.Erase object/people/text from video/image.Build-in AI Tech to remove watermark automatically.Get rid of moving watermark from video without effort.Batch remove watermark from images using AI Algorithm.

Removing Mosaic Blur with Photoshop
For those who prefer more manual control over the editing process or already have experience with professional editing software, Adobe Photoshop offers powerful tools for removing mosaic from photos. While it has a steeper learning curve than AI tools, it provides unparalleled precision for those willing to learn its features.
Photoshop approaches the challenge of how to remove mosaic from picture files through a combination of resolution enhancement, noise reduction, and sharpening techniques. Rather than having a single “remove mosaic” button, you’ll use multiple tools in sequence to gradually improve the image quality and reduce the pixelation effect.
![]()
Advantages of Using Photoshop:
- Extensive professional-grade tools and features
- High level of precision and control over the editing process
- Advanced selection and masking capabilities
- Ability to work with layers for non-destructive editing
Disadvantages of Photoshop:
- Can be overwhelming for beginners
- Requires a subscription, which can be expensive
- Steeper learning curve than simpler tools
- May require more time to achieve desired results
Step-by-Step Process to Remove Mosaic with Photoshop
Step 1: Launch Adobe Photoshop and create a new project or open an existing one.
Step 2: Import the image with mosaic blur by clicking on File > Open, then selecting your image file. Photoshop supports various formats including JPEG, PNG, and its native PSD format.
Step 3: Once your image is open, you’ll want to convert the background to a regular layer if it isn’t already. Double-click on the Background layer in the Layers panel and click OK to convert it to Layer 0.
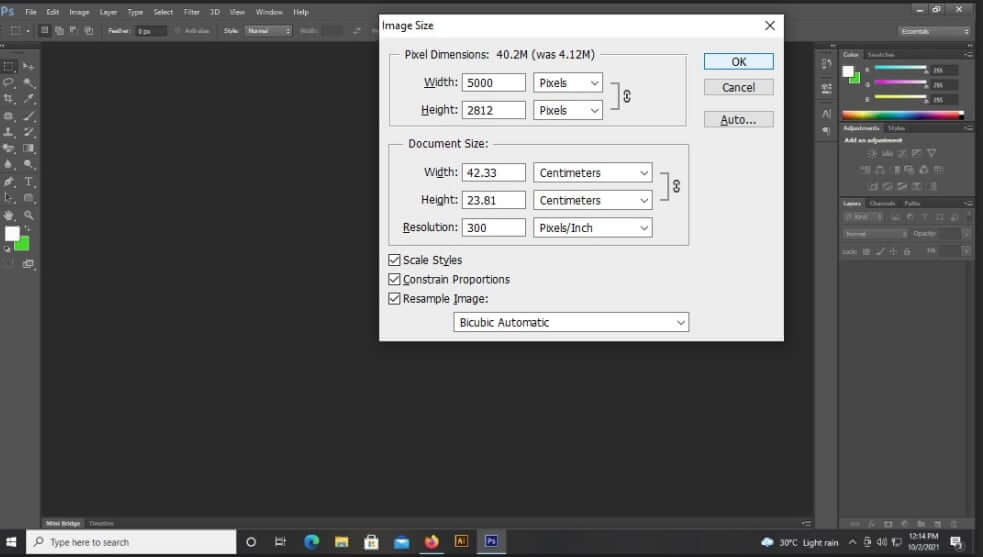
Step 4: Now it’s time to address the image resolution. Go to Image > Image Size from the main menu. This will open a dialog box where you can adjust the dimensions and resolution of your image.
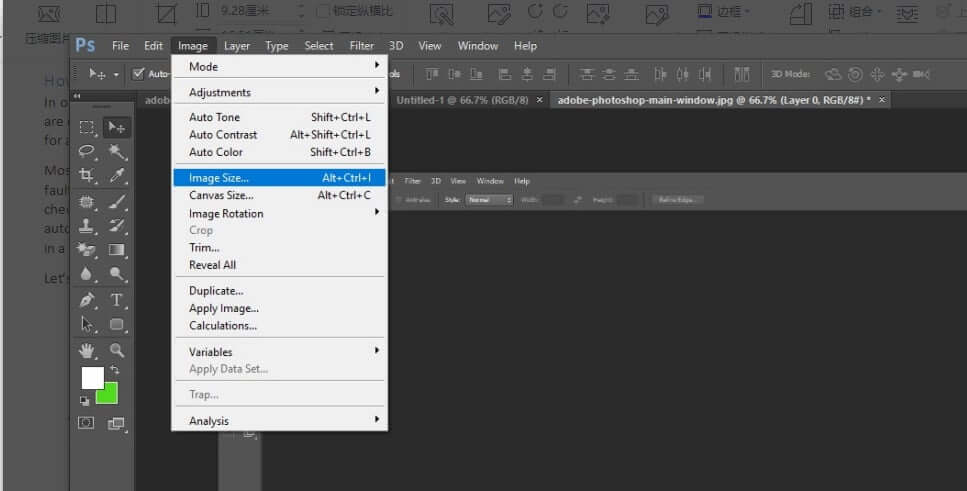
Step 5: In the Image Size dialog, increase the resolution to 300 pixels per inch. This helps provide more data for the subsequent editing steps. Be careful not to increase the physical dimensions too much, as this can sometimes worsen the pixelation.
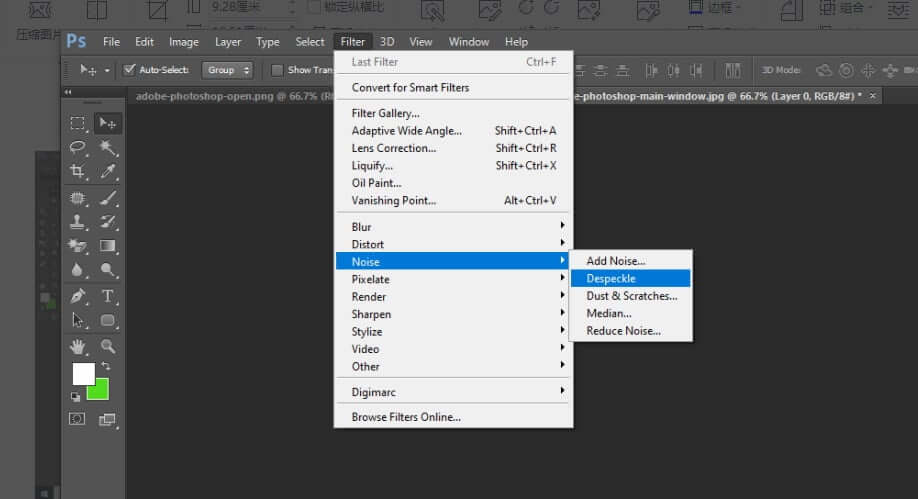
Step 6: Now we’ll work on reducing the noise and pixelation. Go to Filter > Noise > Despeckle. This helps to smooth out some of the mosaic pattern. For best results, you may want to apply this filter 2-3 times by pressing Ctrl+F (Cmd+F on Mac) to repeat the last filter.
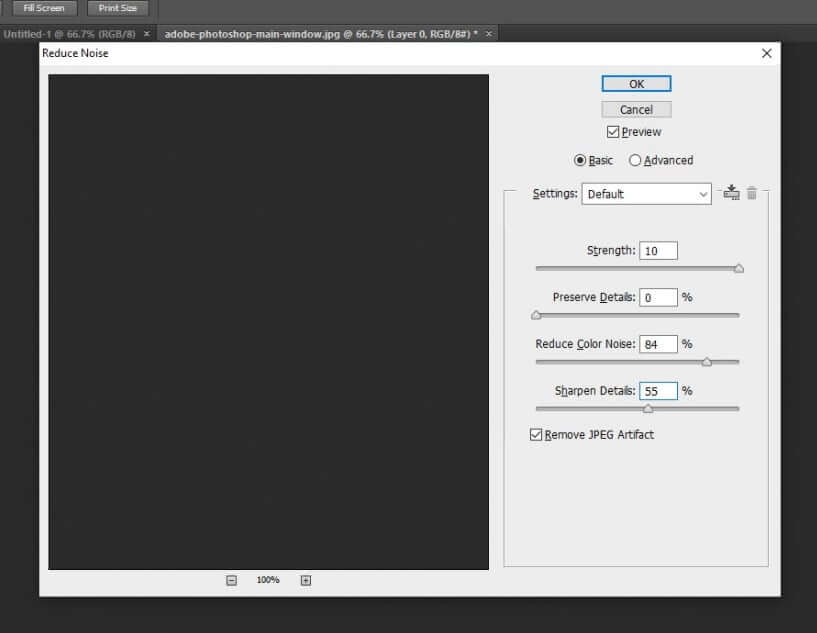
Step 7: Next, go to Filter > Noise > Reduce Noise. This will open a more detailed dialog box where you can adjust several parameters to fine-tune the noise reduction. Adjust the Strength, Preserve Details, Reduce Color Noise, and Sharpen Details sliders until you find a balance that reduces the mosaic effect without making the image too soft or artificial-looking.
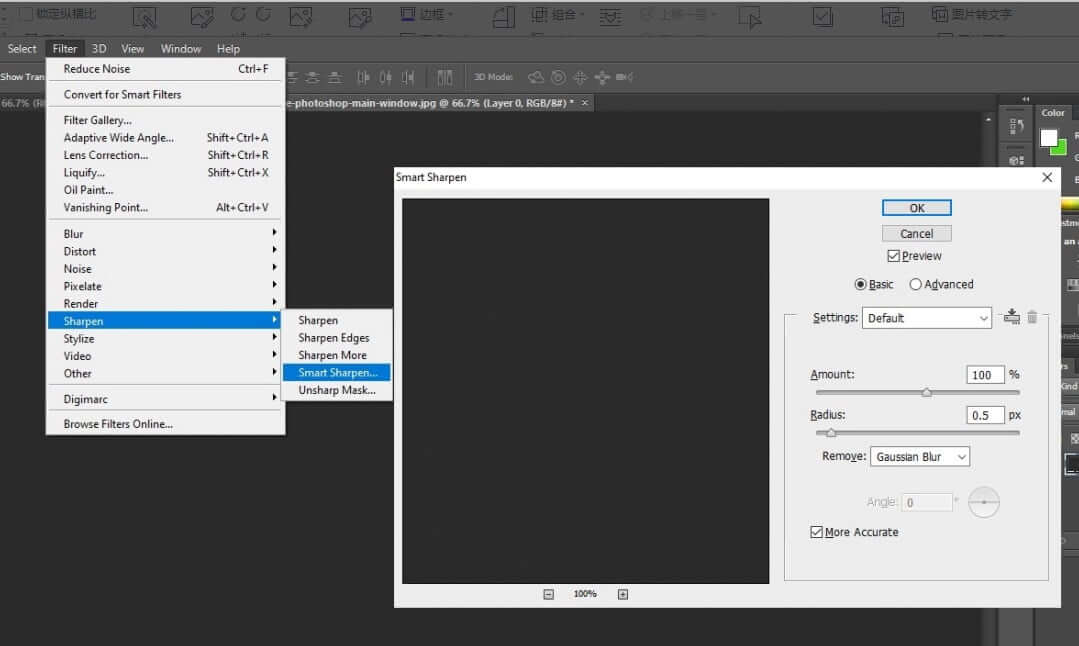
Step 8: After addressing the noise, we can apply some sharpening to help clarify the image. Go to Filter > Sharpen > Smart Sharpen. Adjust the Amount, Radius, and Reduce Noise sliders until the image looks clearer without emphasizing the remaining mosaic pattern.
Step 9: If certain areas still show noticeable mosaic patterns, you can use the Clone Stamp tool or Healing Brush tool to manually sample from clean areas and paint over the problematic sections.
Step 10: Once you’re satisfied with the result, save your image in your preferred format. For best quality, consider saving as a PNG or high-quality JPEG.
Understanding how to remove mosaic from videos and photos with Photoshop does take some practice, but the results can be impressive once you get the hang of it. The key is to work gradually and make subtle adjustments rather than trying to fix everything with one dramatic change.
Enhancing Video Quality with iMyFone Filme
When it comes to video content, mosaic blur can be even more frustrating than in photos because it affects moving images. Fortunately, there are dedicated video editing tools that can help you learn how to remove mosaic from video files effectively. iMyFone Filme is one such application that balances powerful features with user-friendly operation.
This software is particularly useful for people who want to improve video quality without diving into the complexity of professional-grade editing suites. It offers various enhancement tools that can reduce the appearance of mosaic patterns and improve overall clarity.
One of the advantages of using Filme for learning how to remove mosaic from video content is its intuitive timeline-based editing system. You can easily apply effects to specific sections of your video, which is helpful when mosaic blur only affects certain parts of your footage.
Benefits of Using iMyFone Filme:
- Straightforward interface that’s easy to navigate
- Quick learning curve for beginners
- Good balance of basic and advanced features
- Affordable compared to professional editing software
- Includes various video enhancement tools beyond just mosaic removal
Limitations to Consider:
- Not designed for complex graphic design work
- May lack some advanced features found in professional suites
- Primarily focused on editing rather than restoration
Steps to Improve Video Quality with Filme
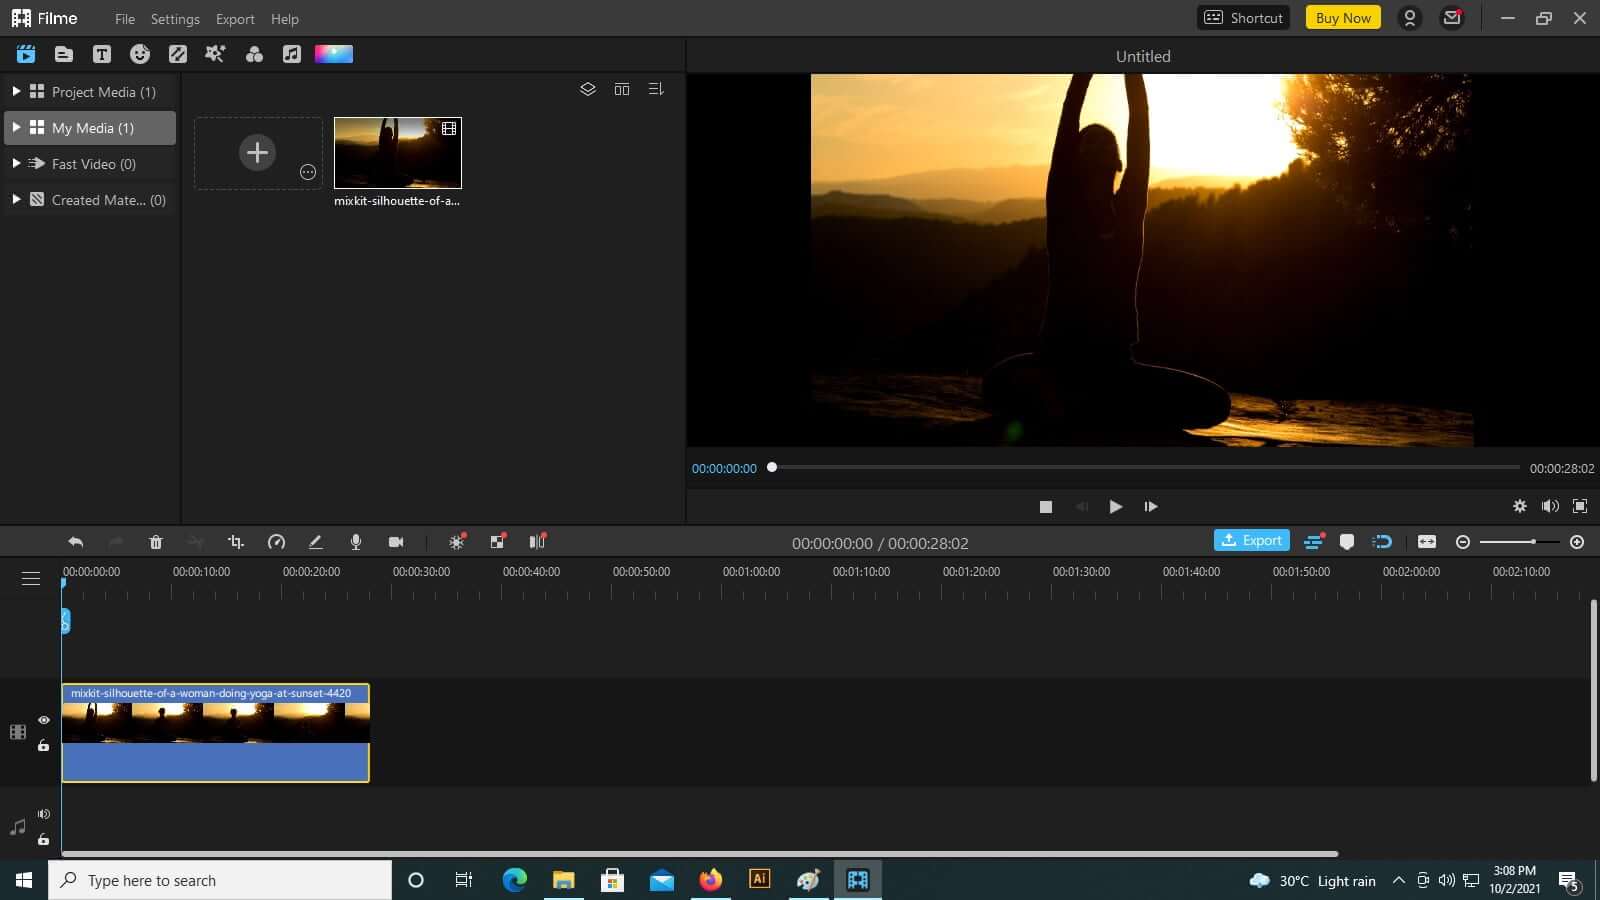
Step 1: Open iMyFone Filme on your computer. The main interface presents your media library, preview window, and timeline in a clean, organized layout.
Step 2: Start a new project by selecting File > New Project from the menu. This gives you a fresh workspace to import and edit your video.
Step 3: Import your video file by clicking on the Media option and selecting the video with mosaic issues. Once imported, drag the video from the media library down to the timeline at the bottom of the screen.
Step 4: With the video selected on the timeline, double-click on it to open the editing panel. Here you’ll find various tabs for adjusting different aspects of your video, including effects, text, color correction, and filters.
Step 5: Explore the available filters and effects that might help reduce the mosaic appearance. Pay particular attention to sharpening tools and noise reduction options. Adjust these settings gradually, previewing the changes to ensure you’re improving the video without creating other issues.

Step 6: If the mosaic is limited to specific sections of your video, you can split the clip at those points and apply different levels of correction to different segments. This targeted approach often yields better results than applying the same correction to the entire video.
Step 7: Once you’re satisfied with the improvements, click the Export button to save your enhanced video. Choose appropriate export settings based on how you plan to use the video—higher quality for professional use, compressed formats for online sharing.
Learning how to remove mosaic from video footage with Filme is largely about experimentation. Don’t be afraid to try different combinations of effects and settings until you find what works best for your specific video.
Professional Video Mosaic Removal with Premiere Pro
For those working with professional video content or needing the highest quality results, Adobe Premiere Pro represents the industry standard in video editing. This powerful software offers sophisticated tools for how to remove mosaic from video files, though it does require more technical knowledge than consumer-level applications.
Premiere Pro approaches video enhancement through a comprehensive set of effects and adjustments that can be precisely controlled using keyframes and masks. This level of control is essential when dealing with challenging issues like mosaic patterns that may change throughout a video clip.
Strengths of Adobe Premiere Pro:
- Industry-standard software with extensive capabilities
- Supports virtually all professional video formats
- Comprehensive effects and adjustment layers
- Precise control through keyframing and masking
- Regular updates with new features
Challenges with Premiere Pro:
- Significant learning curve for newcomers
- Requires a fairly powerful computer system
- Subscription-based pricing model
- Can be overwhelming for simple tasks
Detailed Steps for Video Mosaic Reduction in Premiere Pro
Step 1: Launch Adobe Premiere Pro and create a new project or open an existing one. Set up your project settings to match your video footage for optimal performance.
Step 2: Import your video file by going to File > Import, then navigating to and selecting your video. Alternatively, you can simply drag and drop the video file directly into the Project panel.
Step 3: Drag the video from the Project panel to the Timeline to begin working with it. If your timeline already contains other clips, make sure you’re placing the new video on an appropriate track.
Step 4: Navigate to the Effects panel, typically located in the lower-left corner of the interface. Use the search field to find “Unsharp Mask”—this is one of the most effective built-in tools for addressing mosaic-like issues in Premiere Pro.
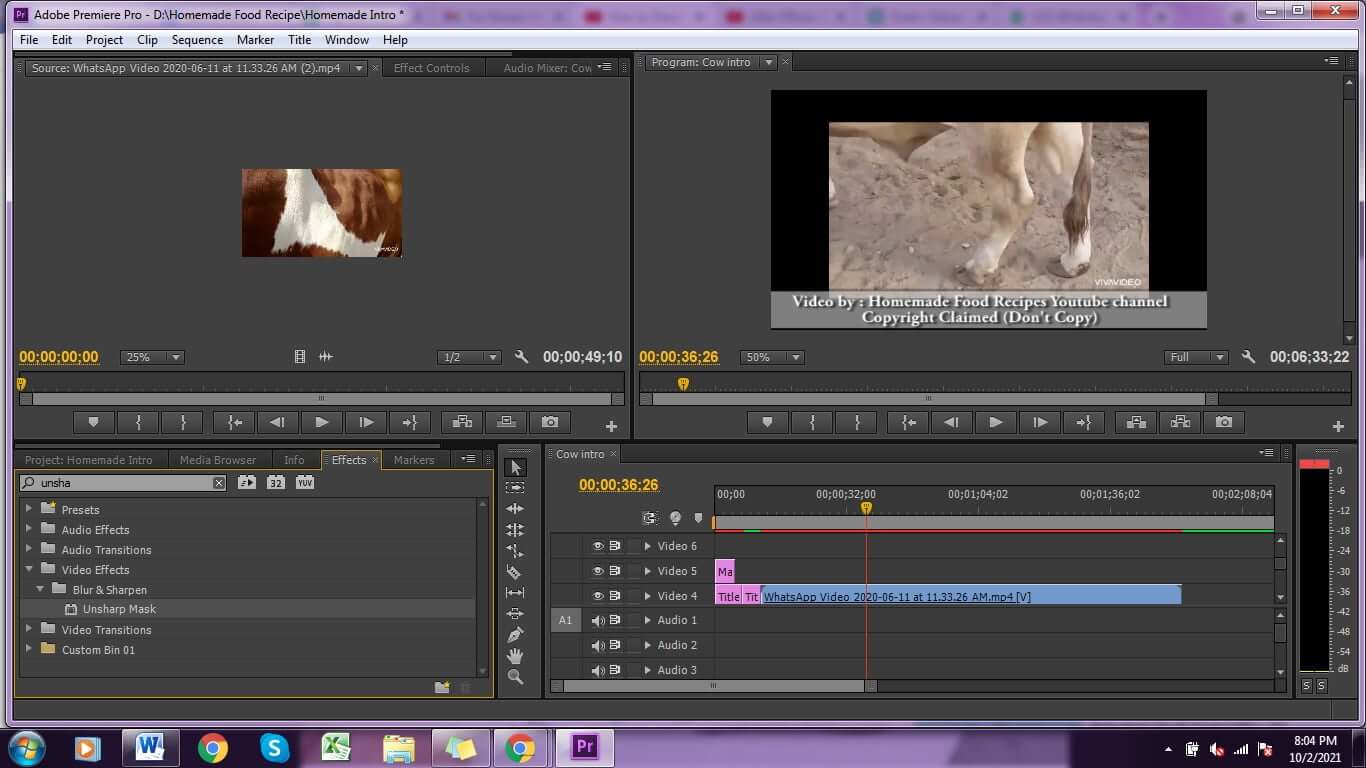
Step 5: Drag the Unsharp Mask effect from the Effects panel onto your video clip in the timeline. Then, go to the Effect Controls panel (usually in the upper-left area) to adjust the effect parameters.
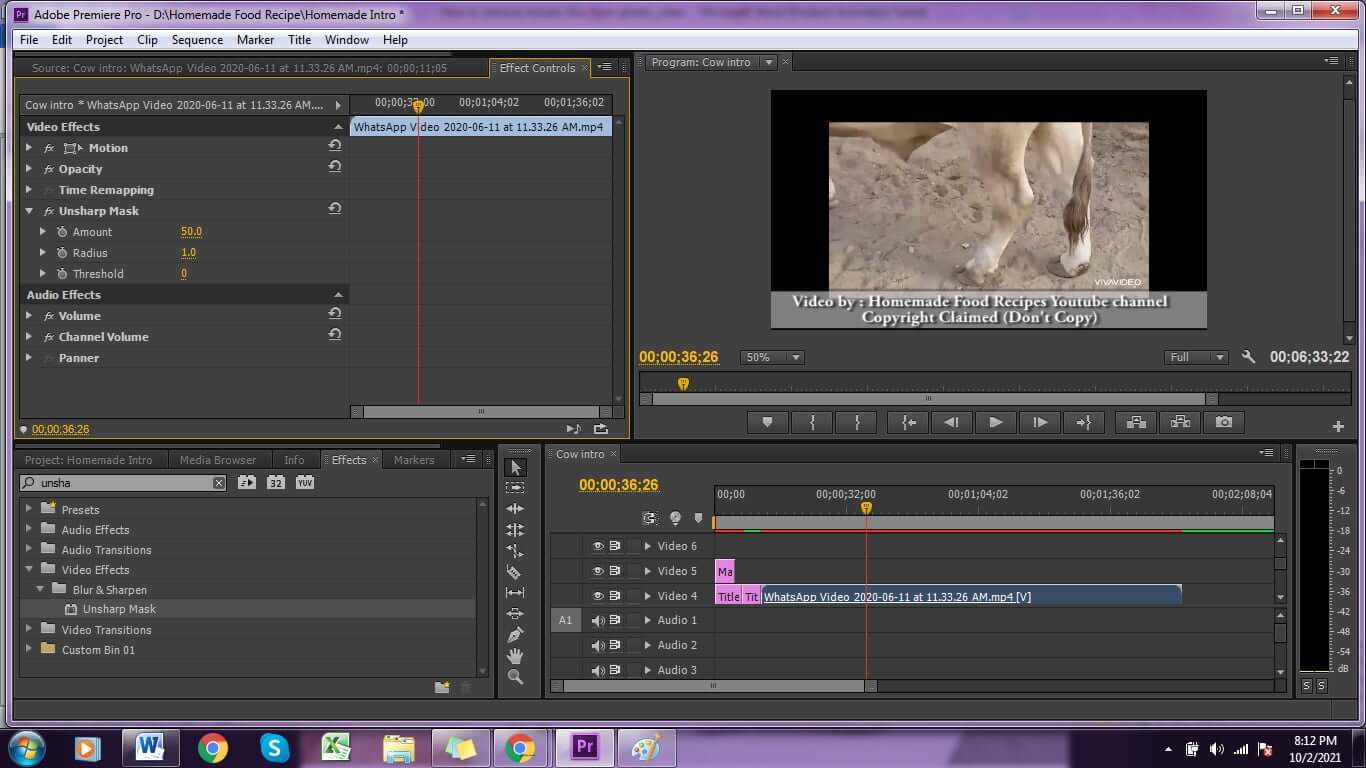
Step 6: In the Effect Controls panel, you’ll see three main settings for the Unsharp Mask effect: Amount, Radius, and Threshold. Adjust these settings while monitoring the result in the Program panel to find the optimal balance for reducing the mosaic effect.
- Amount controls the intensity of the sharpening effect
- Radius determines how many pixels around edges are affected
- Threshold sets how different pixels must be to be considered edge pixels
Step 7: If the mosaic effect varies throughout your video, you can use keyframes to animate the effect settings. Click the stopwatch icon next to each parameter to set keyframes at different points in time, adjusting the values as needed for different sections of your video.
Step 8: For more advanced control, consider using adjustment layers. Create a new adjustment layer (File > New > Adjustment Layer), place it above your video clip on the timeline, and apply effects to the adjustment layer instead of directly to the clip. This non-destructive approach gives you more flexibility to experiment.
Step 9: Preview your changes thoroughly by scrubbing through the timeline and playing back various sections. Pay attention to how the video looks in motion, as some adjustments that look good on still frames may cause issues during playback.
Step 10: Once satisfied with the result, export your video by going to File > Export > Media. Choose appropriate export settings based on your intended use, and consider using the High Quality preset for the best results when dealing with mosaic issues.
iMyFone MarkGo.AI Video & Image Watermark Remover.Remove watermark from video and photo without blur.Remove logo from video/picture selectively.Erase object/people/text from video/image.Build-in AI Tech to remove watermark automatically.Get rid of moving watermark from video without effort.Batch remove watermark from images using AI Algorithm.
Online Solutions for Mosaic Removal
For those who prefer not to download software or need a quick solution for occasional mosaic issues, online tools can be a convenient option. These web-based applications allow you to upload your images or videos and process them directly in your browser.
When looking for a mosaic remover online, it’s important to consider both the capabilities and limitations of these tools. Generally, online solutions work better for images than videos, as video processing requires significant computing resources that may not be available through web browsers.
Most online mosaic removal tools use similar AI technology to their downloadable counterparts, but may have restrictions on file size, processing time, or output quality. Some offer free basic services with paid upgrades for higher quality results or additional features.
The process for using an online mosaic remover typically involves:
- Uploading your image or video to the website
- Selecting the mosaic-affected areas
- Adjusting any available settings
- Processing the file
- Downloading the result
While online tools offer convenience, they may not provide the same level of quality or control as dedicated software, especially for complex mosaic removal tasks. Additionally, privacy-conscious users should be aware that uploading sensitive content to online services may raise security concerns.
Common Questions About Mosaic Removal
What’s the best free tool to remove mosaic from images? For free options, iMyFone MarkGo offers excellent capabilities for removing mosaic from pictures with just a few clicks. The AI-powered approach makes it accessible even for users without technical expertise in photo editing.
Are there specialized tools specifically designed to remove mosaic from video content?