TOOL HUNTER

Have you ever experienced that moment of panic when you realize important notes have disappeared from your iPhone? Whether it’s meeting minutes, creative ideas, or personal reminders, losing notes can feel like losing a piece of your memory. The good news is that if you’ve been using iCloud, there are several reliable methods to get your notes back.
Many iPhone users don’t realize that their notes might still be recoverable even after deletion. Understanding how to restore notes from iCloud can save you from potential frustration and data loss. Let’s explore the various approaches available for recovering your valuable notes.
Table of Contents
- Understanding iCloud Notes Storage
- Method 1: How to Restore Notes from iCloud via iCloud.com
- Method 2: How to Restore Notes on iPhone from iCloud Backup
- Method 3: Using Professional Software to Recover Notes from iCloud
- Comparing Recovery Methods: iCloud vs. Professional Tools
- Preventive Measures: How to Back Up Notes to iCloud Properly
- Additional Tips for Note Management and Recovery
- Troubleshooting Common Note Recovery Issues
- Understanding iCloud Note Recovery Limitations
- Final Thoughts on Note Recovery
Understanding iCloud Notes Storage
Before diving into recovery methods, it’s helpful to understand how iCloud handles your notes. When you enable iCloud sync for notes, they’re stored in the cloud rather than locally on your device. This means even if you lose your phone or delete notes accidentally, there’s a good chance they’re still accessible through iCloud.
The Notes app automatically syncs with iCloud when you’re signed in with your Apple ID. This synchronization happens across all your Apple devices, ensuring your notes are available wherever you need them. However, this also means that if you delete a note on one device, it disappears from all devices connected to the same iCloud account.
Method 1: How to Restore Notes from iCloud via iCloud.com
The simplest way to recover deleted notes is through iCloud.com. This method works well for notes deleted within the last 30 days, as iCloud keeps them in a special folder during this period.
Here’s how to recover notes from iCloud using the web interface:
Step 1: Open your web browser and go to iCloud.com. Sign in using your Apple ID and password. Make sure you’re using the same account that was active on your iPhone when the notes were created.
Step 2: Once logged in, click on the Notes icon. This will open your notes interface where you can see all currently synced notes.
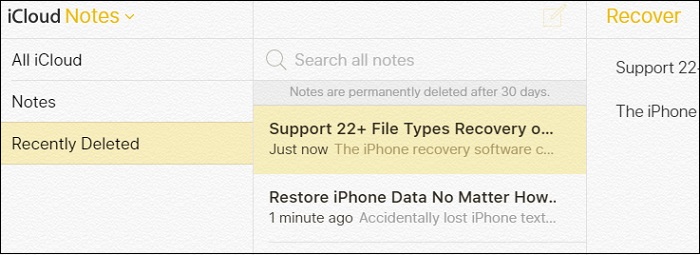
Step 3: Look for the “Recently Deleted” folder in the bottom left corner of the screen. Click on this folder to view notes that have been deleted within the past 30 days.
Step 4: Browse through the deleted notes and select the ones you want to recover. You can either recover individual notes by selecting them and clicking “Recover” or use “Recover All” to restore everything in the folder.
Step 5: After recovery, your notes will return to their original folders. You can find them in the main Notes section organized by date or folder structure.
This method of restoring notes from iCloud is straightforward but has limitations. The 30-day window means if your notes were deleted more than a month ago, you’ll need to explore other options for recovering your data.
Method 2: How to Restore Notes on iPhone from iCloud Backup
If your notes are no longer in the Recently Deleted folder, another approach involves restoring your entire device from an iCloud backup. This method is more comprehensive but also more disruptive, as it replaces all current data on your device with the backup data.
Before proceeding with this method to restore notes from iCloud, verify that you have a recent backup:
Go to Settings > [Your Name] > iCloud > Manage Storage > Backups. Here you can see your available backups and their dates. Choose the most recent backup that should contain your missing notes.
Here’s the complete process for restoring notes from iCloud backup:
Step 1: Ensure you have a recent computer backup of your current data, as the restoration process will erase your device.
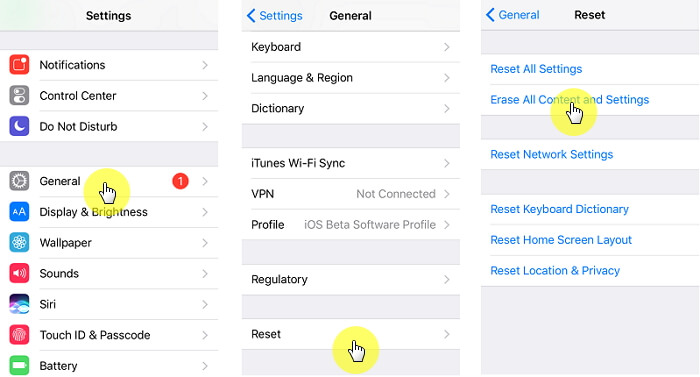
Step 2: Go to Settings > General > Transfer or Reset iPhone > Erase All Content and Settings. This will wipe your device clean and prepare it for restoration.
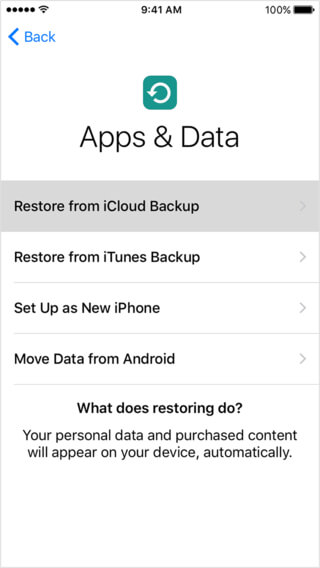
Step 3: After your device restarts, follow the setup prompts until you reach the Apps & Data screen. Select “Restore from iCloud Backup.”
Step 4: Sign in to iCloud with your Apple ID and choose the backup that contains your missing notes. Make sure to select the most appropriate backup based on creation date and size.
Step 5: Keep your device connected to Wi-Fi and power until the restoration completes. This process can take from several minutes to hours depending on your backup size and internet speed.
While this method can effectively recover notes from iCloud, it has significant drawbacks. You’ll lose any data created after the backup date, and the process requires substantial time and a stable internet connection.
Method 3: Using Professional Software to Recover Notes from iCloud
For those who need more flexibility and control over the recovery process, third-party software offers an excellent solution. These tools allow you to preview and selectively recover notes without restoring your entire device.
Specialized data recovery software can access iCloud backups directly, letting you browse their contents and choose specific items to recover. This approach is ideal when you want to recover only certain notes without affecting your current device data.
iMyFone D-Back.All-in-one Data Recovery Software: You can recover deleted, lost, formatted, or corrupted files from iOS/Android devices and PCs in one tool.1000+ Data Types Recovery: Restore photos, videos, messages, contacts, office documents, emails, audio, etc. without backup.Third-Party App Recovery: Retrieve messages and attachments directly from WhatsApp, LINE, Kik, WeChat, Skype and more.iOS Data Backup: Securely back up various data from your iOS device, reducing the risk of data loss.
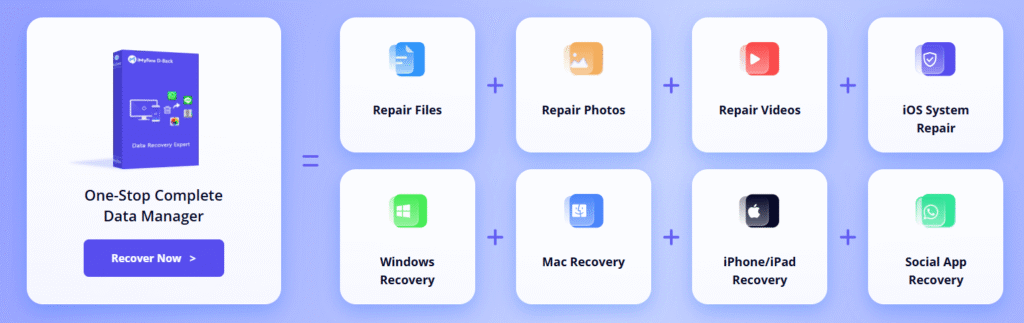
Check More Details | Download Now! | Check All Deals
Here’s how to use iMyFone D-Back to recover notes from iCloud:
Step 1: Download and install iMyFone D-Back on your computer. Launch the program and select “Recover from iCloud” from the main interface.
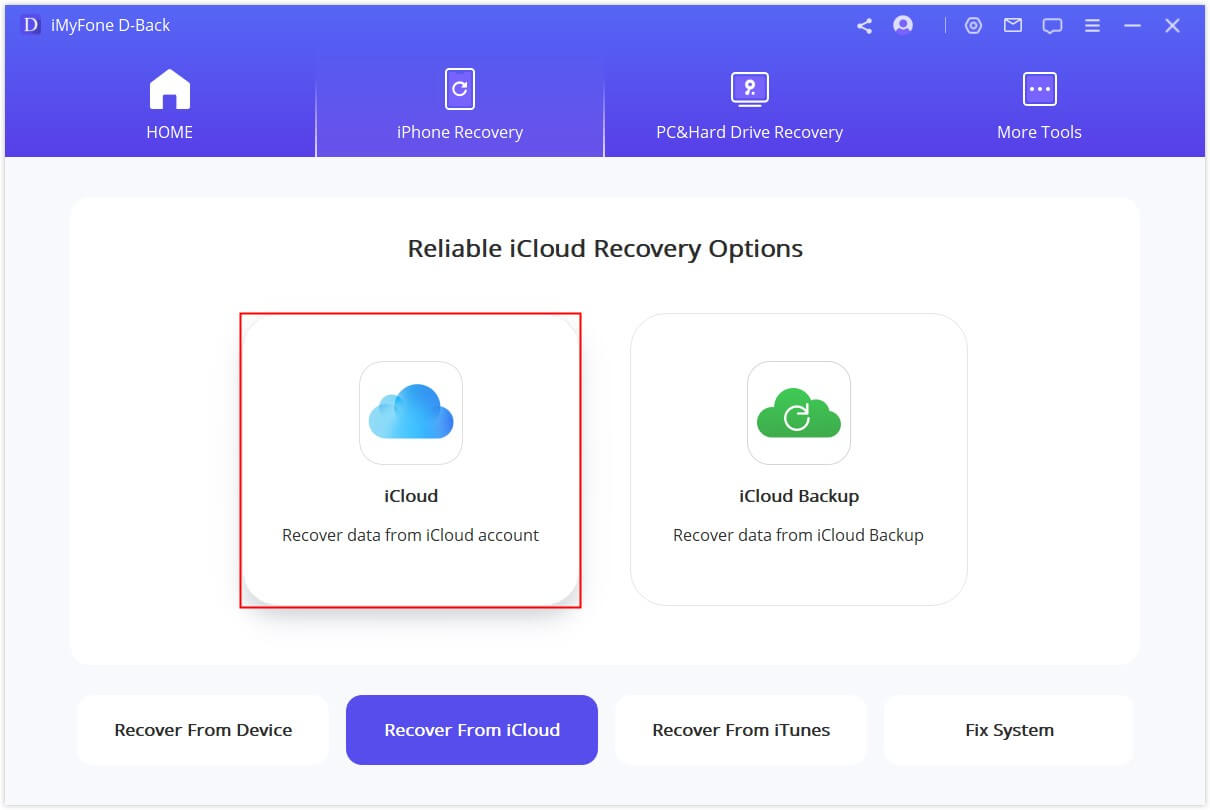
Step 2: Sign in to your iCloud account using your Apple ID and password. The software uses secure encryption to protect your login information.
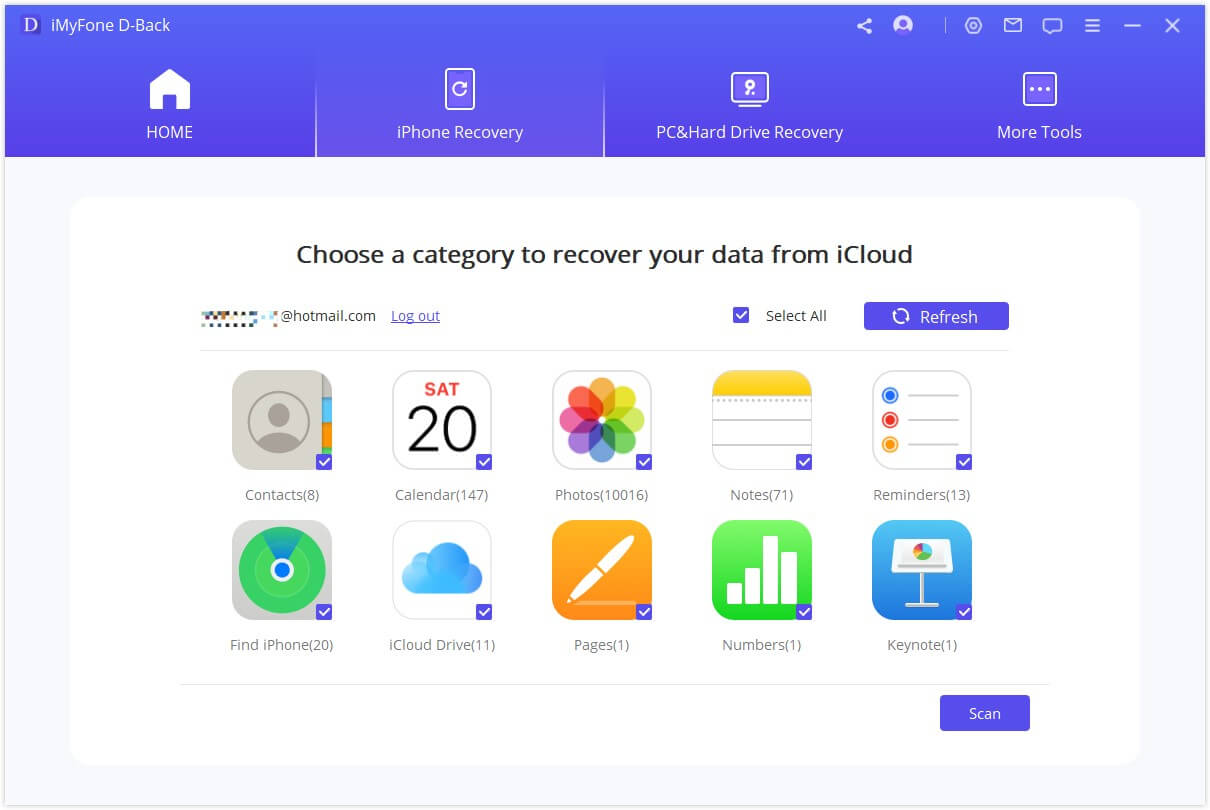
Step 3: After authentication, the program will display all data types available for recovery. Select “Notes” and click “Scan” to begin analyzing your iCloud backup.
Step 4: Once scanning completes, you’ll see a preview of all recoverable notes. Browse through the list and select the specific notes you want to recover.
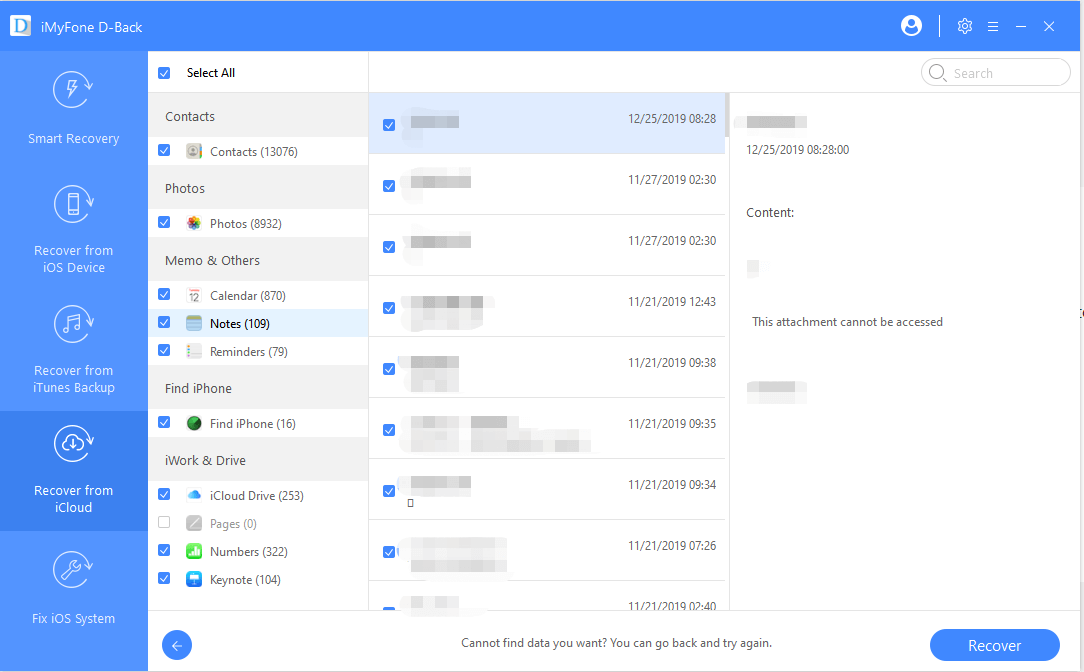
Step 5: Click “Recover” and choose a location on your computer to save the recovered notes. The software will extract the selected notes from your iCloud backup and save them to your specified folder.
This method for how to restore notes from iCloud provides several advantages: you can preview notes before recovery, select specific items instead of everything, and avoid overwriting current data on your device.
Comparing Recovery Methods: iCloud vs. Professional Tools
When deciding how to recover notes from iCloud, it’s helpful to understand the differences between Apple’s native solutions and third-party tools. Each approach has distinct advantages and limitations depending on your specific situation.
Native iCloud recovery methods are free and integrated directly into Apple’s ecosystem. The iCloud.com approach works well for recently deleted notes, while full backup restoration can recover older notes but at the cost of current data.
Professional recovery software like iMyFone D-Back offers more flexibility and control. You can preview backups before recovery, selectively choose which notes to restore, and avoid the data loss associated with full device restoration.
iMyFone D-Back.All-in-one Data Recovery Software: You can recover deleted, lost, formatted, or corrupted files from iOS/Android devices and PCs in one tool.1000+ Data Types Recovery: Restore photos, videos, messages, contacts, office documents, emails, audio, etc. without backup.Third-Party App Recovery: Retrieve messages and attachments directly from WhatsApp, LINE, Kik, WeChat, Skype and more.iOS Data Backup: Securely back up various data from your iOS device, reducing the risk of data loss.
Check More Details | Download Now! | Check All Deals
Consider these factors when choosing your approach:
- How long ago were the notes deleted?
- Do you have a recent iCloud backup?
- Are you willing to potentially lose current data?
- Do you need to preview notes before recovery?
- How quickly do you need access to the recovered notes?
For most users, trying the iCloud.com method first makes sense due to its simplicity and zero cost. If that doesn’t work, professional software provides the next best option before considering full device restoration.
Preventive Measures: How to Back Up Notes to iCloud Properly
The best way to avoid note recovery stress is to ensure your notes are properly backed up before anything goes wrong. Proper iCloud configuration can save you from future headaches and data loss.
Here’s how to ensure your notes are consistently backed up to iCloud:
Step 1: Connect your iPhone to a stable Wi-Fi network. iCloud backups require internet connectivity and won’t proceed over cellular data unless specifically enabled.
Step 2: Open the Settings app and tap on your name at the top to access your Apple ID settings.
Step 3: Select “iCloud” to view all apps and data syncing with your iCloud account.
Step 4: Scroll down and ensure the toggle next to “Notes” is enabled (green). This ensures your notes are included in iCloud sync.
Step 5: Return to the main iCloud screen and tap “iCloud Backup.” Toggle “iCloud Backup” to the on position if it isn’t already enabled.
Step 6: For immediate backup, tap “Back Up Now.” Keep your device connected to power and Wi-Fi until the backup completes.
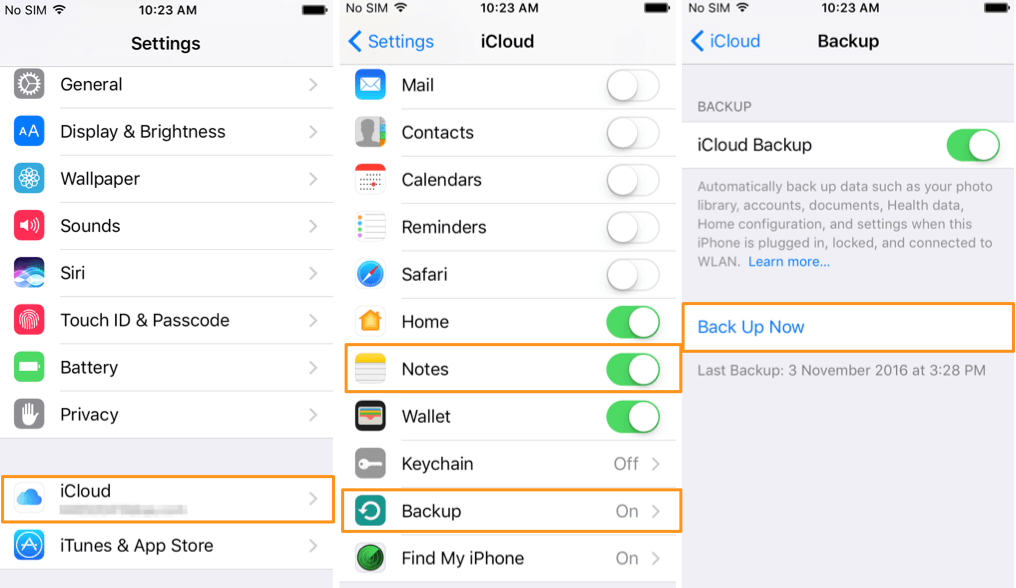
Regularly checking your iCloud storage is also important. If you’re running low on space, backups may fail or exclude certain data. Consider upgrading your iCloud storage plan if you frequently approach your storage limit.
Additional Tips for Note Management and Recovery
Beyond the basic recovery methods, there are several practices that can enhance your note security and recovery success:
Create regular manual backups: While automatic iCloud backups are convenient, occasionally creating manual backups provides an extra layer of security. You can do this through Settings > [Your Name] > iCloud > iCloud Backup > Back Up Now.
Use folders strategically: Organizing notes into folders not only helps with navigation but can also simplify recovery. If you need to restore notes from iCloud, having them properly categorized makes identification easier.
Enable note locking: For sensitive information, use the Note Lock feature to add an extra layer of security. While this doesn’t affect recovery, it protects your private information.
Check multiple devices: Sometimes notes appear missing on one device but are accessible on another. Before attempting recovery, check your notes on other Apple devices signed into the same iCloud account.
Monitor iCloud sync status: Occasionally, notes may not sync properly due to connectivity issues or software glitches. If you notice sync problems, try signing out and back into iCloud or restarting your devices.
Troubleshooting Common Note Recovery Issues
Even with the right methods, you might encounter challenges when trying to recover notes from iCloud. Here are solutions to common problems:
If you can’t find notes in Recently Deleted: The 30-day window may have passed, or the notes might have been permanently deleted. In this case, you’ll need to rely on iCloud backups or recovery software.
If iCloud backup restoration fails: This can happen due to unstable internet connections, insufficient iCloud storage, or corrupted backups. Try using a different Wi-Fi network or check if you have other available backups.
If notes don’t appear after recovery: Sometimes recovered notes need time to sync across devices. Wait a few minutes, then check again. You can also try manually triggering a sync by creating a new note and seeing if it appears on other devices.
If you can’t remember Apple ID password: Without your Apple ID credentials, you cannot access iCloud backups. Use Apple’s account recovery options to reset your password before attempting note recovery.
If notes are missing from specific dates: Try to remember if you were using multiple Apple IDs during that period. Notes are tied to the Apple ID used when they were created, so you might need to check backups associated with different accounts.
Understanding iCloud Note Recovery Limitations
While iCloud provides robust note recovery options, there are inherent limitations to what’s possible:
Time restrictions: The Recently Deleted folder only retains notes for 30 days. After this period, they’re permanently removed from immediate recovery options.
Backup dependency: Recovery from iCloud backups only works if you have a backup containing the notes you need. If backups weren’t enabled or were created after note deletion, recovery becomes impossible.
Selective recovery limitations: Native iCloud methods don’t allow previewing or selecting individual notes from backups. You either recover everything or nothing when using full backup restoration.
Storage constraints: If your iCloud storage is full, new backups may not include all your data. Regularly monitor your storage and upgrade if necessary to ensure complete backups.
Understanding these limitations helps set realistic expectations and emphasizes the importance of proactive backup habits rather than relying solely on recovery solutions.
Final Thoughts on Note Recovery
Losing important notes can be frustrating, but as we’ve seen, there are multiple ways to recover notes from iCloud. The method you choose depends on your specific situation: how long ago the notes were deleted, whether you have backups, and how much current data you’re willing to risk losing.
For most users, the progression should be: first check iCloud.com’s Recently Deleted folder, then consider professional recovery software, and only as a last resort perform a full device restoration from backup. This approach maximizes your chances of successful recovery while minimizing potential data loss.
Remember that prevention is always better than cure. Regular backups, proper iCloud configuration, and good note organization habits can save you from needing to recover notes from iCloud in the first place. Take a few minutes today to verify your backup settings – your future self will thank you if the unexpected happens.
Some images in this article are sourced from iMyFone materials.