TOOL HUNTER

Ever found yourself staring at your iPhone screen, completely frozen, with no idea what to do next? We’ve all been there. When your device starts acting up – maybe it’s stuck on the Apple logo, refusing to update properly, or just being generally uncooperative – there’s one troubleshooting method that often comes to the rescue: putting your iPhone into recovery mode.
Learning how to put iPhone into recovery mode is one of those essential skills every iPhone owner should have in their back pocket. It’s like knowing how to change a flat tire – you hope you never need it, but when you do, you’ll be incredibly grateful you took the time to learn.
Table of Contents
- What Exactly is iPhone Recovery Mode?
- Common Scenarios Where You Might Need Recovery Mode
- How to Put iPhone in Recovery Mode Without Computer
- What About iPhone 11 Recovery Mode Without Computer?
- Understanding the Limitations
- Restoring Your iPhone Using iTunes/Finder
- Important Considerations Before Using Recovery Mode
- When Recovery Mode Button Combinations Don’t Work
- Advanced Solution: iMyFone Fixppo
- What If Your iPhone Won’t Stay in Recovery Mode?
- Fixing iOS System Issues That Prevent Recovery Mode Access
- Exiting Recovery Mode
- Prevention: Avoiding the Need for Recovery Mode
- When to Seek Professional Help
- Real-World Recovery Mode Success Stories
- The Evolution of iPhone Recovery Mode
- Recovery Mode vs. DFU Mode
- Troubleshooting Common Recovery Mode Problems
- The Future of iPhone Recovery
What Exactly is iPhone Recovery Mode?
Before we dive into the step-by-step processes, let’s talk about what recovery mode actually is and why you might need to use it. Think of recovery mode as your iPhone’s “safe mode” – it’s a special state that allows your device to communicate with iTunes or Finder on a computer while bypassing the normal startup process.
When your iPhone is in recovery mode, you can perform critical operations like restoring from a backup or reinstalling iOS without the usual system restrictions getting in the way. It’s particularly useful when your device is experiencing software issues that prevent it from starting normally.
Common Scenarios Where You Might Need Recovery Mode
There are several situations where knowing how to put iPhone in recovery mode becomes absolutely essential:
If your iPhone gets stuck during an iOS update and won’t progress beyond the Apple logo, recovery mode can often break it out of this loop. This is one of the most common reasons people need to learn how to put iPhone into recovery mode.
When your device experiences repeated crashes or freezes that make it unusable, putting iPhone in recovery mode might be your ticket to stability again.
If you’re trying to restore from a backup but iTunes or Finder can’t recognize your device properly, recovery mode can establish that crucial connection.
Sometimes after installing a beta version of iOS, you might encounter bugs that make your iPhone unstable. Recovery mode allows you to restore to a stable version.
When your iPhone displays the “Connect to iTunes” screen but won’t progress further, recovery mode gives you the tools to resolve this.
If you’ve forgotten your passcode and can’t access your device, recovery mode combined with iTunes/Finder restoration is often the solution.
How to Put iPhone in Recovery Mode Without Computer
Now let’s get to the main event – the actual process of how to put iPhone into recovery mode using just your device’s buttons. The specific button combinations vary depending on which iPhone model you have, so I’ll break it down by device type.
Before starting any of these methods, I recommend ensuring your iPhone has at least 50% battery or is connected to a power source. The last thing you want is for your device to die in the middle of the process!
For iPhone 8 and Newer Models (Including SE 2nd/3rd Gen)
If you have an iPhone 8, iPhone X, iPhone 11, iPhone 12, iPhone 13, iPhone 14, iPhone 15, iPhone 16, or any of the newer models, here’s how to put iPhone in recovery mode:
First, press and quickly release the Volume Up button. Then immediately press and quickly release the Volume Down button. Now press and hold the Side button (what we used to call the Power button) until you see the recovery mode screen appear.
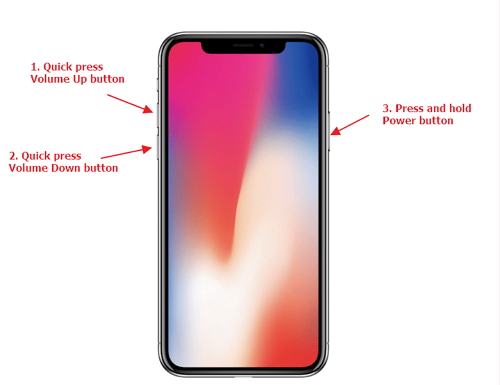
You’ll know you’ve succeeded when you see a cable pointing toward a laptop icon on your screen. This indicates your iPhone is ready to connect to a computer for restoration.
For iPhone 7 and iPhone 7 Plus
The process for iPhone 7 models is slightly different since these devices have a different button configuration:
Simultaneously press and hold both the Side button and the Volume Down button. Continue holding both buttons until the recovery mode screen appears with the cable and computer icon.
Keep holding even if you see the Apple logo – only release when the recovery mode screen is visible.
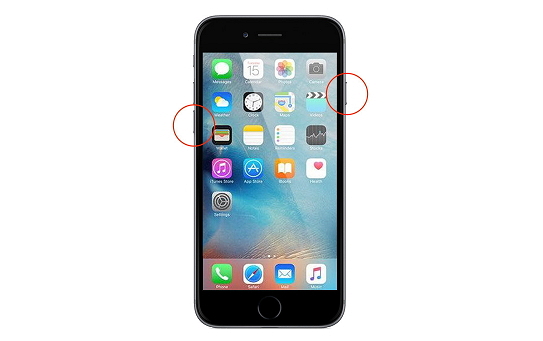
For iPhone 6s and Earlier Models (Including Original SE)
If you’re using an older iPhone with a Home button, here’s how to put iPhone into recovery mode:
Press and hold both the Home button and the Top (or Side) button at the same time. Keep holding until you see the recovery mode screen appear.

Don’t release the buttons when you see the Apple logo – wait for the recovery mode indicator.
What About iPhone 11 Recovery Mode Without Computer?
Since the iPhone 11 falls into the newer model category, the process is identical to what I described for iPhone 8 and newer devices. For iPhone 11 recovery mode without computer, you’ll use the Volume Up, Volume Down, then hold Side button sequence.
This same method works for all Face ID iPhones, so whether you have an iPhone 11, 12, 13, 14, 15, or 16, you’ll follow these exact steps when you need to learn how to put iPhone in recovery mode.
Understanding the Limitations
It’s important to understand what you can and can’t do with recovery mode alone. While you can put iPhone in recovery mode without computer using the button methods above, you can’t actually perform a restore without connecting to a computer running iTunes (for Windows or older macOS) or Finder (for newer macOS).
Think of it this way: putting your iPhone in recovery mode is like putting a car up on jacks – it gets the vehicle in position for repairs, but you still need tools to actually fix anything. Similarly, recovery mode prepares your iPhone for restoration, but you need iTunes/Finder to perform the actual software repair.
Restoring Your iPhone Using iTunes/Finder
Once you’ve successfully put your iPhone in recovery mode, the next step is connecting to a computer to complete the restoration process. Here’s how that works:
Make sure you have the latest version of iTunes installed if you’re using Windows or an older Mac. For newer Macs with macOS Catalina or later, you’ll use Finder instead of iTunes.
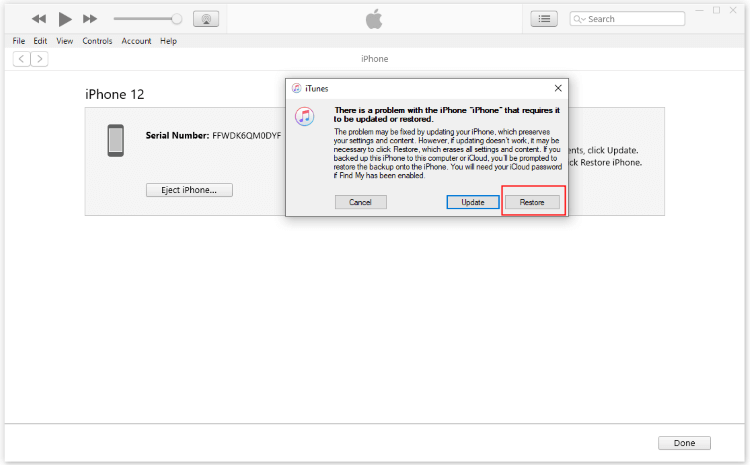
Connect your iPhone to your computer using a USB cable. If it’s already in recovery mode, iTunes or Finder should automatically detect a device in recovery mode and present you with options.
You’ll typically see a message asking if you want to Restore or Update your device. Restore will completely wipe your iPhone and install a fresh copy of iOS, while Update will attempt to reinstall iOS without erasing your data.
If you have a recent backup, choosing Restore is usually the safer option, though it will erase all your current data. The Update option can sometimes resolve issues without data loss, but it doesn’t always work if the software corruption is severe.
After the process completes, your iPhone will restart with either a fresh iOS installation (if you chose Restore) or with your data intact (if Update was successful).
Important Considerations Before Using Recovery Mode
Before you proceed with putting your iPhone in recovery mode, there are a few crucial things to keep in mind:
Recovery mode restoration will typically erase all data on your device if you choose the Restore option. Always ensure you have a recent backup in iCloud or on your computer before proceeding.
The restoration process can take anywhere from 15 minutes to over an hour, depending on your internet speed and the size of the iOS firmware that needs to be downloaded.
Make sure you have a stable internet connection throughout the process, as iTunes/Finder needs to download iOS firmware files from Apple’s servers.
Use the cable that came with your iPhone or a certified MFi (Made for iPhone) cable to avoid connection issues during the restoration.
If you’re using a computer, ensure it has enough free storage space for temporary files during the restoration process.
When Recovery Mode Button Combinations Don’t Work
Sometimes, despite following the correct button sequences, your iPhone just won’t enter recovery mode. This can happen for several reasons:
Physical button damage is a common culprit. If your Volume buttons, Home button, or Side button aren’t working properly, the button combinations won’t function correctly.
Severe software corruption can prevent the recovery mode sequence from working as intended.
Hardware issues beyond button problems might interfere with the process.
Low battery power can sometimes prevent recovery mode from initializing properly.
Connection issues with your computer or cable might give the appearance that recovery mode isn’t working.
If you find yourself in this situation where the standard methods for how to put iPhone into recovery mode aren’t working, don’t panic. There are alternative approaches you can try.
Advanced Solution: iMyFone Fixppo
When the traditional button methods fail, or if you’re dealing with broken buttons that make the physical sequences impossible, third-party tools like iMyFone Fixppo can be incredibly helpful.
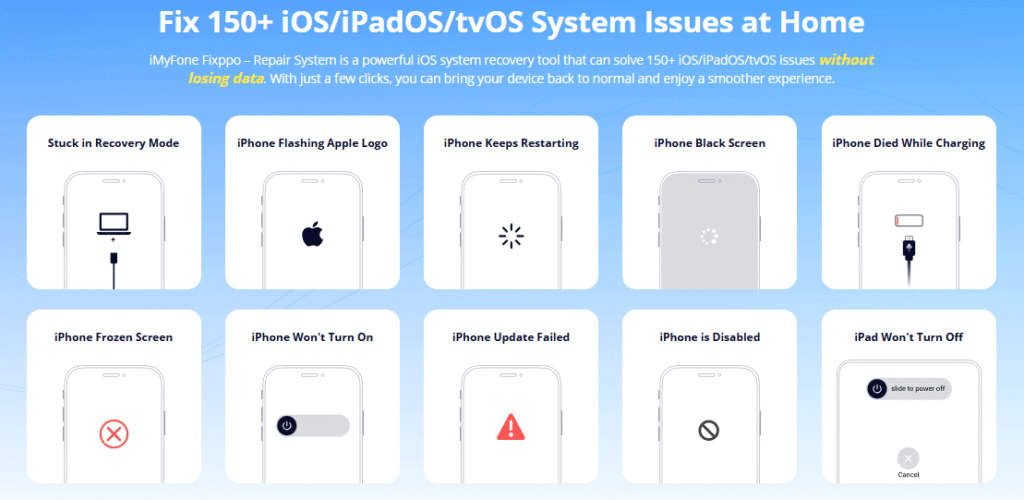
iMyFone Fixppo.Downgrade iOS 26 to 18 or upgrade to iOS 26, no jailbreak.Repair 150+ iOS/iPadOS/tvOS system issues like stuck on Apple logo, boot loop, black screen without losing data.Free enter/exit Recovery Mode on iPhone and iPad with one-click.Factory reset iPhone/iPad/Apple TV without passcode/iTunes/Finder.Back up and restore iPhone data without iTunes/iCloud.Fix various iOS bugs at home for you to smoothly use your device.Support all iOS versions and devices including iOS 26/18 and iPhone 17.Fixppo only performs system repair with the user’s permission.
Check More Details | Download Now! | Check All Deals
This tool offers a one-click solution to put your iPhone in recovery mode, which can be especially useful when physical buttons aren’t an option. Even when your device is completely unresponsive or the buttons are damaged, Fixppo can often still initiate recovery mode without risking your data.
The process is remarkably simple compared to the manual button sequences. After installing Fixppo on your computer and connecting your iPhone, you just navigate to the Recovery Mode section and click “Enter.” Within seconds, your device will be in recovery mode, ready for whatever troubleshooting steps come next.
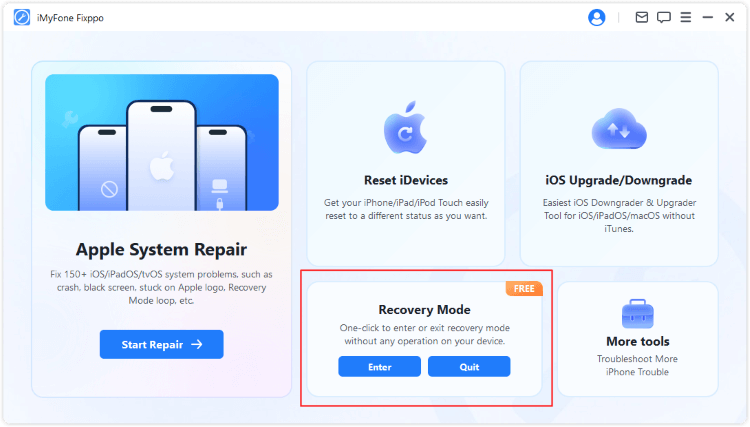
One of the standout features of this approach is that it doesn’t automatically erase your data just by entering recovery mode. This gives you more flexibility compared to some iTunes restoration processes that immediately wipe your device.
What If Your iPhone Won’t Stay in Recovery Mode?
Another common issue people encounter is their iPhone exiting recovery mode almost immediately after entering it. This can be incredibly frustrating when you’re trying to perform a restore.
This automatic exit typically happens because iTunes or Finder isn’t properly communicating with your device, or because of underlying software issues that prevent stable recovery mode operation.
If you’re experiencing this problem, here are some troubleshooting steps:
Try a different USB cable – sometimes connection issues are cable-related.
Use a different USB port on your computer, preferably one directly on the computer rather than through a hub.
Restart your computer to clear any software glitches that might be interfering with the connection.
Ensure you have the latest version of iTunes or macOS updates installed.
If these basic steps don’t resolve the issue, the software repair functionality in tools like Fixppo can often address the underlying iOS problems causing the instability.
Fixing iOS System Issues That Prevent Recovery Mode Access
Sometimes the reason you can’t access recovery mode or your iPhone won’t stay in recovery mode is due to deeper iOS system corruption. In these cases, you might need to repair the iOS system itself before recovery mode will function properly.
iMyFone Fixppo.Downgrade iOS 26 to 18 or upgrade to iOS 26, no jailbreak.Repair 150+ iOS/iPadOS/tvOS system issues like stuck on Apple logo, boot loop, black screen without losing data.Free enter/exit Recovery Mode on iPhone and iPad with one-click.Factory reset iPhone/iPad/Apple TV without passcode/iTunes/Finder.Back up and restore iPhone data without iTunes/iCloud.Fix various iOS bugs at home for you to smoothly use your device.Support all iOS versions and devices including iOS 26/18 and iPhone 17.Fixppo only performs system repair with the user’s permission.
Check More Details | Download Now! | Check All Deals
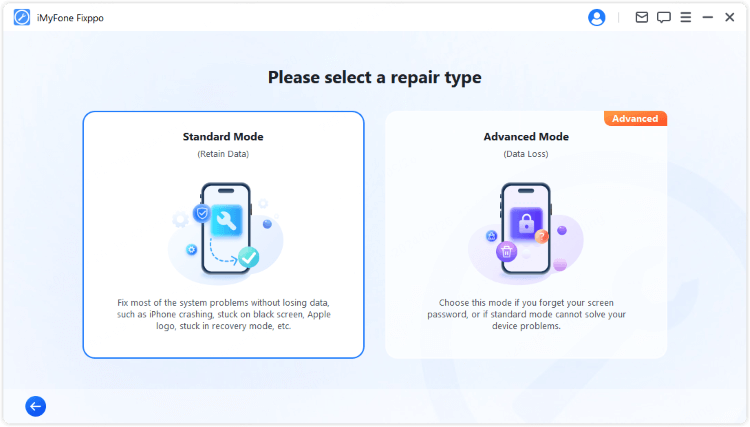
Professional iOS repair tools can diagnose and fix these underlying issues without data loss in many cases. The process typically involves:
Connecting your iPhone to a computer with the repair software installed.
Selecting a repair mode – usually there’s an option that fixes system issues without erasing your data.
Downloading the necessary firmware (the software often handles this automatically).
Initiating the repair process, which reinstalls iOS components without touching your personal data.
After such a repair, your iPhone should restart normally, and you should then be able to use the standard button methods to put iPhone in recovery mode if needed for future troubleshooting.
Exiting Recovery Mode
If you’ve accidentally entered recovery mode or changed your mind about restoring your device, exiting is usually straightforward:
The simplest method is to force restart your iPhone using the same button combinations for your specific model. For newer iPhones, quickly press Volume Up, then Volume Down, then press and hold the Side button until the Apple logo appears.
If you used a tool like Fixppo to enter recovery mode, you can typically use the same tool to exit with a single click.
Sometimes simply disconnecting your iPhone from the computer and letting the battery drain completely will cause it to exit recovery mode on its own (though this isn’t the most practical method).
In most cases, the force restart method will successfully get your iPhone out of recovery mode and back to normal operation.
Prevention: Avoiding the Need for Recovery Mode
While knowing how to put iPhone into recovery mode is valuable, it’s even better to avoid situations where you need it. Here are some tips to keep your iPhone running smoothly:
Regularly back up your iPhone to iCloud or your computer. This way, if you do need to use recovery mode and restore, you won’t lose important data.
Keep your iOS version updated. Apple frequently releases updates that fix bugs and security issues.
Avoid installing beta iOS versions on your primary device unless you’re comfortable with potential instability.
Be cautious with jailbreaking, as this can make your device more prone to issues that require recovery mode.
Monitor your storage space – iPhones that are nearly full can experience performance issues and crashes.
Install apps only from the official App Store to minimize the risk of malware or poorly optimized software.
When to Seek Professional Help
While learning how to put iPhone in recovery mode empowers you to handle many software issues yourself, there are situations where professional assistance might be necessary:
If you’ve repeatedly tried recovery mode restoration and your iPhone continues to experience the same issues, there might be a hardware problem that software fixes can’t address.
When your iPhone shows physical damage like a cracked screen or water exposure alongside software issues, a professional repair might be needed.
If your device won’t turn on at all, not even showing the Apple logo or recovery mode screen, the issue is likely hardware-related.
When you’re uncomfortable performing technical procedures yourself, there’s no shame in seeking help from Apple Support or an authorized service provider.
Real-World Recovery Mode Success Stories
To give you some context about how useful knowing how to put iPhone in recovery mode can be, here are a few scenarios where it saved the day:
Sarah’s iPhone 12 got stuck on the Apple logo after an iOS update failed. She used the recovery mode button sequence (Volume Up, Volume Down, then hold Side button) to enter recovery mode, connected to iTunes, and restored from a backup she’d made the previous day. Within an hour, her phone was back to normal with minimal data loss.
Mike’s iPhone 7 Plus started randomly restarting throughout the day. After trying various troubleshooting steps, he used recovery mode to perform a clean iOS reinstall. This resolved the mysterious crashes that had been plaguing his device for weeks.
Jessica’s iPhone XR wouldn’t turn on after the battery completely drained. When charging didn’t help, she used recovery mode to force the device to connect to her computer, which allowed her to restore it to working condition.
These examples show how mastering how to put iPhone in recovery mode can rescue you from what might otherwise seem like catastrophic phone failures.
The Evolution of iPhone Recovery Mode
It’s interesting to note how the process of how to put iPhone into recovery mode has evolved alongside iPhone hardware changes. The original iPhone and iPhone 3G used a simple Home button + Power button combination. As iPhones evolved, the button combinations changed to accommodate different hardware designs.
The removal of the Home button with the iPhone X represented the biggest shift, introducing the current Volume Up, Volume Down, then hold Side button sequence that continues with the latest models.
Understanding this evolution helps explain why the process varies between models and ensures you use the correct method for your specific device when you need to learn how to put iPhone in recovery mode.
Recovery Mode vs. DFU Mode
You might have heard about DFU (Device Firmware Update) mode as another iPhone troubleshooting option. While both are advanced recovery states, there are important differences:
Recovery mode is easier to enter and exit, while DFU mode requires more precise timing.
Recovery mode loads a small bit of iOS code to facilitate restoration, while DFU mode bypasses iOS completely.
DFU mode allows for deeper-level restoration and can sometimes resolve issues that recovery mode can’t.
For most users and most situations, recovery mode is sufficient and preferable due to its simpler entry process. DFU mode is typically reserved for more advanced troubleshooting scenarios.
Troubleshooting Common Recovery Mode Problems
Even when you know how to put iPhone into recovery mode, you might encounter hurdles. Here are solutions to some common issues:
If iTunes/Finder doesn’t recognize your device in recovery mode, try a different USB cable, different USB port, or restart your computer.
When the restoration process fails repeatedly, check your internet connection or try using a different network.
If the progress bar seems stuck during restoration, be patient – it can sometimes appear frozen while files are being processed in the background.
When recovery mode won’t initialize despite correct button presses, ensure your buttons are working properly by testing them in normal device operation.
If you accidentally enter recovery mode, use the force restart method to exit.
The Future of iPhone Recovery
As iPhones continue to evolve, the methods for how to put iPhone into recovery mode may