TOOL HUNTER

Have you ever noticed how vertical videos seem to dominate your social media feeds these days? From TikTok dances to Instagram stories, these portrait-oriented clips are perfectly designed for mobile viewing. While they appear everywhere, many people still struggle with creating them, particularly when using editing software like iMovie.
If you’ve been searching for ways to create stunning vertical content that looks amazing on smartphones, you’ve come to the right guide. Today, we’re diving deep into the world of vertical video creation with iMovie, covering everything from basic adjustments to professional techniques. You’ll discover how to achieve that perfect imovie portrait mode effect that makes your content stand out on social platforms.
Learning how to make imovie vertical videos might seem challenging initially, but we’re breaking it down into manageable steps that work across all Apple devices. Whether you’re working on a Mac, iPhone, or iPad, you’ll find methods that suit your needs. We’ll also explore how to create portrait videos in imovie that maintain professional quality while being optimized for various social media platforms.
For those specifically interested in mobile editing, we’ve included a comprehensive section on how to make imovie vertical on iphone. Let’s jump right in and transform your video content!
Table of Contents
- Understanding iMovie’s Vertical Video Capabilities
- Creating Portrait Videos Using Mac’s App Preview Mode
- Alternative Method: Rotate-Export-Rotate Technique
- Creating Vertical Videos on iPhone
- Editing Vertical Videos on iPad
- Advanced Alternative: CapCut Desktop Video Editor
- Final Thoughts
- Common Questions
Understanding iMovie’s Vertical Video Capabilities
iMovie serves as an excellent solution for Apple users seeking to resize and reformat their video content. As built-in software across Apple devices, it offers remarkable convenience and accessibility. The interface remains user-friendly enough that even editing beginners can quickly grasp how to modify video dimensions, crop frames, and apply enhancements with minimal effort.
When tackling the challenge of creating an imovie vertical video, this software provides all necessary tools in one place. It streamlines the process of adapting videos to different formats and platforms, making it equally suitable for Instagram content, TikTok clips, or personal memory preservation. The journey to mastering how to make imovie vertical becomes significantly smoother with iMovie’s intuitive design.
Essential Video Resizing Features in iMovie
Let’s examine the specific features that make iMovie particularly effective for video resizing tasks. These functionalities collectively help you achieve that polished imovie portrait mode appearance that works so well on mobile devices.
The aspect ratio adjustment feature allows seamless transitions between different screen formats. You can select 16:9 for traditional widescreen displays, 4:3 for older monitor compatibility, or even 1:1 for Instagram square posts. Importantly, these changes maintain your video quality without distortion, which proves invaluable when preparing content for multiple viewing platforms.
Crop and fit options provide additional control over your composition. These tools help direct viewer attention to the most crucial elements of your videos. Real-time previews ensure you can immediately see how your adjustments will appear in the final product, which is particularly helpful when determining how to make imovie vertical without sacrificing important visual elements.
Zoom and pan effects contribute cinematic quality to your projects. These features enable smooth, controlled movements within the frame, allowing you to create intimate moments by zooming in on subjects or establish context by panning across landscapes. Such effects significantly enhance storytelling potential in your vertical videos.
For users requiring precise control, iMovie offers custom resolution settings. This functionality benefits those creating content for non-standard displays, such as digital signage or unique social media graphics that demand specific dimensions.
The drag-and-drop functionality simplifies the entire workflow. This feature enables quick video clip imports, easy timeline placement, and straightforward adjustment of placement, duration, and transition effects. It dramatically streamlines the process of creating portrait videos in imovie, making the editing experience more efficient and enjoyable.
Creating Portrait Videos Using Mac’s App Preview Mode
For Mac users, iMovie’s App Preview mode presents an excellent method for creating videos formatted specifically for mobile applications. This mode ensures your content meets App Store requirements while facilitating professional-looking results suitable for smartphones and tablets. It also provides great practice for learning how to make imovie vertical videos for other platforms.
Here’s how to create vertical video in iMovie on Mac using app preview mode:
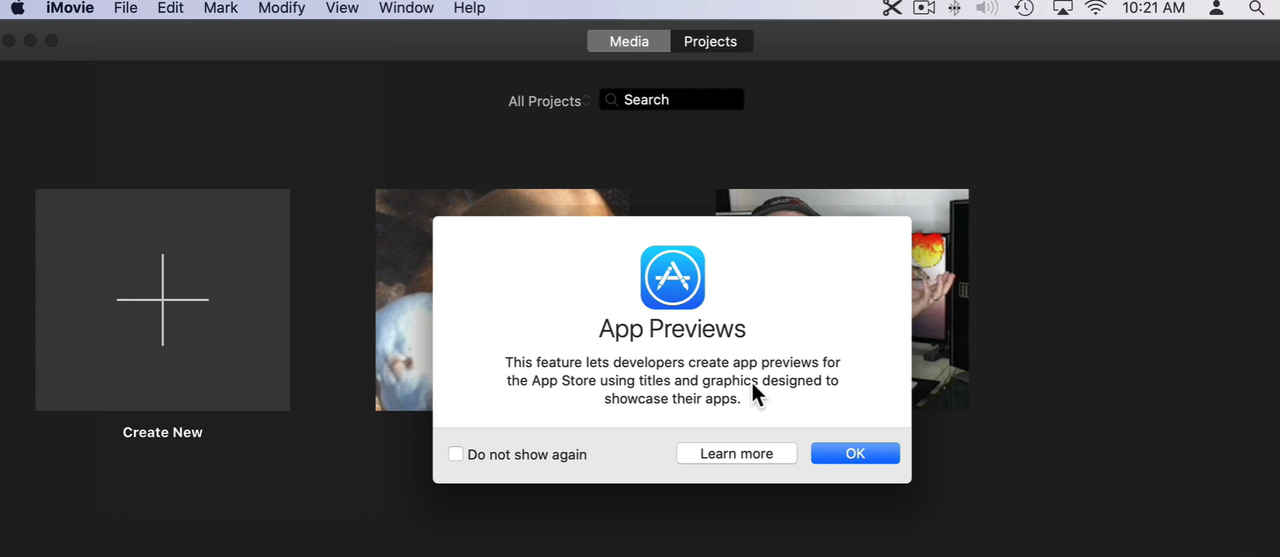
Begin by launching iMovie on your Mac device. Navigate to the “File” menu in the upper toolbar and select “New App Preview” to initiate a project specifically designed for portrait videos. This represents your first step toward achieving that perfect imovie portrait mode presentation.
Next, import your video footage by simply dragging and dropping vertical videos into the editing timeline. This area serves as your workspace for assembling and organizing content.
Proceed with editing your video using available tools. To incorporate text elements, select “Titles” from the top menu and choose a style that complements your project. You can also perform cuts, trims, and additional adjustments to refine your footage until it meets your standards.
After completing your edits, address cropping requirements. Click on your video within the timeline and access the crop tool. Choose either “Fit” or “Crop to Fill” to ensure your video properly occupies the portrait frame. This step proves crucial for learning how to make imovie vertical without awkward empty spaces or distorted imagery.
Finally, when satisfied with your project, click the “Share” button located in the top right corner. Select “App Preview” to export your project as a 1080 x 1920 HD MP4 file. For additional format options, choose “Export File” instead.
Alternative Method: Rotate-Export-Rotate Technique
Sometimes you may possess horizontal footage that you want to convert into vertical format. iMovie accommodates this through a straightforward rotate-export-rotate approach. This method enables you to adapt existing footage for mobile viewing without compromising video quality, offering another effective approach to creating an imovie vertical video when original material wasn’t shot vertically.
Here’s how to create a vertical video in iMovie using this technique:
Start by importing your video into iMovie. Open the application on your Mac and create a new project, then upload your videos to the editing timeline.
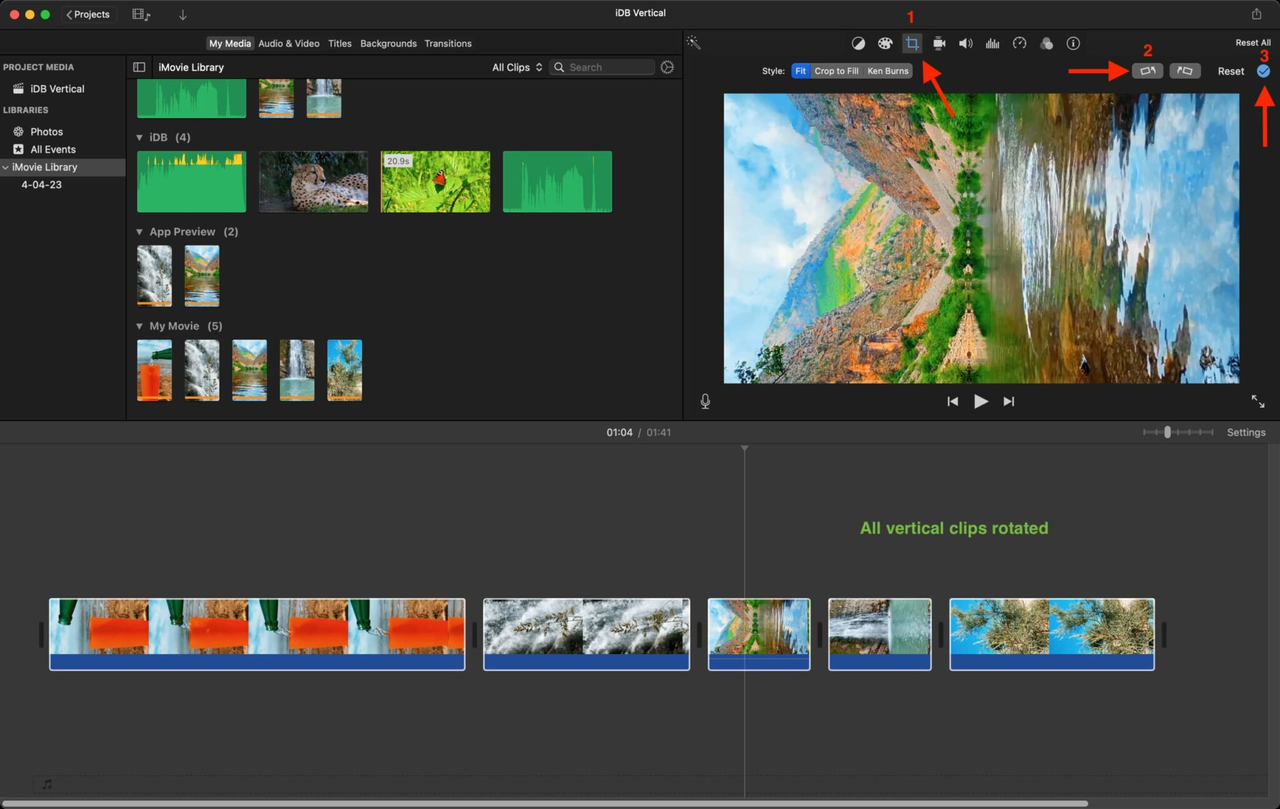
Now select and rotate your videos. Click on one video in the timeline, then hold the Command key to select additional clips. Click the “Crop” icon in the preview section and utilize the rotate button to adjust your videos’ orientation. Confirm the rotation by clicking the blue checkmark icon.
At this stage, you can implement additional edits if desired. You might trim clips or incorporate music, sound effects, or voiceovers. However, avoid adding text within iMovie during this phase, as it won’t rotate correctly with the video.
After completing your edits, proceed to export the video. Click the “Share” icon and export the video file to your preferred location on your Mac.
For the final step, use a video player like QuickTime to rotate the video back to its original vertical orientation after exporting. Save the file, and you’ll obtain a perfectly formatted vertical video ready for sharing. While this method might appear somewhat circuitous, it effectively demonstrates how to make imovie vertical when working with originally horizontal footage.
Creating Vertical Videos on iPhone
Developing vertical videos on your iPhone using iMovie proves simpler than many anticipate. It’s ideal for content destined for social media platforms, providing straightforward editing and optimization capabilities directly on your device. This allows you to leverage intuitive tools while ensuring your videos maintain perfect compatibility with mobile viewing requirements.
If you’ve been searching for how to make imovie vertical on iphone, follow these exact steps:
Begin by opening iMovie on your iPhone. Tap the plus sign to create a new movie project and import the vertical videos you intend to edit.
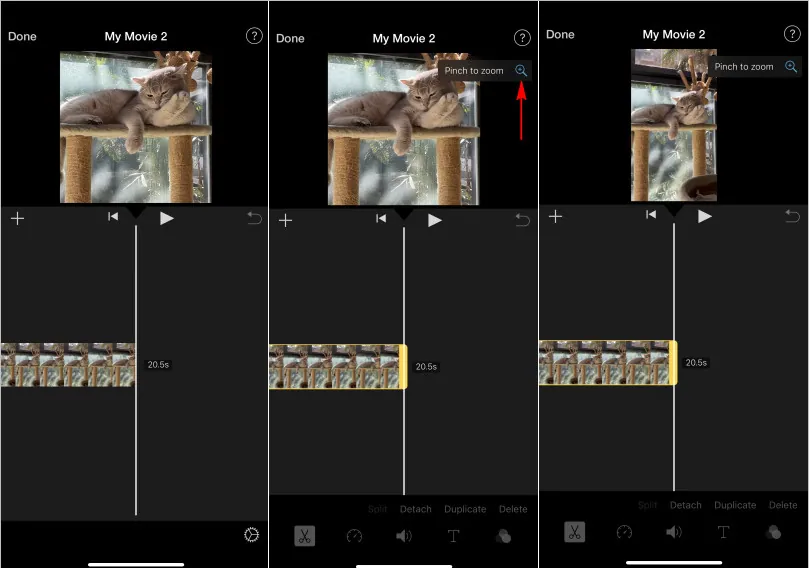
You might notice your video initially appears zoomed or cropped awkwardly. To correct this, tap the “Pinch to Zoom” icon in the upper right corner, then pinch the screen to adjust the video to its original vertical aspect ratio. This step is essential for achieving proper imovie portrait mode formatting.
With your video now correctly formatted vertically, continue with your edits. Add titles, transitions, or other effects as desired. When finished, tap “Done” and then select the “Share” button to save your video. Note that iMovie might still add black bars to your video’s sides at this stage.
To eliminate these black bars, utilize the Photos app. Ensure you have it installed, then open it and select the video exported from iMovie. Tap “Edit” in the upper right corner. Within the cropping section, adjust the frame to completely remove black bars, then save your video in true vertical format ready for sharing. This additional step makes all the difference when learning how to make imovie vertical on iphone effectively.
Editing Vertical Videos on iPad
Editing vertical videos using iMovie on an iPad offers exceptional convenience for creating mobile-friendly content. The iPad’s larger screen combined with iMovie’s user-friendly interface simplifies the process of adjusting and enhancing your vertical videos. Those looking to create portrait videos in imovie using their iPad will find the process remarkably straightforward.
Here’s how to make iMovie vertical on iPad:
Start by opening iMovie on your iPad and tapping the “+” icon in the top right corner. Select “Videos” and choose the vertical video you want to edit.
Once your video imports, tap on it within the timeline. You’ll notice a small rotate icon at the video’s bottom—tap it and rotate the video to your desired orientation. This represents your initial step toward creating that perfect imovie vertical video.
Now enhance your video with effects and transitions. Tap the “Effects” or “Transitions” button at the screen’s bottom. Choose from various options like filters, Ken Burns effects, and different transitions to elevate your video’s quality.
Remember to incorporate text and audio elements. Tap the “Text” or “Audio” button to add titles, captions, or background music to your video. Multiple options exist for fonts, styles, and soundtracks, allowing extensive customization according to your preferences.
When satisfied with your video, proceed to export it. Tap the “Share” button and select “Save Video.” Choose your preferred resolution and quality settings, and your edited video will save to your iPad. You now possess a excellent vertical video ready for sharing across platforms.
Advanced Alternative: CapCut Desktop Video Editor
While iMovie handles basic editing competently, sometimes you may desire expanded features and greater flexibility. For those seeking a more intuitive and powerful tool for vertical video creation, the CapCut desktop video editor presents an outstanding alternative. Designed for both beginners and professionals, it delivers seamless experiences for adjusting aspect ratios, cropping, and enhancing videos with precision.
CapCut — Your all-in-one video & photo editing powerhouse! Experience AI auto-editing, realistic effects, a huge template library, and AI audio transformation. Easily create professional masterpieces and social media viral hits. Available on Desktop, Web, and Mobile App.

CapCut’s user-friendly interface and advanced features streamline the creation of polished vertical content. It’s particularly effective for producing videos that capture attention on platforms like TikTok and Instagram. If you’ve encountered challenges determining how to make imovie vertical and want to explore alternatives, CapCut merits serious consideration.
Notable CapCut Features
CapCut boasts several impressive features that distinguish it from other editors. First, it provides adjustable aspect ratios, enabling effortless switching between different ratios like 9:16 for vertical videos or 1:1 for Instagram posts. This simplifies creating the perfect imovie portrait mode style video without complicated procedures.
The accurate video cropping tool allows precise focus on your video’s most important elements, removing unnecessary components and framing content exactly as envisioned. This proves invaluable when attempting to create portrait videos in imovie that maintain professional standards.
Automatic video framing through CapCut’s auto reframing feature intelligently adjusts footage to match your chosen aspect ratio. This streamlining capability ensures your videos maintain professional appearance across all devices while simplifying the editing process.
Flexible background fillers offer creative solutions when resizing videos. CapCut provides various background options ranging from blurred edges to solid colors, enabling creative gap filling while maintaining visual cohesion in your imovie vertical video.
Finally, CapCut supports multiple formats, allowing effortless import, editing, and export of projects without compatibility concerns. This convenience particularly benefits those working with diverse video file types.
Creating Vertical Videos with CapCut
For newcomers to CapCut, the initiation process remains straightforward. First, download and install the software on your device.
CapCut — Your all-in-one video & photo editing powerhouse! Experience AI auto-editing, realistic effects, a huge template library, and AI audio transformation. Easily create professional masterpieces and social media viral hits. Available on Desktop, Web, and Mobile App.
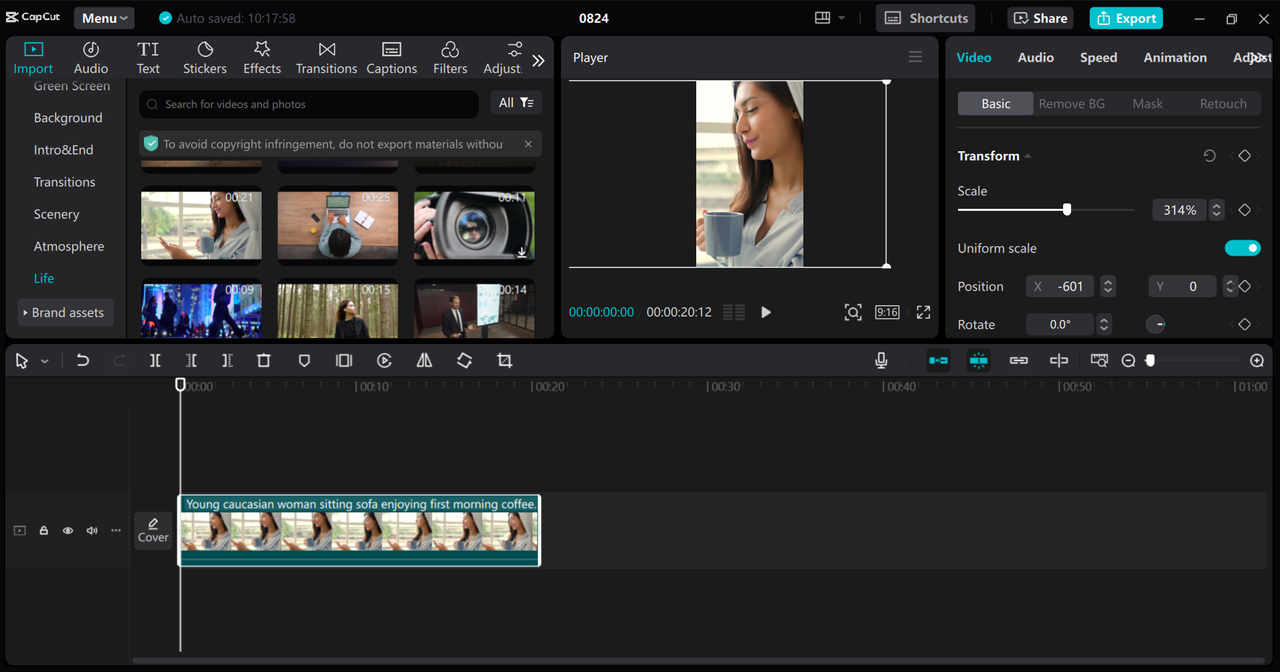
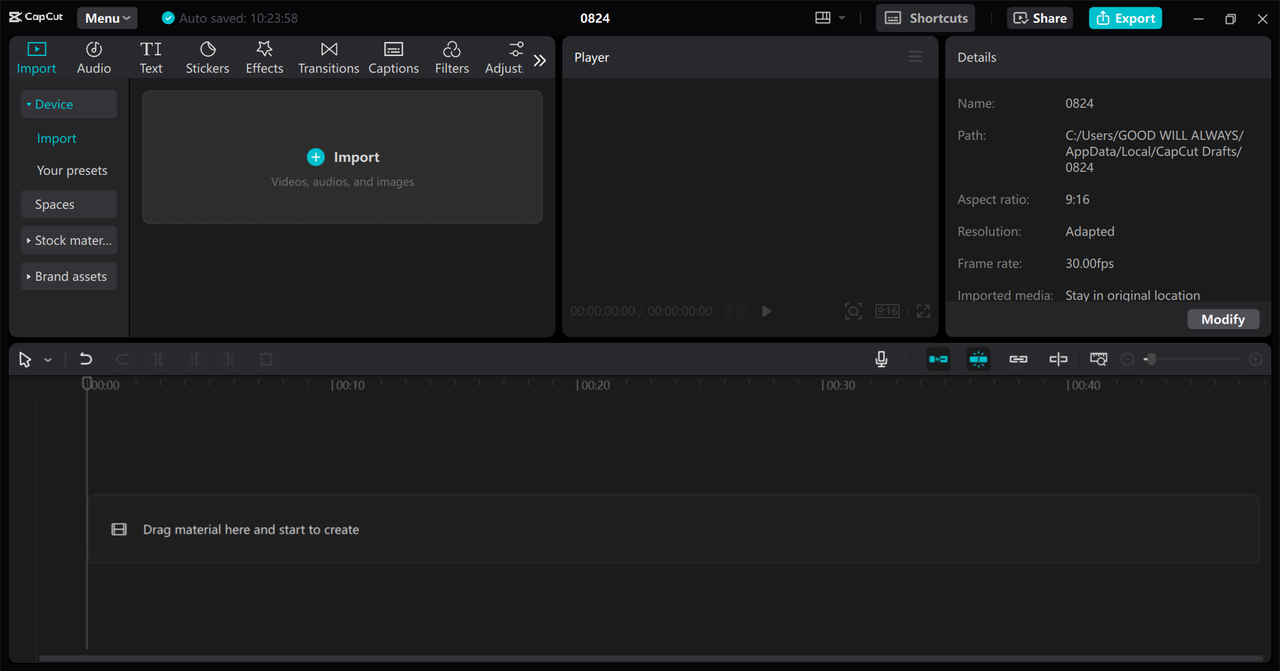
Once installed, open CapCut and import your media. Click “Import” to upload videos from your device into the editing interface.
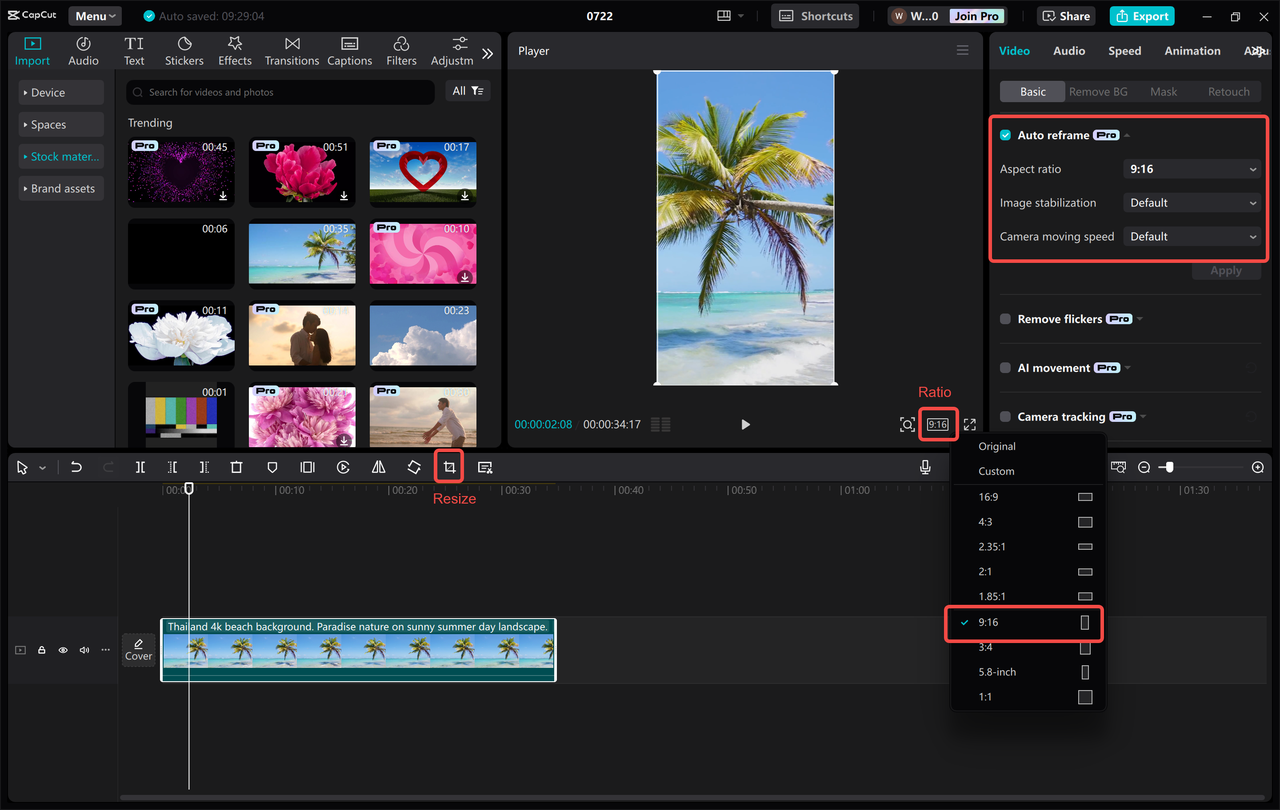
Now modify your video’s aspect ratio. To convert to vertical format, select “Ratio” to change the video canvas from horizontal to vertical. Navigate to the “Basic” section and choose “Auto reframe,” selecting the 9:16 ratio for ideal vertical layout. For complete vertical display without black bars or cropping, utilize the “Resize” option above the timeline. This process significantly simplifies determining how to make imovie vertical compared to complex workarounds.
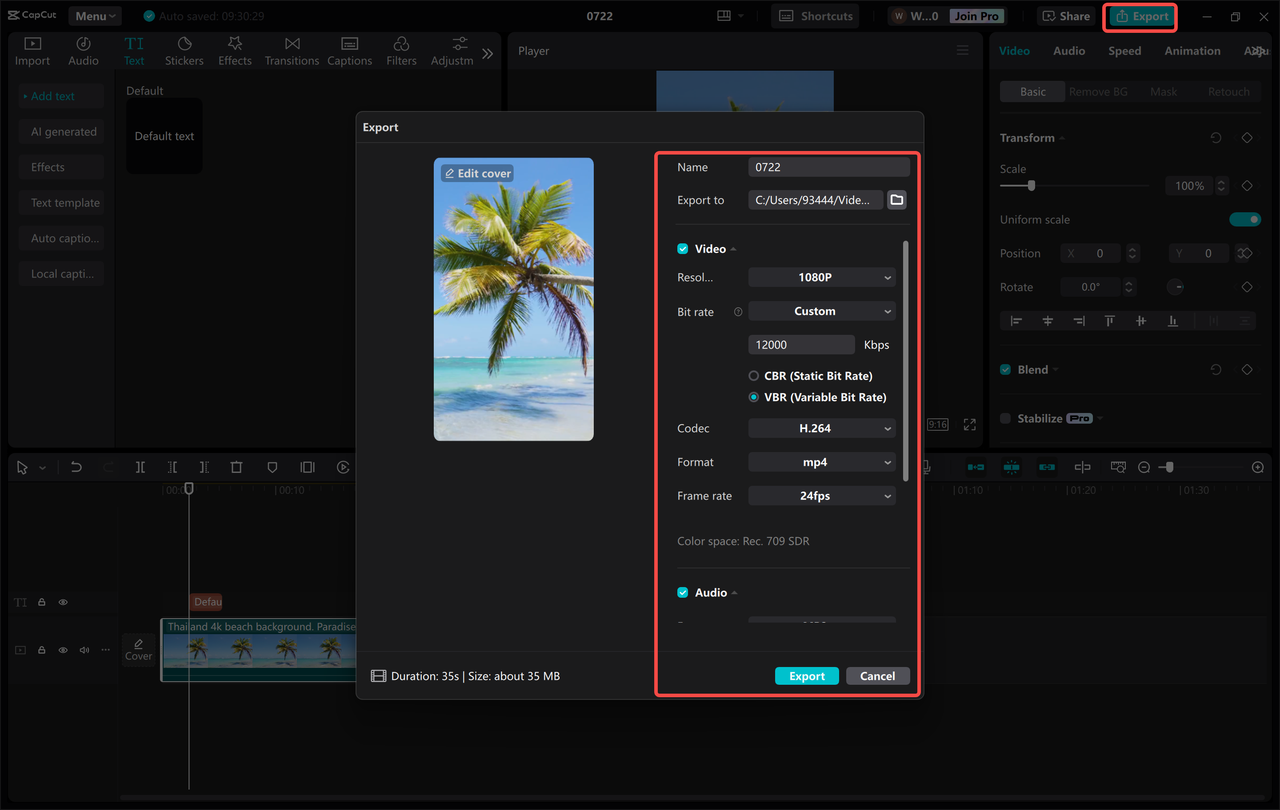
When satisfied with your video, click “Export” in the top right corner. Adjust quality, frame rate, codec, bit rate, and other settings before finalizing export to save to your device. You can also share directly to social media platforms like YouTube or TikTok.
Generating Multiple Vertical Videos with CapCut
Among CapCut’s most impressive capabilities is transforming longer videos into multiple engaging vertical content pieces using advanced AI tools. Here’s how to utilize this feature:
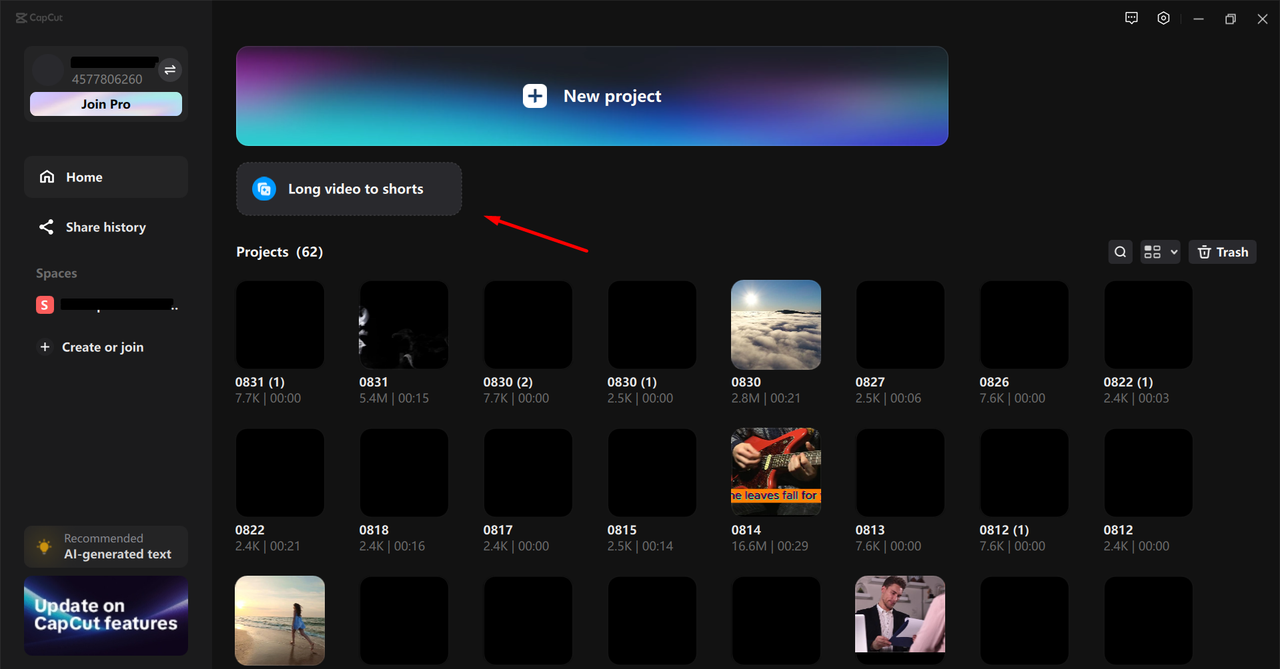
Launch CapCut on your PC and locate the “Long video to shorts” feature on the main interface. Upload your target video to initiate the transformation process.
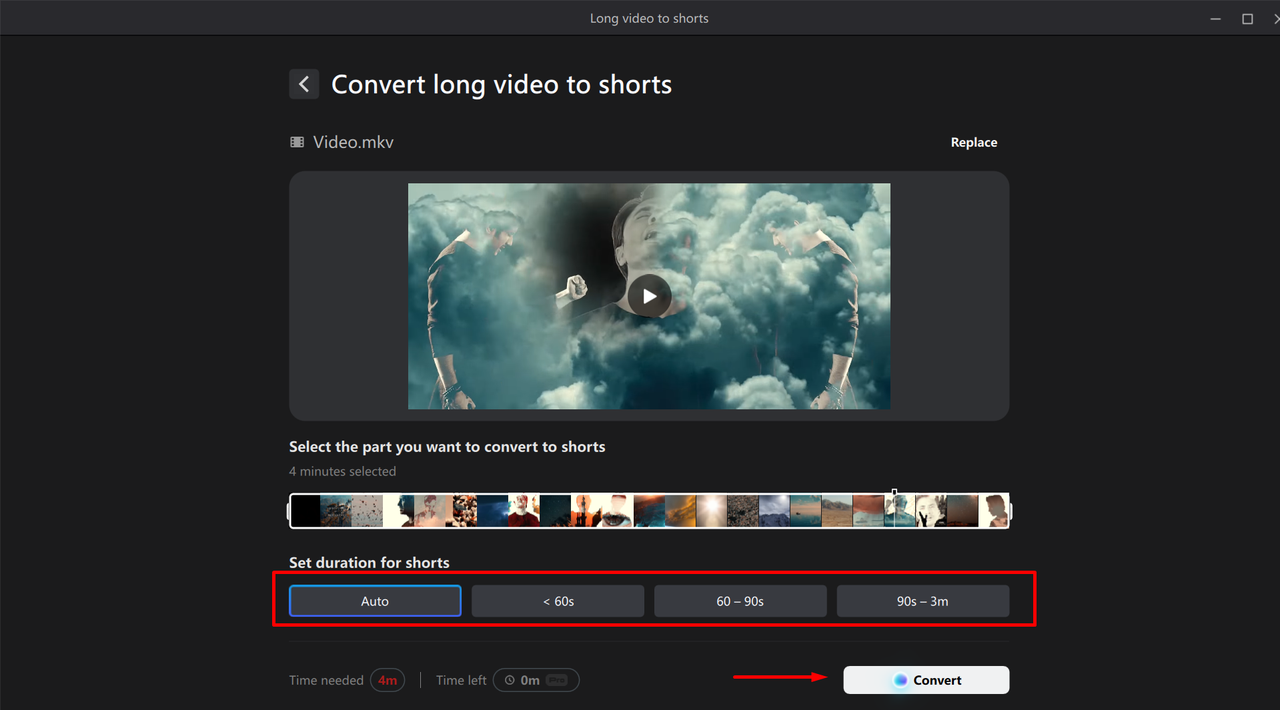
Optionally select specific video parts and adjust length settings for new shorts. Alternatively, choose the “Auto” option allowing AI to automatically select, sort, and create engaging segments. Click “Convert” to instantly generate four vertical shorts from your full-length video. This perfectly facilitates creating multiple portrait videos in imovie style without manual labor.
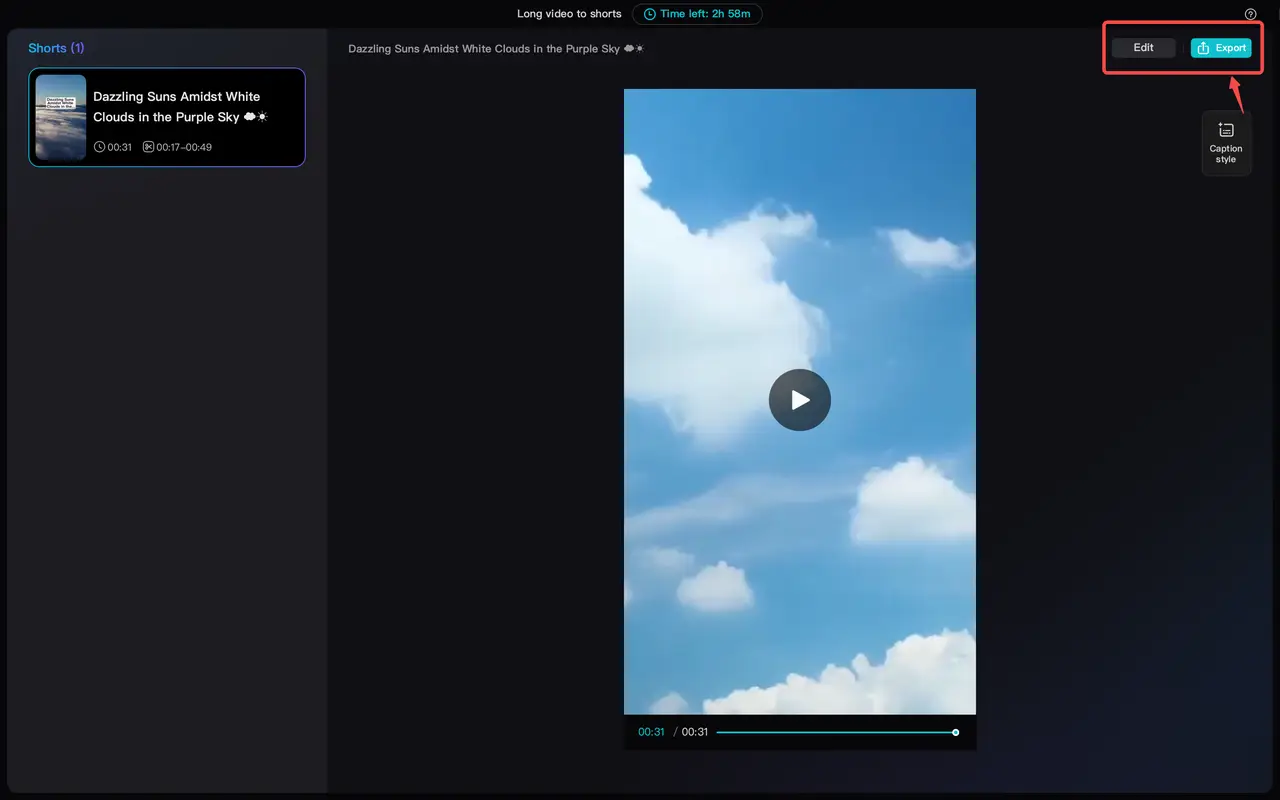
Finally, with your shorts optimized for various vertical screens, export and share them immediately. This feature tremendously benefits content creators seeking to repurpose longer videos into multiple social media posts.
Final Thoughts
We’ve comprehensively explored how to create vertical videos using iMovie across various Apple devices. From simple rotations to aspect ratio adjustments and quality enhancements, iMovie offers diverse tools for producing visually engaging vertical content that appears fantastic on mobile devices.
We’ve examined techniques for how to make imovie vertical on Mac, iPhone, and iPad platforms. Each method possesses unique steps, but all become straightforward with practice. Whether pursuing perfect imovie portrait mode or creating portrait videos in imovie for social media, iMovie delivers capable solutions.
CapCut — Your all-in-one video & photo editing powerhouse! Experience AI auto-editing, realistic effects, a huge template library, and AI audio transformation. Easily create professional masterpieces and social media viral hits. Available on Desktop, Web, and Mobile App.
We’ve also introduced CapCut desktop video editor as a viable alternative. If you desire expanded features or simplified editing processes, CapCut warrants exploration. Its user-friendly interface and advanced editing tools provide the flexibility and efficiency necessary for high-quality video production.
Remember that creating exceptional vertical videos requires practice and experimentation. Don’t hesitate to try different techniques and tools until you discover what works best for your specific needs. Whether remaining with iMovie or testing CapCut, the primary objective involves enjoying the creative process while producing videos that bring pride and satisfaction.
Common Questions
Can you flip a video vertically in iMovie?
Yes, iMovie permits video flipping, though it primarily emphasizes rotation rather than vertical or horizontal flipping. To flip a video vertically in iMovie, you might need to rotate it sideways before adjusting orientation, which can become somewhat complicated. For simpler video flipping and rotation, consider trying CapCut desktop video editor, which offers more intuitive tools for these operations.
How to make vertical videos in iMovie for TikTok?
To