TOOL HUNTER

Have you ever spent hours perfecting a PowerPoint presentation, only to have someone accidentally delete important content or make unwanted changes? Whether you’re sharing business reports with colleagues or submitting academic presentations, knowing how to lock PowerPoint from editing is an essential skill that can save you from potential headaches.
Microsoft PowerPoint remains one of the most widely used presentation tools across various industries. From corporate boardrooms to classroom presentations, these files often contain sensitive information that requires protection. Learning how to lock a PowerPoint from editing ensures your hard work remains intact while still allowing others to view your content.
Why You Should Learn How to Lock PowerPoint from Editing
Understanding how to lock editing in PowerPoint provides multiple benefits beyond basic protection. When you share presentations with team members or clients, locking prevents accidental modifications that could compromise your message. It also maintains your professional credibility by ensuring the presentation appears exactly as you intended.
Additionally, knowing how to lock PowerPoint from editing becomes crucial when dealing with confidential data. Financial reports, strategic plans, or proprietary research need safeguards against unauthorized changes. Even if you’re just sharing a presentation for review purposes, restricting editing capabilities ensures feedback remains separate from the original content.
Methods to Lock Entire PowerPoint Presentations
Using the Mark as Final Feature
One straightforward approach to how to lock a powerpoint from editing involves using PowerPoint’s built-in “Mark as Final” feature. This method doesn’t require passwords but signals to other users that the document shouldn’t be modified.
To implement this protection:
Begin by opening your completed PowerPoint presentation. Navigate to the File menu and select Info. Click on Protect Presentation and choose Mark as Final from the dropdown options. Confirm the action when prompted, then save your document.
When recipients open the file, they’ll see a notification bar indicating the presentation has been marked as final. While this method provides a clear visual cue against editing, it’s important to note that determined users can simply click “Edit Anyway” to bypass this restriction. Therefore, this approach works best for collaborative environments where team members respect document protocols rather than situations requiring strong security.
Adding Digital Signatures
For more formal protection, digital signatures offer a professional way to how to lock PowerPoint from editing while authenticating document ownership. This method is particularly valuable for legal documents, official reports, or any presentation requiring verification of source integrity.
The process begins by accessing your PowerPoint file and selecting the File menu. Choose Info, then click Protect Presentation. Select Add a Digital Signature from the available options. If you don’t have a digital ID, PowerPoint will guide you through obtaining one from a trusted provider.
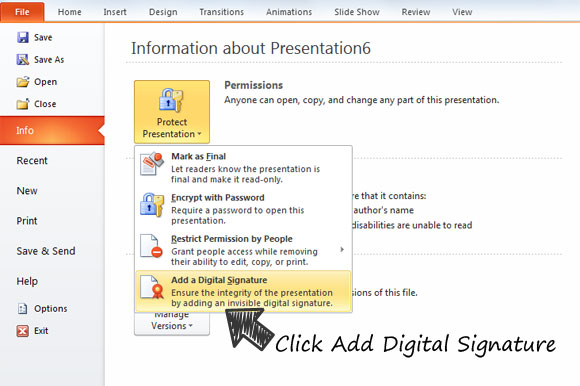
Once your digital certificate is ready, enter your purpose for signing the document in the designated field. Complete the process by clicking Sign. The presentation will now display your digital signature, indicating its authenticity and protected status. Any attempt to modify the content after signing will invalidate the signature, alerting viewers to potential tampering.
Converting to PDF or PPSX Format
Sometimes the simplest solutions are the most effective when considering how to lock editing in PowerPoint. Converting your presentation to PDF or PowerPoint Show (PPSX) format creates view-only versions that are notoriously difficult to edit without specialized software.
To convert your presentation:
Open your PowerPoint file and select File > Save As. Choose your preferred save location, then click the dropdown menu for file types. Select either PDF or PowerPoint Show (PPSX). Confirm your selection by clicking Save.
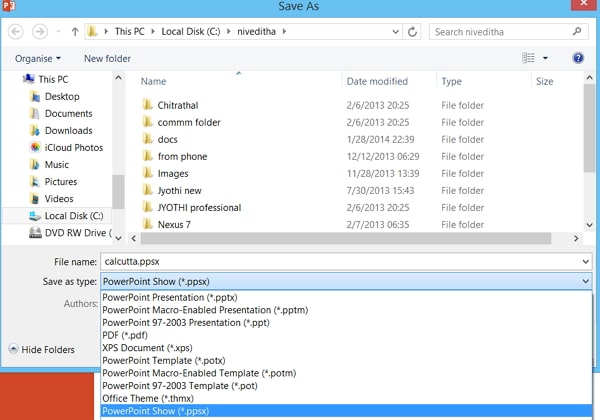
The PDF option is ideal for universal compatibility, as nearly every device can open PDF files. The PPSX format launches directly into slideshow mode when opened, providing an excellent viewing experience while making editing considerably more challenging. Both approaches effectively address how to lock a PowerPoint from editing for distribution purposes, though determined individuals with appropriate software could potentially convert these files back to editable formats.
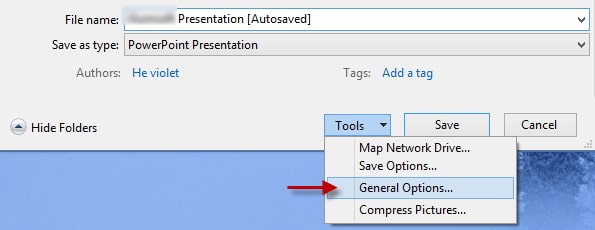
Setting Modification Passwords
For maximum security when exploring how to lock PowerPoint from editing, password protection offers the strongest defense against unauthorized changes. This method requires anyone attempting to edit the presentation to enter a correct password, while still allowing view-only access without the password.
Implementation involves these steps:
Open the presentation you want to protect and select File > Save As. Choose your destination folder, then click Tools > General Options within the Save As dialog box.
In the General Options window, you’ll find two password fields. For editing restrictions, enter your desired password in the “Password to modify” field. You can also set a separate “Password to open” if you want to restrict viewing entirely. Confirm your password when prompted.
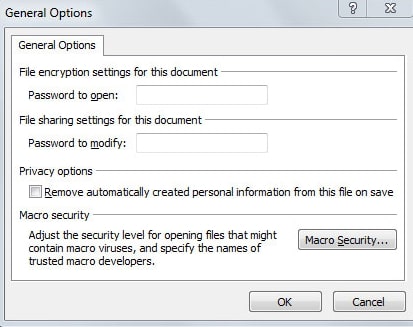
Complete the process by returning to the Save As dialog and clicking Save. Now, when anyone opens the presentation, they’ll need to enter your password to make edits. Without it, they can only view the presentation in read-only mode. This method provides the most comprehensive solution for how to lock editing in PowerPoint for sensitive materials.
Mac-Specific Protection Methods
Apple users have additional options for how to lock a powerpoint from editing using native macOS functionality. The Finder application provides file-level locking that complements PowerPoint’s built-in security features.
To utilize this method:
Open Finder and navigate to your PowerPoint presentation. Right-click (or Control-click) the file and select Get Info from the context menu.
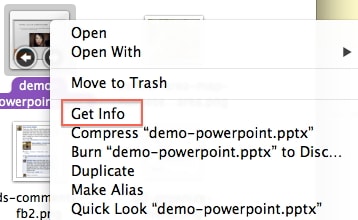
In the Info window that appears, locate the General section and check the Locked checkbox. This system-level protection prevents modifications to the file unless the lock is manually removed.
It’s worth noting that this method works best for files shared among Mac users, as the locking feature may not translate perfectly to Windows systems. Additionally, users with appropriate permissions can easily unlock the file, so this approach should be combined with other protection methods for maximum security when determining how to lock PowerPoint from editing on Apple devices.
How to Lock Individual Slides in PowerPoint
While full presentation protection covers most scenarios, sometimes you only need to secure specific slides containing sensitive data. Unfortunately, PowerPoint doesn’t include built-in functionality for individual slide locking. However, creative workarounds exist for those wondering how to lock slides in PowerPoint selectively.
The most effective method involves converting specific slides to images, which effectively prevents editing while maintaining visual integrity:
Open your presentation and navigate to the slide you want to protect. Select File > Save As and choose Change File Type from the options.
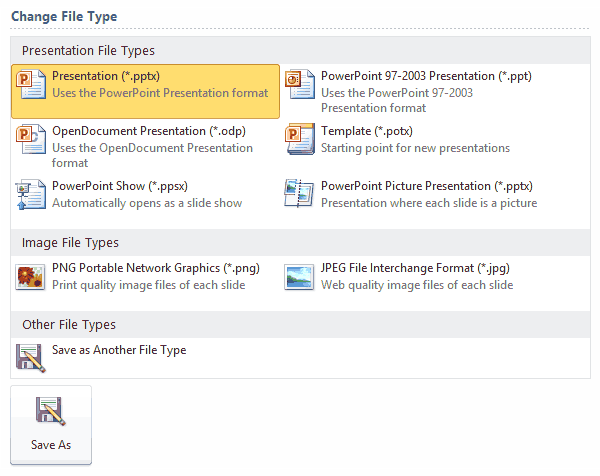
Select your preferred image format (PNG typically offers the best quality). When prompted, choose “Just This One” to export only the current slide. Insert the resulting image into a new slide in your presentation, replacing the original editable content.
While this approach successfully addresses how to lock individual slide content from modification, it does have limitations. The converted content becomes static, preventing future edits without starting from the original. Text within the image won’t be searchable or selectable, which may impact accessibility. Despite these drawbacks, this method remains the most practical solution for partial presentation protection.
Advanced Solutions: Unlocking Protected Presentations
Life sometimes presents situations where you need to edit a locked presentation but don’t have the password. Perhaps you’ve inherited files from a former colleague, encountered a forgotten password scenario, or received protected files that require modifications. In these cases, specialized tools become necessary.
iMyFone Passper Pro.Ultimate 6-in-1 File Password Remover.1-click to remove Excel/Word/PDF/RAR/ZIP/PowerPoint passwords.Unlock file passwords to read, edit or print easily.Remove read-only file protection permanently.Break file locks with up to 99% sucessful rate.
Check More Details | Download Now! | Check All Deals
This comprehensive tool addresses various password-related scenarios, making it invaluable when you need to reverse PowerPoint protection. The software specializes in removing editing restrictions without damaging presentation content, offering multiple recovery methods to handle different protection types.
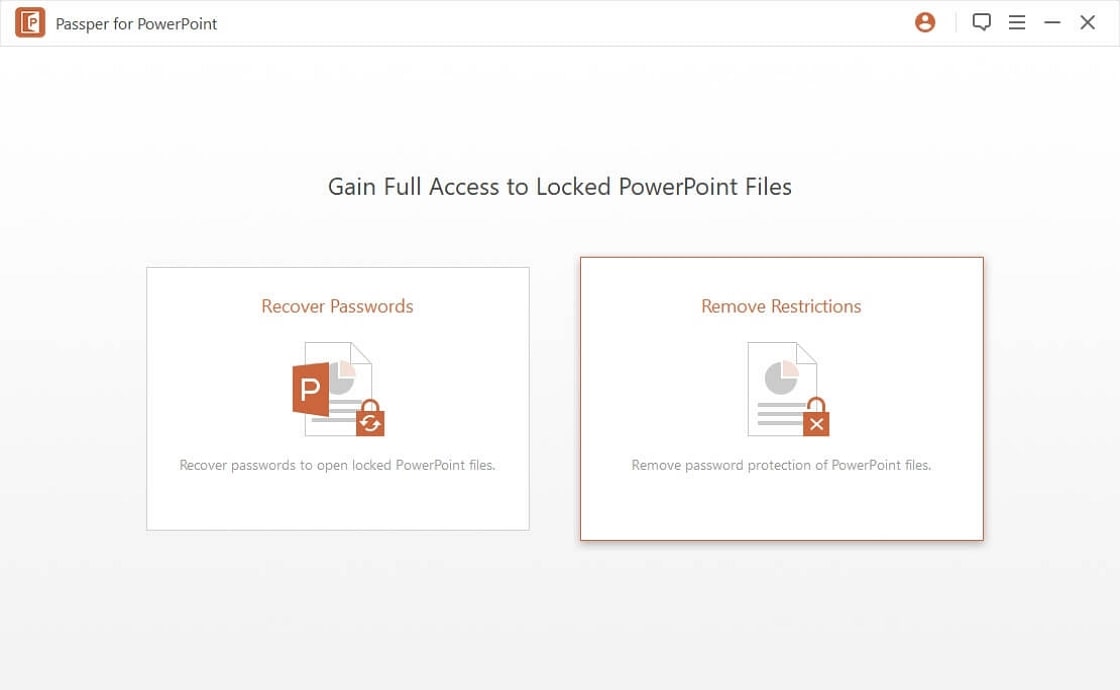
The process begins by launching the software and selecting the “Remove Restrictions” option. After importing your protected PowerPoint file, the program analyzes the encryption and prepares to eliminate editing barriers.
With a single click on the Remove button, the software immediately begins working to strip away the protection layers. The duration depends on file complexity and protection strength, but the process typically completes within minutes.
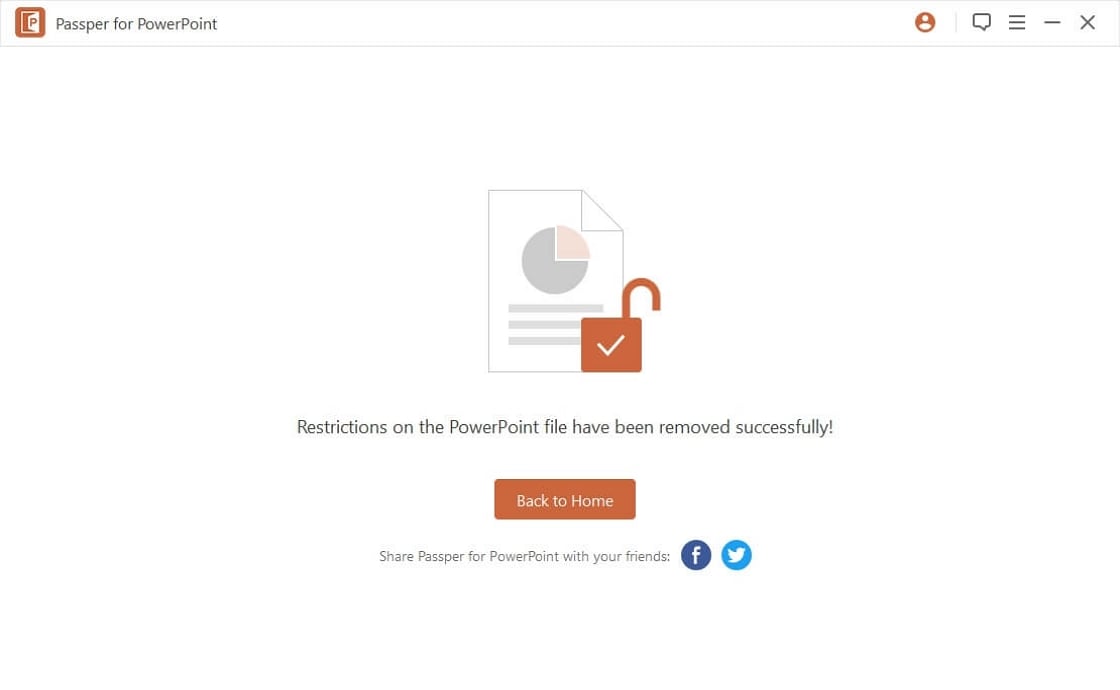
Once finished, you’ll receive confirmation that all restrictions have been successfully removed. The newly unlocked presentation will open with full editing capabilities, allowing you to make necessary changes while preserving all original content and formatting.
Beyond removing editing restrictions, this powerful tool can also recover lost “password to open” credentials using advanced algorithms. Its versatility extends to various file formats beyond PowerPoint, making it a comprehensive solution for multiple document access challenges.
Best Practices for PowerPoint Protection
Understanding how to lock PowerPoint from editing is only part of the equation. Implementing protection strategically ensures optimal security without creating unnecessary access barriers. Consider these practical tips:
Always maintain unprotected backup copies of important presentations. Password protection provides security but becomes problematic if you lose access. Store backups in secure locations separate from your protected files.
Choose protection levels appropriate to your sensitivity needs. For internal collaborations, “Mark as Final” might suffice. For confidential external sharing, password protection offers greater security.
Document your passwords securely using reputable password managers. Avoid storing passwords in easily accessible locations or using obvious combinations that compromise security.
When using modification passwords, consider sharing them through separate communication channels rather than including them with the presentation file itself.
For maximum protection, combine multiple methods. Use both PowerPoint’s password protection and macOS’s file locking for layered security that addresses different vulnerability points.
iMyFone Passper Pro.Ultimate 6-in-1 File Password Remover.1-click to remove Excel/Word/PDF/RAR/ZIP/PowerPoint passwords.Unlock file passwords to read, edit or print easily.Remove read-only file protection permanently.Break file locks with up to 99% sucessful rate.
Check More Details | Download Now! | Check All Deals
Final Thoughts on PowerPoint Security
Mastering how to lock PowerPoint from editing empowers you to share presentations confidently while maintaining control over your content. From simple “Mark as Final” notifications to robust password protection, PowerPoint offers multiple security tiers suitable for different scenarios.
Each protection method serves specific needs—whether you’re preventing accidental edits during review cycles, securing confidential business information, or preserving artistic integrity. Understanding these options allows you to select appropriate security levels without unnecessarily complicating access for authorized users.
Similarly, knowing how to unlock protected presentations when legitimate needs arise ensures you’re never permanently locked out of your important files. Tools like dedicated password recovery software provide safety nets for those inevitable moments when passwords are forgotten or personnel changes create access gaps.
As presentation security needs evolve, so do the tools and techniques for protection and recovery. Staying informed about both native PowerPoint features and third-party solutions ensures you’re prepared for whatever document security challenges arise in your professional or academic endeavors.
Some images in this article are sourced from iMyFone.