TOOL HUNTER

If you’re an Outlook user, you’ve probably heard about OST files but might not know exactly what they are or where to find them. These offline Outlook data files are crucial for accessing your emails, calendar, and contacts when you’re not connected to the internet. Knowing how to locate your Outlook OST file can be really helpful for troubleshooting, backing up your data, or just understanding how Outlook stores your information.
Outlook OST files are essentially local copies of your mailbox that sync with the server when you’re online. They’re automatically created when you set up an Outlook account with an Exchange server or Microsoft 365 account. The tricky part is that these files are typically hidden away in system folders, making them a bit challenging to find if you don’t know where to look.
Understanding Outlook OST Files and Their Importance
OST files, which stands for Offline Storage Table files, serve as local copies of your mailbox data. When you’re working offline, any changes you make to your emails, calendar events, or contacts are saved to these OST files. Once you reconnect to the internet, Outlook synchronizes these changes with the server. This functionality is particularly useful for people who frequently work in locations with unreliable internet connections.
The location of your Outlook OST file isn’t random—it follows specific patterns based on your Windows version and Outlook edition. Microsoft places these files in designated system folders to keep them organized and somewhat protected from accidental modification. However, there are times when you might need to access these files directly, such as when you’re troubleshooting synchronization issues, need to free up disk space, or want to create backups.
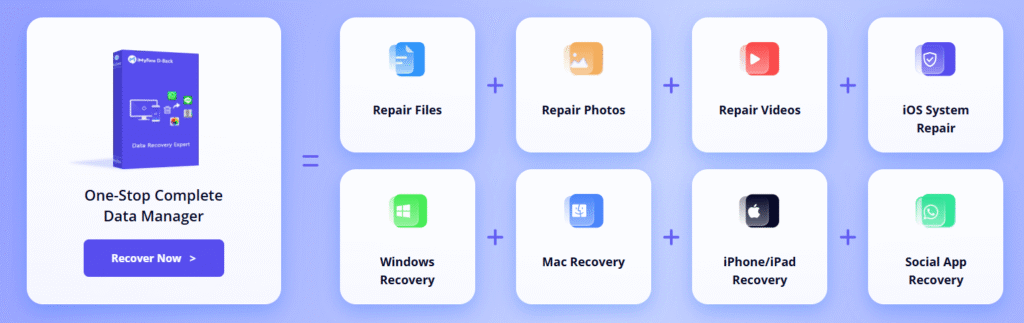
iMyFone D-Back.All-in-one Data Recovery Software: You can recover deleted, lost, formatted, or corrupted files from iOS/Android devices and PCs in one tool.1000+ Data Types Recovery: Restore photos, videos, messages, contacts, office documents, emails, audio, etc. without backup.Third-Party App Recovery: Retrieve messages and attachments directly from WhatsApp, LINE, Kik, WeChat, Skype and more.iOS Data Backup: Securely back up various data from your iOS device, reducing the risk of data loss.
Check More Details | Download Now! | Check All Deals
How to Locate Outlook OST File on Different Windows Versions
Checking Default OST File Locations
The simplest way to find your Outlook OST file is to check the default locations where Outlook typically stores them. These locations vary depending on which version of Windows and Outlook you’re using. Here’s a breakdown of where you can typically find these files:
For Outlook 2007 on Windows 7, 8, or 10, the default OST file location is usually: C:\Users[Your User Name]\AppData\Local\Microsoft\Outlook
If you’re using Outlook 2010 on Windows 7, 8, or 10, you’ll typically find the OST files in: Documents\Outlook Files\
For those with Outlook 2013, 2016, or 2019 on Windows 7, 8, or 10, the usual path is: C:\Users[Admin]\AppData\Local\Microsoft\Outlook
Remember that the AppData folder is hidden by default in Windows, so you’ll need to enable the viewing of hidden files and folders in File Explorer options to see it. To do this, open File Explorer, click on the View tab, and check the “Hidden items” box.
Using Outlook Options to Find OST File Location
If navigating through system folders sounds complicated, there’s an easier way to locate your Outlook OST file directly through Outlook itself. This method works on Windows 10, 11, 8, and 7, regardless of your Outlook version.
First, open Outlook and click on the “File” menu in the top-left corner. From there, select “Info” from the left-hand menu, then click on “Account Settings.” A dropdown will appear—select “Account Settings” again from this menu.
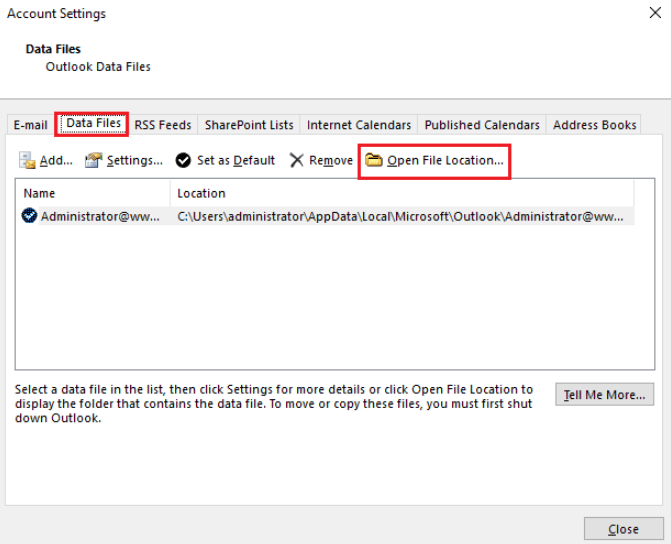
In the Account Settings window that opens, click on the “Data Files” tab. You’ll see a list of all data files associated with your Outlook profile. Select the one you’re interested in (it will typically be labeled with your email address), then click the “Open File Location” button. This will automatically open Windows File Explorer to the exact folder containing your OST file.
This method is particularly useful because it takes you directly to the file without having to remember or type any complicated file paths. It also ensures you’re looking at the correct file, especially if you have multiple Outlook profiles or accounts set up.
Direct Method to Access OST File Location
There’s an even quicker way to access your Outlook OST file location if you’re already working in Outlook. This method is straightforward and doesn’t require navigating through multiple menus.
Simply open Outlook and right-click on any email in your inbox or any folder. From the context menu that appears, select “Open File Location.” This action will immediately open Windows File Explorer and display the location of your OST files.
It’s worth noting that this method might not work in all versions of Outlook or with all account types, but it’s definitely worth trying as it’s the fastest approach when it does work. If it doesn’t work for you, simply revert to the previous method using Outlook Options.
Changing Your Outlook OST File Location
There are several reasons why you might want to change where Outlook stores your OST files. Maybe your system drive is running low on space, or you want to move these files to a faster SSD, or perhaps you’re implementing a new organizational system for your files. Whatever the reason, there are multiple methods to change the Outlook OST file location.
Creating a New Outlook Profile
One of the most reliable methods to change your Outlook OST file location is by creating a new Outlook profile. This approach gives you a fresh start while maintaining your email account settings.
Start by locating your current OST file using one of the methods described earlier. Once you’ve found it, copy the file to your desired new location. Remember this new location as you’ll need it later in the process.
Next, open the Control Panel on your computer. You can do this by typing “Control Panel” in the Windows search bar. In the Control Panel, look for the “Mail” option. If you can’t find it, change the view to “Large icons” or “Small icons” to see all available options.
Click on the Mail setup dialog box, then select the “Show Profiles” tab. Click “Add” to create a new profile, and give it a descriptive name that you’ll remember. Click “OK” to proceed.
You’ll now need to set up your email account again in this new profile. Enter your email address and follow the prompts to configure your account. During the setup process, you’ll have the opportunity to specify server settings. Click on “More Settings,” then navigate to the “Advanced” tab. Here, click on “Outlook Data File settings.”
Browse to the location where you copied your OST file earlier and select it. Complete the setup process by clicking “Finish.” Now, go back to the Control Panel Mail settings, select “Always use this profile,” and choose the new profile you just created. Apply the changes and restart Outlook.
Using Registry Editor to Change OST Location
For more advanced users, the Windows Registry Editor provides another method to change the Outlook OST file location. This approach works with most Outlook versions, including 2003, 2007, 2010, 2013, 2016, and 2019.
Before you begin, it’s important to note that editing the Windows Registry can be risky if done incorrectly. I recommend creating a system restore point or backing up your registry before proceeding.
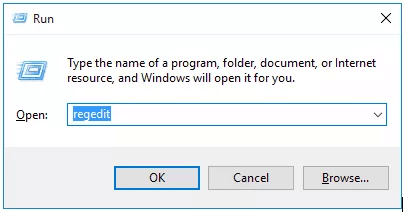
To open the Registry Editor, press the Windows key + R to open the Run dialog box. Type “regedit” and press Enter. You might need to confirm this action if User Account Control prompts you.
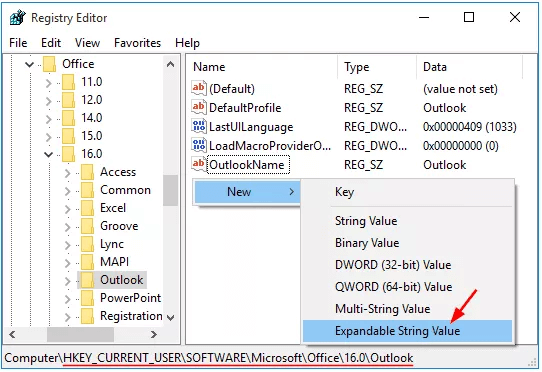
In the Registry Editor, you’ll need to navigate to the appropriate key for your version of Outlook. The path varies depending on your Outlook version, but it’s typically located in HKEY_CURRENT_USER\Software\Microsoft\Office[Outlook Version]\Outlook.
Once you’ve found the correct key, right-click in the right pane and select “New” followed by “Expandable String Value.” Name this new value “ForceOSTPath.” Double-click on it and enter the full path to your desired new OST file location. Click “OK” to save this change.
Close the Registry Editor and restart Outlook for the changes to take effect. Outlook will now use your specified location for storing OST files. Remember that this change will affect all Outlook profiles on your computer.
Alternative Method Using Outlook Client
If you’re using Outlook 2013, 2010, 2007, or 2003, there’s another method to change the OST file location directly through the Outlook client. This method is a bit more involved but can be effective.
First, you’ll need to know the current location of your OST files, which you can find using the methods described earlier in this article. Once you’ve located the file, go to “Account Settings” in Outlook and select the “Data Files” tab.
Choose your “Exchange Server Account” and click on “Settings.” Navigate to the “Advanced” tab and uncheck the box labeled “Use Cached Exchange Mode.” Click “OK” to confirm. You’ll then be prompted to disable offline use—select “Yes” to continue.
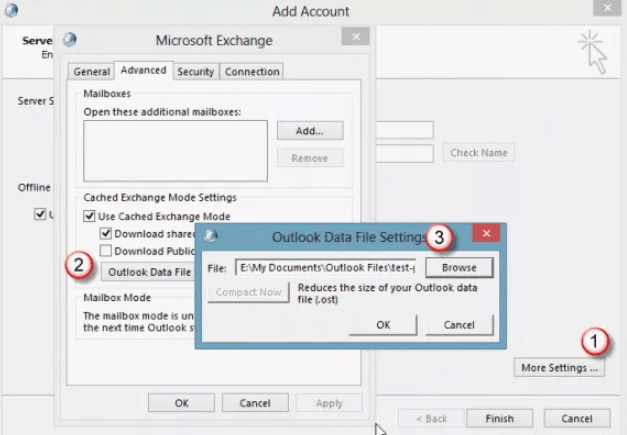
Now, go to “Outlook Data File Settings” and select the option that says “I want to move the old file.” Click “Browse” and navigate to where you want to store your new OST file. Select “Offline Outlook Data (OST)” as the file type and open it. Outlook will create a new OST file in your chosen location.
Return to the “Advanced” section and recheck the “Use Cached Exchange Mode” box. Click “OK” to save your changes, then restart Outlook. Your OST files will now be stored in the new location you specified.
Using Symbolic Links for OST Location
The final method for changing your Outlook OST file location involves using symbolic links, which are essentially advanced shortcuts that redirect file access from one location to another. This method is particularly useful if you want to move your OST files to a different drive without Outlook knowing the difference.
Start by moving your existing OST file from its current location to your desired new location. Make sure you remember both the original path and the new path, as you’ll need both for the next step.
Open the Command Prompt as an administrator. You can do this by typing “cmd” in the Windows search bar, right-clicking on “Command Prompt,” and selecting “Run as administrator.”
In the Command Prompt window, type the following command: mklink “C:\original\path\to\ost\file.ost” “D:\new\path\to\ost\file.ost”
Replace the paths with your actual original and new file paths. Press Enter to execute the command. If successful, you’ll see a message confirming that a symbolic link was created.
What this does is create a link at the original location that points to the new location. When Outlook tries to access the OST file at the original path, it’s automatically redirected to the new location. The advantage of this method is that it doesn’t require any changes to Outlook settings or registry entries.
Be careful not to delete the symbolic link, as this would break the connection to your OST file. If you need to reverse the process, simply delete the symbolic link and move the file back to its original location.
Recovering Lost or Deleted Outlook OST Files
Despite our best efforts to manage and protect our Outlook OST files, sometimes accidents happen. Files can get accidentally deleted, become corrupted, or simply disappear due to system issues. When this happens, it’s important to know how to recover them.
iMyFone D-Back.All-in-one Data Recovery Software: You can recover deleted, lost, formatted, or corrupted files from iOS/Android devices and PCs in one tool.1000+ Data Types Recovery: Restore photos, videos, messages, contacts, office documents, emails, audio, etc. without backup.Third-Party App Recovery: Retrieve messages and attachments directly from WhatsApp, LINE, Kik, WeChat, Skype and more.iOS Data Backup: Securely back up various data from your iOS device, reducing the risk of data loss.
Check More Details | Download Now! | Check All Deals
Using Specialized Recovery Software
When you need to recover deleted Outlook OST files, specialized data recovery software like iMyFone D-Back can be incredibly helpful. This type of software is designed specifically to recover various file types, including Outlook data files.
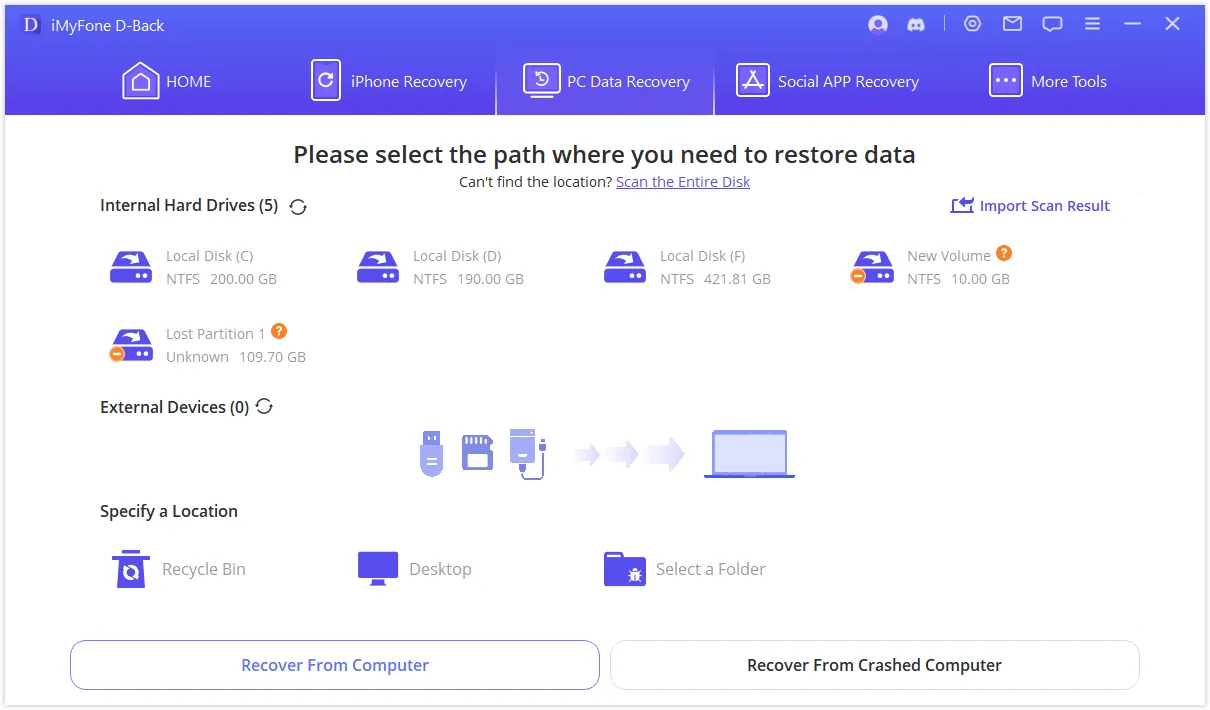
The recovery process typically begins with installing and launching the recovery software. Once open, you’ll need to select the drive or location where your OST files were previously stored. This might be your system drive or another drive if you had moved your OST files previously.
After selecting the location, the software will perform a comprehensive scan of the drive. The duration of this scan depends on the size of the drive and the amount of data it contains. Some recovery tools offer both quick and deep scan options, with deep scans taking longer but potentially recovering more files.
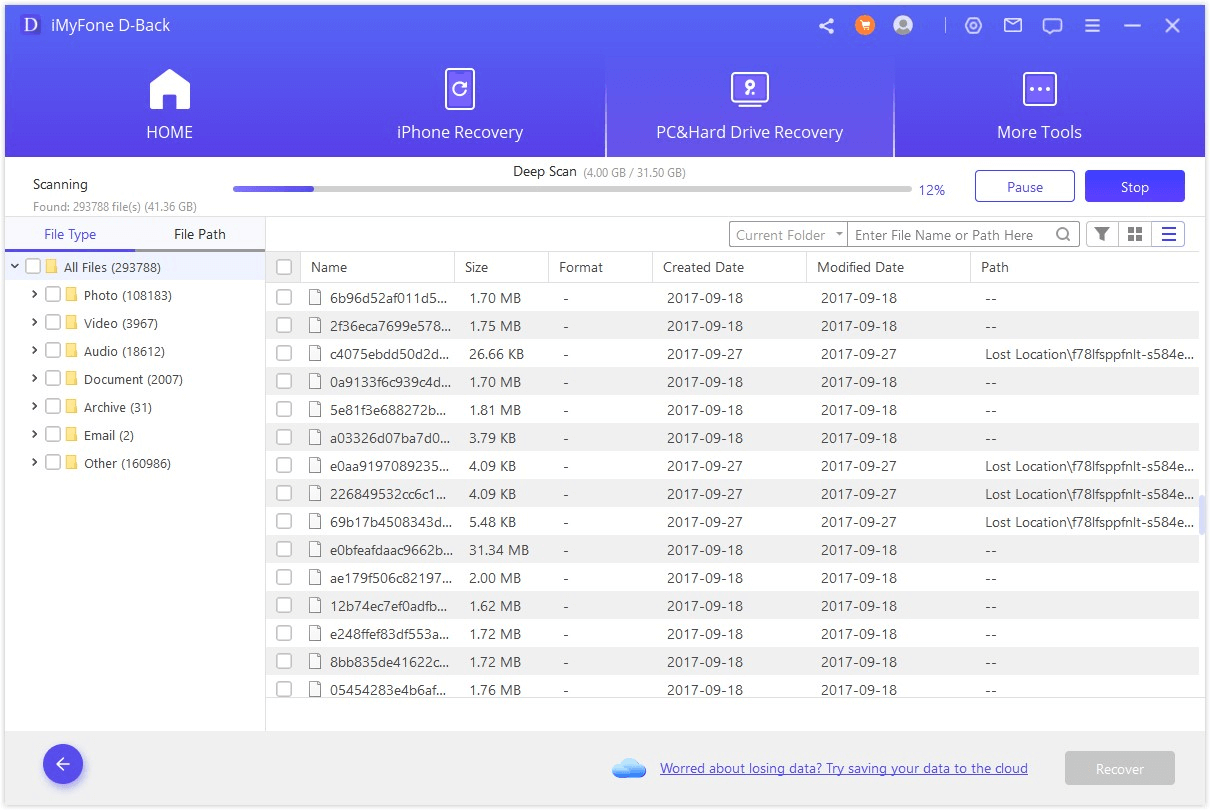
Once the scan is complete, the software will display all recoverable files it found. You can typically filter these results by file type to make it easier to locate your OST files. Look for files with the .ost extension or browse through the list to identify your Outlook data files.
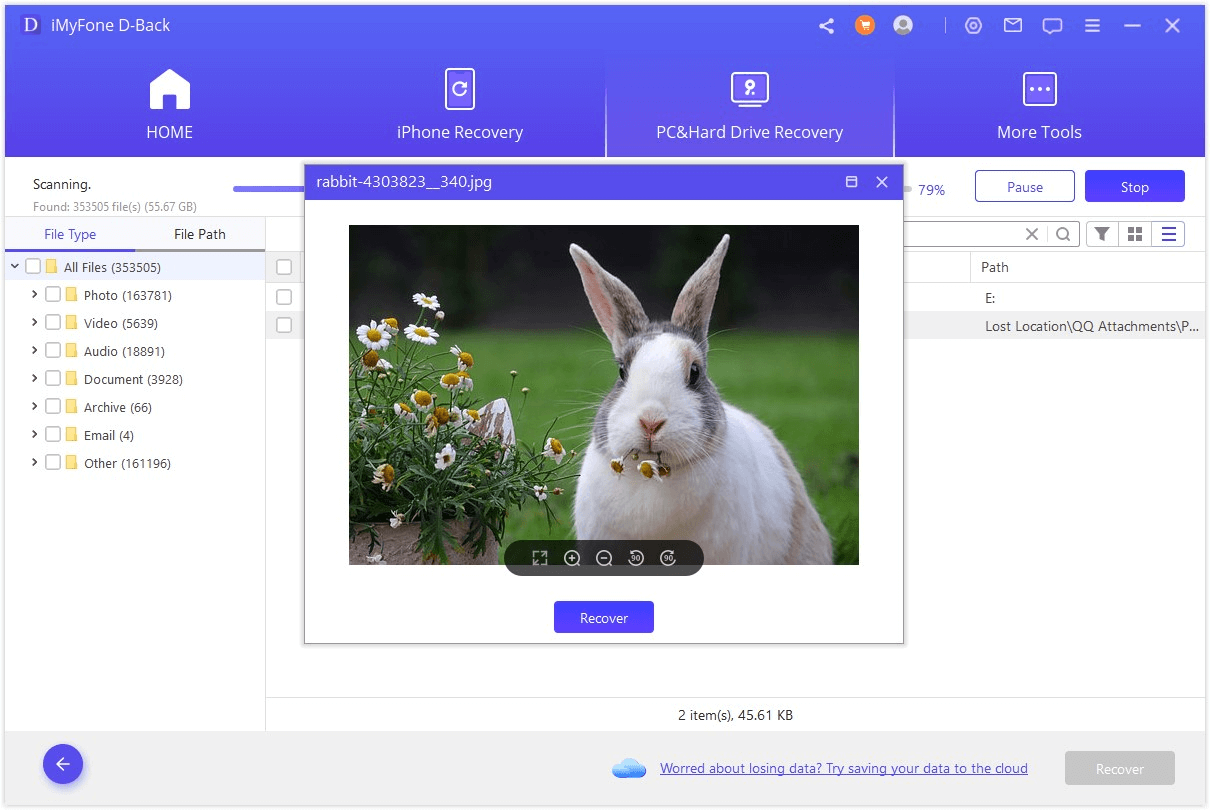
Select the files you want to recover and choose a safe location to save them. It’s important not to save the recovered files back to the same drive they were lost from, as this could overwrite other recoverable data. Instead, save them to a different drive or external storage device.
Understanding OST File Recovery Limitations
While recovery software can be powerful, it’s important to understand its limitations when it comes to OST files. The success of recovery largely depends on how the files were lost and what has happened to the storage space since then.
If OST files were recently deleted and no new data has been written to that area of the disk, recovery chances are high. However, if significant new data has been saved to the drive after deletion, the original OST files may have been partially or completely overwritten, making recovery difficult or impossible.
Another consideration is file corruption. If your OST files became corrupted before being deleted, even successful recovery might yield files that are still corrupted and unusable. In such cases, you might need to repair the OST files after recovery or rely on server resynchronization.
It’s also worth noting that while recovery software can often retrieve deleted files, the process doesn’t always preserve the folder structure within the OST file. You might recover the file itself but need to take additional steps to make it functional within Outlook again.
Prevention Strategies for OST File Issues
While knowing how to recover lost OST files is valuable, preventing such losses in the first place is even better. There are several strategies you can implement to protect your Outlook data and minimize the risk of file loss.
Regular backups are your first line of defense. While OST files themselves are technically temporary copies of server data, backing them up can save time if you need to restore a large mailbox. You can manually copy OST files to a backup location or use backup software that includes Outlook data in its routine.
Monitoring your disk space is another important preventive measure. When your system drive runs low on space, it can lead to various issues, including file corruption. Ensure you have adequate free space on the drive where your OST files are stored.
Be cautious when cleaning up your system. Many disk cleanup tools might identify OST files as temporary files and offer to delete them. Always review what files these tools plan to remove before proceeding with cleanup operations.
Consider implementing a consistent naming convention if you have multiple OST files or profiles. This makes it easier to identify the correct files and reduces the chance of accidentally modifying or deleting the wrong file.
Troubleshooting Common OST File Issues
Even when you know how to locate and manage your Outlook OST files, you might encounter issues from time to time. Understanding how to troubleshoot these common problems can save you time and frustration.
Synchronization Problems
One of the most common issues with OST files is synchronization failure. When Outlook can’t properly sync with the server, you might see error messages, missing emails, or duplicate items.
If you’re experiencing sync issues, start by checking your internet connection. A stable connection is essential for proper synchronization. Next, verify that your Outlook is up to date, as Microsoft frequently releases updates that address synchronization bugs.
Sometimes, the OST file itself can become corrupted and cause sync problems. In such cases, you might need to delete the OST file and let Outlook create a new one. Before doing this, ensure you have a stable internet connection and that all your recent changes have been synced to the server to avoid data loss.
To delete and recreate an OST file, first close Outlook completely. Navigate to your OST file location using one of the methods described earlier, and delete the problematic OST file. Restart Outlook, and it will automatically create a new OST file and begin synchronizing with the server.
OST File Size Issues
OST files can grow quite large, especially if you have a mailbox with years of emails and attachments. This can lead to performance issues in Outlook and consume significant disk space.
If your OST file is becoming too large, you have several options. You can adjust your synchronization settings in Outlook to download only a specific time range of emails rather than your entire mailbox. This significantly reduces the size of your OST file.
To change these settings, go to File > Account Settings > Account Settings. Select your email account and click “Change.” Then click “More Settings” and navigate to the “Advanced” tab. Here you can adjust the mail to keep offline slider to sync only a certain number of months of email.
Another approach is to archive older items. Outlook’s AutoArchive feature can automatically move older emails to archive PST files, reducing the size of your primary mailbox and consequently your OST file.
You can also manually clean up your mailbox by deleting unnecessary emails, especially those with large attachments.