TOOL HUNTER

If you’ve ever worked with Excel spreadsheets, you’ve probably encountered situations where you needed to track completion, create checklists, or mark items as verified. That’s where checkboxes come in handy! Learning how to insert checkbox in Excel can transform your spreadsheets from simple data containers into interactive tools that make data management much more efficient.
Many people get confused between check marks and checkboxes in Excel, but they’re actually quite different. Understanding this distinction will help you choose the right tool for your specific needs.
Understanding Check Marks vs Checkboxes in Excel
When you’re working with Excel, it’s important to know the difference between check marks and checkboxes since they serve different purposes and behave differently in your spreadsheets.
Check marks are essentially text characters that you insert into cells, similar to regular text. You can copy them, delete them, and format them just like any other text in Excel. They’re great for simple visual indicators but don’t offer interactive functionality.
Checkboxes, on the other hand, are form controls that act as interactive elements. They’re not part of the cell’s text content but rather objects that float above your worksheet. When you click a checkbox, it toggles between checked and unchecked states, and you can link this state to cell values, making them perfect for interactive forms, checklists, and dynamic dashboards.
The method you choose for how to insert checkbox in Excel will depend on whether you need simple visual indicators (check marks) or interactive elements (checkboxes) in your spreadsheet.
Different Methods to Insert Checkbox in Excel
There are several approaches to add checkboxes to your Excel worksheets, each with its own advantages and use cases. Let’s explore the most effective methods.
Using the Developer Tab to Insert Checkbox in Excel
The most straightforward way to add interactive checkboxes is through Excel’s Developer tab. Here’s how do i insert a checkbox in Excel using this method:
First, you’ll need to enable the Developer tab if it’s not already visible:
- Go to File > Options > Customize Ribbon
- Under Main Tabs, check the Developer option
- Click OK
Now you’re ready to insert checkboxes:
- Go to the Developer tab
- Click Insert in the Controls group
- Under Form Controls, select the Checkbox icon
- Click anywhere on your worksheet to place the checkbox
- Right-click the checkbox to edit its text or format it
This method creates interactive checkboxes that users can click to toggle between checked and unchecked states. You can link these checkboxes to cells to capture their status (TRUE for checked, FALSE for unchecked), which is incredibly useful for creating dynamic formulas and calculations.
Copy and Paste Method
If you need multiple checkboxes with consistent formatting, the copy-paste method can save you significant time. Here’s how insert checkbox in Excel using this approach:
- Create your first checkbox using the Developer tab method
- Format it exactly how you want it (size, color, etc.)
- Right-click the checkbox and select Copy
- Paste it wherever you need additional checkboxes
- Repeat as needed
The beauty of this method is that all pasted checkboxes maintain the same properties and formatting as the original. This ensures consistency across your worksheet and saves you from having to format each checkbox individually.
Note: While this method is efficient for small to medium sets of checkboxes, it might become tedious if you need hundreds of them. For large-scale implementations, other methods might be more appropriate.
Using Keyboard Shortcuts for Check Marks
If you’re looking for a quicker way to add simple check marks (rather than interactive checkboxes), keyboard shortcuts might be your best bet. Here’s how to insert a checkbox in Excel using keyboard methods:
For check marks that act as visual indicators:
- Select the cell where you want the check mark
- Change the font to Wingdings 2
- Press Shift + P for a check mark (✓)
- Press Shift + O for an X mark (✗)
Alternatively, you can use Alt codes:
- Make sure Num Lock is enabled
- Hold Alt and type 0252 on the numeric keypad
- Release Alt to insert a check mark
This method is perfect when you need simple, non-interactive check marks that you can quickly add or remove manually. It’s much faster than creating formal checkboxes when interactivity isn’t required.
iMyFone Passper Pro.Ultimate 6-in-1 File Password Remover.1-click to remove Excel/Word/PDF/RAR/ZIP/PowerPoint passwords.Unlock file passwords to read, edit or print easily.Remove read-only file protection permanently.Break file locks with up to 99% sucessful rate.

Check More Details | Download Now! | Check All Deals
Using Excel Formulas for Check Marks
Excel formulas offer a dynamic way to display check marks based on specific conditions. This method is particularly useful when you want check marks to appear automatically when certain criteria are met. Here’s how to add checkbox in Excel using formulas:
The CHAR function is your go-to tool for this approach. Different character codes produce different symbols:
| Symbol Type | Character Code | Formula Example |
|---|---|---|
| Check mark | 252 | =CHAR(252) |
| Check mark in box | 254 | =CHAR(254) |
| X mark | 251 | =CHAR(251) |
| X mark in box | 253 | =CHAR(253) |
To use these formulas:
- Select the cell where you want the symbol to appear
- Change the font to Wingdings
- Enter the appropriate CHAR formula
- The symbol will appear based on the character code
The real power of this method comes when you combine it with logical functions. For example, you could use =IF(A1>100,CHAR(252),“”) to automatically show a check mark when the value in cell A1 exceeds 100.
This approach is fantastic for dashboards and automated reports where you want visual indicators to update automatically based on changing data.
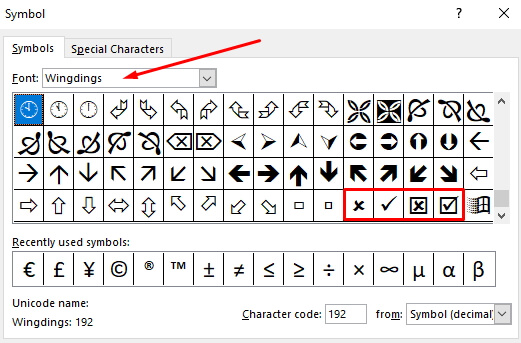
Inserting Check Marks via Symbol Dialog
For those who prefer a visual interface, the Symbol dialog box provides access to all of Excel’s available symbols, including various check mark styles. Here’s how to insert a checkbox in Excel using this method:
- Select the cell where you want the check mark
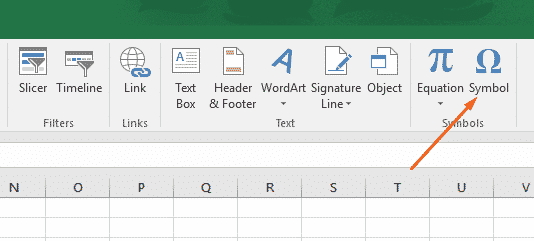
- Go to the Insert tab on the ribbon
- Click Symbol in the Symbols group
- In the Symbol dialog box, choose “Segoe UI Symbol” from the Font dropdown
- Scroll through the symbols until you find the check mark style you prefer
- Double-click the check mark to insert it into your selected cell
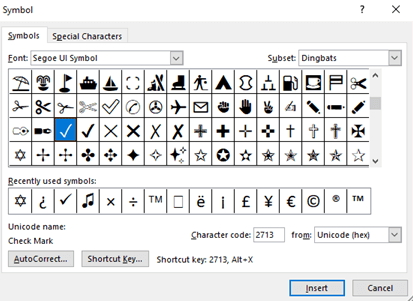
This method gives you access to a wide variety of check mark styles beyond the basic Wingdings characters. You can find filled check marks, outlined check marks, and various other styles that might better match your document’s aesthetic.
While this process takes a bit longer than keyboard shortcuts, it’s perfect when you need a specific check mark style or when you’re not sure which character code to use.
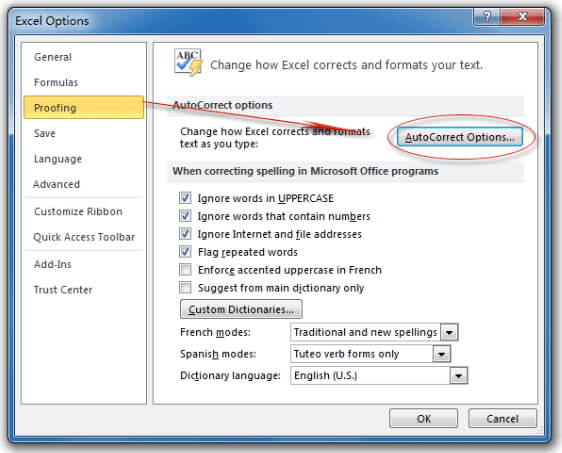
Using AutoCorrect for Quick Check Mark Insertion
Excel’s AutoCorrect feature can be customized to automatically replace specific text with check marks, saving you time in the long run. Here’s how to add checkbox in Excel using AutoCorrect:
- Go to File > Options
- Select Proofing in the left pane
- Click AutoCorrect Options
- In the Replace field, enter a trigger word (like “tick” or “check”)
- In the With field, insert a check mark (you can copy one from another cell)
- Click Add, then OK
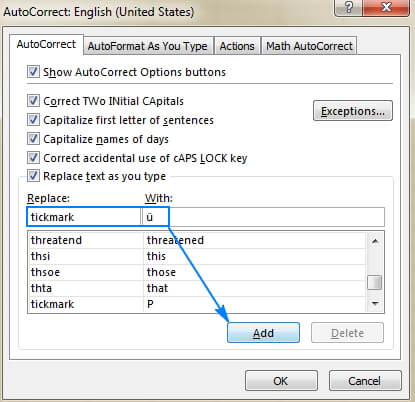
Once set up, whenever you type your trigger word and press Space or Enter, Excel will automatically replace it with the check mark. This is incredibly efficient if you frequently need to insert check marks throughout your workday.
You can set up multiple AutoCorrect entries for different types of marks—one for check marks, another for X marks, etc. This method works for check marks but not for interactive checkboxes.
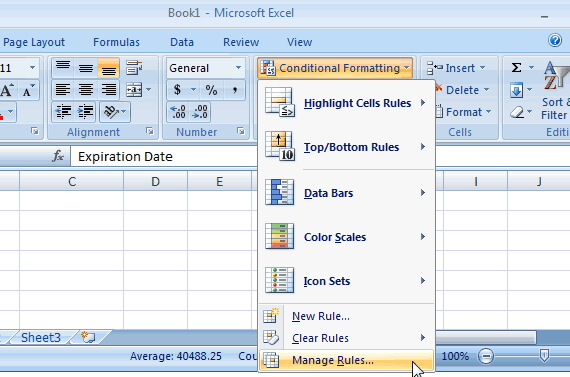
Creating Check Marks with Conditional Formatting
Conditional formatting allows you to automatically apply check marks based on cell values, creating dynamic visual indicators that update as your data changes. Here’s how insert checkbox in Excel using conditional formatting:
Let’s walk through a practical example using sales data:
- Suppose you have sales figures in column A
- In column B, enter formulas that reference column A (e.g., B2 =A2)
- Select the cells in column B where you want check marks to appear
- Go to Home > Conditional Formatting > New Rule
- Select “Format only cells that contain”
- Set the rule to “Cell Value” “greater than” your threshold (e.g., 100)
- Click Format, go to the Font tab, and choose Wingdings font
- In the Custom Number Format, enter ;;✓ (this hides numbers and shows check marks)
- Click OK to apply the formatting
![]()
This method is particularly powerful because it automatically updates your visual indicators as underlying data changes. It’s perfect for tracking performance against targets, monitoring project milestones, or any situation where you want immediate visual feedback based on numerical data.
Advanced Checkbox Techniques
Once you’ve mastered the basics of how to insert checkbox in Excel, you can explore more advanced techniques that make your checkboxes even more powerful.
Formatting and Customizing Checkboxes
Customizing the appearance of your checkboxes can make your spreadsheets more professional and user-friendly. Here are some formatting options:
To resize checkboxes:
- Right-click the checkbox
- Select Format Control
- Go to the Size tab
- Adjust the height and width as needed
To change checkbox text:
- Right-click the checkbox
- Select Edit Text
- Modify or remove the default text
To change colors and styles:
- Right-click the checkbox
- Use the formatting options in the mini toolbar or
- Use the options in the Font group on the Home tab
For interactive checkboxes created via the Developer tab, you can also link them to cells to capture their state (checked or unchecked). This allows you to use checkbox status in formulas and calculations throughout your spreadsheet.
Counting Check Marks and Checkbox Status
Being able to count check marks or checkbox statuses is crucial for creating summary reports and tracking progress. Here’s how to count tick marks in Excel:
For check marks inserted as text:
=COUNTIF(B2:B10,"✓")For check marks created with CHAR function:
=COUNTIF(B2:B10,CHAR(252))For interactive checkboxes linked to cells:
=COUNTIF(C2:C10,TRUE)These counting techniques become especially powerful when combined with other Excel functions. For example, you could use =COUNTIF(C2:C10,TRUE)/COUNTA(C2:C10) to calculate the percentage of completed tasks in a checklist.
iMyFone Passper Pro.Ultimate 6-in-1 File Password Remover.1-click to remove Excel/Word/PDF/RAR/ZIP/PowerPoint passwords.Unlock file passwords to read, edit or print easily.Remove read-only file protection permanently.Break file locks with up to 99% sucessful rate.
Check More Details | Download Now! | Check All Deals
Using Checkboxes in Formulas and Calculations
The real power of interactive checkboxes emerges when you incorporate them into Excel formulas and calculations. This allows you to create dynamic spreadsheets that respond to user input.
Here are some practical examples:
Task completion tracking:
=IF(C2=TRUE,"Complete","Incomplete")Dynamic budgeting:
=IF(C2=TRUE,B2,0)(This formula includes the amount in column B only if the checkbox in column C is checked)
Priority filtering:
=IF(C2=TRUE,"High Priority","Normal")These formula integrations transform static checkboxes into powerful tools for data analysis, reporting, and interactive dashboard creation.
Choosing the Right Method for Your Needs
With so many options for how to insert checkbox in Excel, how do you choose the right approach? Consider these factors:
For simple visual indicators: Use keyboard shortcuts or the Symbol dialog for quick check marks.
For interactive forms: Use the Developer tab method to create clickable checkboxes.
For automated reporting: Use formulas or conditional formatting for check marks that update automatically.
For large-scale implementations: Consider using the copy-paste method or creating checkboxes via VBA for efficiency.
For user-friendly interfaces: Use formatted interactive checkboxes linked to cells for the best user experience.
Remember that you’re not limited to just one method—many advanced Excel users employ multiple approaches depending on the specific requirements of each spreadsheet section.
Troubleshooting Common Checkbox Issues
Even experienced Excel users sometimes encounter issues when working with checkboxes. Here are solutions to common problems:
Checkboxes not appearing: Ensure the Developer tab is enabled and you’re selecting Form Controls, not ActiveX Controls (unless you specifically need ActiveX functionality).
Checkboxes not aligning with cells: Use the alignment tools in the Format Control dialog or hold Alt while dragging to snap checkboxes to cell boundaries.
Checkbox text overlapping cells: Resize the checkbox or adjust the text font size to fit within cell boundaries.
Formulas not recognizing checkbox status: Ensure checkboxes are properly linked to cells and that your formulas reference those linked cells.
Check marks not displaying correctly: Verify that the correct font (usually Wingdings or Segoe UI Symbol) is applied to cells containing check marks.
Best Practices for Using Checkboxes in Excel
To make the most of checkboxes in your Excel workbooks, follow these best practices:
- Be consistent – Use the same checkbox style and method throughout a single workbook
- Provide clear labels – Ensure users understand what each checkbox represents
- Use appropriate spacing – Leave enough space around checkboxes to prevent accidental clicks
- Group related checkboxes – Use borders or background colors to visually group related options
- Protect your worksheet – Once your checkbox setup is complete, consider protecting the worksheet to prevent accidental modifications
- Document your setup – For complex implementations, add comments or a separate documentation sheet explaining how the checkboxes work
Conclusion
Learning how to insert checkbox in Excel opens up a world of possibilities for creating interactive, user-friendly spreadsheets. Whether you need simple visual indicators or fully interactive forms, Excel provides multiple methods to meet your needs.
From the quick keyboard shortcuts for simple check marks to the sophisticated conditional formatting for automated visual feedback, each method has its place in the Excel user’s toolkit. The key is understanding the strengths of each approach and selecting the right one for your specific situation.
Remember that the best way to master these techniques is through practice. Start with simple implementations and gradually work your way up to more complex checkbox applications. Before long, you’ll be using checkboxes to create professional, interactive Excel workbooks that impress colleagues and streamline your workflow.
Some images in this article are sourced from iMyFone.