TOOL HUNTER

Adobe Premiere Pro is widely recognized as one of the most powerful video editing platforms available, serving both professional filmmakers and casual content creators. Whether you are producing a cinematic short, a YouTube vlog, or social media content, having control over your visual elements is essential. One common yet crucial technique is flipping a video—a simple adjustment that can dramatically enhance your final output.
This guide offers a step-by-step walkthrough on how to flip a video in Premiere Pro. We’ll cover flipping entire clips, specific segments, and introduce an intuitive alternative—the CapCut desktop video editor. By the end, you’ll be flipping videos like an expert.
Why Learning to Flip Video in Premiere Matters
Flipping a video isn’t just a stylistic choice—it can correct errors or introduce creative elements into your project. For instance, if you recorded with a front-facing camera that mirrors the scene, you may need to flip it back to achieve a natural look. Alternatively, you might want to incorporate mirror effects for artistic sequences.
In Adobe Premiere Pro, flipping is made simple with built-in effects. You can flip video in premiere horizontally or vertically depending on your needs. But first, it’s important to distinguish between flipping and rotating, as these terms are often confused.
Rotation vs. Flipping in Premiere Pro
Though they might seem similar, rotating and flipping achieve different visual outcomes.
Rotating a video involves turning the entire image by a specific degree—common rotations include 90°, 180°, or custom angles. This is especially useful when footage was shot in the wrong orientation, such as vertical video mistakenly recorded in horizontal mode. Rotation reorients the clip without mirroring the content.
Flipping, on the other hand, creates a mirror image. A horizontal flip in Premiere Pro swaps the left and right sides, while a vertical flip reverses the top and bottom. This technique does not alter the angle but reflects the image as if viewed in a mirror.
So when should you use each?
Opt for rotation when your video is misaligned or needs angle correction. Choose flipping when you want a mirrored effect or need to correct a reversed image.
Mastering how to flip a video in Premiere Pro is a valuable skill for any video editor.
How to Flip an Entire Video Clip in Premiere Pro
Flipping a full video clip in Premiere Pro is a simple process. Just follow these steps:
- Begin by opening your project and placing the desired clip on the timeline.
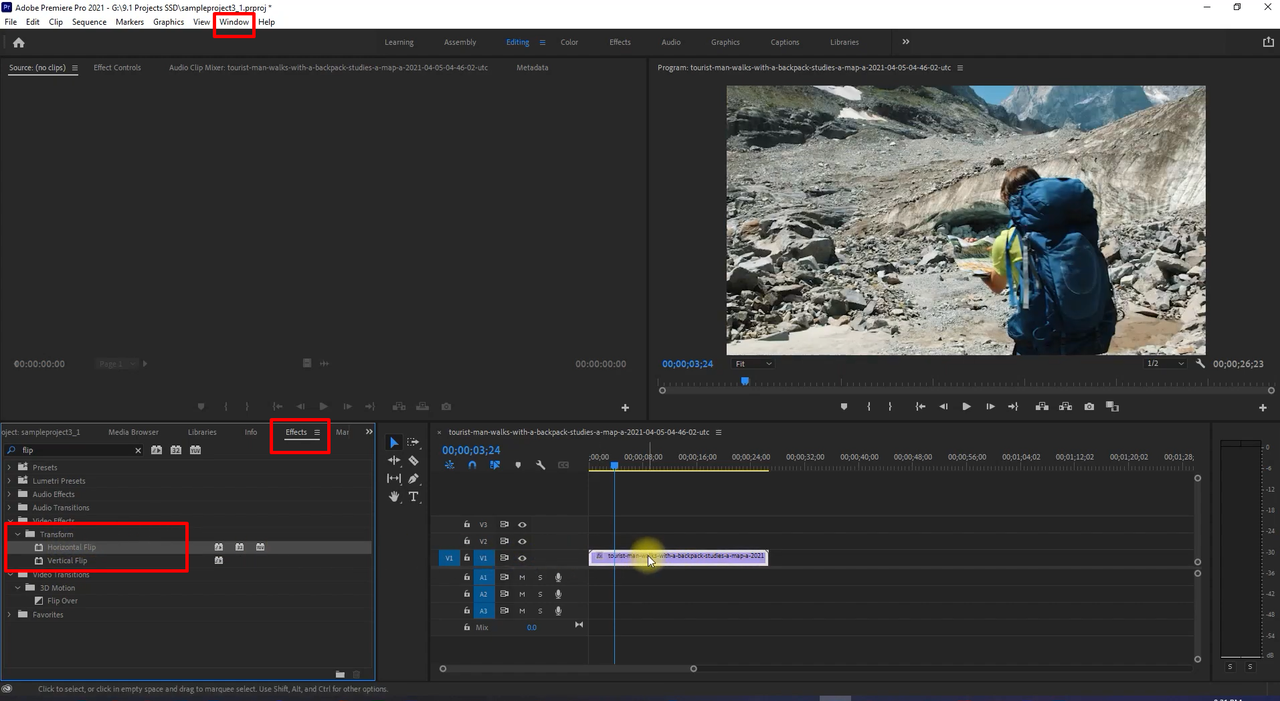
- Navigate to the “Window” menu and select “Effects.” Alternatively, use the shortcut Shift+7.
- In the Effects panel, type “Flip” into the search bar. You will see two options: “Horizontal Flip” and “Vertical Flip.” Select based on your needs.
- Drag and drop your chosen effect onto the video clip in the timeline.
That’s all it takes! Now you know how to flip a video in Premiere Pro from start to finish.
How to Flip Part of a Video in Premiere Pro
What if you only want to flip a specific section? Premiere Pro makes it easy to apply effects to partial clips.
Here’s how to flip a part of a video clip in Premiere Pro:
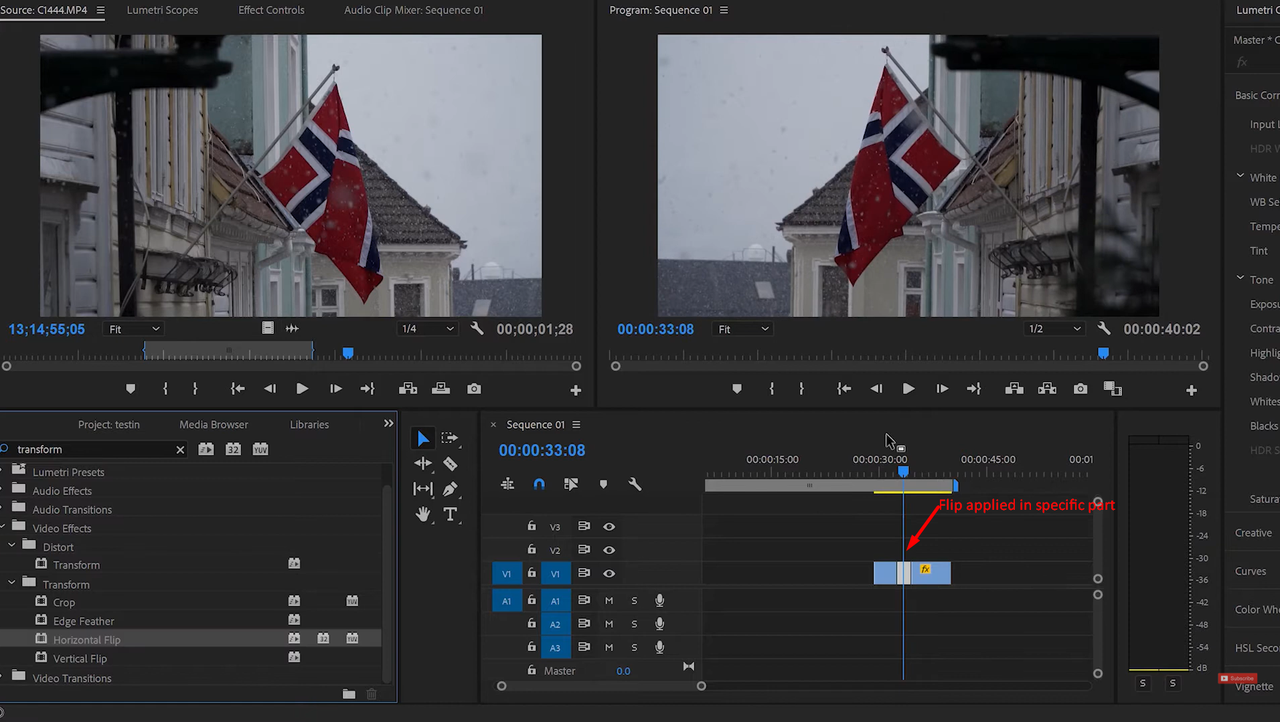
- Place your video on the timeline and press ‘C’ to activate the Razor tool.
- Make cuts at the points where you want the flip to begin and end, splitting the clip into segments.
- Open the Effects panel (Shift+7 if not already open) and search for “Flip.”
- Choose either Horizontal Flip or Vertical Flip and apply it to the desired segment.
This method is perfect for emphasizing moments or creating engaging transitions. Now you understand how to flip clip in premiere for specific portions.
Introducing CapCut: A User-Friendly Alternative
While Premiere Pro is feature-rich, some users may find it overwhelming. If you’re looking for a simpler, yet powerful tool, try the CapCut desktop video editor.
CapCut is a free, intuitive editing application suitable for all skill levels. It supports a wide range of edits—including flipping, rotating, resizing, and more—with just a few clicks. Its clean interface minimizes the learning curve, letting you focus on creativity.
CapCut — Your all-in-one video & photo editing powerhouse! Experience AI auto-editing, realistic effects, a huge template library, and AI audio transformation. Easily create professional masterpieces and social media viral hits. Available on Desktop, Web, and Mobile App.

CapCut also includes AI-enhanced tools, audio editing features, and visual effects that help you produce high-quality content quickly.
If you’re exploring how to flip a video in Premiere Pro alternatives, CapCut is an excellent option.
How to Flip Videos Using CapCut
Ready to try flipping with CapCut? Here’s how:
- Download and install CapCut—it’s completely free.
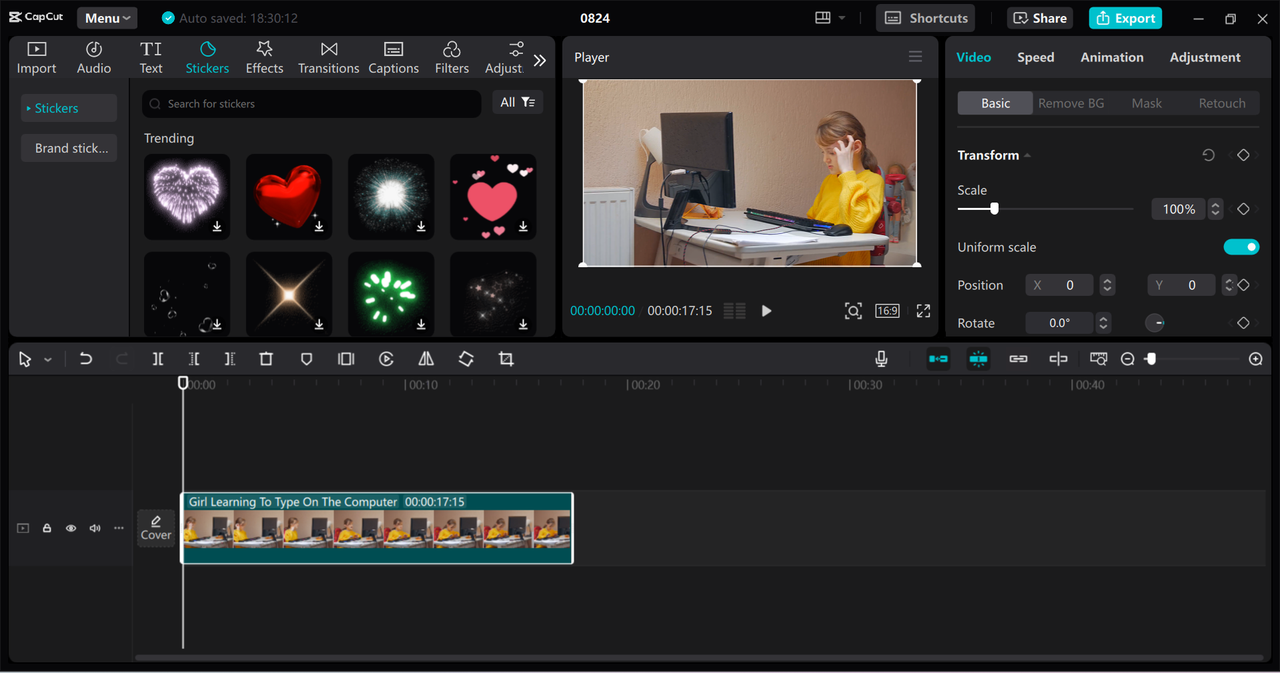
- Open the application and start a new project. Import your video via the “Import” button.
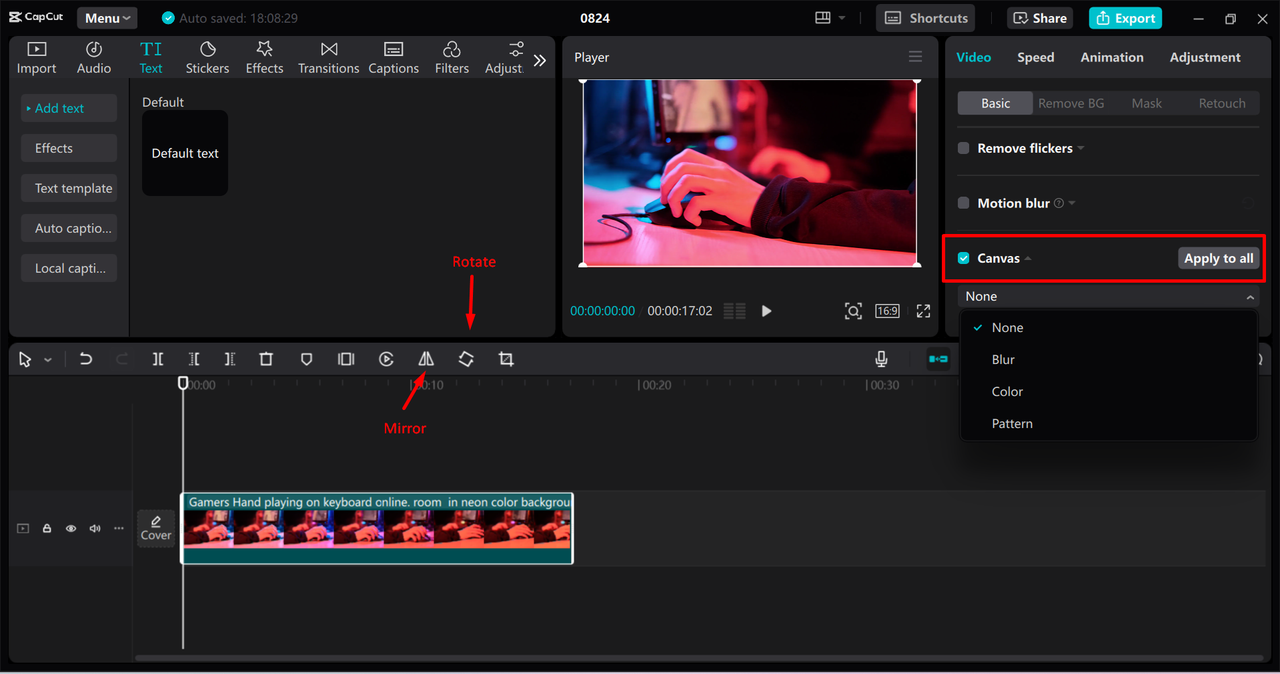
- Drag your video to the timeline. Select the clip, then click the “Mirror” icon (two opposing triangles) above the timeline to flip it horizontally. Use rotation and adjustment tools for further refinements.
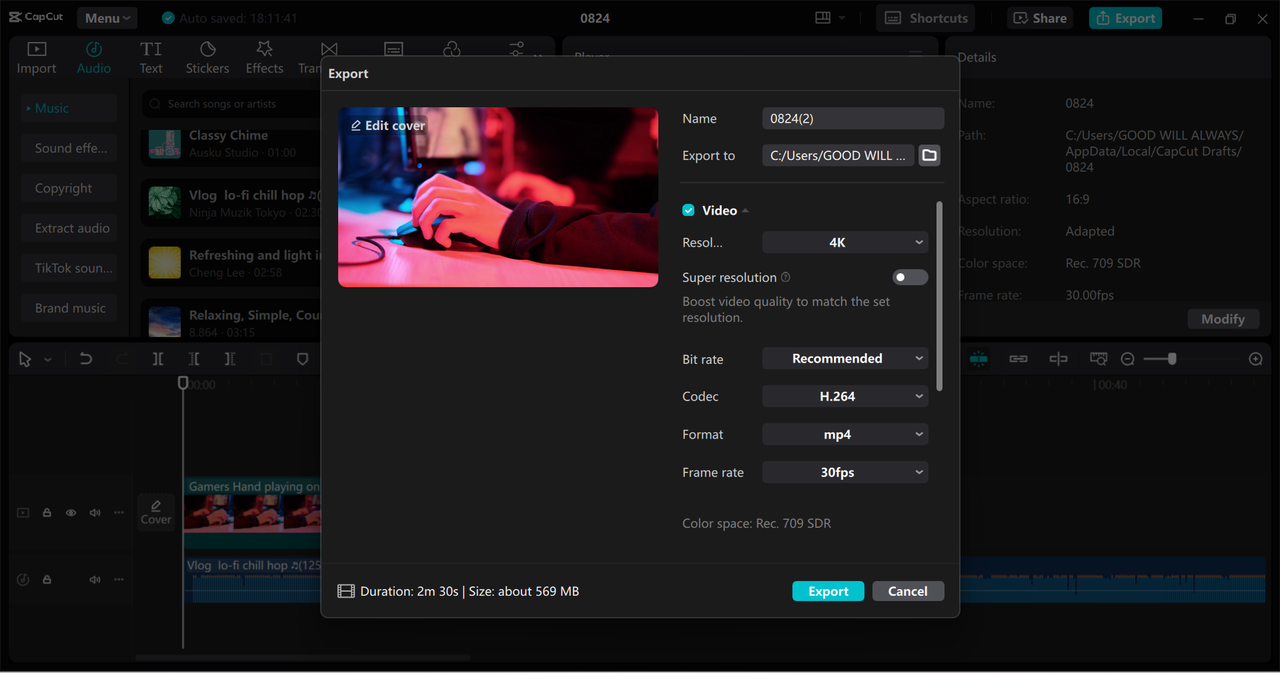
- Once satisfied, export your video. Customize quality, format, and destination, then save or share directly to social platforms.
So the next time you’re unsure how to flip a video in Premiere Pro, remember that CapCut offers a simpler path.
Key Features of CapCut Desktop Video Editor
CapCut offers far more than just flipping:
- Rotate to any angle: Freely adjust orientation for creative or corrective purposes.
- Resize and reposition: Easily tweak your video’s dimensions and placement for ideal framing.
- Auto aspect ratio correction: Ensure your video fits any screen or platform without distortion.
- Broad format support: Import and export in various formats without compatibility concerns.
CapCut — Your all-in-one video & photo editing powerhouse! Experience AI auto-editing, realistic effects, a huge template library, and AI audio transformation. Easily create professional masterpieces and social media viral hits. Available on Desktop, Web, and Mobile App.
These capabilities make CapCut a compelling alternative for those learning how to flip a video in Premiere Pro or performing other common edits.
Wrapping Up
Flipping video clips might appear minor, but it significantly elevates video quality. Whether correcting orientation or adding flair, understanding how to flip video in premiere is invaluable.
We’ve detailed how to flip entire clips and segments in Premiere Pro, and also presented CapCut as a streamlined alternative. With CapCut, video flipping becomes quick and intuitive—plus you gain access to a full suite of editing tools.
Next time you need to flip a video, you’re fully equipped. Enjoy editing!
Frequently Asked Questions
How do you flip a section of a clip in Premiere Pro?
Use the Razor tool (key: C) to isolate the segment. Then apply Horizontal Flip or Vertical Flip from the Effects panel. If Premiere feels complex, CapCut offers a simpler experience.
How can I reposition a clip in Premiere Pro?
In Effect Controls, find the Motion settings and adjust Position values. Alternatively, drag the clip directly in the Program Monitor. CapCut simplifies this with intuitive drag-and-drop.
How do I flip an image in Premiere Pro?
Place the image on the timeline, search “Flip” in Effects, and apply your chosen flip effect—just like with video. CapCut also supports image flipping with fewer steps.
How to reverse video playback in Premiere?
Right-click the clip, choose Speed/Duration, and check “Reverse Speed.” CapCut offers a simpler method for reversing clips.
Some images used are courtesy of CapCut.