TOOL HUNTER

Ever wondered why Android phones are so popular? It’s all about the freedom to customize! You can have two phones from the same brand that look identical on the outside but feel completely different when you use them. That’s the magic of Android’s flexibility.
One of the coolest ways to transform your phone is by “flashing” it. I know, it sounds super technical and maybe a bit scary, but it’s actually not as complicated as it seems. So what exactly is flashing? Basically, it means installing a custom ROM (Read-Only Memory) on your device. You’re replacing your current Android version with a modified one—it could be an official update from your phone’s manufacturer like Samsung or Google, or even a community-created version that adds unique features.
Table of Contents
- Why Would You Want to Flash Your Android Phone?
- Understanding the Risks of Android Flashing
- Essential Preparation Before Flashing Your Android Device
- Choosing Your Android Flash Tool
- Method 1: Using iMyFone Fixppo – The Simplest Android Flash Utility
- Method 2: SP Flash Tool – For MediaTek Devices
- Method 3: Odin – The Samsung Specialist
- Making the Right Choice for Your Needs
Why Would You Want to Flash Your Android Phone?
Before diving into the flashing process, it’s important to understand both the benefits and the risks. People flash their devices for various reasons, and knowing these can help you decide if it’s right for you.
Getting rid of bloatware is a big motivator for many. When you buy a new phone, it often comes with pre-installed apps you don’t want and can’t remove. By installing a custom ROM, you can eliminate this unwanted software and free up valuable space.
Customization is another major draw. A new ROM can let you personalize your device down to the smallest details, changing everything from the look of your icons to how your menus function. It’s like giving your phone a complete makeover.
Performance improvements are also possible. Normally, you can’t tweak how your phone’s processor and graphics chip work, but some custom ROMs allow overclocking to boost performance for gaming or other demanding tasks. You might even see better battery life since these ROMs can reduce background activity when your phone isn’t in use.
Then there’s the update advantage. Most Android devices stop receiving official updates after a few years, but with community-developed custom ROMs, you can continue getting the latest features and security patches long after your manufacturer has moved on.
Understanding the Risks of Android Flashing
As exciting as flashing sounds, it does come with some serious considerations you shouldn’t ignore.
Compatibility issues can arise where some of your phone’s features or pre-installed apps might not work properly with the new ROM. You could lose functionality you previously enjoyed.
Your warranty will almost certainly be voided. Manufacturers typically won’t honor warranty claims on devices that have been flashed, even if the problem has nothing to do with the custom ROM.
Finding the right ROM can be challenging, especially for less popular phone models. Not all custom ROMs work with every device, so you’ll need to do thorough research to find one that’s compatible with your specific phone.
Important reminder: Flashing will erase all data on your device. Always, always create a complete backup of your photos, contacts, messages, and other important files before you begin the flashing process.

If you’re wondering how to actually flash your Android phone using a computer, you’ve come to the right place. This guide will walk you through several methods using different software tools. The great news is that modern android flash utility options have made the process much more accessible than it used to be.
Essential Preparation Before Flashing Your Android Device
Proper preparation is key to a successful flashing experience. Before you start, make sure you have everything you need:
- The Android device you plan to flash
- A computer (Windows is most commonly supported)
- USB cable for your specific device
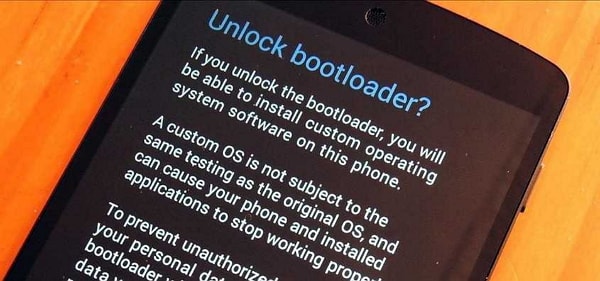
- Unlocked bootloader (more on this later)
- Flashing software (we’ll cover several options)
- Android USB drivers installed on your computer
- Custom ROM file downloaded (for some methods)
Helpful tip: If you choose to use iMyFone Fixppo for Android, you won’t need to worry about installing USB drivers or downloading ROM files separately—the software handles these steps for you.
Before attempting any flashing method, ensure your device’s bootloader is unlocked and that you have the correct USB drivers installed. Also, make sure your phone has at least 50% battery to prevent interruptions during the process.
Getting Your USB Drivers Ready
For Samsung devices:
Download the official Samsung USB drivers from the Samsung developers website. Extract the zip file by right-clicking it and selecting “extract all.” Open the extracted folder and run the .exe file. Follow the installation prompts, select your language, and complete the installation.
For MediaTek (MTK) devices:
Download the Android CDC driver file online and extract it. Open Device Manager on your computer (you can search for it in the Start menu). Click on your computer’s name, then select Action and “Add legacy hardware.” Choose “Install the hardware that I manually select from a list,” then select “Have disk.” Browse to the extracted driver folder and select the “Android Gadget CDC Driver” file. Complete the installation process.

If Windows shows a security warning during driver installation, select “Install this driver software anyway.”
Unlocking Your Device’s Bootloader
Samsung devices typically come with unlocked bootloaders, so you can skip this step if you have a Samsung phone. For other devices, the process generally involves:
Downloading and installing Android SDK tools, getting the specific drivers for your device from the manufacturer’s website, enabling Developer Options on your phone (usually by tapping the build number multiple times in About Phone), turning on USB Debugging within Developer Options, obtaining an unlock key from your manufacturer, and using command prompt with fastboot commands to unlock the bootloader.
Since the exact process varies by device, I recommend searching online for your specific phone model followed by “unlock bootloader” to find detailed instructions.
Choosing Your Android Flash Tool
When it comes to tools to flash android phones, you have several options. Each has its own strengths and learning curve. Here’s a quick comparison to help you decide:
| Feature | iMyFone Fixppo | SP Flash Tool | Odin |
|---|---|---|---|
| Success Rate | High | Medium | Medium |
| USB Driver Required | No | Yes | Yes |
| ROM Download Required | No | Yes | Yes |
| User-Friendliness | Easy | Complex | Complex |
| Time Investment | ~10 minutes | Several hours | Several hours |
Method 1: Using iMyFone Fixppo – The Simplest Android Flash Utility
If you’re looking for the most straightforward approach to flash your Android device, iMyFone Fixppo is hard to beat. This android flash utility stands out for its simplicity and effectiveness, working even with completely unresponsive phones. It’s both a system repair tool and a comprehensive flash tool for Android phone restoration.
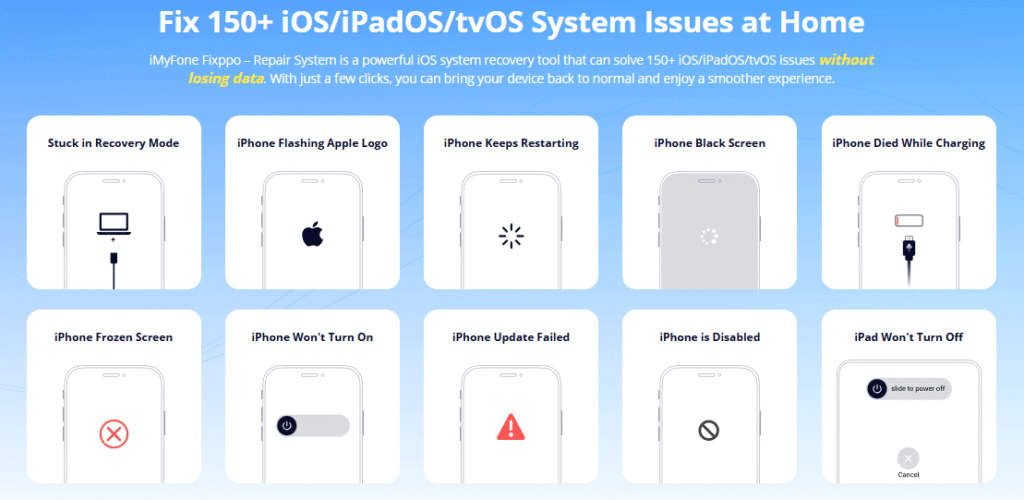
iMyFone Fixppo.Downgrade iOS 26 to 18 or upgrade to iOS 26, no jailbreak.Repair 150+ iOS/iPadOS/tvOS system issues like stuck on Apple logo, boot loop, black screen without losing data.Free enter/exit Recovery Mode on iPhone and iPad with one-click.Factory reset iPhone/iPad/Apple TV without passcode/iTunes/Finder.Back up and restore iPhone data without iTunes/iCloud.Fix various iOS bugs at home for you to smoothly use your device.Support all iOS versions and devices including iOS 26/18 and iPhone 17.Fixppo only performs system repair with the user’s permission.
Check More Details | Download Now! | Check All Deals
The process with Fixppo is refreshingly simple:
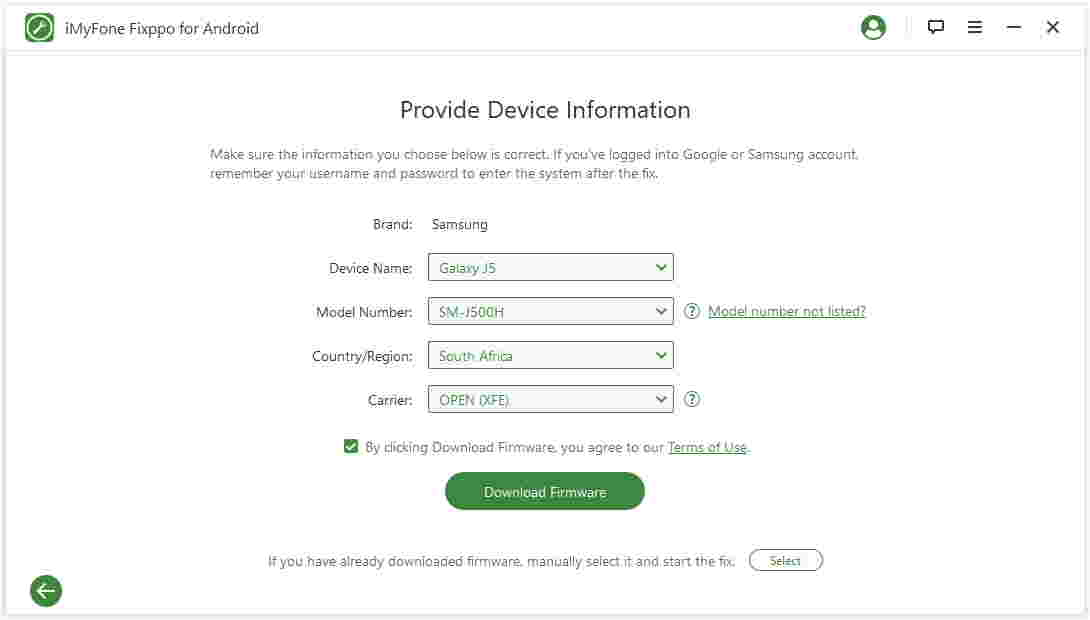
Download and install iMyFone Fixppo for Android on your Windows computer. Launch the program and click Start. Enter your device information when prompted, then click “Download Firmware.” The software automatically finds, downloads, and prepares the correct firmware for your specific phone model.
Once the firmware is ready, confirm your device details and press Start to continue. Follow the on-screen instructions to put your phone into Download Mode. Connect your device to the computer via USB cable. The software automatically handles the entire flashing process. Your phone will reboot when the process is complete, indicating that any system issues have been resolved. Finally, disconnect your device—it’s now ready to use.
What makes this flash tool for Android phone particularly appealing is its automated approach to what are typically the most challenging steps of the flashing process. It eliminates the need to manually search for compatible firmware or worry about complex procedures that could potentially harm your device.
Thousands of users have successfully used Fixppo to resolve various Android system issues, making it one of the most trusted tools to flash android phones available today.

Method 2: SP Flash Tool – For MediaTek Devices
If you have a device with a MediaTek processor and prefer a more hands-on approach, SP Flash Tool is a popular choice among advanced users. This method requires more technical knowledge but gives you greater control over the flashing process.
Completely power off your Android device. If your phone has a removable battery, take it out. Download the custom ROM you want to install, making absolutely sure it’s compatible with your specific device model. Reliable sources like XDA Developers forums are good places to find trustworthy ROMs. Extract the downloaded ROM file to a folder on your computer.
Download the SP Flash Tool application to your computer. Extract the zip file by right-clicking and selecting “extract all.” Navigate to the extracted folder and locate “flash_tool.exe” – double-click to run it. Ensure the “Download” tab is selected in the application interface.
Click the “Choose” button next to “Scatter-loading File.” Browse to your extracted ROM folder, open the “Firmware” subfolder, and select the text file that contains “Scatter” in its name. Once the file loads, click the “Download” button in SP Flash Tool.
With your phone still powered off (and battery removed if possible), connect it to your computer via USB cable. You may need to press a volume button to ensure your device is detected. The flashing process will begin automatically. Once completed, close SP Flash Tool and disconnect your phone.
Your device should now be running the new ROM. The first boot might take longer than usual as the system initializes—this is completely normal.

Method 3: Odin – The Samsung Specialist
For Samsung device owners, Odin is the traditional flashing software that has stood the test of time. While it requires careful attention to detail, it’s a powerful android flash utility specifically designed for Samsung phones and tablets.
Download the ROM you wish to install on your Samsung device. Trusted sources like SamMobile offer official firmware. Extract the downloaded file on your computer. Install the Samsung USB drivers on your PC if you haven’t already. Download and extract the latest version of Odin to your computer.
Putting your phone in Download Mode varies by model:
For devices with physical home buttons: Power off your device, then simultaneously press and hold Volume Down, Home, and Power buttons. When you see a warning screen, press Volume Up to enter Download Mode.
For devices without physical home buttons (like Galaxy S8 and newer): Power off your device, then press and hold Volume Up and Bixby buttons. While holding these, press and hold the Power button until the device vibrates and shows a blue screen. Release all buttons, then press Volume Up to enter Download Mode.
If these methods don’t work for your specific model, a quick internet search for “your phone model + download mode” should provide the exact steps.
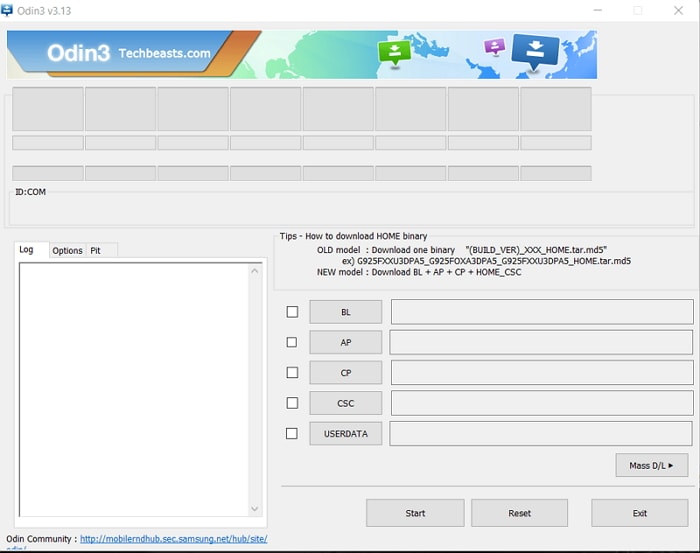
Connect your phone to the computer via USB cable. Launch Odin from the extracted folder—you should see your device detected in the ID:COM section. Click the “AP” button in Odin, navigate to your extracted ROM folder, and select the appropriate file. Wait for the file to load into Odin, then click the Start button to begin the flashing process.
Your phone will automatically reboot when the process is complete. The first startup may take several minutes as the new system initializes. Once your phone is fully booted, you can disconnect it from the computer.
Making the Right Choice for Your Needs
When considering which method to use, think about your technical comfort level and how much time you want to invest. For most users, especially those new to flashing, iMyFone Fixppo offers the best balance of simplicity and effectiveness. Its automated process significantly reduces the risk of errors that can occur with manual methods.
The traditional tools like SP Flash Tool and Odin are powerful options for experienced users who want more control over the process, but they require careful attention to detail and more time to execute properly. Mistakes with these tools can potentially lead to a “bricked” device that won’t turn on.
iMyFone Fixppo.Downgrade iOS 26 to 18 or upgrade to iOS 26, no jailbreak.Repair 150+ iOS/iPadOS/tvOS system issues like stuck on Apple logo, boot loop, black screen without losing data.Free enter/exit Recovery Mode on iPhone and iPad with one-click.Factory reset iPhone/iPad/Apple TV without passcode/iTunes/Finder.Back up and restore iPhone data without iTunes/iCloud.Fix various iOS bugs at home for you to smoothly use your device.Support all iOS versions and devices including iOS 26/18 and iPhone 17.Fixppo only performs system repair with the user’s permission.
Check More Details | Download Now! | Check All Deals
Regardless of which android flash utility you choose, remember to back up your data beforehand, ensure your device has adequate battery, and carefully follow each step of the process. Flashing can breathe new life into an older device or resolve persistent software issues, but it does require patience and attention to detail.
The world of Android flashing has evolved significantly, with modern tools making what was once an expert-only process accessible to everyday users. Whether you’re looking to revive a malfunctioning device, update an abandoned phone, or simply experiment with custom software, there’s never been a better time to explore the possibilities of Android customization.
Some images courtesy of iMyfone