TOOL HUNTER

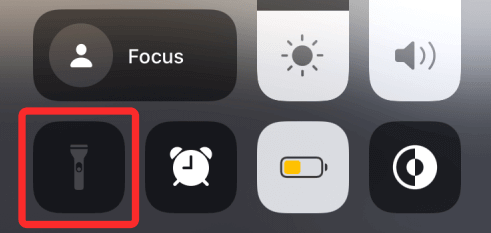
It’s really annoying when you need to use your iPhone’s flashlight but the icon is greyed out and nothing happens when you tap it. This is a pretty common issue that many iPhone users experience, and it can be super frustrating when you’re in a dark place and really need that light.
The good news is that there are several ways to fix this problem, ranging from simple troubleshooting steps to using professional repair tools. In this comprehensive guide, we’ll explore why your iPhone flashlight might not be working and walk you through seven different methods to get it working again.
Table of Contents
Understanding Why Your iPhone Flashlight Isn’t Working
Before we jump into the solutions, it’s helpful to understand what might be causing your iPhone flashlight not working. There are several reasons why this happens, and knowing the cause can help you choose the right fix.
When your iPhone flashlight is disabled, it’s usually due to software conflicts or settings issues rather than actual hardware problems. The flashlight on your iPhone shares resources with the camera system, which means when certain camera-related functions are active, the flashlight gets temporarily disabled.
Here are the most common reasons why you might be dealing with an iPhone torch not working situation:
Camera app interference – This is probably the most common reason. When your camera app is open or running in the background, the flashlight often becomes unavailable. The camera and flashlight use some of the same hardware components, so they can’t both be active at the same time.
LED flash alerts setting – If you have the LED flash for alerts feature enabled, this can sometimes conflict with the flashlight function. This setting makes the camera flash blink when you receive notifications, which can cause the flashlight to appear greyed out.
Background apps using camera – Even if you’re not actively using your camera, other apps might be accessing it in the background. Social media apps, video calling apps, and even some games might be using camera permissions, which can disable your flashlight.
Low battery power – When your iPhone’s battery is very low (usually below 20%), some non-essential features like the flashlight might be automatically disabled to conserve power.
Software glitches – Like any electronic device, iPhones can develop temporary software issues that cause certain features to stop working properly. These glitches can make your iPhone flashlight disabled even when there’s no apparent reason.
Control center restrictions – In some cases, the flashlight option in Control Center might have been accidentally removed or restricted, making it appear greyed out or unavailable.
Physical damage – While less common, actual physical damage to your iPhone, particularly around the camera and flash area, could potentially cause the flashlight to stop working.
Now that we understand why your iPhone torch greyed out might be happening, let’s look at the various ways to fix it. We’ll start with the most effective solution and then move on to simpler troubleshooting methods.
Professional Solution for iPhone Flashlight Not Working
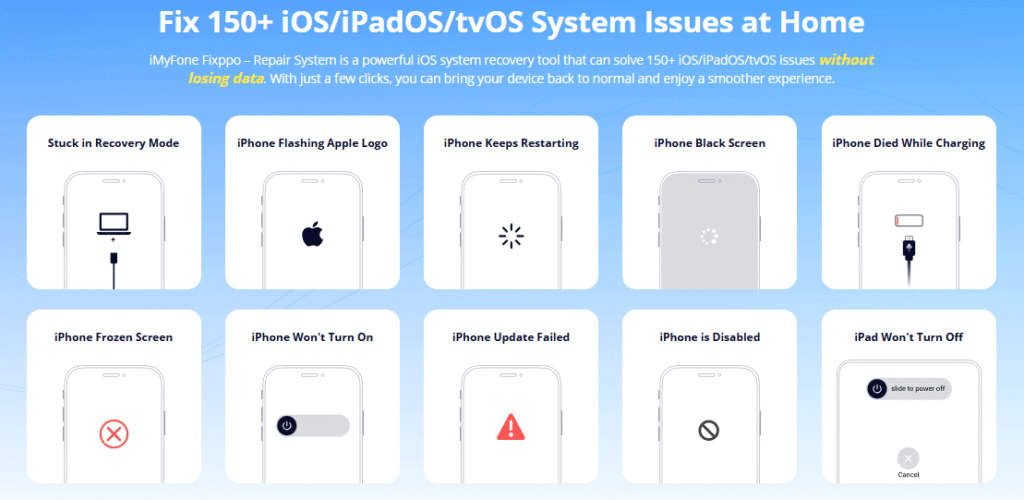
When you’re dealing with persistent iPhone flashlight issues that won’t go away with basic troubleshooting, using a professional repair tool like iMyFone Fixppo can be your best bet. This specialized software is designed to fix various iOS system issues without causing data loss.
iMyFone Fixppo.Downgrade iOS 26 to 18 or upgrade to iOS 26, no jailbreak.Repair 150+ iOS/iPadOS/tvOS system issues like stuck on Apple logo, boot loop, black screen without losing data.Free enter/exit Recovery Mode on iPhone and iPad with one-click.Factory reset iPhone/iPad/Apple TV without passcode/iTunes/Finder.Back up and restore iPhone data without iTunes/iCloud.Fix various iOS bugs at home for you to smoothly use your device.Support all iOS versions and devices including iOS 26/18 and iPhone 17.Fixppo only performs system repair with the user’s permission.
Check More Details | Download Now! | Check All Deals
What makes iMyFone Fixppo particularly useful for flashlight disabled iPhone issues is its ability to repair underlying iOS system problems that might be causing the malfunction. Unlike some other methods that only address surface-level symptoms, Fixppo can identify and fix the root cause of the problem.
Here’s how to use iMyFone Fixppo when your iPhone flashlight isn’t working:

First, you’ll need to download and install iMyFone Fixppo on your computer. The software is compatible with both Windows and Mac systems. Once installed, launch the program and connect your iPhone to your computer using a USB cable.
Make sure you’re using an original Apple cable or a high-quality third-party cable, as connection issues can sometimes interfere with the repair process.
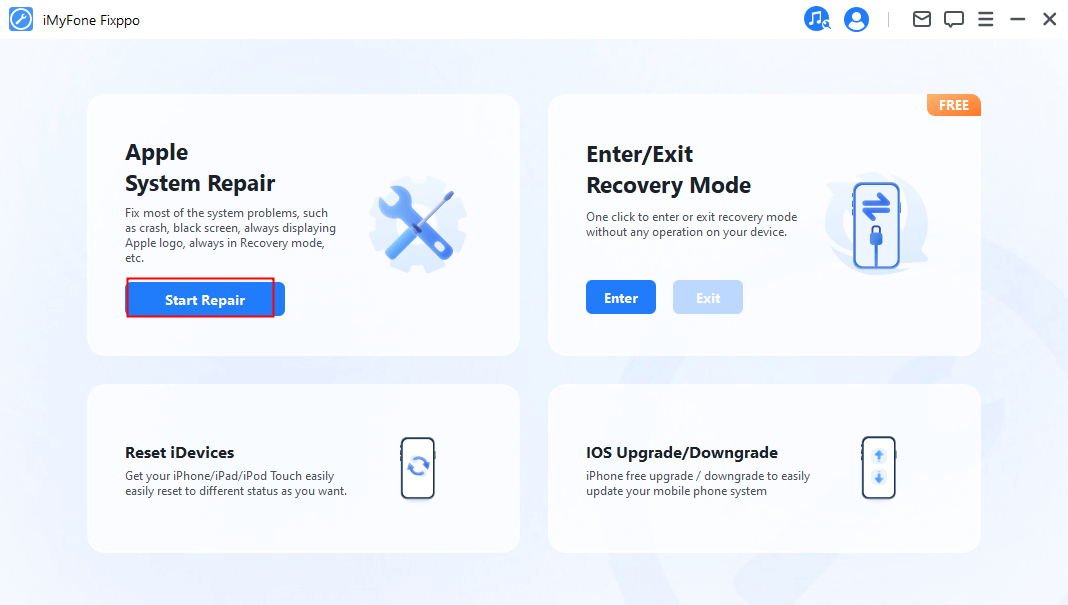
After launching Fixppo, you’ll see the main interface with several options. Click on the “Start” button to begin the process. The software will detect your connected device and display relevant information about it.

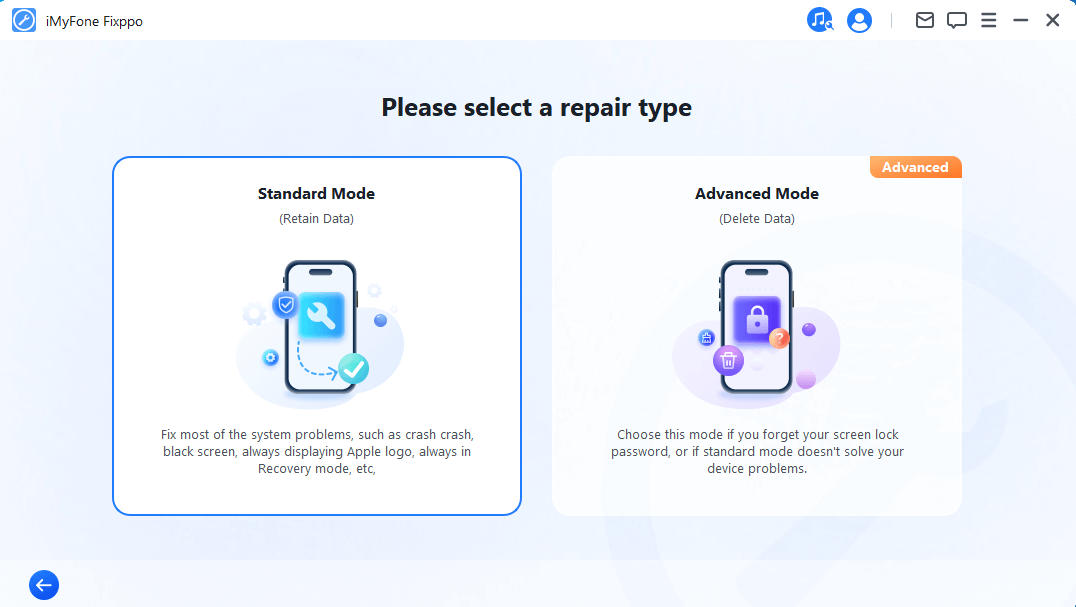
Next, you’ll need to select a repair mode. For flashlight issues, the “Standard Mode” is usually sufficient. This mode fixes common iOS issues without causing data loss. If you’re dealing with more serious system problems, you might need to use “Advanced Mode,” but this will erase all data on your device.
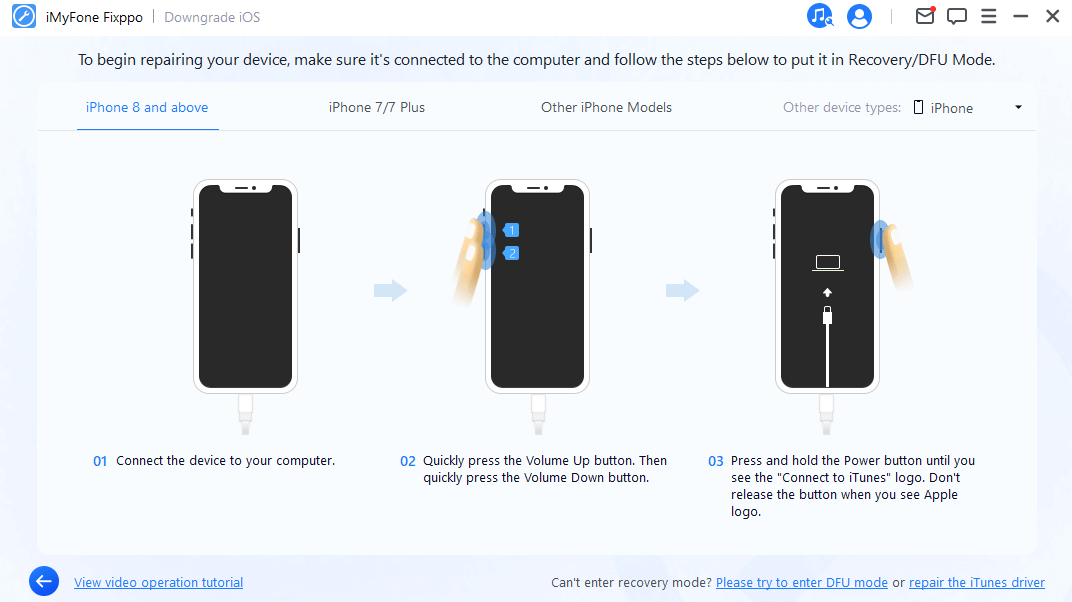
The software will then guide you through putting your iPhone into Recovery Mode or DFU Mode. Don’t worry if these terms sound technical – Fixppo provides clear, step-by-step instructions based on your specific iPhone model.
For newer iPhones without a Home button, you’ll typically need to press and quickly release the Volume Up button, then press and quickly release the Volume Down button, and finally press and hold the Side button until the recovery mode screen appears.
For older iPhones with Home buttons, the process involves holding both the Home and Side (or Top) buttons simultaneously until you see the recovery mode screen.
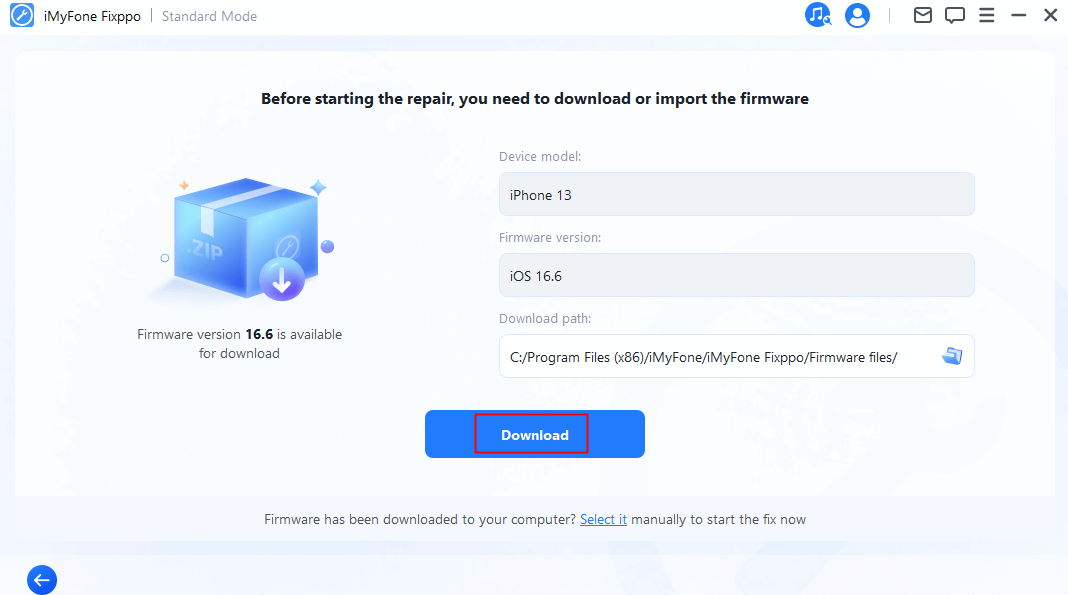
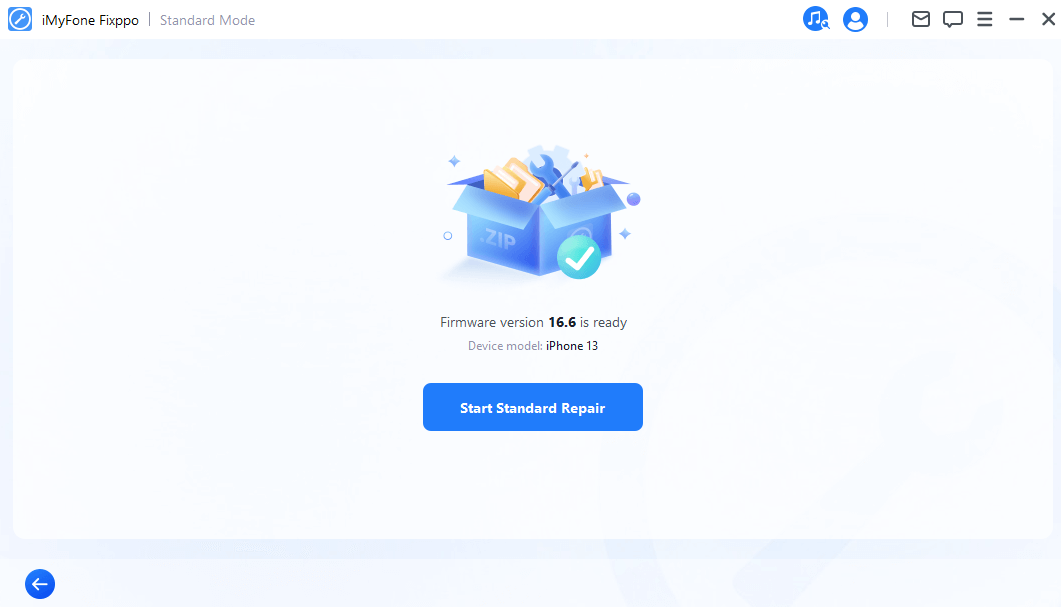
Once your iPhone is in recovery mode, iMyFone Fixppo will automatically detect your device model and iOS version, then provide the appropriate firmware package for download. The software downloads this firmware directly from Apple’s servers, ensuring compatibility and safety.
The download time will vary depending on your internet connection speed and the size of the firmware package, which is typically several gigabytes. It’s a good idea to ensure you have a stable internet connection during this process.
After the firmware download is complete, click the “Start Standard Repair” button to begin the system repair process. The software will now extract and install the firmware on your device.
This process typically takes between 10 to 30 minutes, during which your iPhone will display a progress bar. It’s important not to disconnect your device during this time, as this could potentially cause additional issues.
Once the repair process is complete, your iPhone will automatically restart. After it boots up normally, check if the flashlight disabled iPhone problem has been resolved by accessing the flashlight through Control Center.
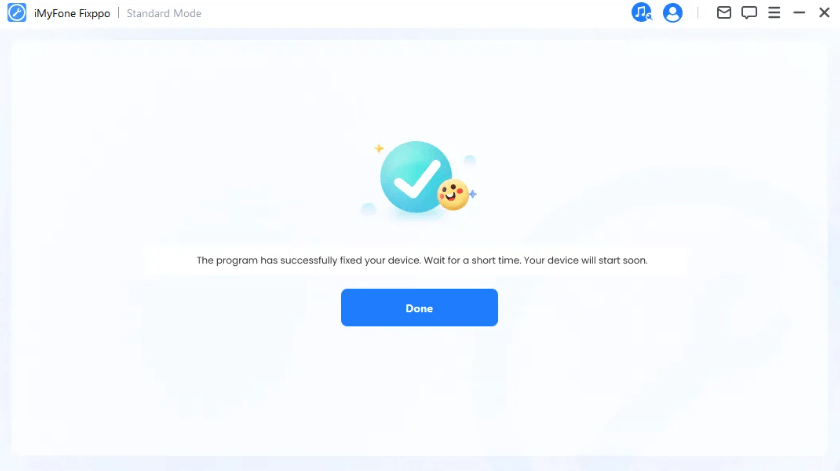
Using iMyFone Fixppo is particularly effective when your iPhone torch not working issue is caused by deeper system software problems that basic troubleshooting can’t fix. The tool essentially reinstalls your iOS system while preserving your data, which often resolves persistent glitches affecting hardware functions like the flashlight.
Simple Troubleshooting Methods for iPhone Flashlight Greyed Out
If you prefer to try simpler solutions before using professional repair software, here are several basic troubleshooting methods that can often resolve the iPhone flashlight not working issue.
Turn Off LED Flash for Alerts
One of the most common reasons for iPhone flashlight disabled situations is the LED Flash for Alerts setting. When this feature is enabled, your iPhone’s camera flash will blink when you receive notifications, which can conflict with the flashlight function.
Here’s how to disable this setting:
Open the Settings app on your iPhone and scroll down to find “Accessibility.” Tap on it to open the accessibility settings.
Within the Accessibility menu, look for the “Audio/Visual” section (on some iOS versions, it might be under “Hearing”). Here you’ll find the “LED Flash for Alerts” option.
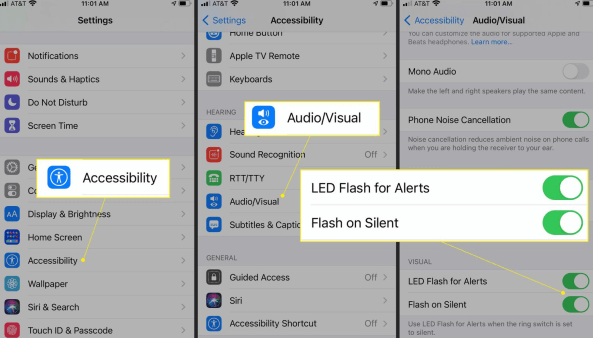
Toggle the switch next to “LED Flash for Alerts” to the off position. The switch will turn from green to grey when it’s disabled.
Once you’ve turned off this setting, check if your iPhone flashlight not working issue has been resolved by trying to use the flashlight from Control Center.
This simple setting change fixes the problem for many users, especially if you’ve recently enabled LED Flash for Alerts or if you’ve never checked this setting before.
Close the Camera App
If your camera app is open or running in the background, it can cause your iPhone torch greyed out because both features share some hardware resources. Here’s how to properly close the camera app:
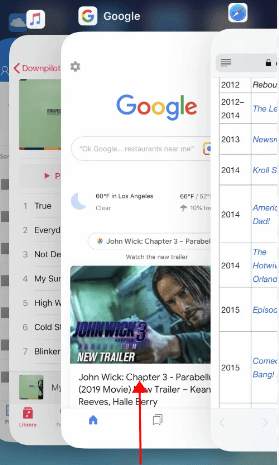
For iPhones with Face ID (iPhone X and newer), swipe up from the bottom of the screen and pause in the middle of the screen to bring up the App Switcher.
For iPhones with Home buttons, double-press the Home button to access the App Switcher.

Swipe left or right through the app previews until you find the Camera app. If you recently used the camera, it will likely be one of the first apps shown in the App Switcher.
Swipe up on the Camera app preview to close it completely. Make sure you swipe it all the way off the screen.
After closing the Camera app, try using your flashlight again. This simple step resolves many cases of iPhone flashlight disabled issues, especially if you were using the camera recently or if the camera app crashed in the background.
Close Other Apps Using the Camera
Sometimes it’s not just the Camera app that’s causing the conflict. Other apps that use the camera can also prevent your flashlight from working. Social media apps, video calling apps, scanning apps, and even some games might be accessing your camera in the background.
Here’s how to close apps that might be using your camera:
Access the App Switcher using the same method described above – swipe up and pause for Face ID iPhones, or double-press the Home button for older models.
Scroll through your open apps and look for any that might use the camera. Common culprits include Instagram, Snapchat, Facebook, Zoom, Skype, WhatsApp, and banking apps with check deposit features.
Swipe up on each of these apps to close them. You don’t necessarily need to close every single app, but focus on ones that commonly use camera functions.
If you’re unsure which apps might be causing the issue, or if you want to be thorough, you can close all background apps. Simply swipe up on each app preview one by one until all apps are closed.
After closing potential camera-using apps, check if your iPhone torch not working problem has been resolved. This method is particularly effective if you’ve recently used apps that access the camera and might have left them running in the background.
Check Your iPhone’s Battery Level
When your iPhone’s battery is very low, it automatically disables some non-essential features to conserve power, and the flashlight is often one of these features. This is a common reason for iPhone flashlight not working, especially if your battery is below 20%.
Here’s how to check your battery level and address low battery issues:
Open the Settings app and go to “Battery.” Here you’ll see your current battery percentage and battery usage information.
If your battery is below 20%, connect your iPhone to a charger and allow it to charge for at least 10-15 minutes.
Once your battery has reached at least 20%, try using the flashlight again. In most cases, the flashlight will become available once your battery has sufficient charge.
If you frequently experience your iPhone flashlight disabled due to low battery, consider carrying a portable power bank or being more mindful of your battery level when you might need to use the flashlight.
It’s also worth noting that extreme temperatures can affect battery performance and might cause features like the flashlight to become temporarily unavailable, even if the battery percentage appears sufficient.
Force Restart Your iPhone
A force restart can resolve many temporary software glitches that might be causing your iPhone torch greyed out. This process clears temporary system files and resets various software components without deleting your personal data.
The method for force restarting varies depending on your iPhone model:
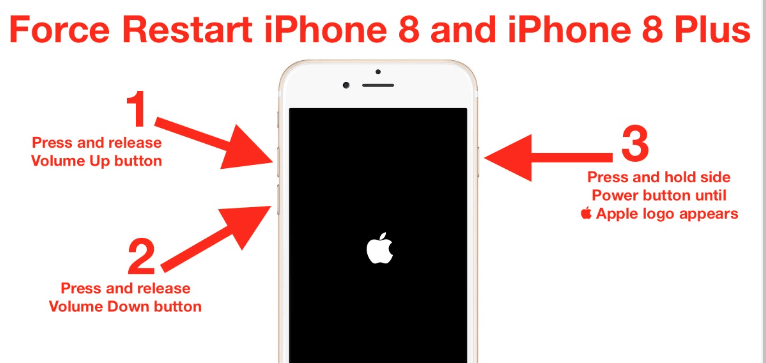
For iPhone 8 or later: Quickly press and release the Volume Up button, then quickly press and release the Volume Down button. Finally, press and hold the Side button until you see the Apple logo appear on the screen.
For iPhone 7 and 7 Plus: Press and hold both the Volume Down button and the Sleep/Wake (Side) button simultaneously until the Apple logo appears.
For iPhone 6s and earlier: Press and hold both the Home button and the Sleep/Wake (Top) button at the same time until you see the Apple logo.
After your iPhone restarts, check if the flashlight is now working. A force restart is a simple but effective troubleshooting step that resolves many common iOS issues, including flashlight problems.
Check for Physical Damage
While less common than software issues, physical damage can sometimes cause your iPhone flashlight not working. This is more likely if you’ve recently dropped your iPhone or exposed it to liquids.
Here’s how to check for physical damage:
Examine the area around your iPhone’s camera and flash module. Look for any visible cracks, scratches, or other damage to the glass or housing.
Check if the camera lens appears cloudy or has moisture inside, which could indicate water damage.
Look for any dents or deformities around the camera area that might suggest impact damage.
If you find physical damage, the flashlight issue might require professional repair. You can contact Apple Support, visit an Apple Store, or take your device to an authorized service provider for assessment.
It’s worth noting that sometimes what appears to be physical damage might just be a dirty lens. Before assuming the worst, try gently cleaning the camera and flash area with a soft, dry cloth to remove any dirt, smudges, or debris that might be interfering with the flash.
Reset All Settings
If none of the previous methods have worked and you’re still dealing with an iPhone flashlight disabled situation, resetting all settings might help. This will restore all system settings to their defaults without deleting your personal data, apps, or media.
Go to Settings > General > Transfer or Reset iPhone > Reset.
Tap on “Reset All Settings.” You may need to enter your passcode to confirm this action.
Your iPhone will restart, and all system settings will be restored to factory defaults. You’ll need to reconfigure things like Wi-Fi passwords, wallpaper, display settings, and privacy permissions, but your personal data will remain intact.
After the reset is complete, check if your iPhone torch not working issue has been resolved. This method can fix problems caused by corrupted settings or configuration conflicts.
Preventing Future Flashlight Issues
Once you’ve resolved your current iPhone flashlight not working problem, you might want to take some steps to prevent it from happening again in the future.
Regularly close camera apps and other apps that use the camera when you’re done with them instead of leaving them running in the background.
Keep your iOS updated to the latest version, as updates often include bug fixes that address issues like flashlight malfunctions.
Avoid letting your battery drain completely too frequently, as this can sometimes cause temporary software glitches.
Be mindful of the LED Flash for Alerts setting – if you don’t really need this feature, consider keeping it disabled to prevent potential conflicts with the flashlight.
Periodically restart your iPhone to clear temporary files and refresh the system software.
When to Seek Professional Help
If you’ve tried all the methods above and your iPhone flashlight is still not working, it might be time to seek professional assistance. This is particularly true if:
The issue persists across multiple iOS updates You suspect physical damage to your device Other camera-related functions are also not working properly Your iPhone is still under warranty
Apple’s official support channels are your best bet for hardware-related issues. You can contact Apple Support online, use the Apple Support app, or visit an Apple Store for in-person assistance.
iMyFone Fixppo.Downgrade iOS 26 to 18 or upgrade to iOS 26, no jailbreak.Repair 150+ iOS/iPadOS/tvOS system issues like stuck on Apple logo, boot loop, black screen without losing data.Free enter/exit Recovery Mode on iPhone and iPad with one-click.Factory reset iPhone/iPad/Apple TV without passcode/iTunes/Finder.Back up and restore iPhone data without iTunes/iCloud.Fix various iOS bugs at home for you to smoothly use your device.Support all iOS versions and devices including iOS 26/18 and iPhone 17.Fixppo only performs system repair with the user’s permission.
Check More Details | Download Now! | Check All Deals
Final Thoughts on iPhone Flashlight Issues
Dealing with an