TOOL HUNTER

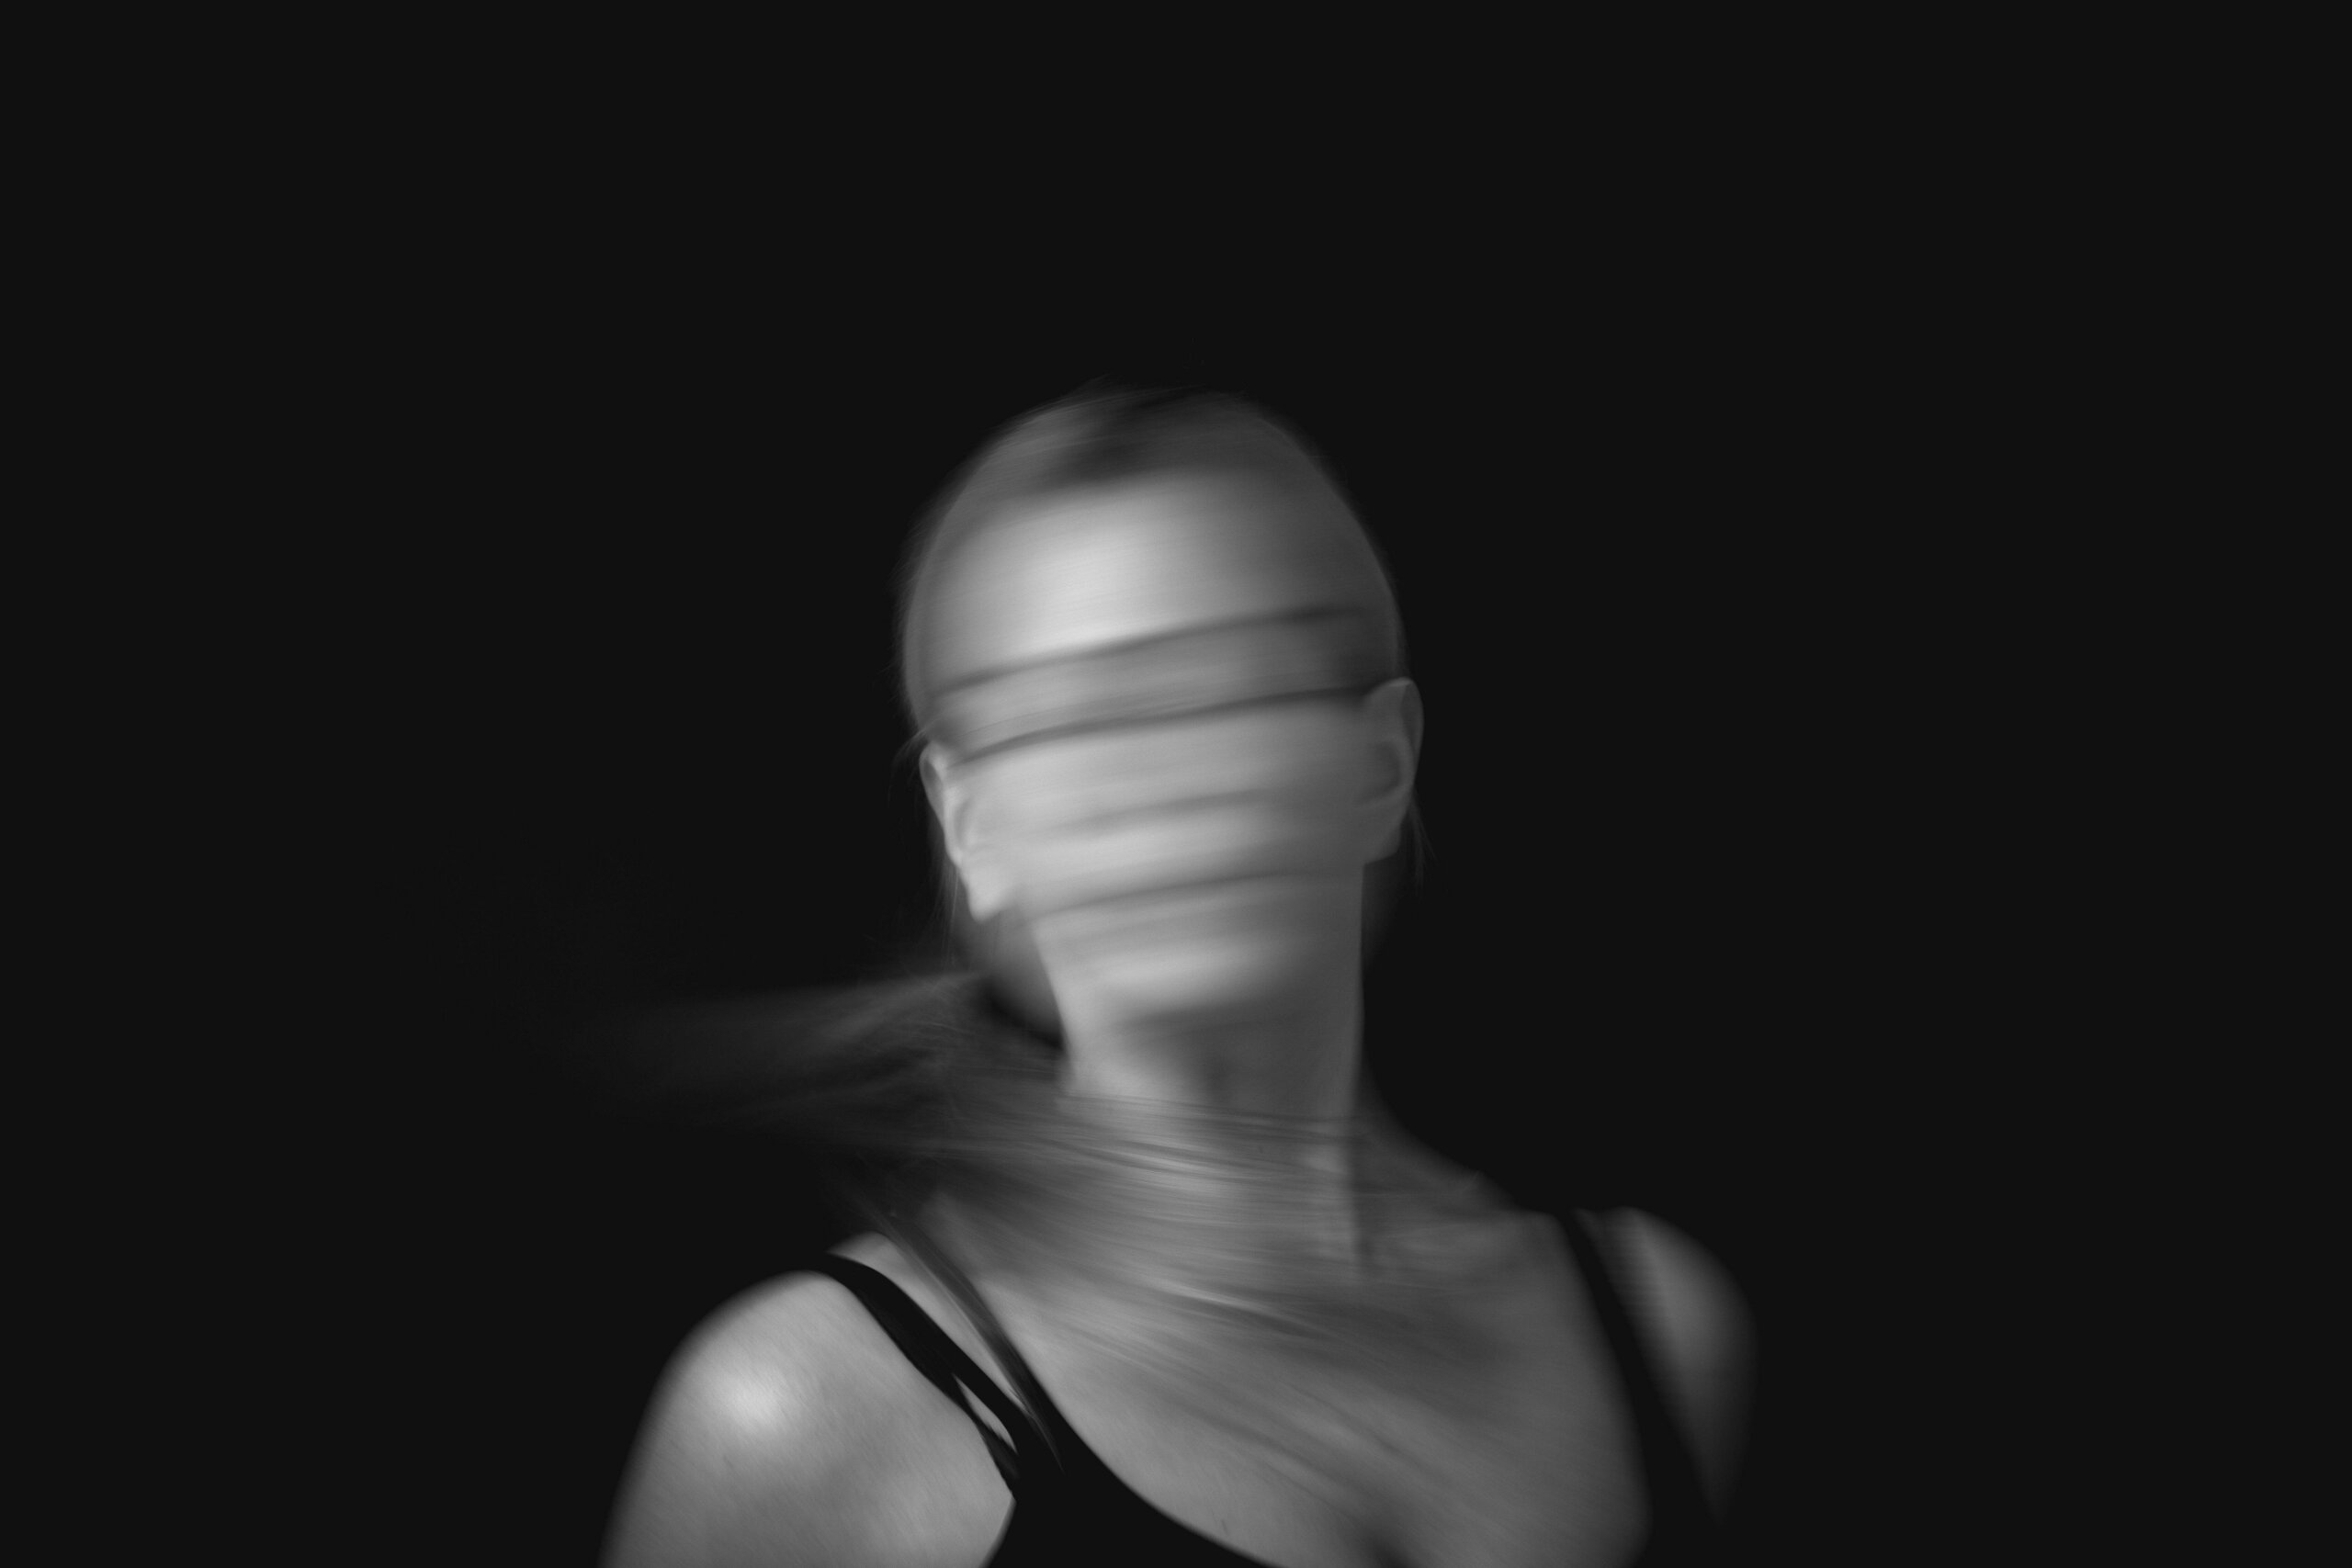
Have you ever captured a moment only to find the photo came out blurry? It’s a common frustration that can leave you feeling disappointed, especially when you’ve put effort into getting that perfect shot. The good news is, you don’t have to settle for unclear images anymore. While in the past you might have needed professional editing skills to fix blurry photos, today’s tools make it accessible for everyone. This guide will walk you through practical ways on how to make blurry photos clear and vibrant again, covering everything from why photos get blurry to step-by-step editing solutions.
Common Reasons for Blurry Photos
Understanding why photos turn out blurry is the first step toward preventing and fixing them. Several factors can contribute to this issue, and being aware of these can help you capture better shots in the future.
Camera Movement
One of the most frequent causes of blurry images is camera shake. This happens when your hands aren’t steady while taking the picture, especially in low-light conditions where the camera uses a slower shutter speed. Even the slightest movement can result in a blurry photo. To minimize camera shake, try using a tripod or increasing your shutter speed. Many modern cameras and lenses also come with stabilization features that help reduce this problem.
Focus Issues
Sometimes the camera focuses on the wrong part of the scene, leaving your main subject blurry. This can occur due to low light, busy backgrounds, or simply because the autofocus selected the wrong point. Using manual focus or ensuring your camera is set to focus on the correct area can help avoid this issue. Additionally, understanding depth of field settings can prevent parts of your image from being unintentionally blurry.
Subject Motion
When your subject is moving quickly, you might end up with motion blur. This is common in sports photography or when capturing pets and children. Using a faster shutter speed can freeze the action, while techniques like panning (following the subject with your camera) can help maintain focus on moving objects while creating a dynamic background blur.
Depth of Field Challenges
A shallow depth of field can create beautiful background blur (bokeh) but can also make parts of your image unintentionally soft or blurry if not managed properly. Adjusting your aperture to a higher f-number increases the depth of field, keeping more of your image in focus. For maximum sharpness throughout the image, focus stacking—taking multiple shots at different focus distances and combining them—can be an effective technique.
Effective Tools to Enhance Blurry Photos
Now that we understand why photos become blurry, let’s explore how to fix them using modern editing tools. Today’s software makes it surprisingly simple to improve image quality, even if you’re not a professional editor.
CapCut: AI-Powered Photo Enhancement
CapCut stands out as a powerful, user-friendly tool that utilizes artificial intelligence to transform blurry photos into clear, vibrant images. This online platform offers comprehensive editing features beyond just sharpening, including color correction, background removal, and creative effects. What makes CapCut particularly appealing is that it’s completely free and doesn’t add watermarks to your edited photos.
CapCut — Your all-in-one video & photo editing powerhouse! Experience AI auto-editing, realistic effects, a huge template library, and AI audio transformation. Easily create professional masterpieces and social media viral hits. Available on Desktop, Web, and Mobile App.

Key Features of CapCut
CapCut offers several impressive features that make it ideal for photo enhancement:
The AI-enhanced editing tools can automatically analyze and improve your images, adjusting sharpness, contrast, and color balance for optimal results. Whether you’re working with portraits, landscapes, or action shots, the intelligent algorithms can target specific areas that need improvement.
You’ll appreciate the high-quality output that maintains detail and clarity even after significant enhancements. The platform supports various file formats and resolutions, ensuring your images look great whether you’re sharing them online or printing them.
The extensive template library provides creative starting points for your projects, while the real-time collaboration features make it easy to work with others on editing projects. Cloud storage ensures your work is safely backed up and accessible from any device.
Step-by-Step Guide to Using CapCut
Fixing blurry photos with CapCut is straightforward, even for beginners. Here’s how to transform your unclear images into sharp, vibrant photos:
Upload Your Image
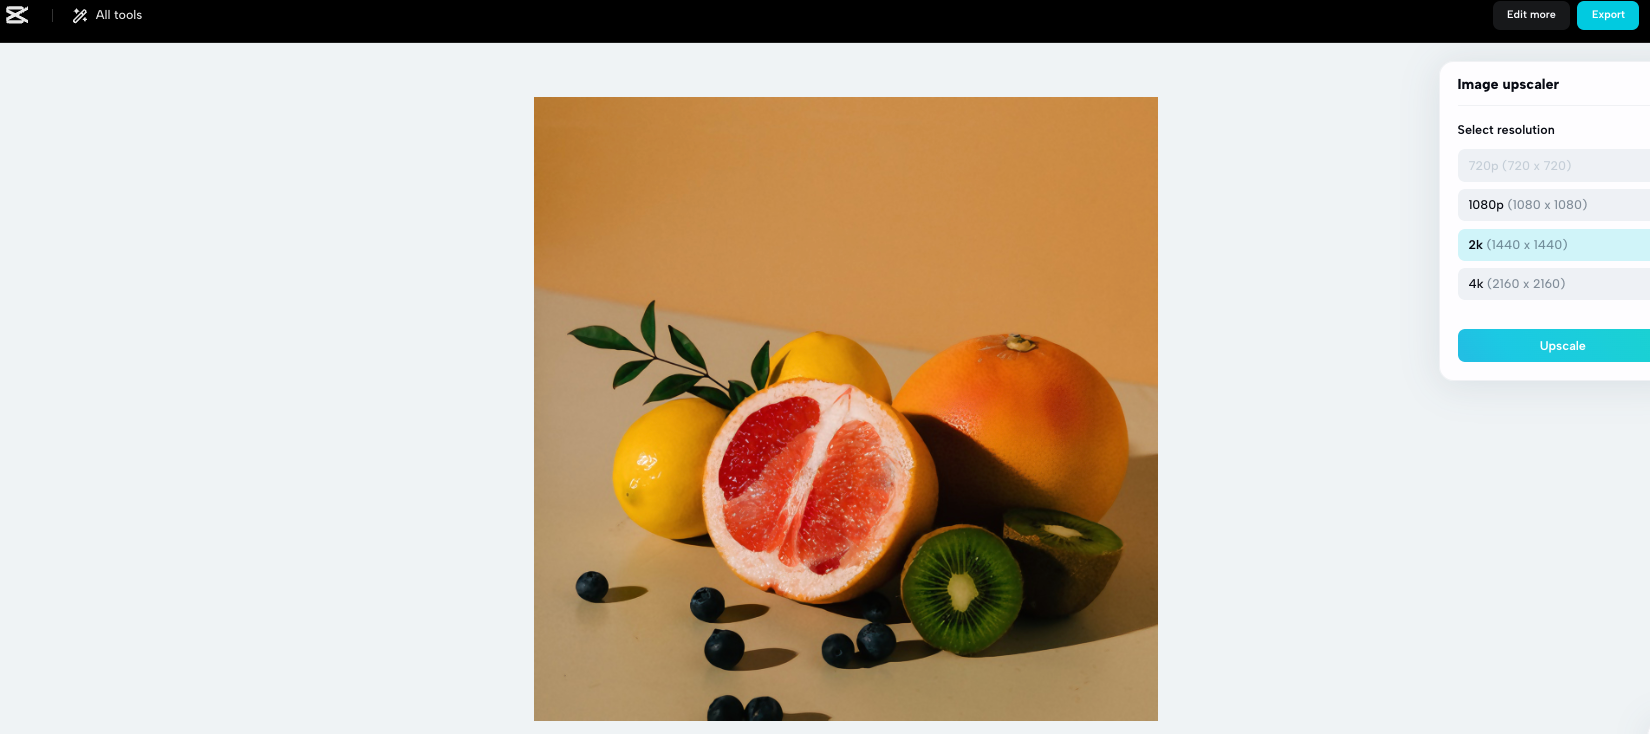
Navigate to CapCut’s website and select the “Image Upscaler” from the Magic Tools section. Upload your blurry photo directly from your device. The platform will immediately begin analyzing the image to determine the best enhancement approach.

Enhance and Upscale
Choose your desired output resolution—CapCut can significantly increase image size while maintaining quality thanks to its AI algorithms. Click the “Upscaler” button to begin the enhancement process. The software will intelligently reduce blurriness, sharpen details, and improve overall image quality.
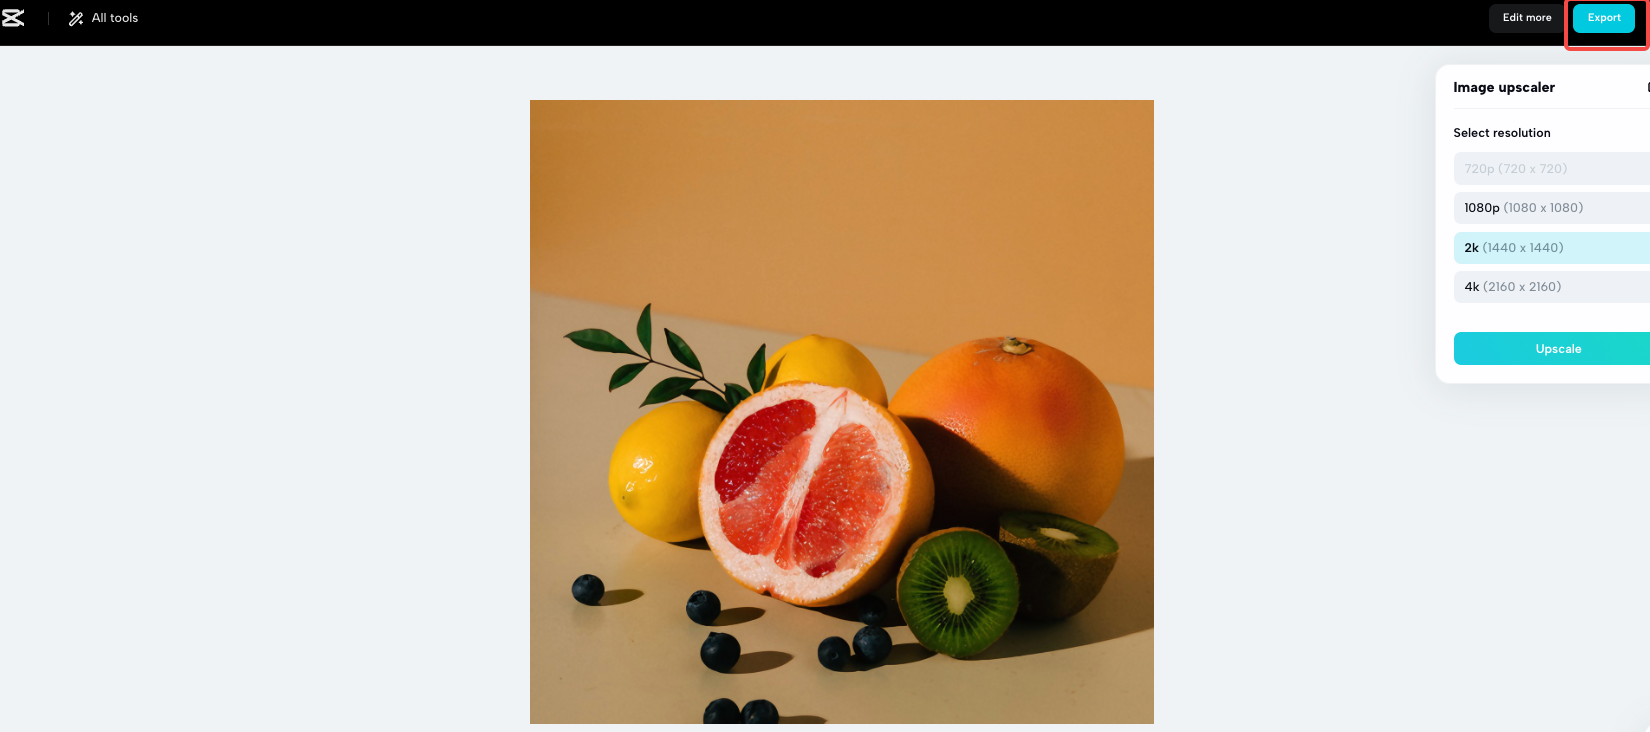
Finalize and Export
Once processing is complete, review the enhanced image. CapCut allows for additional adjustments using its full suite of editing tools if needed. When satisfied with the results, export the image to your device in your preferred format. The entire process typically takes just moments, depending on image size and complexity.
Alternative Tool: HitPaw Photo AI
While CapCut offers comprehensive editing capabilities, HitPaw Photo AI provides another excellent option specifically focused on photo enhancement through artificial intelligence. This desktop application specializes in making blurry photos clear, reducing noise, and improving overall image quality.
Using HitPaw Photo AI
After downloading and installing the software (available for both Windows and Mac), simply drag and drop your blurry image into the program. Select the appropriate AI model for sharpening or clarity enhancement, then preview the changes before applying them permanently. The interface is intuitive, making it accessible even for those new to photo editing.
HitPaw offers multiple AI models tailored to different types of images and issues, from portrait sharpening to landscape enhancement. The software preserves image quality while significantly reducing blurriness and improving detail visibility.
Preventive Measures for Clearer Photos
While knowing how to fix blurry photos is valuable, preventing the issue in the first place is even better. Here are some practical tips for capturing clearer images from the start:
Stabilize Your Camera
Using a tripod or stabilizing surface can dramatically reduce camera shake, especially in low-light situations. If a tripod isn’t available, brace yourself against a solid object or use your camera’s built-in stabilization features.
Optimize Camera Settings
Understanding your camera’s settings is crucial for preventing blurry photos. Use faster shutter speeds for moving subjects, appropriate aperture settings for your desired depth of field, and ensure your ISO settings match the lighting conditions without introducing excessive noise.
Master Focusing Techniques
Learn how to control your camera’s focus points manually when necessary. Many cameras allow you to select specific focus points, ensuring your subject remains sharp regardless of distracting background elements.
Utilize Proper Lighting
Good lighting is essential for clear photos. Natural light often produces the best results, but when shooting indoors or in low light, consider using additional light sources or your camera’s flash appropriately.
Practice and Experiment
The more you practice with your camera, the better you’ll understand how to avoid common pitfalls that lead to blurry photos. Don’t hesitate to experiment with different settings and techniques to find what works best for your specific equipment and shooting scenarios.
Transforming Your Photography Experience
Blurry photos don’t have to be permanent disappointments. With today’s advanced editing tools like CapCut and HitPaw Photo AI, you can rescue images that would otherwise be lost to blurriness. These solutions make the process of how to make blurry photos clear accessible to everyone, regardless of technical expertise.
CapCut — Your all-in-one video & photo editing powerhouse! Experience AI auto-editing, realistic effects, a huge template library, and AI audio transformation. Easily create professional masterpieces and social media viral hits. Available on Desktop, Web, and Mobile App.
Remember that while editing tools are powerful, developing good photography habits will reduce your need for extensive edits. Combine proper shooting techniques with the enhancement capabilities of modern software, and you’ll consistently achieve clear, vibrant photos that preserve your memories in the best possible quality.
Whether you’re a casual smartphone photographer or an enthusiast with dedicated equipment, understanding how to make blurry photos clear is an invaluable skill in today’s visual world. With the right knowledge and tools at your disposal, you can ensure that even imperfect shots can be transformed into keepers worth sharing and cherishing.
Some images courtesy of CapCut.