TOOL HUNTER

Have you ever experienced that sinking feeling when Excel crashes before you’ve saved your work? Whether it’s a sudden power outage, system freeze, or accidental closure, losing hours of spreadsheet work can be incredibly frustrating. But here’s the good news – your data might not be gone forever. Microsoft Excel automatically creates temporary backup files that can rescue your unsaved work. The key question is: where are excel temp files stored, and how can you find them when disaster strikes?
Understanding where Excel hides these temporary files and how to recover them can save you from data loss headaches. Let’s explore everything you need to know about Excel’s temporary file system and the various recovery methods available.
Table of Contents
- Understanding Excel Temporary Files
- Where Are Excel Temp Files Stored on Windows?
- Locating Temporary Excel Files on Mac
- How to Recover Unsaved Excel Files
- Preventing Future Excel Data Loss
- Advanced Recovery Scenarios
- Understanding Excel Temporary File Behavior
- Troubleshooting Common Recovery Issues
- Excel Version Considerations
- Best Practices for Excel File Management
- When to Seek Professional Help
- Conclusion
Understanding Excel Temporary Files
Before we dive into recovery methods, it’s helpful to understand what Excel temporary files are and why they exist. When you’re working on a spreadsheet, Excel creates temporary files as backup copies. These files serve as safety nets, preserving your work in case of unexpected crashes or closures.
Excel temporary files typically have distinctive characteristics that make them easier to identify. They often start with a tilde symbol (~) and may have a .tmp extension. These files are created automatically in the background while you work, capturing your progress at regular intervals.
The location where these temporary excel files are stored depends on your operating system and Excel version. Knowing these default locations is crucial for successful recovery when things go wrong.
Where Are Excel Temp Files Stored on Windows?
Finding where Excel stores its temporary files on Windows systems requires knowing the specific directories for your version. The location varies between Windows versions, so you’ll need to check the path that matches your system.
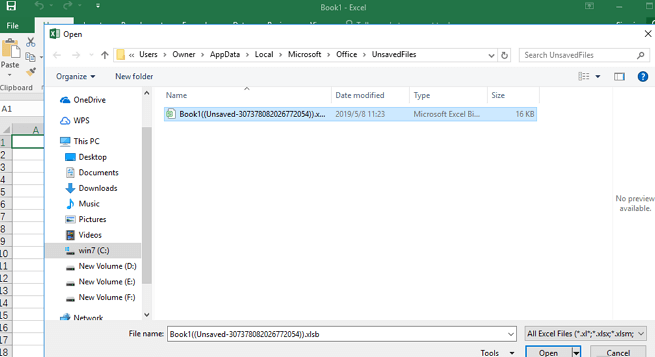
For Windows 10 and 11 users, the primary location for temporary Excel files is: C:\Users[username]\AppData\Local\Microsoft\Office\UnsavedFiles
If you’re using Windows 8, 7, or Vista, look for temporary files at: C:\Users[username]\AppData\Local\Microsoft\Office\UnsavedFiles
For those still running Windows XP, the path is slightly different: C:\Documents and Settings[username]\Local Settings\Application Data\Microsoft\Office\UnsavedFiles
To access these locations quickly, you can copy and paste the appropriate path into Windows File Explorer’s address bar. Remember to replace “[username]” with your actual Windows account name. The AppData folder is typically hidden by default, so you might need to enable “Show hidden files and folders” in Folder Options if you can’t see it immediately.
It’s worth noting that Excel might store temporary files in additional locations based on your specific settings and whether you’re working on files stored on network drives. The paths above represent the primary locations where you’re most likely to find your unsaved work.
Locating Temporary Excel Files on Mac
Mac users have a different approach to finding where Excel stores temporary files. While the file system structure differs from Windows, Excel for Mac still creates temporary backups that can rescue your unsaved work.
To locate temporary Excel files on your Mac, follow these steps:
Step 1: Open the Finder application from your dock or Applications folder.
Step 2: Click on “Go” in the menu bar while holding the Option key to reveal the Library option.
Step 3: Select “Library” from the dropdown menu.
Step 4: Navigate to Containers > com.microsoft.Excel > Data > Library > Preferences > AutoRecovery.
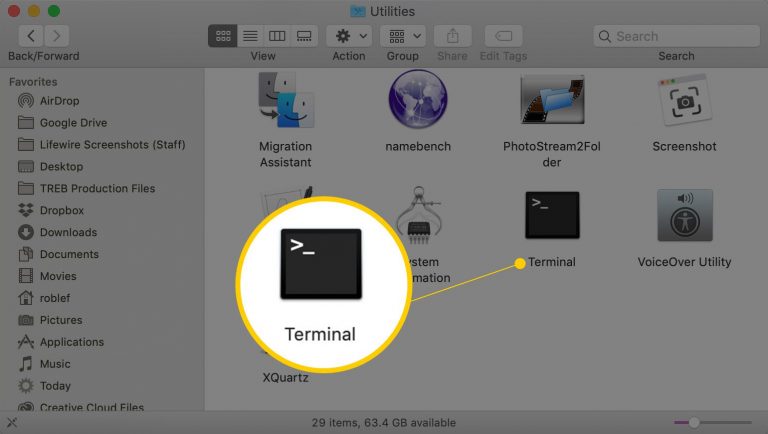
Alternatively, you can use the Terminal method mentioned in the reference article if you’re comfortable with command-line navigation. Open Terminal from Applications > Utilities, then type: open $TMPDIR and press Enter. This will open the temporary files directory in Finder, where you can search for Excel-related files.
On Mac systems, Excel temporary files typically have the same distinctive naming convention – they start with a tilde (~) symbol followed by the original file name. This makes them easier to spot among other files in the directory.
How to Recover Unsaved Excel Files
Now that you know where to find Excel’s temporary files, let’s explore the various methods to recover your unsaved work. Excel provides multiple recovery pathways, and understanding each one increases your chances of successful data recovery.
Method 1: Using Excel’s Built-in Recovery Feature
Excel includes a dedicated feature specifically designed to recover unsaved workbooks. This is often the quickest and most straightforward method to restore your lost data.
Step 1: Open Microsoft Excel on your computer. You can start with a new blank workbook or any existing file.
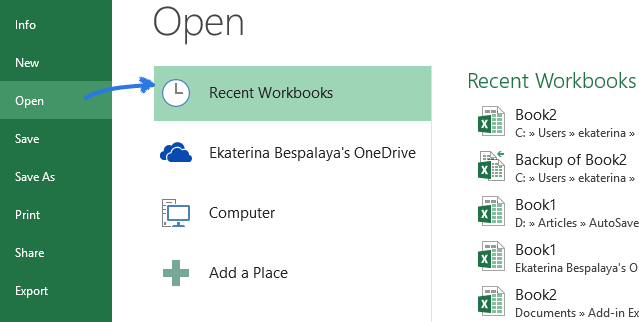
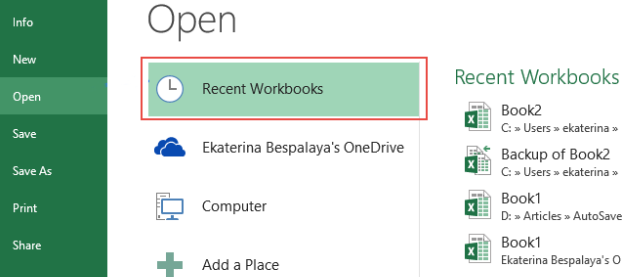
Step 2: Click on the “File” tab in the top-left corner of the Excel window.
Step 3: Select “Open” from the left-hand menu, then choose “Recent” from the options that appear.
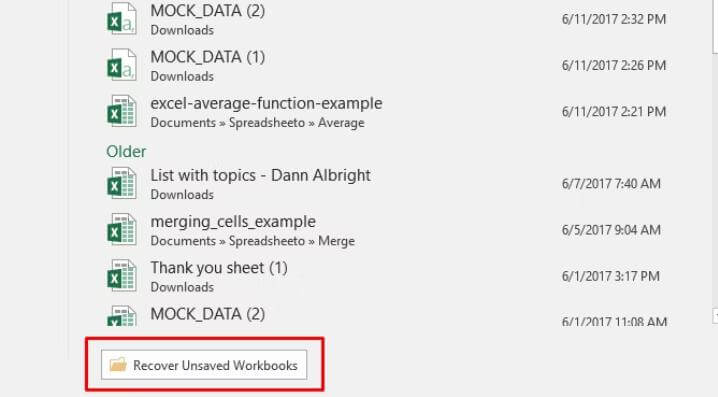
Step 4: Scroll to the bottom of the recent documents list and click on “Recover Unsaved Workbooks.”
Step 5: A dialog box will open showing all recoverable unsaved files. Select the file you want to recover and click “Open.”
Step 6: Once the file opens, immediately save it with a descriptive name to prevent future data loss.
This method works best for files that were never saved or were closed without saving changes. It’s particularly useful when you can’t remember where Excel might have stored temporary files manually.
Method 2: Accessing the AutoRecover Feature
Excel’s AutoRecover function automatically saves backup copies of your work at regular intervals. If Excel crashes or closes unexpectedly, it will typically prompt you to recover these auto-saved versions when you restart the program. However, you can also access these files manually.
Step 1: Open Excel and navigate to File > Info.
Step 2: Look for the “Manage Workbook” or “Manage Document” section.
Step 3: Click on “Recover Unsaved Workbooks” if available, or check for any listed autosaved versions.
Step 4: If you see your file listed, select it and click “Open” to restore your work.
The AutoRecover feature is configurable through Excel’s options. You can adjust how frequently it saves backup copies and where it stores these files. To modify these settings, go to File > Options > Save, where you can change the AutoRecover save interval and view the AutoRecover file location.
Method 3: Manual Recovery from Temporary Folders
When the built-in recovery methods don’t work, you can manually search for temporary Excel files in the system directories we discussed earlier. This approach requires knowing exactly where does Excel save temp files on your specific system.
Step 1: Navigate to the appropriate temporary files directory for your Windows version using File Explorer.
Step 2: Look for files with the .tmp extension or files starting with “~” that correspond to your lost work.
Step 3: Sort files by date modified to find the most recent temporary files.
Step 4: Copy any promising files to a safe location before attempting to open them.
Step 5: Try opening these files in Excel. You may need to change the file extension from .tmp to .xlsx if Excel doesn’t recognize them automatically.
For Mac users, the process is similar but follows the Mac file paths mentioned earlier. Navigate to the AutoRecovery folder in your user library and look for files with recent modification dates.
When searching for temporary file excel backups manually, pay attention to file sizes and modification dates to identify the most relevant versions of your lost work.
Method 4: Using Previous Versions Feature
Windows includes a “Previous Versions” feature that can sometimes recover lost Excel files, especially if you had saved the file at least once before losing your recent changes.
Step 1: Navigate to the folder where your Excel file was last saved.
Step 2: Right-click on the folder and select “Restore previous versions” or “Properties” then “Previous Versions.”
Step 3: If available, you’ll see a list of previous versions of the folder from different points in time.
Step 4: Select a version from before you lost your file and click “Restore” or “Open” to explore its contents.
This method relies on Windows’ Volume Shadow Copy service, which must be enabled on your system for previous versions to be available. It’s particularly useful when you’ve saved a file previously but lost more recent unsaved changes.
Method 5: Professional Data Recovery Software
When all else fails, or if you’re dealing with more complex data loss scenarios (like deleted files or corrupted drives), professional data recovery software can be your best option. These tools can often recover files that seem permanently lost.
iMyFone D-Back.All-in-one Data Recovery Software: You can recover deleted, lost, formatted, or corrupted files from iOS/Android devices and PCs in one tool.1000+ Data Types Recovery: Restore photos, videos, messages, contacts, office documents, emails, audio, etc. without backup.Third-Party App Recovery: Retrieve messages and attachments directly from WhatsApp, LINE, Kik, WeChat, Skype and more.iOS Data Backup: Securely back up various data from your iOS device, reducing the risk of data loss.

Check More Details | Download Now! | Check All Deals
D-Back stands out as a comprehensive solution for Excel file recovery, offering several advantages over built-in methods:
- It can recover files even after they’ve been deleted from the Recycle Bin
- It works with corrupted drives and formatted storage devices
- It can retrieve files based on file signatures, not just file system entries
- It offers preview functionality before recovery
Using D-Back to recover lost Excel files is straightforward:
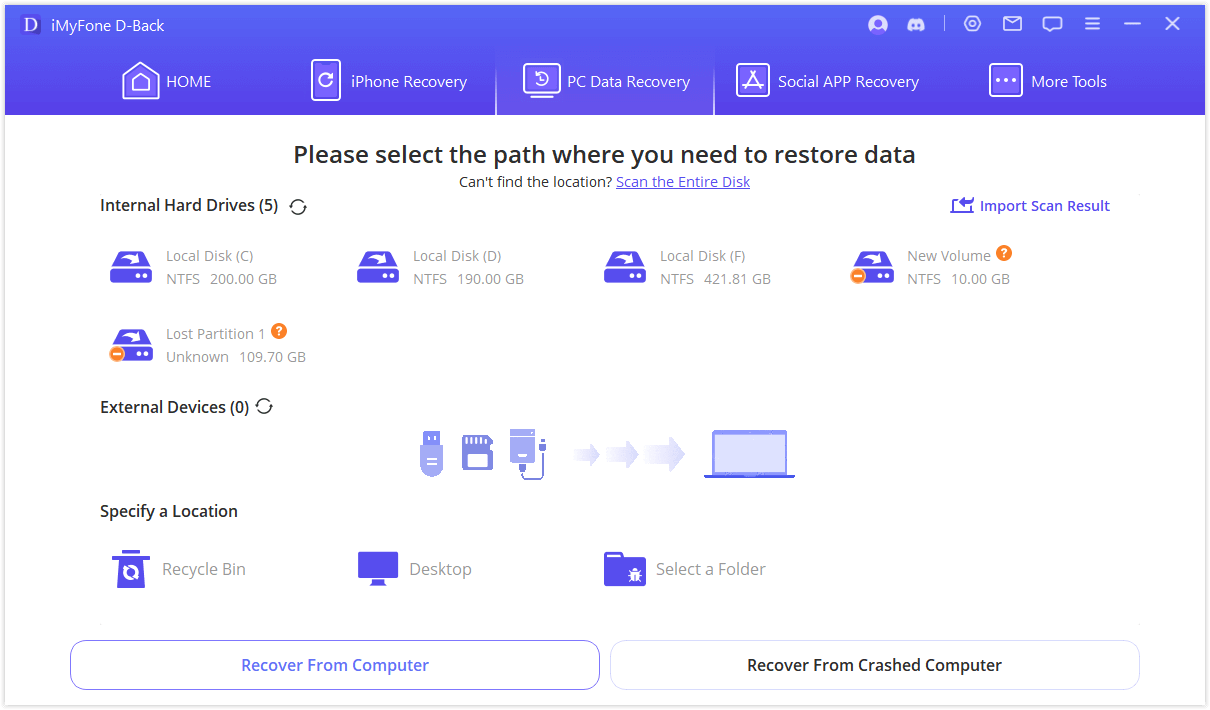
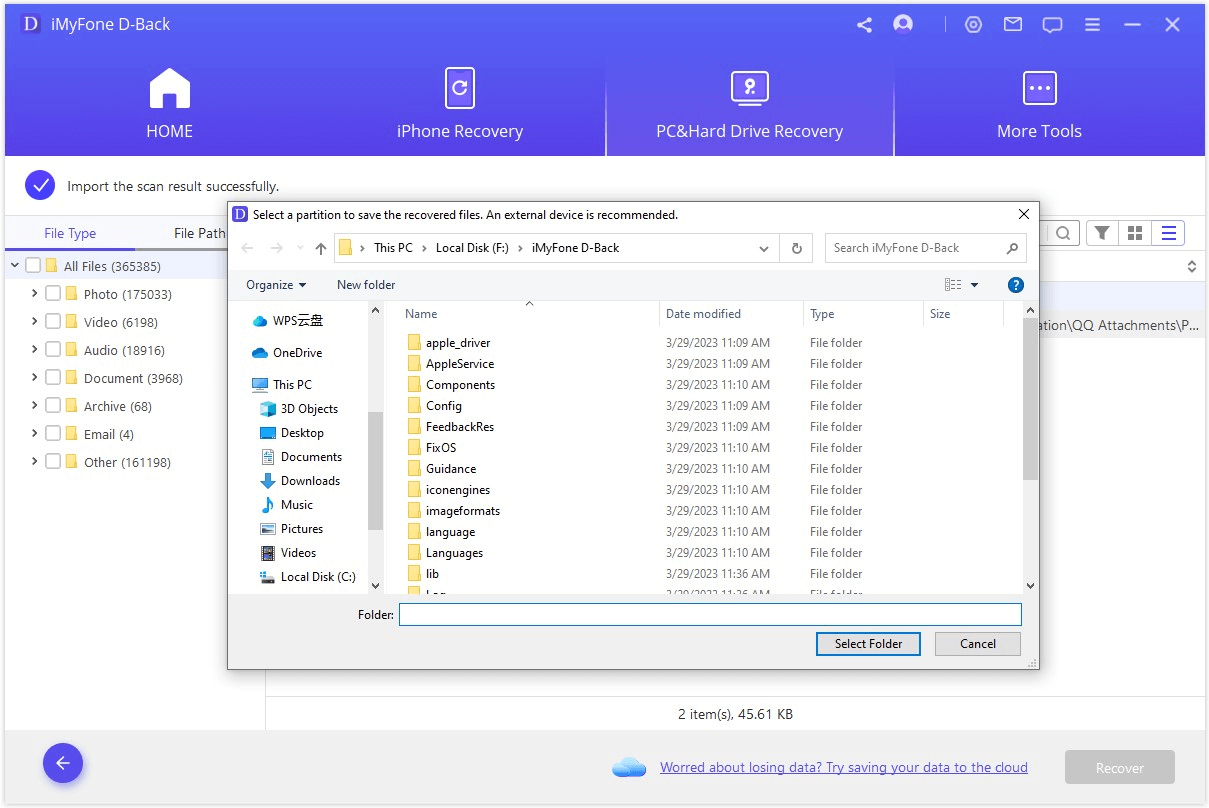
Step 1: Download and install iMyFone D-Back on your computer.
Step 2: Launch the software and select the location where your Excel files were stored.
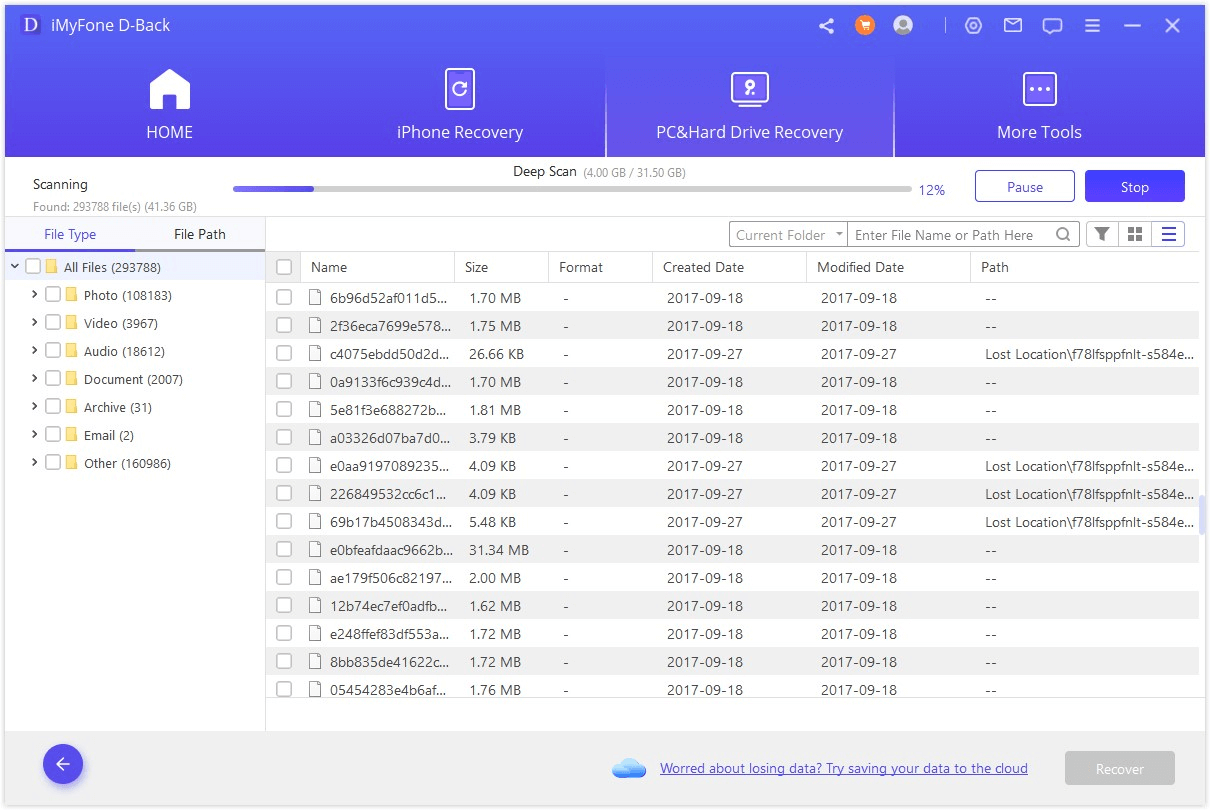
Step 3: Initiate a scan of the selected location. D-Back will perform both quick and deep scans to find recoverable files.
Step 4: Preview the found files and select the Excel documents you want to recover.
Step 5: Click “Recover” and choose a safe location to save your restored files.
The deep scan feature is particularly useful for finding temporary Excel files that might not be visible through normal methods. It thoroughly examines your storage device for any recoverable data, including temporary file excel backups that other methods might miss.
One of D-Back’s strengths is its ability to handle various data loss scenarios. Whether you’re dealing with accidentally deleted files, formatted drives, system crashes, or virus attacks, this software provides a reliable recovery solution.
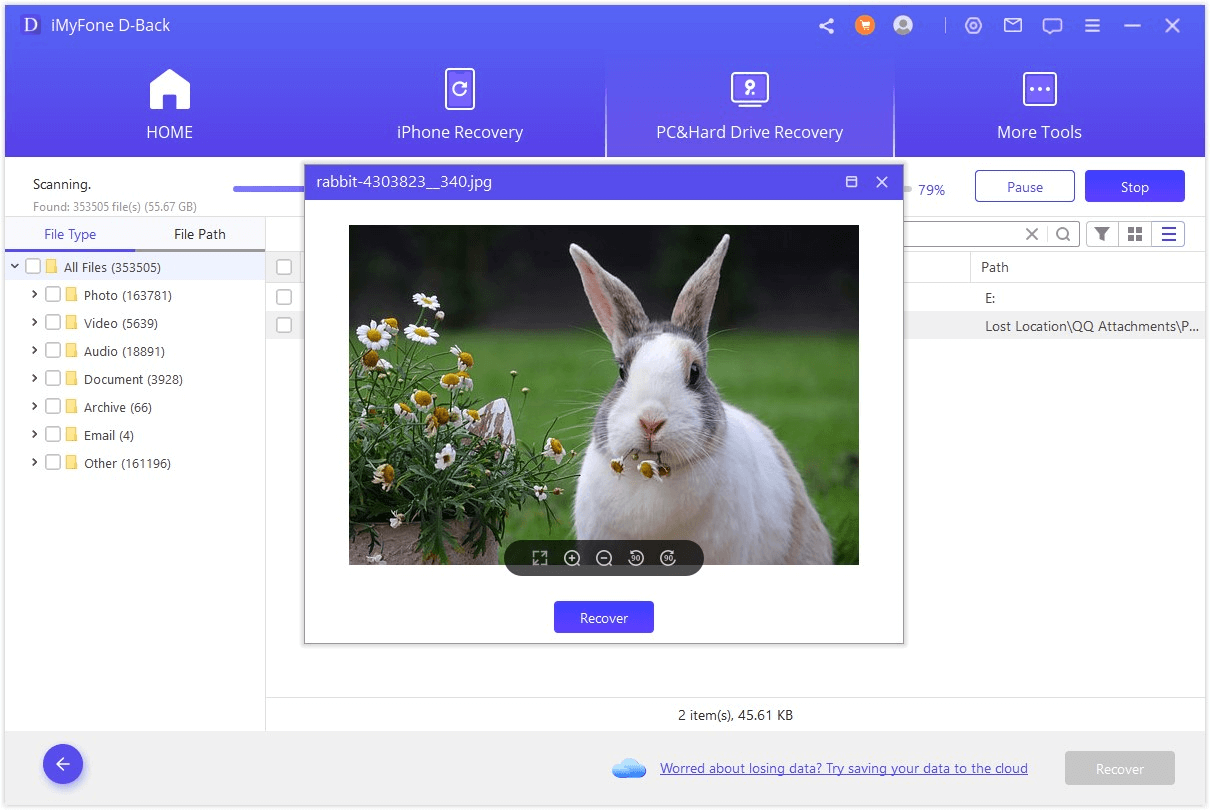
The preview functionality allows you to verify that you’re recovering the correct files before completing the process. This is especially helpful when dealing with temporary files that might have ambiguous names.
Preventing Future Excel Data Loss
While knowing how to recover lost files is important, preventing data loss in the first place is even better. Here are some proactive measures you can take to safeguard your Excel work:
Configure AutoSave and AutoRecover Settings
Excel’s built-in AutoSave and AutoRecover features are your first line of defense against data loss. To optimize these settings:
Step 1: Go to File > Options > Save in Excel.
Step 2: Ensure both “Save AutoRecover information every X minutes” and “Keep the last autosaved version if I close without saving” are checked.
Step 3: Set a reasonable AutoRecover interval – 5-10 minutes is typically sufficient without impacting performance.
Step 4: Note the AutoRecover file location so you know where to look if needed.
Develop Good Saving Habits
Simple habits can significantly reduce your risk of data loss:
- Save your work frequently using Ctrl+S (Windows) or Command+S (Mac)
- Use descriptive file names that help you identify different versions
- Create backup copies of important files in separate locations
- Save your work before performing complex operations or running macros
Utilize Cloud Storage with Version History
Cloud services like OneDrive, Google Drive, or Dropbox often include version history features that automatically save multiple versions of your files. These services typically:
- Automatically sync your files to the cloud
- Maintain version history for a specified period
- Allow you to restore previous versions with a few clicks
- Provide access to your files from multiple devices
Regular Backups
Establish a consistent backup routine for your important Excel files:
- Use external hard drives or network storage for local backups
- Leverage cloud services for off-site backups
- Consider automated backup software for hassle-free protection
- Test your backups periodically to ensure they’re working correctly
Advanced Recovery Scenarios
Sometimes, standard recovery methods aren’t enough for particularly challenging data loss situations. Here are some advanced scenarios and how to handle them:
Recovering Files from Corrupted Drives
When your storage device itself becomes corrupted or develops bad sectors, specialized tools like iMyFone D-Back become essential. These tools can often read data directly from the damaged sectors, bypassing the corrupted file system structures that prevent normal access.
Recovering Overwritten Files
If you’ve saved a new file with the same name as your lost work, the original data might seem gone forever. However, data recovery software can sometimes find remnants of the previous file, especially if the new file is smaller than the original.
Network and Shared Drive Recovery
When working with files stored on network drives or shared locations, recovery can be more complex. Temporary files might be stored locally rather than on the network, so check both locations. Additionally, network administrators might have backup systems in place that can restore previous versions.
Understanding Excel Temporary File Behavior
To effectively work with Excel’s temporary file system, it’s helpful to understand some key behaviors and characteristics:
Temporary File Naming Conventions
Excel temporary files follow specific naming patterns that help identify them:
- Files typically start with a tilde (~) followed by the original file name
- They may have a .tmp extension
- Sometimes they include additional characters to ensure unique names
- The names might be truncated if the original file name was long
When Temporary Files Are Created and Deleted
Excel manages its temporary files automatically:
- Temporary files are created when you first make changes to a workbook
- They’re updated periodically as you work (based on AutoRecover settings)
- They’re typically deleted when you properly save and close a file
- They may persist if Excel closes unexpectedly
File Size Considerations
Temporary files generally reflect the current state of your work:
- They start small and grow as you add data and formatting
- Complex spreadsheets with formulas, charts, and pivot tables create larger temporary files
- The size can give you clues about how much data might be recoverable
Troubleshooting Common Recovery Issues
Even with the right methods, you might encounter challenges when trying to recover Excel files. Here are solutions to some common problems:
“File Format Not Valid” Errors
If Excel can’t open a recovered temporary file, try these steps:
- Ensure you’re using the correct file extension (.xlsx, .xls, or .xlsm)
- Try opening the file in a text editor to check if it contains readable data
- Use Excel’s “Open and Repair” feature (File > Open > select file > click the arrow next to Open > Open and Repair)
- Try importing the data rather than opening the file directly
Missing Temporary Files
If you can’t find temporary files where they should be:
- Check if hidden files are visible in File Explorer/Finder
- Search your entire system for files with .tmp extension or ~ prefix
- Verify that AutoRecover is enabled in Excel options
- Check if antivirus software might be quarantining or deleting temporary files
Insufficient Permissions
Sometimes, permission issues prevent access to temporary files:
- Ensure you’re logged in with an administrator account
- Check folder permissions for the temporary file locations
- Try taking ownership of the folders if necessary
- Disable User Account Control temporarily if it’s interfering
Excel Version Considerations
Different versions of Excel may handle temporary files slightly differently:
Office 365 and Excel 2019/2021
- Enhanced AutoRecover features with cloud integration
- Automatic saving when signed in with Microsoft account
- Version history accessible through File > Info
- Improved recovery interface
Excel 2016 and 2013
- Solid AutoRecover functionality
- Manual recovery through File > Recent > Recover Unsaved Workbooks
- Similar temporary file locations to newer versions
Older Excel Versions (2010 and earlier)
- May use different temporary file locations
- Less sophisticated recovery features
- More reliance on manual temporary file recovery
Best Practices for Excel File Management
Beyond recovery, adopting good file management practices can minimize data loss risks:
Organizational Strategies
- Use clear, consistent naming conventions for your files
- Create a logical folder structure for different projects
- Implement a version numbering system for important documents
- Regularly archive old files to reduce clutter
Security Considerations
- Password-protect sensitive spreadsheets
- Use digital signatures for important financial documents
- Be cautious with macros from untrusted sources
- Regularly update Excel and your operating system for security patches
Performance Optimization
- Break extremely large spreadsheets into smaller, linked files
- Use Excel’s Data Model feature for complex data relationships
- Clean up unused cells and formatting to reduce file size
- Compress images within your spreadsheets when appropriate
When to Seek Professional Help
While the methods covered in this guide will resolve most Excel data loss situations, there are times when professional assistance might be necessary:
- Physical damage to storage devices
- Complex RAID array failures
- Critically important business data with no backups
- Legal or compliance requirements for data recovery
In these cases, specialized data recovery services with cleanroom facilities might be your only option. These services can be expensive but may be justified for irreplaceable data.
Conclusion
Losing unsaved Excel work can be frustrating, but as we