TOOL HUNTER

Ever wanted to save just the background music from your favorite movie scene, or extract a voiceover from a video you shot? Learning how to extract audio from video in iMovie is a super useful skill that opens up a world of creative possibilities. Whether you’re a content creator, a student working on a project, or just someone who wants to save audio from memorable videos, this guide will walk you through everything you need to know.
Apple’s iMovie makes the process surprisingly straightforward, and in this comprehensive tutorial, we’ll cover multiple methods to get audio from your video files. We’ll also explore some alternative tools in case you want options beyond iMovie. Let’s dive right in!
Table of Contents
- How to Extract Audio from Video in iMovie
- How to Extract Specific Audio Clips from Video in iMovie
- Alternative Methods: Extract Audio from Video on Mac Without iMovie
- Advanced iMovie Audio Editing Techniques
- Tips for Better Audio Extraction Results
- Common iMovie Audio Extraction Scenarios
- Troubleshooting Common iMovie Audio Issues
- Expanding Your Audio Editing Skills
- Conclusion
How to Extract Audio from Video in iMovie
If you’re wondering how to extract audio on iMovie, you’ll be happy to know it’s a pretty simple process. iMovie is Apple’s user-friendly video editing software that comes pre-installed on most Mac computers, and it handles audio extraction with just a few clicks.
Before we begin, remember that iMovie is exclusive to Apple devices, so you’ll need a Mac, iPhone, or iPad to follow these steps. The process we’re about to cover will show you exactly how to separate video and audio in iMovie for the entire length of your video file.
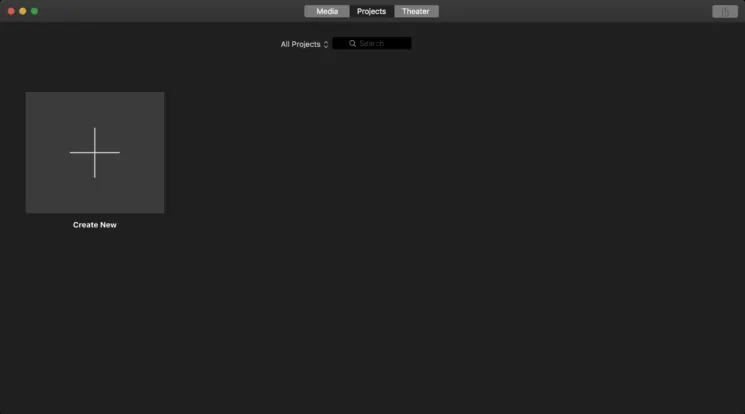
Step 1: Start by opening iMovie from your Applications folder or using Spotlight search. Once the program launches, click on the “Projects” tab and then select “Create New” to start a fresh project.
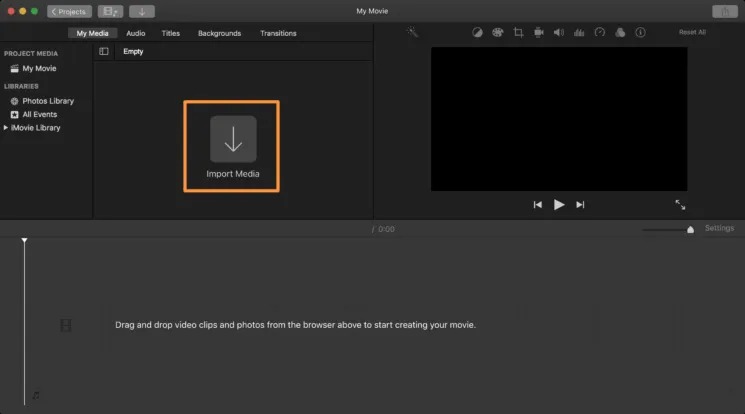
Step 2: Now click on the “Import Media” button, which will open a Finder window. Navigate to the video file you want to work with and select it. iMovie supports most common video formats, so your file should load without issues.
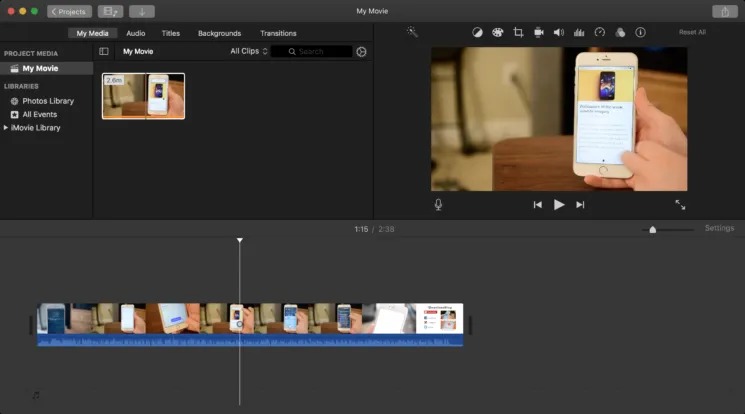
Step 3: After your video imports into iMovie, you’ll see it in your media library. Click and drag it down to the timeline at the bottom of the screen. This is where all your editing will happen.
Step 4: Look for the Share button in the top-right corner of the iMovie interface (it looks like a box with an arrow pointing up). Click it, and from the dropdown menu, select “File” as your export option.

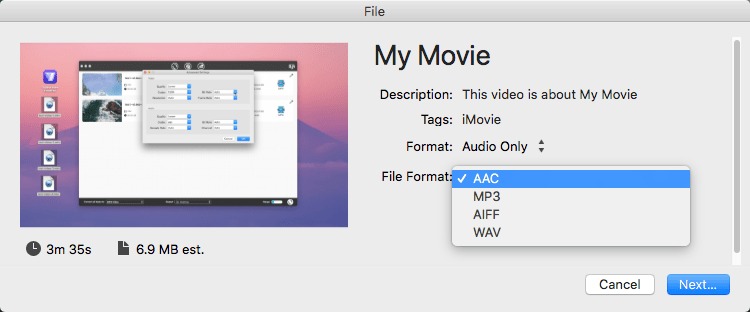
Step 5: This is the crucial step for audio extraction. A settings window will pop up. Where it says “Format,” change the option from “Video and Audio” to “Audio Only.” Then use the “File Format” dropdown to choose your preferred audio format—MP3 is usually a good choice for compatibility.
Step 6: Click “Next,” and iMovie will ask where you want to save your new audio file. Choose a location you’ll remember, and let iMovie work its magic. The conversion usually takes just a few moments depending on the size of your original video.
Step 7: Once the process completes, navigate to your chosen save location, and there you’ll find your extracted audio file, ready to use however you like!
When you’re learning how to extract audio from video in iMovie, it’s worth noting that the quality of your output will depend on the original video’s audio quality. For best results, use high-quality source material.
Filme – Best Video Editor for Beginners.Explore Your Creativity, Limitless

How to Extract Specific Audio Clips from Video in iMovie
Sometimes you don’t need the entire audio track from a video—maybe you just want to save a particular segment, like a great line of dialogue or a specific part of a song. This is where learning how to separate audio from video iMovie for specific portions becomes really valuable.
The process is similar to extracting the full audio, but with an extra step where you isolate just the part you want. Here’s how to extract audio on iMovie for just a selected portion of your video:
Step 1: Open iMovie and create a new project just like we did in the previous section. Click “Create New” to get started.
Step 2: Import your video file by clicking “Import Media” and selecting the file you want to work with from your computer.

Step 3: Drag the video from your media library down to the timeline so you can begin working with it.
Step 4: Now for the clipping part. Move the vertical playhead line to the point where you want your audio clip to begin. Right-click on the video in the timeline and select “Split Clip.” Then move the playhead to where you want the clip to end and split again. You’ve now isolated the section you want.
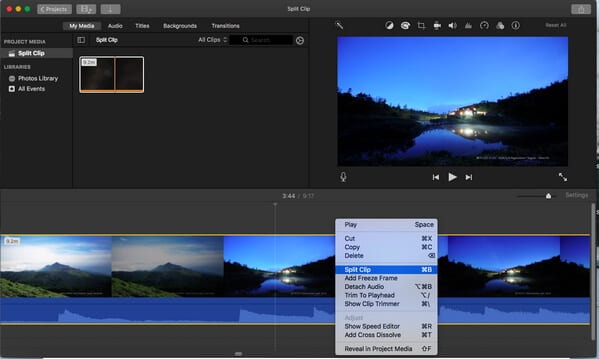
Step 5: Click on the portions of the video before and after your selected clip and press Delete to remove them. Now only your desired segment remains in the timeline.
Step 6: Just like before, click the Share button and select “File.” In the export settings, choose “Audio Only” format and select your preferred audio file type.
Step 7: Choose where to save your file and let iMovie export it. In just a few moments, you’ll have your custom audio clip ready to use.
This method of how to separate video and audio in iMovie for specific portions is perfect for creating sound bites, saving favorite music segments, or extracting particular dialogue sections. The split clip function gives you precise control over exactly what audio you extract.
Alternative Methods: Extract Audio from Video on Mac Without iMovie
While iMovie is a great tool for basic audio extraction, it’s not your only option. Sometimes you might want more advanced features, or perhaps you don’t have iMovie installed. Whatever your reason, here are a couple of solid alternatives for how to extract audio from video in iMovie alternatives.
Using iMyFone Filme for Audio Extraction
If you find yourself needing more robust editing capabilities or a more intuitive interface, iMyFone Filme is an excellent choice. It’s designed to be user-friendly for beginners while still offering professional-level features. When you’re considering how to separate audio from video iMovie alternatives, Filme stands out as a powerful option.

What makes Filme particularly appealing is its straightforward approach to tasks like audio extraction. Here’s how to use it:
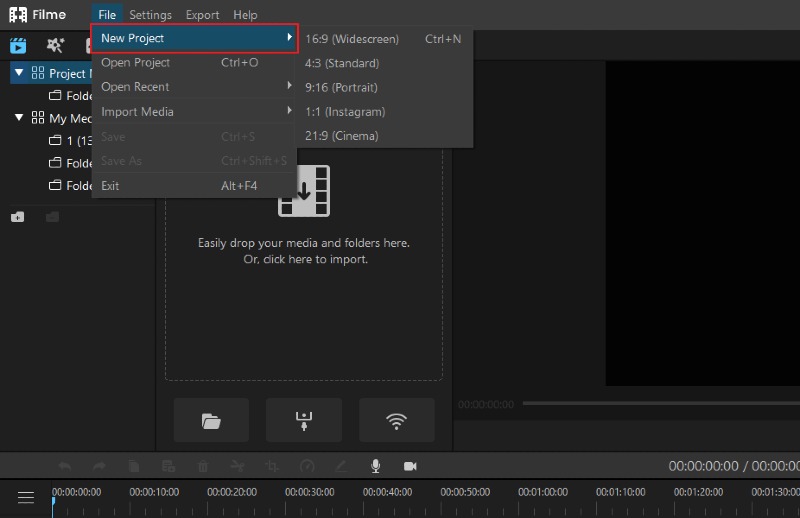
Step 1: After installing Filme, launch the program and create a new project. You’ll be prompted to choose an aspect ratio—select whichever matches your original video or your intended use for the audio.
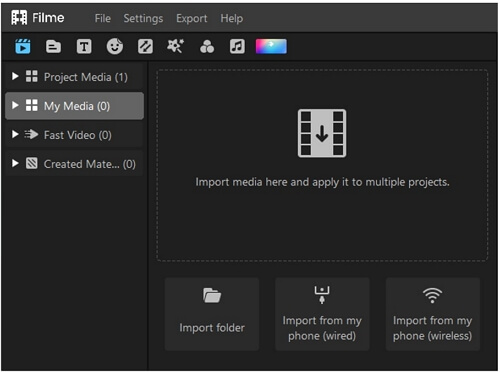
Step 2: Click on the Media section to import your video file. Navigate to where your video is stored and select it for import.
Step 3: Once your video appears in the media library, drag it down to the timeline. Filme’s interface makes it easy to preview and trim your video if needed.
Step 4: Click the Export button, and a window with various output options will appear. Select MP3 from the Music section (or choose another audio format if you prefer). You can adjust quality settings here based on your needs.
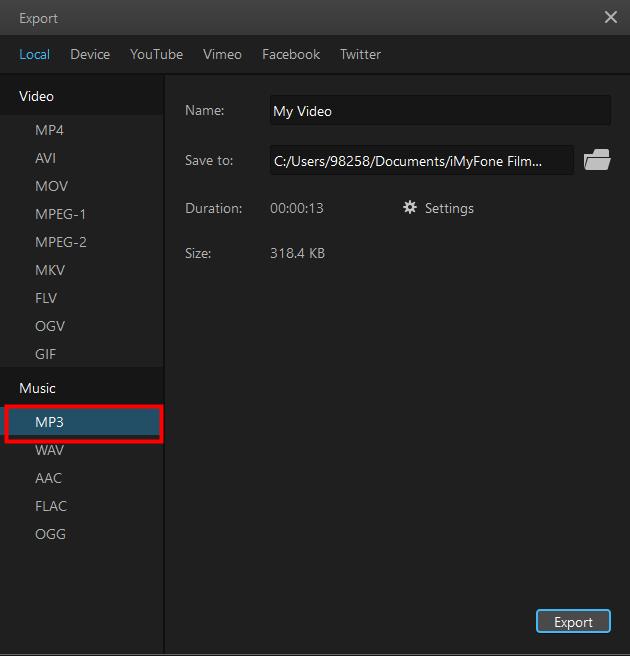
Step 5: Choose your save location and click Export. Filme will quickly process your file and save just the audio track.
The advantage of using Filme for learning how to extract audio on iMovie alternatives is the additional control you get over the output quality and format, plus the ability to perform more sophisticated edits if needed.
Filme – Best Video Editor for Beginners.Explore Your Creativity, Limitless
Using QuickTime Player for Simple Audio Extraction
If you’re looking for the absolute simplest method and don’t need any editing capabilities, QuickTime Player might be all you need. It comes pre-installed on every Mac, so there’s nothing extra to download. When you want to know how to separate video and audio in iMovie alternatives with minimal steps, QuickTime is worth considering.
The process for how to extract audio from video in iMovie alternatives using QuickTime is incredibly straightforward:
Step 1: Locate and open QuickTime Player from your Applications folder.
Step 2: Go to File > Open and select the video file you want to extract audio from.
Step 3: Once the video opens, go back to the File menu, but this time select “Export As” and then choose “Audio Only.”
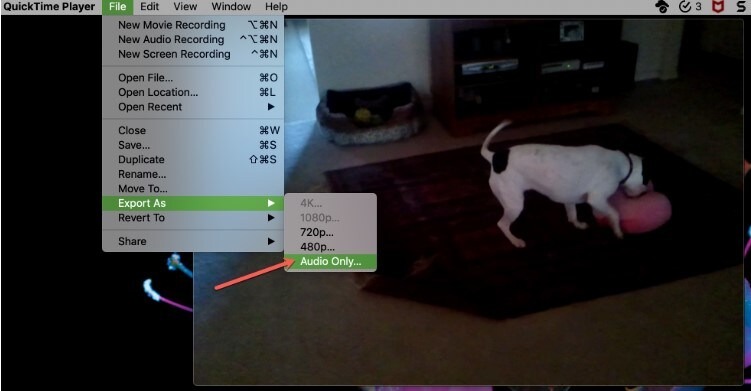
Step 4: Name your file, choose where to save it, and click Save. That’s it!
QuickTime doesn’t offer the editing capabilities of iMovie or Filme, but for a quick and dirty audio extraction when you need the entire track, it’s hard to beat for simplicity. This method of how to separate audio from video iMovie alternatives is perfect when you’re in a hurry.
Advanced iMovie Audio Editing Techniques
Once you’ve mastered the basics of how to extract audio on iMovie, you might want to explore some of the program’s other audio capabilities. iMovie offers several tools for manipulating and working with audio that can enhance your projects.
How to Remove Audio from Video in iMovie
Sometimes instead of extracting audio, you might want to remove it entirely—perhaps to replace it with different music or voiceover. The process for how to separate video and audio in iMovie for removal is straightforward:
Step 1: Import your video into iMovie and add it to the timeline as usual.
Step 2: Right-click on the video clip in the timeline and select “Detach Audio” from the context menu.
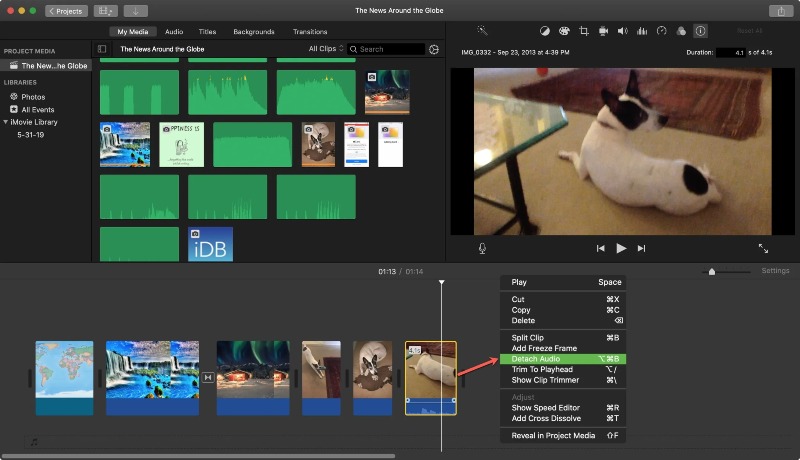
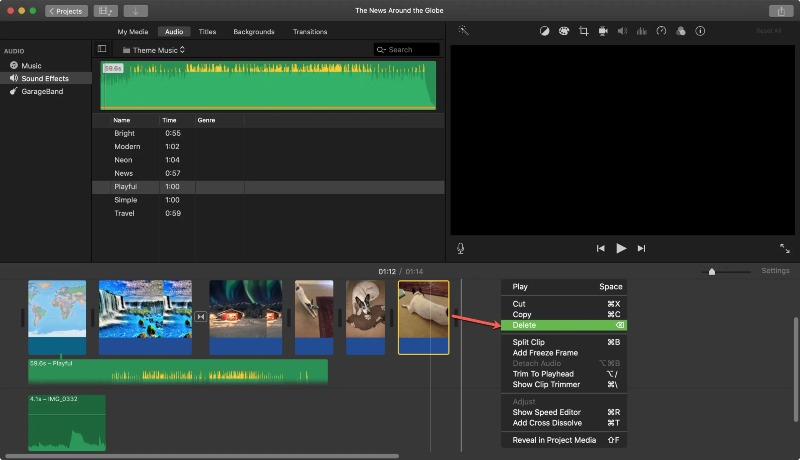
Step 3: The audio will separate from the video and appear as a green bar in the timeline below your video clip. You can now click on this audio track and delete it if you want complete silence, or you can move it around, adjust its volume, or replace it with other audio.
Step 4: If you do want to remove it completely, simply select the green audio track and press the Delete key.
Knowing how to extract audio from video in iMovie by detaching it first gives you flexibility—you can choose to keep, modify, or remove the audio entirely based on your project needs.
How to Export Audio from iMovie to GarageBand
If you want to do more sophisticated audio work, you might consider moving your extracted audio to GarageBand, Apple’s music creation studio. Understanding how to separate audio from video iMovie to GarageBand workflow opens up professional-level audio editing possibilities.
Here’s the process for how to extract audio on iMovie and move it to GarageBand:
Step 1: First, extract your audio from iMovie using the methods we covered earlier, but instead of saving it as a file, go to the Share menu and select “Export Movie.”
Step 2: Choose your export settings—Medium quality usually works well for this purpose.
Step 3: In the “Where” dropdown menu, select GarageBand as your destination and click Export.
Step 4: Open GarageBand and make sure the Media Browser is showing (View > Show Media Browser if it’s not visible).
Step 5: Your exported file should appear in the Media Browser. Simply drag it from there into your GarageBand timeline to begin working with it.
This method of how to separate video and audio in iMovie for use in GarageBand preserves quality while moving your audio to a more powerful editing environment.
Tips for Better Audio Extraction Results
No matter which method you use for how to extract audio from video in iMovie or alternative programs, these tips will help you get the best possible results:
Start with high-quality source material: The better the original audio in your video, the better your extracted audio will sound. If possible, use videos with clear, high-bitrate audio.
Consider your output format: MP3 is great for general use due to its small file size and compatibility, but if you need highest quality, consider WAV or AIFF formats, though they will result in larger files.
Use good headphones: When evaluating your extracted audio, use quality headphones to accurately hear the results. This is especially important if you plan to use the audio in professional projects.
Clean up background noise: If your extracted audio has background noise, consider using audio cleaning software or features in programs like GarageBand to reduce it.
Normalize audio levels: If you’re extracting multiple audio clips, you might need to normalize their volume levels so they’re consistent when played together.
Common iMovie Audio Extraction Scenarios
Understanding how to separate audio from video iMovie techniques can be useful in many different situations. Here are some common scenarios where these skills come in handy:
Content creation: YouTubers and social media creators often need to extract audio for use in other videos or as standalone content.
Education: Teachers and students might extract audio from educational videos to create study materials or presentations.
Music sampling: Musicians and producers sometimes extract short audio clips from videos to use as samples in their compositions.
Podcasting: Podcasters might extract interview audio from video recordings to create audio-only versions of their content.
Personal archives: Anyone might want to save audio from family videos, memorable speeches, or other significant recordings.
Troubleshooting Common iMovie Audio Issues
Sometimes things don’t go perfectly when you’re learning how to extract audio on iMovie. Here are solutions to some common problems:
No audio after export: If your exported file has no sound, double-check that you selected “Audio Only” in the export settings and not “Video and Audio” with the volume muted.
Poor audio quality: If the extracted audio sounds worse than the original video audio, try exporting in a different format or higher quality setting.
Sync issues: If you’re realigning extracted audio with video and having sync problems, try using the audio waveform display in iMovie to match things up precisely.
Unsupported format: If iMovie won’t import your video file, you may need to convert it to a compatible format first using a tool like HandBrake or Filme.
Missing export options: If you don’t see the “Audio Only” export option, make sure you’re using a recent version of iMovie, as this feature wasn’t available in very old versions.
Expanding Your Audio Editing Skills
Once you’ve mastered how to extract audio from video in iMovie, you might want to explore other audio editing techniques. iMovie offers several basic audio editing tools that can enhance your extracted audio:
Volume adjustment: You can increase or decrease the volume of any audio clip in iMovie’s timeline.
Fade in/out: Create smooth audio transitions by adding fades at the beginning and end of your clips.
Audio effects: iMovie includes several audio effects that can change the character of your extracted audio.
Ducking: This feature automatically lowers background music when dialogue is present, which is great if you’re combining extracted voice audio with music.
Equalization: iMovie offers several EQ presets that can improve the sound of your audio extracts.
Conclusion
Learning how to extract audio from video in iMovie is a valuable skill that serves countless purposes, from professional content creation to personal projects. As we’ve seen, iMovie provides a straightforward method for both full-length extractions and specific clip isolation.
The process of how to separate audio from video iMovie style is accessible to users of all skill levels, with its intuitive interface guiding you through each step. Whether you choose to use iMovie, QuickTime for simplicity, or Filme for more advanced capabilities, you now have the knowledge to extract audio from any video file on your Mac.
Remember that each tool has its strengths—iMovie offers a good balance of simplicity and features, QuickTime is great for quick extractions, and Filme provides more professional controls and output options. The method you choose will depend on your specific needs and how much editing control you require.
With the techniques covered in this guide, you’re well-equipped to tackle any audio extraction project that comes your way. So go ahead—rescue that amazing soundtrack from your favorite video, save important dialogue, or create audio samples for your next creative project. The world of audio possibilities is now at your fingertips!
Filme – Best Video Editor for Beginners.Explore Your Creativity, Limitless
Check More Details | [Download Now!](https://imyfone