TOOL HUNTER

Ever had your iPhone freeze up on you? Maybe it’s stuck on that Apple logo and just won’t move forward, or perhaps the screen has gone completely black. These kinds of software glitches can be incredibly frustrating, especially when you need your phone for important tasks. When standard troubleshooting methods don’t work, you might need to explore more advanced solutions like Recovery Mode or DFU mode.
These special modes can help you restore your device when normal methods fail. Whether you’re dealing with a simple software hiccup or a more serious system failure, understanding how to use these modes can save you a trip to the Apple Store. Let’s dive into everything you need to know about these powerful troubleshooting tools.
One-Click Solution for Recovery Mode
Before we get into the manual methods, there’s actually a much simpler way to handle recovery mode situations. iMyFone Fixppo offers a straightforward solution that lets you enter or exit recovery mode with just one click. No complicated button combinations to remember, no timing to worry about – just connect your device and let the software do the work.
This tool is particularly helpful if you’re not comfortable with the technical steps or if you’ve tried the manual methods without success. It’s designed to make the process accessible to everyone, regardless of their technical expertise. Beyond just recovery mode management, Fixppo can also repair various iOS system issues without risking your data.
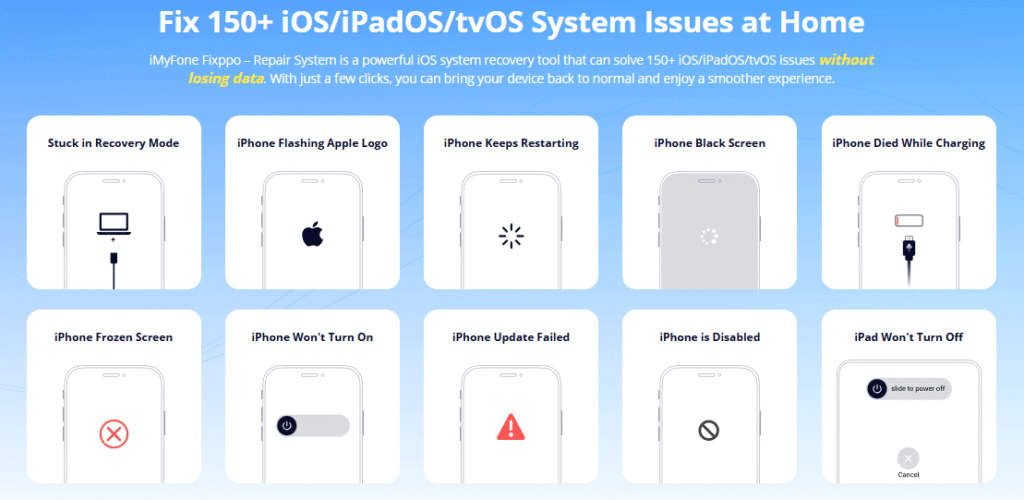
iMyFone Fixppo.Downgrade iOS 26 to 18 or upgrade to iOS 26, no jailbreak.Repair 150+ iOS/iPadOS/tvOS system issues like stuck on Apple logo, boot loop, black screen without losing data.Free enter/exit Recovery Mode on iPhone and iPad with one-click.Factory reset iPhone/iPad/Apple TV without passcode/iTunes/Finder.Back up and restore iPhone data without iTunes/iCloud.Fix various iOS bugs at home for you to smoothly use your device.Support all iOS versions and devices including iOS 26/18 and iPhone 17.Fixppo only performs system repair with the user’s permission.
Check More Details | Download Now! | Check All Deals
Understanding iPhone Recovery Mode
What Exactly is Recovery Mode?
Recovery Mode is like an emergency entrance to your iPhone’s software system. When normal startup processes aren’t working correctly, this mode allows you to bypass the usual boot sequence and connect directly to iTunes or Finder on your computer. Think of it as a safety net that catches your device when the regular software loading process fails.
This mode is specifically designed for situations where your iPhone’s operating system has become corrupted or damaged. It creates a direct communication channel between your device and your computer, allowing you to reinstall iOS or restore from a backup. The process essentially gives your phone a fresh start when it can’t start up normally on its own.

When Should You Use Recovery Mode?
You don’t need to jump into recovery mode for every little iPhone issue. In fact, for most common problems, simpler solutions like force restarting usually do the trick. However, there are specific scenarios where recovery mode becomes necessary.
If your iPhone gets stuck during an iOS update, that’s a classic case for recovery mode. Similarly, if you’re trying to restore from a backup and the process gets interrupted, recovery mode can help you complete the restoration. Devices that are stuck on the Apple logo, showing a black screen, or trapped in a continuous restart loop are also prime candidates for recovery mode intervention.
One crucial thing to remember: using recovery mode to restore your iPhone will erase all your data and settings. Your phone will return to its original factory state. That’s why it’s so important to maintain regular backups – either through iCloud or iTunes – so you can restore your information after the recovery process is complete.
How to Enter Recovery Mode on Different iPhone Models
The process for entering recovery mode varies depending on which iPhone model you have. The button combinations changed significantly with the removal of the home button, so it’s important to follow the right steps for your specific device.
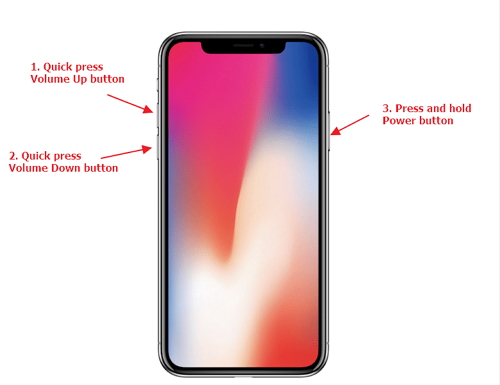
For iPhone 8 and later models, including the newest iPhone 14, iPhone 15, and iPhone 16, the process involves a specific sequence. First, connect your device to a computer using a USB cable. Quickly press and release the volume up button, then quickly press and release the volume down button. Finally, press and hold the side button until you see the recovery mode screen appear. Don’t let go when you see the Apple logo – wait for the computer connection symbol.
If you have an iPhone 7 or iPhone 7 Plus, the process is slightly different. Connect your device to the computer, then press and hold both the volume down button and the side button simultaneously. Keep holding both buttons until the recovery mode screen appears, ignoring the Apple logo if it shows up.
For older devices with home buttons – iPhone 6s and earlier models – you’ll need to press and hold both the home button and the side button together while the device is connected to the computer. Continue holding until you see the recovery mode prompt on the screen.
Exiting Recovery Mode Safely
Getting out of recovery mode is usually much simpler than entering it. In most cases, you can exit recovery mode by performing a force restart on your device. This process also varies by model, so make sure you’re using the correct method for your iPhone.
For iPhone 8 and newer models, quickly press and release the volume up button, then quickly press and release the volume down button. Finally, press and hold the side button until the Apple logo appears and the device restarts normally.
iPhone 7 and iPhone 7 Plus users should press and hold both the side button and volume down button together until the Apple logo appears on the screen. For iPhone 6s and earlier models, press and hold both the home button and side button simultaneously until you see the Apple logo.
Deep Dive into DFU Mode
What is DFU Mode and How Does It Differ?
DFU mode stands for Device Firmware Update mode, and it’s a more intensive restoration option compared to recovery mode. While recovery mode deals with the iOS software, DFU mode goes deeper – it allows direct communication with the device’s firmware, which is the fundamental software that controls the hardware itself.
The main difference between DFU mode and recovery mode lies in their scope and intensity. Recovery mode reloads the current iOS version, while DFU mode lets you completely rewrite the firmware. This makes DFU mode particularly useful for more serious software issues that recovery mode can’t fix. When you’re in DFU mode, your iPhone screen remains completely black, which can be confusing if you’re not expecting it.

When Would You Need DFU Mode?
Most iPhone users will never need to use DFU mode. Recovery mode handles the majority of software issues quite effectively. However, there are specific situations where DFU mode becomes necessary.
One common use for DFU mode is jailbreaking or removing jailbreaks from devices. Since jailbreaking modifies the core system software, sometimes DFU mode is required to completely restore the original firmware. Another scenario involves downgrading iOS versions. If you’ve updated to a new iOS version and discovered compatibility issues or performance problems, DFU mode might allow you to revert to an earlier, more stable version.
DFU mode also comes in handy when recovery mode simply isn’t enough to fix the problem. If you’ve tried recovery mode restoration multiple times without success, DFU mode might be your last resort before seeking professional repair services. However, it’s important to understand that using DFU mode for unauthorized modifications like downgrading to unsigned iOS versions could potentially void your warranty.
Entering DFU Mode Step by Step
Entering DFU mode requires precise timing and button sequences. It’s more complicated than entering recovery mode, so pay close attention to the steps for your specific device model.
For iPhone 8 and later models, including iPhone 14 and iPhone 15, start by connecting your device to a computer. Quickly press and release the volume up button, then quickly press and release the volume down button. Now press and hold the side button for about 10 seconds until the screen goes black. Once the screen is black, immediately press and hold the volume down button while continuing to hold the side button for 5 more seconds. After 5 seconds, release the side button but keep holding the volume down button for another 5 seconds.
iPhone 7 and iPhone 7 Plus users need to press and hold both the side button and volume down button together for exactly 8 seconds. After 8 seconds, release the side button but continue holding the volume down button for about 5 seconds. If done correctly, the screen should remain black, indicating you’ve successfully entered DFU mode.
For iPhone 6s and earlier models, press and hold both the home button and side button simultaneously for 10 seconds. After 10 seconds, release the side button but continue holding the home button for another 5 seconds. The device screen should stay black if you’ve successfully entered DFU mode.

Recognizing Successful DFU Mode Entry
Knowing whether you’ve successfully entered DFU mode can be tricky since the screen remains completely black. Unlike recovery mode, there’s no on-screen indication that you’re in DFU mode. The best way to confirm is through your computer.
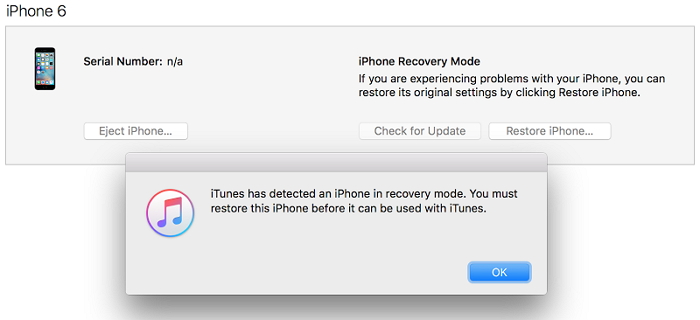
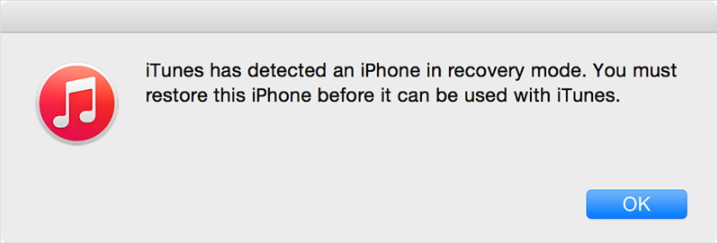
When your iPhone successfully enters DFU mode, iTunes or Finder on your computer should detect it and display a message indicating that a device in recovery mode has been found. You’ll see a prompt asking if you want to restore or update the device. If you see this message, you’ve successfully entered DFU mode. If not, you may need to try the button sequence again, paying close attention to the timing.
Exiting DFU Mode
Exiting DFU mode follows the same process as exiting recovery mode – you simply force restart your device. The method varies by model, so refer to the force restart instructions mentioned earlier in the recovery mode section.
For iPhone 8 and newer models, quickly press volume up, then volume down, then hold the side button until the Apple logo appears. iPhone 7 users should hold both the side button and volume down button together until restarting. Older models with home buttons need both the home button and side button pressed simultaneously until the device restarts.
Troubleshooting Common Issues
When Recovery Mode or DFU Mode Doesn’t Work
Sometimes, despite following all the steps correctly, you might struggle to enter either recovery mode or DFU mode. This can happen for various reasons. First, check your cables and computer connection. A faulty USB cable or port can prevent proper communication between your device and computer.
If the standard methods aren’t working, try using a different computer or USB port. Sometimes security software or firewall settings can interfere with the connection. Also, make sure you’re using the latest version of iTunes or macOS if you’re using Finder.
Timing is crucial when entering these modes, especially DFU mode. If you’re having trouble, try counting the seconds out loud to ensure you’re holding buttons for the correct duration. It might take several attempts to get the timing just right.
Data Protection and Backup Strategies
Before attempting any kind of system restoration, it’s crucial to understand the data implications. Both recovery mode and DFU mode restoration processes will erase all data on your device. That’s why maintaining regular backups is so important.
iCloud provides automatic backup when your device is connected to WiFi and power, but you can also manually trigger a backup in Settings. iTunes or Finder backups on your computer give you another layer of protection. Having multiple recent backups ensures you can restore your data even if one backup becomes corrupted.
If you find yourself needing to use recovery mode or DFU mode but don’t have a recent backup, all hope isn’t lost. You might want to try using data recovery software before proceeding with the restoration, though success isn’t guaranteed. This is why preventive backup habits are so valuable.
Advanced Scenarios and Considerations
Dealing with Water Damage or Physical Issues
If your iPhone has suffered water damage or physical impact, the standard software recovery methods might not work. In these cases, the issue could be hardware-related rather than software-based. Before attempting recovery mode or DFU mode, make sure your device is completely dry and has no visible physical damage.
Water damage can cause short circuits that prevent normal operation, including entering special modes. If you suspect hardware damage, it’s best to consult with a professional repair service rather than attempting software solutions that won’t address the root problem.
Understanding iTunes Errors During Restoration
During the restoration process in either recovery mode or DFU mode, you might encounter various error messages in iTunes. These errors typically have specific numerical codes that can help identify the underlying issue.
Common errors include connection problems, software conflicts, or hardware issues. If you receive an error during restoration, note the error code and search Apple’s support documentation for specific troubleshooting steps for that particular error. Sometimes, simply trying a different computer or USB cable can resolve these issues.
When to Seek Professional Help
While recovery mode and DFU mode are powerful tools for software issues, they’re not magic solutions for every iPhone problem. If you’ve tried multiple restoration attempts without success, or if you’re uncomfortable performing these advanced procedures, it might be time to visit an Apple Store or authorized service provider.
Professional technicians have access to diagnostic tools and resources that aren’t available to consumers. They can determine whether your issue is truly software-related or if there’s a hardware component that needs addressing. Remember, attempting complex procedures on a device that’s still under warranty might void that warranty if not done correctly.
Preventive Measures and Best Practices
Avoiding the Need for Recovery Modes
The best way to deal with recovery mode and DFU mode situations is to avoid needing them in the first place. Regular software maintenance can prevent many common issues that lead to these extreme measures.
Always keep your iOS version updated, as updates often include bug fixes and stability improvements. Be cautious when installing beta versions of iOS, as these can be less stable than public releases. When updating iOS, ensure you have sufficient battery life and a stable internet connection to prevent update interruptions.
Managing your device storage effectively can also prevent many software issues. When your storage becomes critically full, it can cause system instability and unexpected behavior. Regularly review and remove unnecessary files, photos, and apps to maintain healthy storage levels.
Creating a Troubleshooting Routine
When you encounter iPhone issues, having a systematic troubleshooting approach can save time and frustration. Start with simple solutions like force restarting before moving to more advanced options like recovery mode. Only use DFU mode as a last resort when other methods have failed.
Document what you’ve tried and any error messages you’ve encountered. This information can be valuable if you need to seek professional help later. Remember that most software issues can be resolved without data loss if caught early and handled properly.
iMyFone Fixppo.Downgrade iOS 26 to 18 or upgrade to iOS 26, no jailbreak.Repair 150+ iOS/iPadOS/tvOS system issues like stuck on Apple logo, boot loop, black screen without losing data.Free enter/exit Recovery Mode on iPhone and iPad with one-click.Factory reset iPhone/iPad/Apple TV without passcode/iTunes/Finder.Back up and restore iPhone data without iTunes/iCloud.Fix various iOS bugs at home for you to smoothly use your device.Support all iOS versions and devices including iOS 26/18 and iPhone 17.Fixppo only performs system repair with the user’s permission.
Check More Details | Download Now! | Check All Deals
Understanding recovery mode and DFU mode gives you powerful tools for dealing with serious iPhone software issues. While these procedures might seem intimidating at first, following the proper steps for your specific device model can help you resolve problems that would otherwise require professional repair.
Remember that prevention is always better than cure. Regular backups and careful software maintenance can help you avoid most situations that require these advanced recovery methods. But when problems do occur, having this knowledge empowers you to take control of the situation and potentially save both time and money.
Whether you choose to use the manual methods described or opt for the simplicity of one-click solutions like iMyFone Fixppo, the important thing is that you have options when your iPhone runs into trouble. With practice and careful attention to the specific steps for your device, you can confidently handle most software recovery scenarios.
Some images in this article are sourced from iMyFone.