TOOL HUNTER

Ever taken a photo on your iPhone and thought it could look even better? You’re not alone! With just a few taps, you can transform your pictures from simple snapshots into eye-catching images. The best part is you don’t need to be a professional photographer to make your photos stand out. Your iPhone already has some great built-in tools, and there are amazing apps like CapCut that can take your editing to the next level.
In this guide, I’ll walk you through everything you need to know about how to edit photos on iPhone. We’ll explore both the basic tools that come with your phone and the more advanced features you can get with third-party apps. Whether you’re looking to make quick fixes or create stunning visual content, you’ll find plenty of helpful tips here. Let’s dive in and discover how to make your iPhone photos look absolutely fantastic!
Getting started with iPhone photo editing
Before we get into the specific tools, let’s talk about why learning how to edit pictures on iPhone is such a valuable skill. We all take photos constantly – of our friends, our food, beautiful scenery, and special moments. But sometimes these pictures don’t quite capture what we saw with our own eyes. Maybe the lighting wasn’t perfect, or the angle was slightly off. That’s where editing comes in!
Editing allows you to correct these issues and even add creative touches that make your photos unique. The good news is that you don’t need expensive software or complicated techniques. With just your iPhone and a few minutes, you can dramatically improve your photos. Let’s start with the tools you already have on your device.
How to edit photos using your iPhone’s built-in Photos app
Your iPhone comes with a surprisingly powerful photo editor right in the Photos app. It’s perfect for quick edits and basic adjustments. The interface is clean and simple, making it great for beginners who are just learning how to edit photos on iPhone.
Using filters to enhance your images
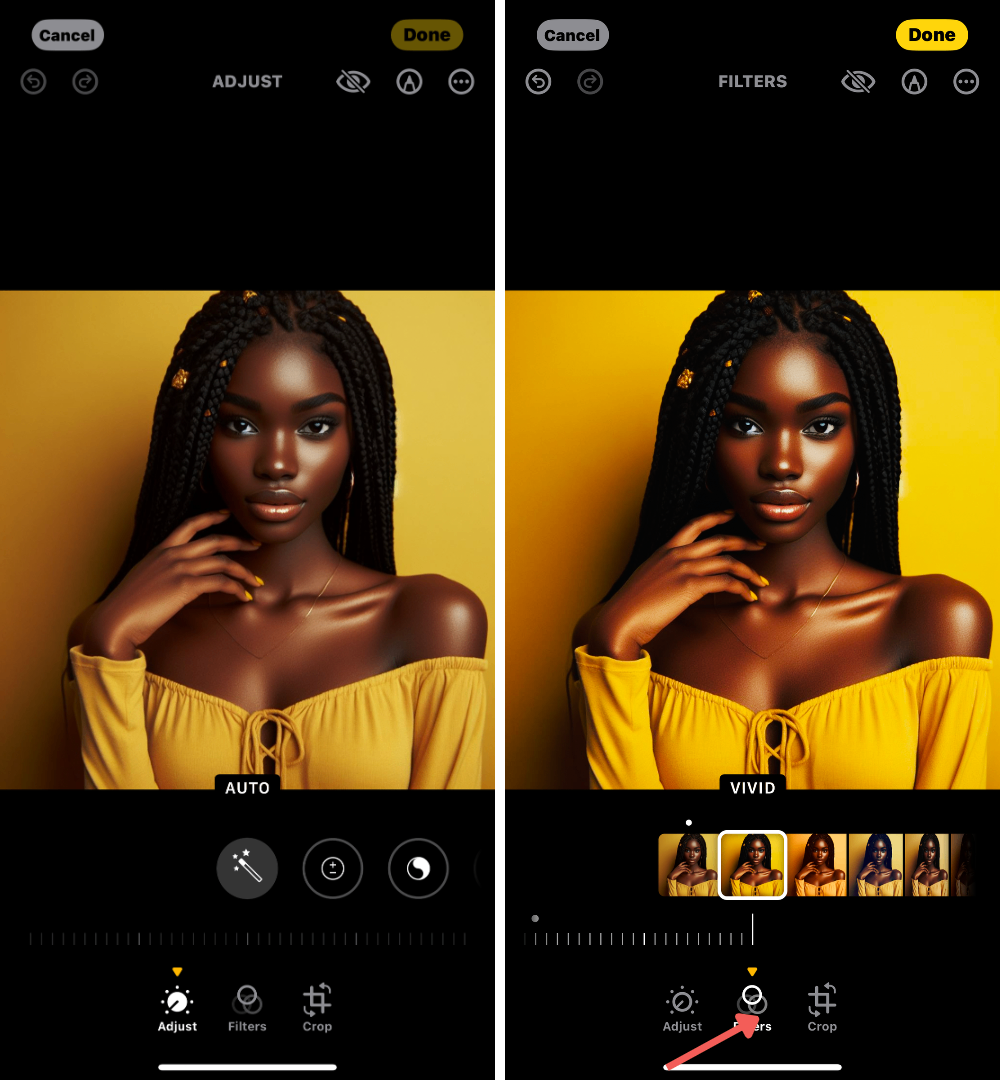
Filters are probably the easiest way to change the look and feel of your photos. They’re like instant mood-setters! The Photos app includes several preset filters with names like “Vivid,” “Dramatic,” and “Silver Tone.” Each one gives your photo a different character.
To apply a filter, just open your photo in the Photos app and tap “Edit” in the top right corner. You’ll see a row of icons at the bottom – tap the one that looks like three overlapping circles (that’s the filter icon). Now you can swipe through the different options and see how they change your image. If a filter feels too strong, you can adjust its intensity with the slider that appears. When you’re happy with how it looks, tap “Done” to save your changes.
Filters are great for creating consistency across your photos too. If you’re posting multiple pictures from an event, using the same filter can give them a cohesive look. Don’t be afraid to experiment with different filters to see which one best suits each photo!
Straightening, rotating and flipping your photos
We’ve all taken photos that ended up slightly crooked or oriented the wrong way. Maybe you were trying to capture a beautiful horizon but the angle was off, or perhaps you took a portrait that would look better flipped. These are common issues, and the Photos app makes fixing them incredibly simple.
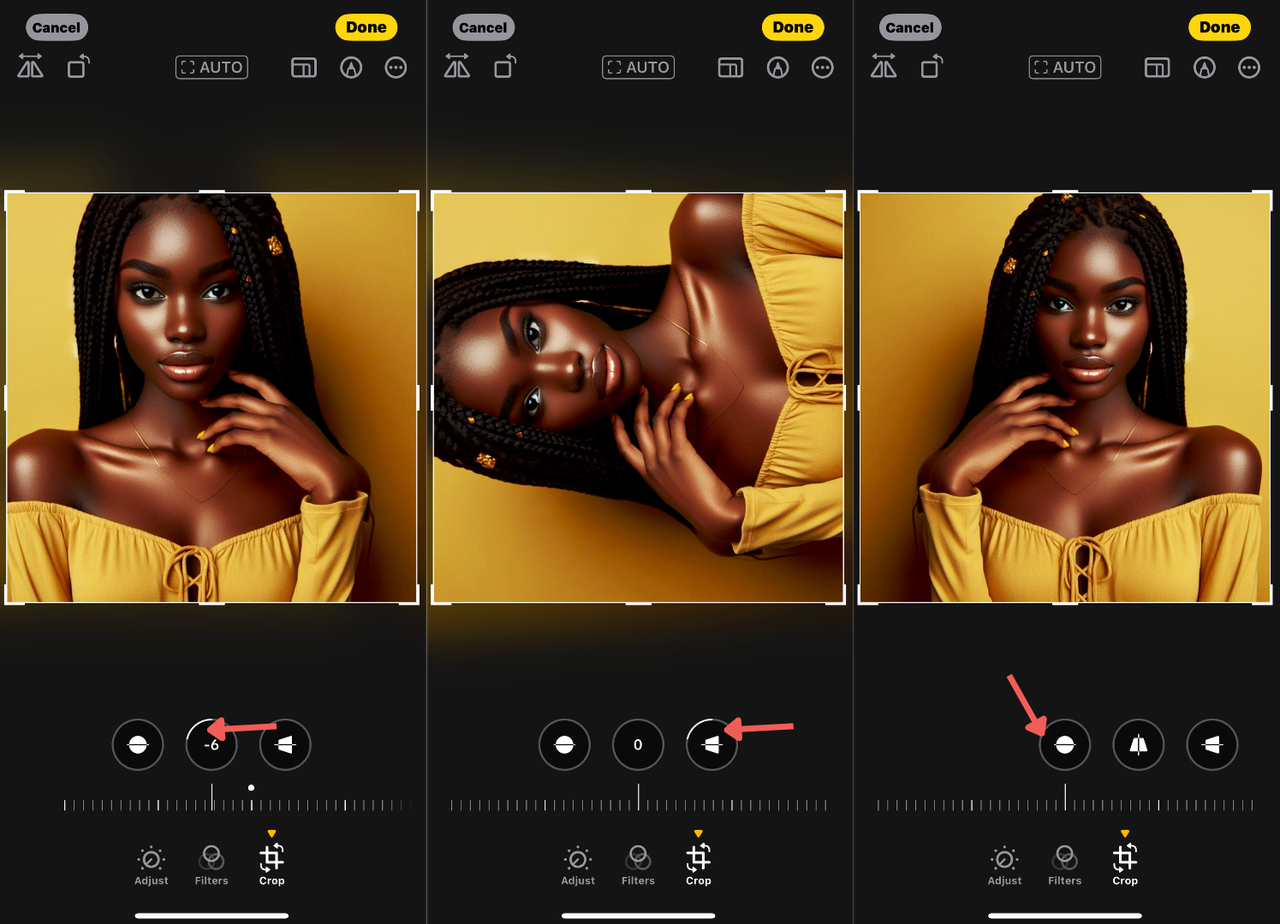
To straighten a photo, tap “Edit” and then select the crop icon (it looks like a square with arrows). You’ll see options for straightening the image vertically or horizontally. There’s a slider that lets you make precise adjustments, or you can tap “Auto” to let your iPhone handle it for you. The grid lines that appear can help you align everything perfectly.
If your photo needs rotating, the process is even easier. Just tap the rotate icon (a curved arrow) and each tap will turn your image 90 degrees. This is perfect for those times when you took a photo with your phone sideways and it saved incorrectly.
Flipping an image can be useful for composition reasons or sometimes just for fun. Tap the flip icon (two arrows pointing away from each other) to create a mirror image of your photo. This can completely change the dynamics of a picture!
Remember to always tap “Done” after making these adjustments to save your changes. Now you’ve mastered some basic techniques for how to edit pics on iPhone!
Working with Live Photos
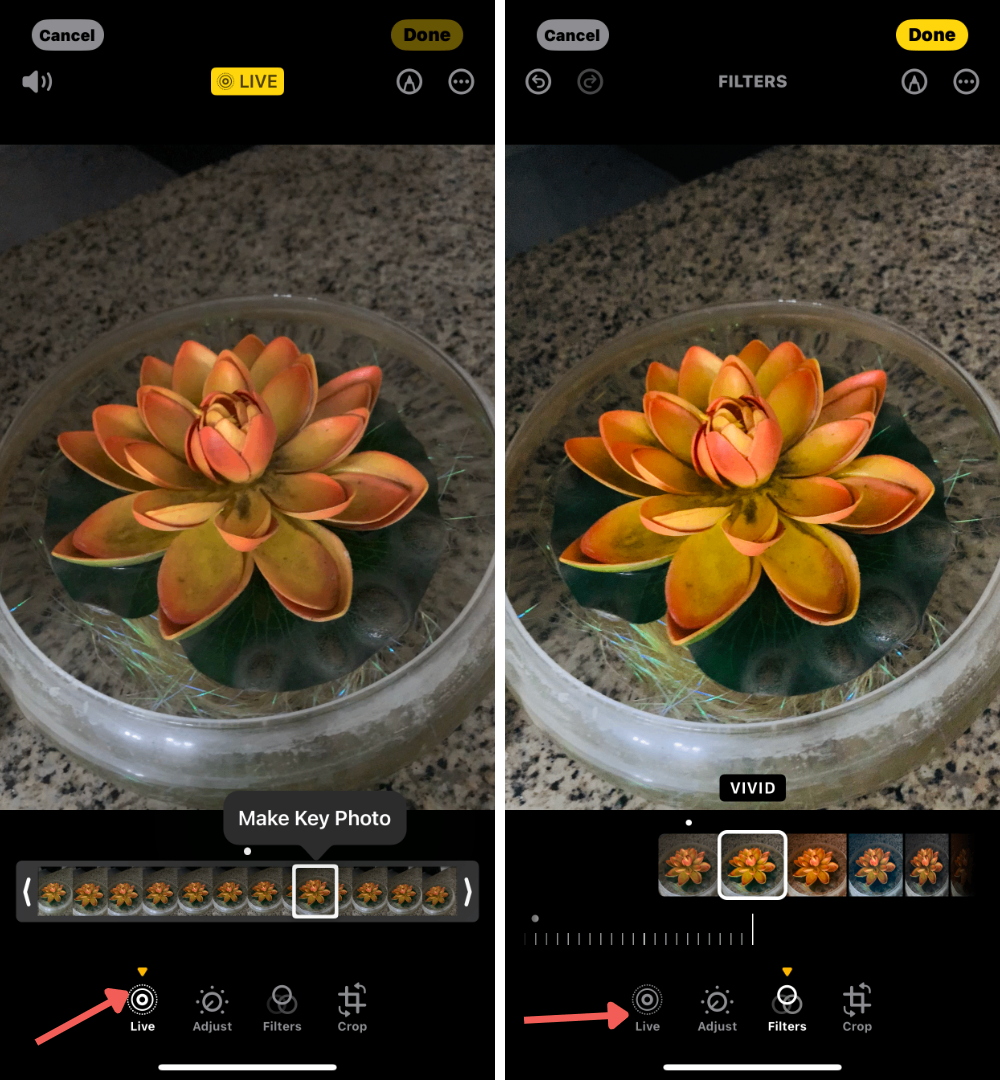
Live Photos are one of the coolest features on iPhones – they capture a few seconds of movement and sound before and after you take the picture. But did you know you can edit these too? You can change which frame appears as the main image, or trim the live portion to highlight the best moment.
To edit a Live Photo, go to your Albums and find the Live Photos album under Media Types. Select the Live Photo you want to edit, then tap “Edit” in the top corner. You’ll see a filmstrip of frames at the bottom – drag to select which frame you want as the key photo. You can also use the handles to trim the beginning and end of the live portion. When you’re finished, tap “Done” to save your changes.
This is especially useful when you’ve captured a great moment but the perfect frame wasn’t exactly when you pressed the shutter. Now you can make sure the best version of that moment is what people see!
Taking your editing further with CapCut
While the built-in Photos app is great for basic edits, sometimes you want to do more with your pictures. That’s where CapCut comes in! It’s a free app available for iOS devices that offers a huge range of editing tools for both photos and videos.
CapCut lets you add text, dramatically improve image quality, remove backgrounds, and so much more. The best part is that it’s designed to be user-friendly, so even if you’re completely new to photo editing, you’ll be able to figure it out quickly. Let’s walk through how to use this powerful tool.
Step-by-step guide to editing photos with CapCut
First things first – you’ll need to download CapCut from the App Store and create an account. You can sign up with your Google account or create a new account specifically for CapCut. The process is straightforward and only takes a minute.
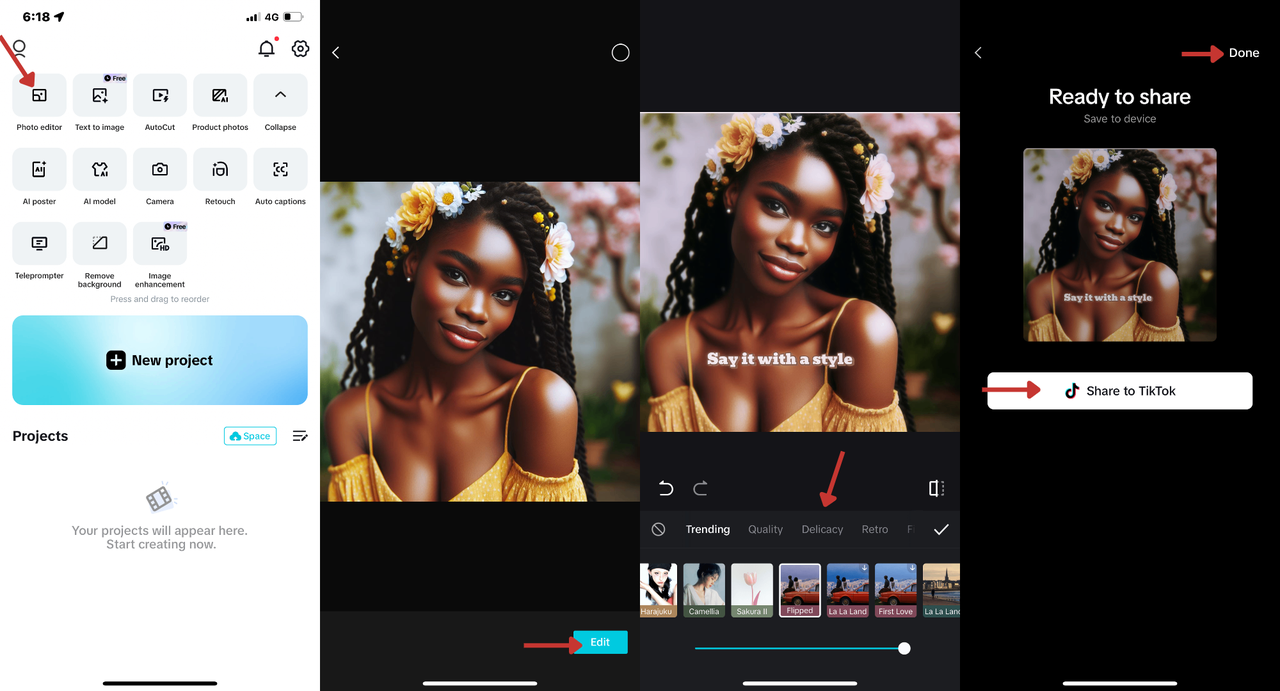
Once you’re in the app, you’ll see various editing tools on the home screen. CapCut offers multiple ways to edit photos for iPhone. You can take new photos using the app’s camera, enhance existing images, remove backgrounds, or add text elements. Just tap on the tool you want to use to get started.
Let’s say you want to use the Photo Editor feature. Select that option, then choose the photo you want to edit from your camera roll and tap “Add.” Now you’re in the editing interface, and you’ll see plenty of options to work with.
Adding text to your photos can give them a personal touch or provide context. Tap “Text,” type your message, and then explore the different fonts and styles available. You can change the color, size, and positioning of your text to make it look just right.
CapCut also offers an extensive collection of filters that can dramatically change the mood of your photos. Tap “Filters” and browse through the options – there are filters for every style from vintage to modern. You can adjust the intensity of each filter with a simple slider control.
Stickers are another fun way to enhance your images. Tap “Stickers” and choose from hundreds of options to match the vibe of your photo. This is perfect for making your pictures more engaging and playful, especially for social media.
The “Adjust” tool is where you can really fine-tune your image. Here you can modify brightness, contrast, saturation, vibrance, and many other parameters. Play around with these settings until your photo looks exactly how you want it.
When you’re happy with your edits, tap “Export” to save the final version to your device. You can also share directly to TikTok or other social media platforms right from the app. See how simple it is to edit photos on CapCut?
Advanced CapCut features for professional-level editing
If you really want to learn how to edit photo on Capcut like a professional, you’ll be excited to explore the app’s more advanced features. These tools take your editing capabilities far beyond basic adjustments.
One incredibly useful feature is background removal. How many times have you taken a great picture of a person or object, but the background was distracting or just didn’t look right? With CapCut’s background removal tool, you can fix this in seconds.
Just tap the background removal option on the main screen, upload your photo, and let CapCut work its magic. The app uses advanced AI to detect and separate the main subject from the background. You can then replace the background with something else or just leave it transparent. The results are impressively clean and precise.
Another amazing tool is “Text to Image.” This feature lets you type a description of what you want to see, and CapCut will generate an image based on your text. It’s like having an AI artist at your fingertips! You can then further edit or enhance these generated images right within the app.
If you’re into fashion or have a clothing business, you’ll love the AI model feature. Instead of organizing expensive photoshoots with real models, you can create virtual models to showcase your designs. Just access the AI model option, add photos of your clothing items, and let CapCut generate realistic model images wearing your designs. This can save you tremendous amounts of time and money!
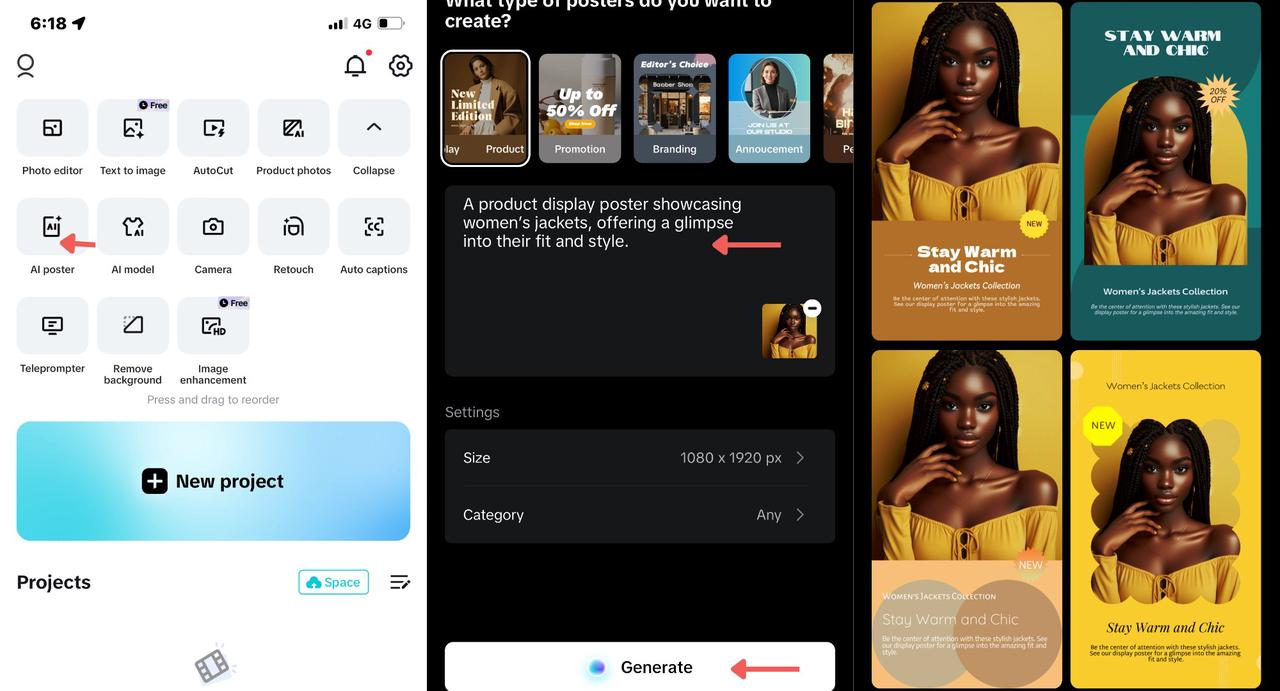
Creating promotional materials is also incredibly easy with CapCut’s AI poster feature. Tap “AI Posters,” input your concept or message, upload any relevant photos, and watch as the app generates custom posters for you. This is perfect for social media content, event promotions, or business advertisements.
Finally, if you’re working with photos that are slightly blurry or low resolution, CapCut’s image enhancement feature can help. This tool intelligently sharpens and improves your images, making them clearer and more vibrant. It’s especially useful for older photos or pictures taken in less-than-ideal lighting conditions.
CapCut — Your all-in-one video & photo editing powerhouse! Experience AI auto-editing, realistic effects, a huge template library, and AI audio transformation. Easily create professional masterpieces and social media viral hits. Available on Desktop, Web, and Mobile App.

Comparing your options: iPhone Photos app vs. CapCut
Now that we’ve explored both editing options, you might be wondering which one is right for you. The truth is, both the iPhone Photos app and CapCut are excellent tools, but they serve slightly different purposes. Understanding their strengths can help you decide when to use each one.
Let’s start with user experience. The Photos app is built right into your iPhone, which makes it incredibly seamless to use. It’s always there when you need it, and it integrates perfectly with iCloud for automatic backups of your edited photos. The interface is clean and straightforward, with no learning curve for basic edits.
CapCut, being a separate app, doesn’t have that same level of integration with the iOS system. However, it makes up for this with its incredibly user-friendly design and extensive tutorial resources. Even with all its advanced features, the app remains accessible to beginners.
When it comes to ease of use, the Photos app definitely wins for simplicity. It’s perfect for those quick edits when you just need to crop, filter, or make minor adjustments. There aren’t too many options to overwhelm you, which is great when you’re in a hurry.
CapCut does have more features, which means there’s a bit more to learn. But the app provides excellent guidance and tutorials to help you get up to speed quickly. Once you familiarize yourself with the interface, you’ll find that even the advanced tools are quite intuitive to use.
The editing capabilities are where CapCut really shines. While the Photos app offers basic tools like cropping, rotating, and filter application, CapCut provides these plus so much more. Advanced color grading, precise text overlays, creative stickers, and professional-level background removal are just some of the additional features you get with CapCut.
For importing and exporting, both apps work well with your iPhone’s camera roll. The Photos app naturally integrates with your existing photo library, making it easy to access any image. CapCut also offers smooth import processes and supports high-quality exports, plus the added convenience of direct sharing to social media platforms.
This social media integration is another area where CapCut stands out. The Photos app requires you to save your edited image and then upload it separately to social platforms. CapCut, being designed with content creators in mind, allows direct exporting to TikTok, Instagram, YouTube, and other platforms. This streamlined workflow is a huge time-saver if you’re regularly creating content for social media.
So which should you use? If you need to make quick adjustments to photos you’ve just taken, the Photos app is perfect. It’s fast, convenient, and right there on your phone. But if you’re creating content for social media, working on professional projects, or want to explore more creative editing possibilities, CapCut is definitely the way to go. Many people actually use both – the Photos app for quick fixes and CapCut for more involved editing sessions.
Answering common questions about iPhone photo editing
How can I remove someone from a photo on my iPhone?
This is a common question, and CapCut makes it surprisingly easy. Open the CapCut app and select the Background Removal tool. Upload the photo containing the person you want to remove. The app’s AI will automatically detect and identify all the people in the image. You can then choose which person to remove. For even more control, use the Manual Select option to precisely indicate which areas to eliminate. This feature gives you professional-level editing power right on your iPhone!
What’s the easiest way to auto-edit photos on iPhone?
If you want great results without spending time on manual edits, CapCut’s automatic enhancement feature is perfect for you. Simply open the app, tap on Image Enhancement, and select the photo you want to improve. CapCut will automatically analyze your image and apply optimizations to make it clearer, brighter, and more vibrant. The process takes just seconds but can dramatically improve your photos. This is ideal when you have multiple images to process quickly or when you’re not sure what specific adjustments a photo needs.
CapCut — Your all-in-one video & photo editing powerhouse! Experience AI auto-editing, realistic effects, a huge template library, and AI audio transformation. Easily create professional masterpieces and social media viral hits. Available on Desktop, Web, and Mobile App.
Bringing it all together
Learning how to edit photos on iPhone opens up a world of creative possibilities. Whether you’re using the built-in Photos app for quick touch-ups or exploring the advanced features of CapCut for more professional results, you have powerful tools right at your fingertips.
Remember that editing is both a technical skill and an artistic expression. Don’t be afraid to experiment with different tools and techniques to develop your unique style. The more you practice, the better you’ll become at seeing the potential in your photos and knowing how to bring out their best qualities.
The best approach is often to start with the Photos app for basic corrections and then move to CapCut when you want to add creative elements or make more sophisticated adjustments. With these two tools combined, you’ll be able to handle virtually any editing task that comes your way.
So go ahead – open your Photos app or download CapCut and start playing with your images. You might be surprised at how much you can improve your photos with just a few simple edits. Happy editing!
Some images courtesy of CapCut