TOOL HUNTER

Ever wondered exactly how long does it take to erase iPhone? Whether you’re selling your device, troubleshooting issues, or just want a fresh start, understanding the time commitment for different erasure methods is crucial. Many users find themselves staring at their screens, wondering why the process seems to take forever.
The time required to erase an iPhone varies significantly depending on your chosen method, your device’s storage capacity, and your internet connection speed. Some methods can complete in just minutes, while others might have you waiting much longer than expected.
Let’s break down the different scenarios and timelines you can expect when trying to erase your iPhone completely.
Table of Contents
- Understanding iPhone Erasure Methods
- How Long Does It Take to Erase All Content and Settings?
- How Long Does It Take to Erase iPhone from iCloud?
- How Long Does It Take to Erase iPhone from Find My iPhone?
- Professional Erasure with iMyFone Umate Pro
- Step-by-Step Guide to Using iMyFone Umate Pro
- Troubleshooting Common Erasure Issues
- Factors That Affect Erasure Time
- Security Considerations When Erasing Your iPhone
- Preparing Your iPhone for Erasure
- What to Do After Erasing Your iPhone
- Conclusion
Understanding iPhone Erasure Methods
Before we dive into specific timeframes, it’s important to understand that not all erasure methods are created equal. Apple provides several ways to wipe your device, each with different purposes and completion times.
The most common methods include using the “Erase All Content and Settings” option directly on your iPhone, erasing through iCloud.com, or using the Find My iPhone feature. Additionally, third-party tools offer more comprehensive erasure options for those concerned about data security.
Your iPhone model, iOS version, and the amount of data stored on your device all play significant roles in determining how long the erasure process will take. Newer iPhones with faster processors typically complete the task more quickly than older models.
How Long Does It Take to Erase All Content and Settings?
When using the built-in “Erase All Content and Settings” feature on your iPhone, you can generally expect the process to take less than 10 minutes under normal conditions. This method is the most straightforward way to reset your device to factory settings without using a computer.
The “Erase All Content and Settings” option performs a complete wipe of your personal data, settings, and installed applications while maintaining the current iOS version. It’s designed to return your iPhone to the state it was in when you first unboxed it, ready for a new user or a fresh start.
Several factors can affect how long this process takes. Devices with larger storage capacities (256GB or more) typically take longer than those with less storage. Similarly, iPhones nearly full of data will require more time to erase than those with significant free space.
Older iPhone models, particularly those with slower processors, may also extend the erasure time. If you’re using an iPhone 6, 7, or 8, don’t be surprised if the process takes a bit longer than the estimated 10 minutes.
If you find that “Erase All Content and Settings” is taking significantly longer than expected—say, 30 minutes to an hour—there might be an issue that needs addressing. We’ll cover troubleshooting these problems later in the article.
How Long Does It Take to Erase iPhone from iCloud?
Erasing your iPhone remotely through iCloud.com is another popular method, especially if your device is lost or stolen. This process generally takes between 10-15 minutes from initiation to completion, though several variables can affect this timeframe.
When you erase your iPhone from iCloud, the command is sent to your device immediately, but the actual erasure only occurs when your iPhone connects to Wi-Fi. This means the time it takes to erase iPhone from iCloud depends largely on when your device comes online after you issue the command.
Your internet connection speed plays a crucial role in how long this process takes. A faster Wi-Fi connection will typically result in a quicker erasure, while slower connections may extend the process. Similarly, iPhones with more stored data will naturally take longer to wipe clean than those with less content.
It’s important to understand that the 10-15 minute estimate refers to the active erasure process once your device connects to Wi-Fi, not the total time from when you initiate the command. If your iPhone is offline when you issue the erase command, it could be hours or even days before the process begins.
How Long Does It Take to Erase iPhone from Find My iPhone?
The Find My iPhone feature provides another remote erasure option that’s particularly useful for lost or stolen devices. This method is typically quite fast, usually completing in less than 5 minutes once the command is received by your device.
Find My iPhone erasure works similarly to iCloud erasure but is initiated directly through the Find My app rather than the iCloud website. The speed advantage comes from the more direct communication pathway between Apple’s servers and your device.
Like iCloud erasure, your iPhone must be connected to the internet to receive and execute the erase command. The actual time it takes to erase iPhone through Find My depends on your internet speed and the amount of data on your device.
If you find that the erase command is pending for an extended period (more than 30 minutes), this typically indicates that your iPhone hasn’t connected to the internet to receive the command. This is common with devices that have dead batteries, are in areas with poor connectivity, or have been powered off.
Professional Erasure with iMyFone Umate Pro
For those who want more control over the erasure process or need guaranteed data destruction, third-party tools like iMyFone Umate Pro offer advanced solutions. This software provides several advantages over Apple’s built-in erasure methods, particularly regarding data security.
iMyFone Umate Pro.Erase iOS Data Permanently to Secure Your Privacy!iOS Data Erasure: One-click to permanently wipe all iOS data with a 0% recovery rate.Selective Data Erasure: Choose specific data types for erasure including messages, contacts, call history, photos, etc.App Privacy Erasure: Wipe data from popular social apps – WhatsApp, LINE, Facebook, Instagram, TikTok, Kik, and more, no traces left.Deep Erasure: Completely erase deleted data and files with no chance of recovery.Free Up Space: Scan and clear up the junk files,temporary fles, photos, app caches, and more on your iOS devices.
One significant advantage of using Umate Pro is the permanent nature of the data erasure. When you use Apple’s built-in methods, some data remnants may remain theoretically recoverable with specialized tools. Umate Pro overwrites your data multiple times, ensuring 0% recoverability—a crucial feature for those selling their devices or protecting sensitive information.
The time it takes to erase iPhone with Umate Pro varies based on your device’s storage capacity and the erasure method selected. For a standard 32GB iPhone using the basic erasure mode, the process typically takes about 30 minutes. Larger capacity devices or higher security erasure levels will understandably take longer.
Umate Pro offers multiple erasure modes to suit different needs. The “Erase All Data” option performs a complete device wipe, while selective erasure allows you to target specific data types like messages, photos, or app data without affecting your entire device.
Step-by-Step Guide to Using iMyFone Umate Pro
If you’ve decided that iMyFone Umate Pro is the right solution for your needs, here’s how to completely erase your iPhone using this powerful tool:
Step 1: Download and install Umate Pro on your computer, then launch the application. Connect your iPhone to your computer using a USB cable and trust the computer if prompted on your device.
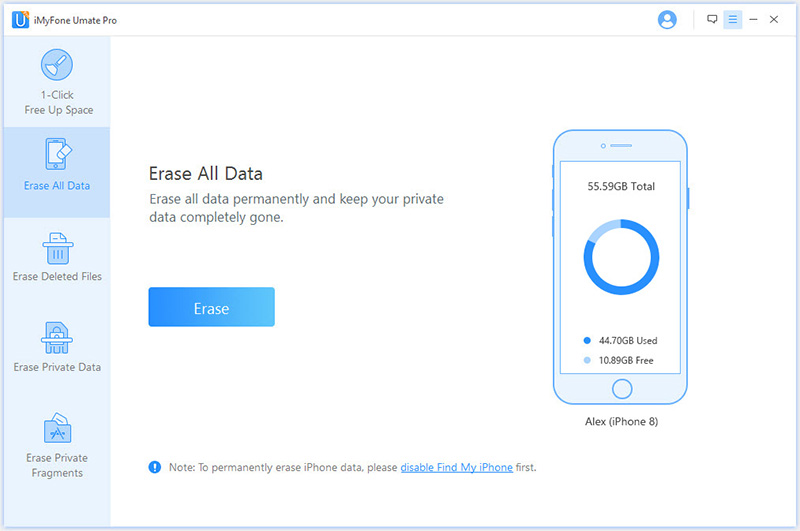
Step 2: The application will display four different erasing options on the main screen. For a complete wipe, select the “Erase All Data” option and click the “Erase” button to proceed.
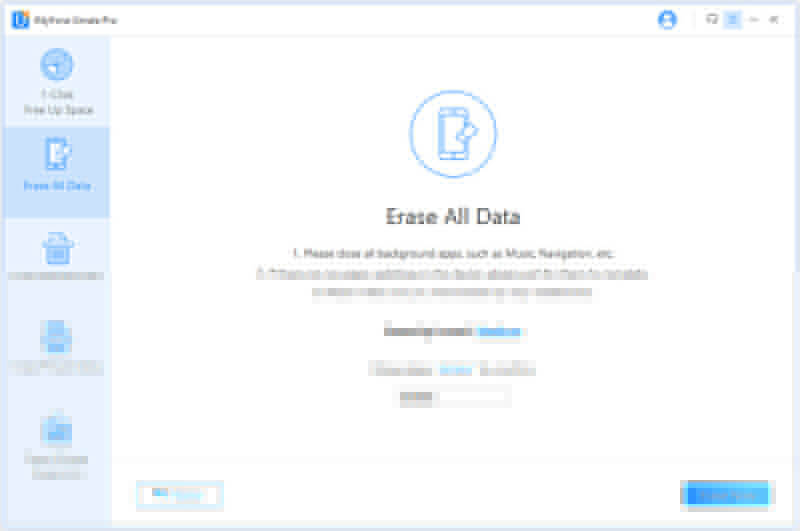
Step 3: Umate Pro will present a confirmation screen where you’ll need to type “delete” in the provided text box. This safety measure prevents accidental erasure. After typing the confirmation word, click “Erase Now” to begin the permanent deletion process.
Umate Pro offers three security levels for erasure: Low, Medium, and High. The Medium level is selected by default and provides a good balance between security and speed. If you’re erasing particularly sensitive information like financial data, the High level offers maximum security through multiple overwrite passes.
Troubleshooting Common Erasure Issues
Sometimes, the process to erase an iPhone doesn’t go as smoothly as expected. Here are solutions to some common problems you might encounter:
iPhone Erase All Content and Settings Not Working
If the “Erase All Content and Settings” option isn’t functioning properly on your device, there are several potential causes and solutions:
First, ensure your iPhone has adequate battery life (at least 50% recommended) or is connected to a power source. Insufficient power can interrupt the erasure process, potentially causing software issues.
Check that you’ve signed out of iCloud and the App Store, as Apple sometimes requires this before allowing a complete erase. To do this, go to Settings > [Your Name] > Sign Out. You’ll need to enter your Apple ID password and choose whether to keep a copy of your data on the iPhone.
If these steps don’t resolve the issue, a hard reset might be necessary. The method varies by iPhone model:
For iPhone X, 8, or 8 Plus: Quickly press and release the Volume Up button, then quickly press and release the Volume Down button. Finally, press and hold the Side button until the Apple logo appears.

For iPhone 7 or 7 Plus: Simultaneously press and hold the Side and Volume Down buttons until the Apple logo appears on screen.
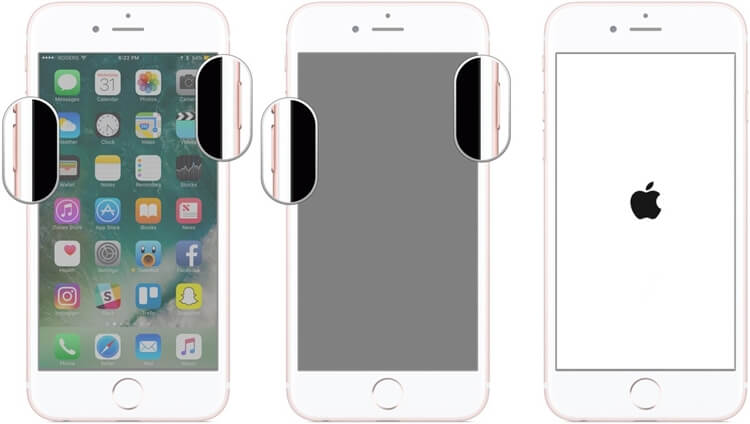
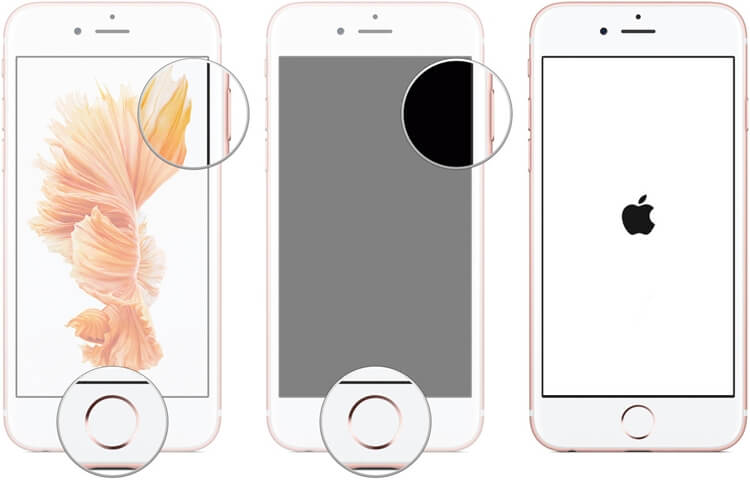
For iPhone 6s or earlier models, and iPads: Press and hold both the Home and Top (or Side) buttons at the same time until you see the Apple logo.
Pending for a Long Time When Erasing iPhone from Find My iPhone
If your remote erase command through Find My iPhone remains pending for an extended period, the issue is typically related to connectivity.

Your iPhone needs an active internet connection to receive the erase command. If the device is in an area with poor Wi-Fi or cellular reception, turned off, or has a dead battery, it cannot receive the command until it reconnects to the internet.
There’s little you can do in this situation except wait for the device to come online. If you believe the iPhone is stolen, you can place it in Lost Mode through Find My iPhone, which will lock it and display a custom message with contact information when it comes online.
Erase All Content and Settings Won’t Finish
If you’ve started the erasure process but it seems stuck or won’t complete, several factors could be responsible:

A software conflict is a common cause of incomplete erasures. If you’ve recently updated iOS or installed new apps, these might interfere with the reset process. Try performing a hard reset using the methods described above, then attempt the erase again.
In rare cases, hardware issues can prevent successful erasure. If you’ve tried multiple troubleshooting steps without success, contact Apple Support or visit an Apple Store for further assistance.
Factors That Affect Erasure Time
Understanding what influences how long it takes to erase iPhone can help you manage expectations and potentially speed up the process:
Storage Capacity: iPhones with larger storage capacities (512GB, 1TB) naturally take longer to erase than those with less storage (64GB, 128GB). The erasure process must overwrite every sector of storage, so more storage means more sectors to process.
Amount of Data: Even with the same storage capacity, an iPhone nearly full of data will take longer to erase than one with significant free space. Some erasure methods only overwrite used sectors, while others overwrite the entire storage regardless of usage.
iPhone Model and Processor Speed: Newer iPhones with faster processors (A14 Bionic and later) complete erasure more quickly than older models with slower chips. The difference can be significant—sometimes cutting the time in half.
Internet Connection Speed: For remote erasure methods, your internet connection speed directly impacts how long the process takes. Faster connections allow for quicker communication between Apple’s servers and your device.
iOS Version: Apple occasionally optimizes the erasure process in iOS updates. Newer versions of iOS might complete erasure faster than older versions, though the differences are usually minor.
Security Considerations When Erasing Your iPhone
Many users don’t realize that standard erasure methods might not completely destroy all data. When you use “Erase All Content and Settings,” the data is marked as deleted and becomes inaccessible to the operating system, but technically remains on the storage until overwritten by new data.
This is why tools like iMyFone Umate Pro exist—they perform multiple overwrite passes to ensure data is truly unrecoverable. For most users selling or giving away their devices, Apple’s built-in methods provide adequate security. But for those handling sensitive business or personal information, more thorough erasure is recommended.
If you’re using Apple’s methods, you can enhance security by encrypting your iPhone backup before erasing, then restoring that backup to your new device before performing the erase. This ensures that even if someone could recover fragments of data, it would be encrypted and unusable.
Preparing Your iPhone for Erasure
To ensure a smooth erasure process and protect your data, follow these preparation steps:
Back up your iPhone to iCloud or your computer. This ensures you don’t lose important photos, messages, or other data.
Sign out of iCloud, iTunes, and the App Store. Go to Settings > [Your Name] > Sign Out. You’ll need to enter your Apple ID password.
Disable Find My iPhone by going to Settings > [Your Name] > Find My > Find My iPhone and toggle it off.
Erase your eSIM if your iPhone uses one (Settings > General > About > eSIM > Remove Cellular Plan).
If you’re selling or giving away your device, remove it from your Apple ID account at appleid.apple.com.
Proper preparation not only protects your privacy but can also speed up the erasure process by reducing the amount of account-related data that needs to be processed.
What to Do After Erasing Your iPhone
Once the erasure process is complete, your iPhone will restart and display the “Hello” screen in multiple languages, indicating it’s ready for setup.
If you’re keeping the device, you can set it up as new or restore from a backup. Setting up as new often results in better performance since it avoids transferring any potential software issues from your previous setup.
If you’re passing the device to someone else, they can begin the setup process immediately. If you’ve properly erased the device, they won’t encounter any of your personal data or accounts during setup.
For those who used third-party erasure tools like iMyFone Umate Pro, you might want to verify the erasure by setting up the device briefly to confirm no personal data remains before handing it over to the new owner.
iMyFone Umate Pro.Erase iOS Data Permanently to Secure Your Privacy!iOS Data Erasure: One-click to permanently wipe all iOS data with a 0% recovery rate.Selective Data Erasure: Choose specific data types for erasure including messages, contacts, call history, photos, etc.App Privacy Erasure: Wipe data from popular social apps – WhatsApp, LINE, Facebook, Instagram, TikTok, Kik, and more, no traces left.Deep Erasure: Completely erase deleted data and files with no chance of recovery.Free Up Space: Scan and clear up the junk files,temporary fles, photos, app caches, and more on your iOS devices.
Conclusion
The time it takes to erase iPhone depends on your chosen method and several device factors. Standard erasure through “Erase All Content and Settings” typically completes in under 10 minutes, while remote methods via iCloud or Find My iPhone usually take 5-15 minutes once the device connects to the internet.
For those requiring maximum data security, third-party solutions like iMyFone Umate Pro offer permanent erasure with 0% data recovery possibility, though with longer processing times of approximately 30 minutes for a 32GB device.
Understanding these timeframes and methods ensures you can properly plan your device erasure, whether you’re troubleshooting, upgrading, or passing your iPhone to someone else. Always remember to back up your data before beginning any erasure process, and consider your security needs when choosing between Apple’s built-in methods and third-party solutions.
Some images in this article are sourced from iMyFone.