TOOL HUNTER

Have you ever been watching a video on your Android phone and thought, “I really wish I could just listen to this part without watching”? Maybe it’s a catchy song, an inspiring speech, or a hilarious sound effect that caught your attention. There are times when you simply want to enjoy the audio without being tied to your screen – during your daily commute, while exercising at the gym, or when you’re just relaxing at home.
The good news is that learning how to extract audio from video on Android is much easier than you might think! You don’t need to be a technology expert or spend money on expensive software. In this comprehensive guide, I’ll walk you through several methods to accomplish this for free using various applications, with special focus on CapCut – my personal favorite tool for this purpose.
We’ll discuss the various reasons why you might want to separate audio from video, explore different applications that can help you achieve this, and then dive deep into CapCut – which I genuinely believe is the best option available. I’ll provide detailed, step-by-step instructions on how to extract audio from video CapCut style, covering both mobile and computer versions.
Table of Contents
Why Would You Want to Separate Audio from Video on Android?
Before we jump into the technical how-to details, let’s explore why someone might want to extract audio from video on Android devices. There are actually numerous practical reasons that make this skill valuable!
Audio-Only Listening Convenience
The most common reason people seek to learn how to extract audio from video android style is the desire to listen without watching. Consider situations where watching simply isn’t practical or safe: driving your car, jogging in the park, or doing household chores. During these activities, you can’t realistically watch a screen, but you can certainly enjoy audio content.
Perhaps you’ve discovered an educational video filled with valuable information, or a podcast that’s only available in video format. By extracting the audio, you transform it into portable content that you can enjoy while multitasking or during activities where visual attention isn’t possible.
Storage Space Conservation
Video files consume substantial storage space – we’re talking significant memory usage here. Even brief video clips can occupy considerable space on your Android device. Audio files, conversely, are dramatically smaller. When you extract audio from video on phone, you’re typically creating a file that’s approximately ten times smaller than the original video file.
This becomes incredibly valuable when your phone’s storage capacity is nearing its limit. You can preserve the audio content you love without compromising your device’s available memory for other important files and applications.
Simplified Content Sharing
Have you ever attempted to send a video file through messaging applications only to encounter issues because the file size exceeded limitations? Audio files are considerably easier to share across platforms and devices. They upload more quickly and download faster, making sharing practically effortless.
If you encounter an amusing video with fantastic audio, you might want to share just the audio component with friends and family. Understanding how to extract audio from video in android makes this sharing possibility a reality.
Personal Audio Collections
Maybe you’re someone who enjoys collecting interesting sounds, inspirational speeches, or musical snippets. By extracting audio from various videos, you can build a personalized audio library tailored to your interests. Imagine having motivational talks, beautiful musical pieces, or humorous moments readily available for listening whenever the mood strikes.
Creative Project Material
If you create your own content or videos, you might want to incorporate audio elements from other videos. Naturally, it’s crucial to always respect copyright laws and only use content for which you have proper permission. But when you have authorization, audio extraction provides valuable raw material for your creative endeavors.
Now that we’ve covered the compelling reasons for audio extraction, let’s explore the practical methods to accomplish this!
Top Applications for Audio Extraction on Android
Several applications can assist with extracting audio from video android devices. After extensive testing of numerous options, here are my top three recommendations:
CapCut Mobile Application – The Comprehensive Solution
CapCut stands as my preferred application for this purpose. Developed by the same company that created TikTok, they possess deep understanding of mobile video editing needs.
What I particularly appreciate about CapCut is that it’s not merely an audio extraction tool – it’s a complete video editing suite. This means you can perform various editing tasks beyond just audio extraction.
The process of how to extract audio from video CapCut offers is remarkably straightforward. Just a few taps completes the task. The interface remains clean and intuitive, even for those with no prior video editing experience.
One of CapCut’s standout features is the ability to edit audio after extraction. You can trim sections, adjust volume levels, or apply effects. This proves incredibly useful when you only need specific audio portions or want to enhance the sound quality.
The application is free to use, which is always appealing. While premium features exist, the free version handles basic audio extraction perfectly without limitations.
Video to MP3 Converter – Straightforward and Focused
As the name clearly indicates, this application specializes in converting videos to MP3 audio files. The process is incredibly simple – select a video, and the application handles the conversion to audio.
This application excels when you want simplicity without additional features. It supports numerous video formats, meaning regardless of your video type, it can likely extract the audio successfully.
Conversion speed is impressive, and audio quality remains good. The interface appears somewhat basic, but it effectively accomplishes its primary function.
The main limitation is the lack of editing features. You receive the complete audio from the video without built-in trimming capabilities. You might need additional applications if post-extraction editing becomes necessary.
Timbre – Feature-Rich but Advertisement-Supported
Timbre presents another excellent option for extracting audio from video on Android. It offers more features than basic converters, including audio trimming, multiple file merging, and quality adjustment settings.
I appreciate Timbre’s format flexibility. You’re not limited to MP3 – you can save files in AAC, FLAC, or other formats depending on your specific needs.
The interface appears clean and contemporary. The extraction process remains simple: select your video, configure your settings, and export.
The primary drawback involves advertisements in the free version. These can become somewhat distracting, though you can purchase premium version to eliminate them if you use the application frequently.
How to Export Audio Only in CapCut Mobile
Now let’s focus on the main attraction: how to export audio only in CapCut mobile. This is likely what brought you here, and I’m pleased to report it’s incredibly straightforward!
I’ll guide you through the process step-by-step. Before beginning, ensure you’ve downloaded CapCut from Google Play Store. It’s free, so cost isn’t a concern.
Step 1: Download and Launch CapCut
First, search “CapCut” in Play Store and install it. Once installed, open the application. You’ll need to sign in using your Google account, Facebook credentials, or email address. Signing in helps preserve your projects.
Step 2: Initiate New Project
Tap “New Project” to begin. The application will prompt you to select videos from your device. Choose the video containing the audio you wish to extract. You can select multiple videos if desired, but for now, let’s use just one.
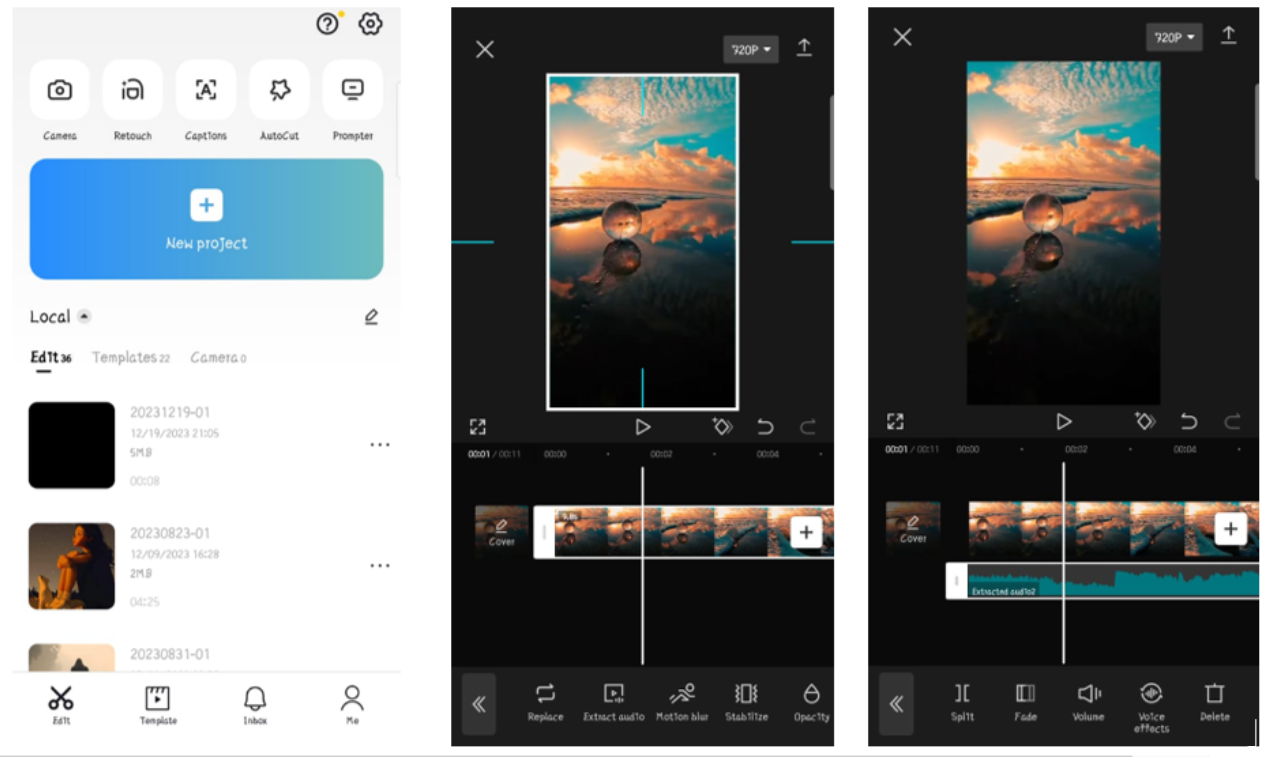
Step 3: Extract the Audio
This represents the crucial step in learning how to export audio only in CapCut mobile. Once your video appears in the timeline (the editing area at screen bottom), tap the video clip. A menu will appear displaying various options.
Locate “Extract audio” and tap it. CapCut will promptly separate audio from video. You’ll observe the audio appearing as a separate timeline track. The video remains present, but now you have independent audio control.
Step 4: Remove Video (Optional)
If you only want the audio and don’t require the video, you can delete the video track. Simply tap the video in the timeline and select delete. Now only the audio remains.
Step 5: Export Your Audio
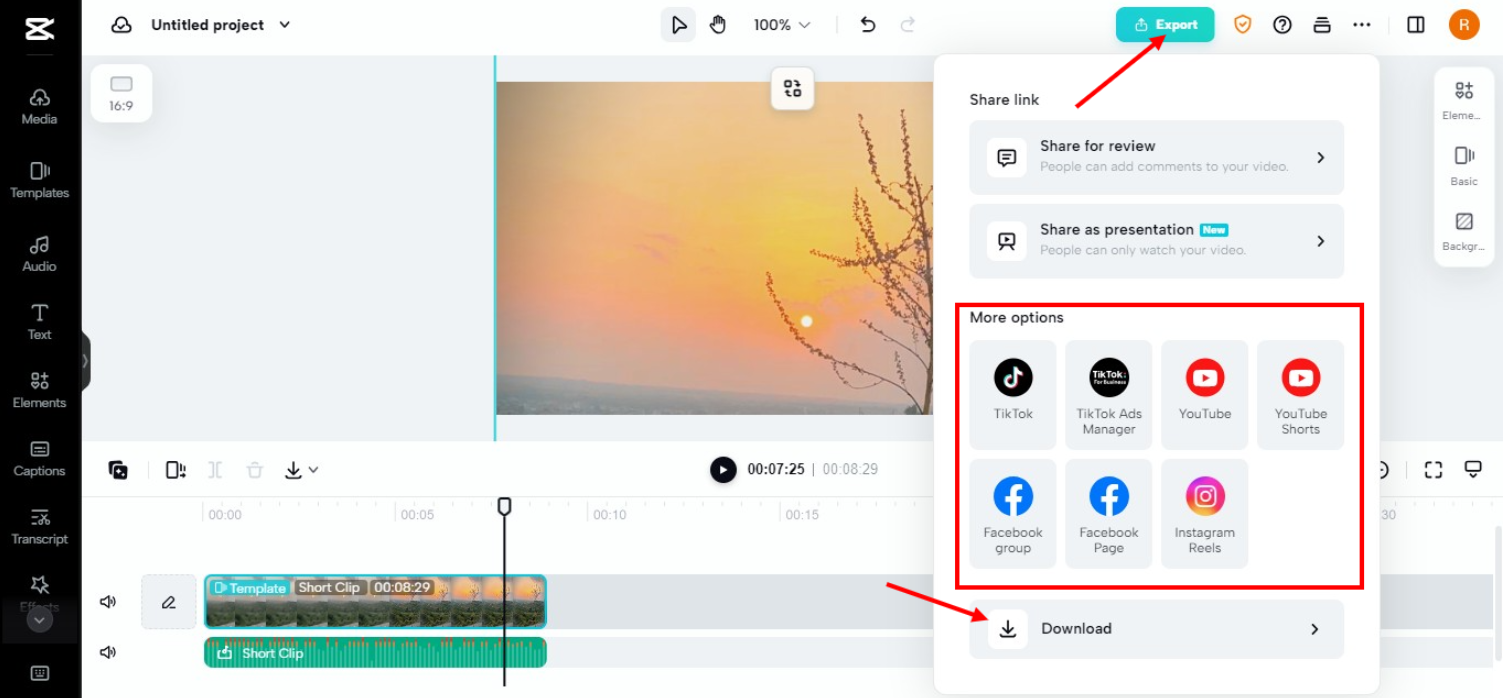
Now for the final step in how to export audio only in CapCut mobile. Tap the export button in the upper right corner (it resembles an upward-pointing arrow).
Before exporting, you can adjust settings. Ensure you select appropriate format – MP3 typically works best for audio-only files. You can also set quality levels. Higher quality delivers better sound but creates larger files.
Once satisfied with settings, tap “Export” or “Save”. CapCut will process your audio and save it to your device. That’s it! You’ve successfully learned how to export audio only in CapCut mobile.
The entire process requires just minutes once you understand the steps. Now you possess an audio file you can enjoy anywhere, share with friends, or use for other projects.
Utilizing CapCut Online Video Editor
Perhaps you prefer not using your phone, or maybe you favor computer work. No problem! CapCut also provides an online video editor functioning within your web browser. The best aspect? No downloads required!
The online editor works excellently because it functions on any computer – Windows, Mac, or even Chromebook. Provided you have a web browser and internet connection, you can use it.
Let me demonstrate how to extract audio from video using CapCut’s online version.
Beginning with CapCut Online
First, visit the CapCut website. You’ll need to sign in or create an account. You can use your Google, Facebook, or TikTok account for quick sign-in.
Once signed in, click “New Project” to start. You’ll see options for uploading your video. You can drag and drop video files, or click to browse your computer.
How to Extract Audio from Video CapCut Online Method
Two methods exist for audio extraction in the online editor:
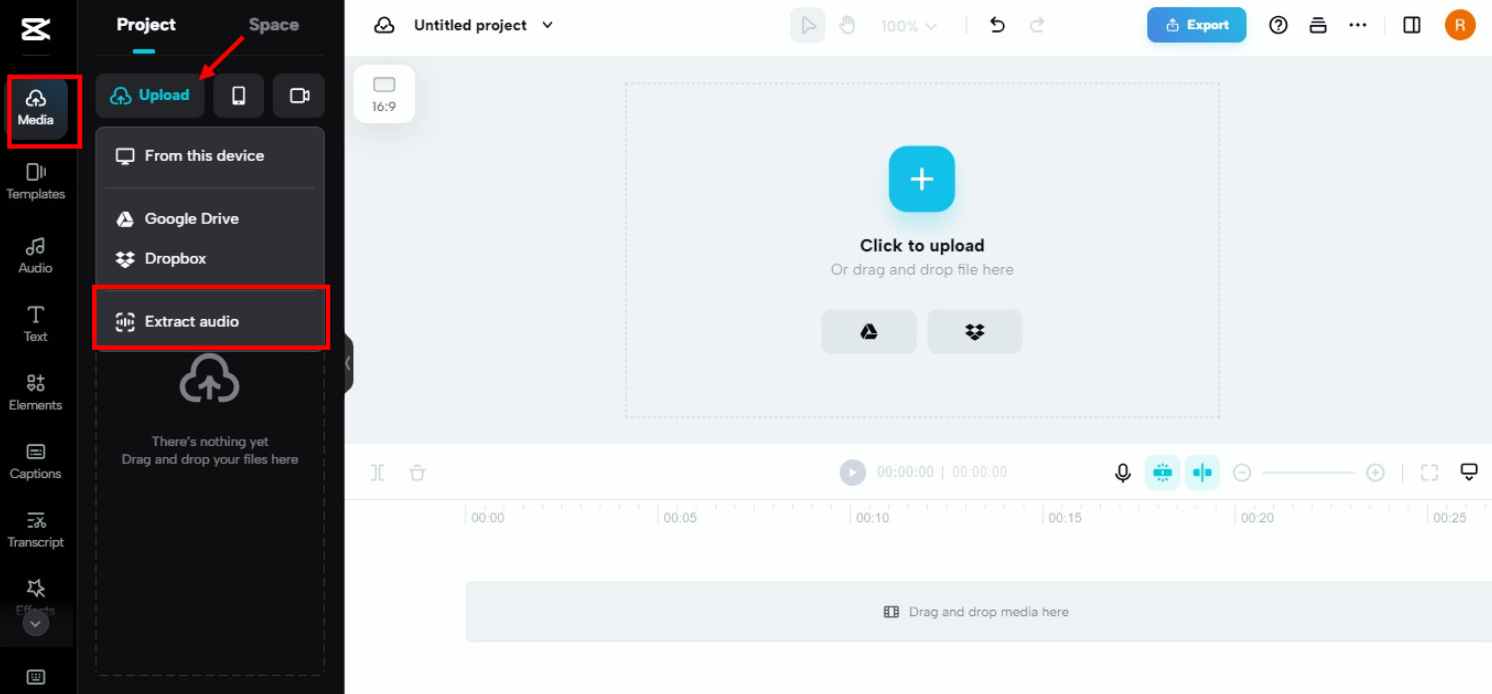
Method 1: Extract During Upload
Extracting audio during upload represents the simplest method for audio extraction. When uploading your video, locate the “Extract audio” option. Clicking this before uploading automatically extracts audio during the upload process. This is probably the easiest approach.
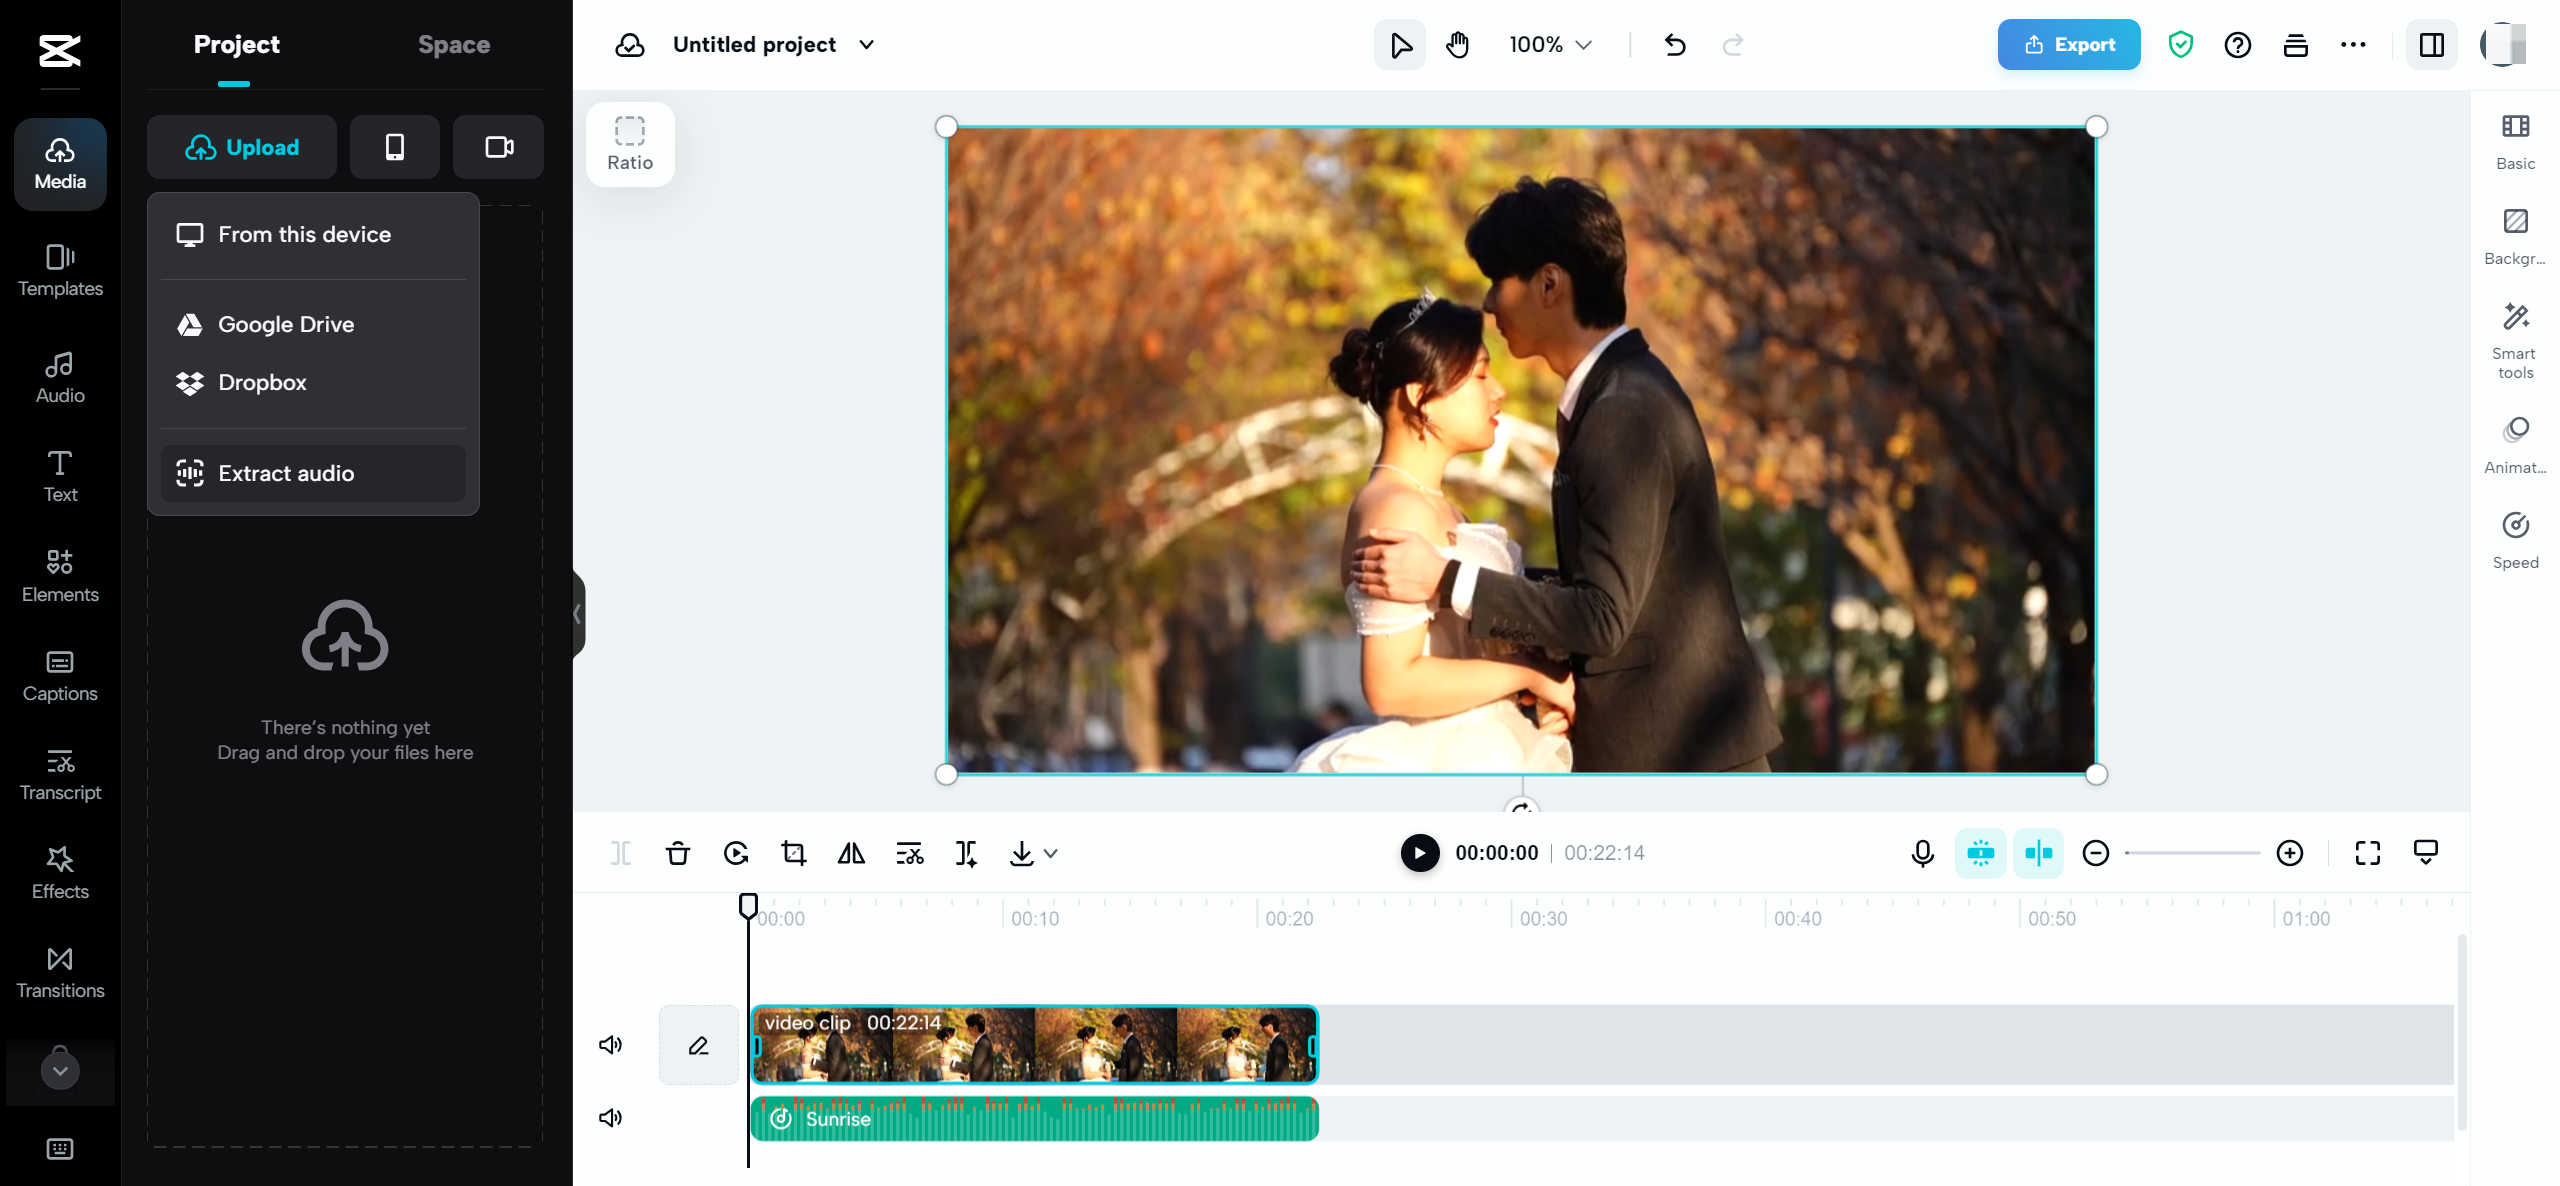
Method 2: Extract from Timeline
If you’ve already uploaded your video to the timeline, right-click on it. You’ll find an option labeled “Separate audio”. Click this, and CapCut will separate audio from video, similar to the mobile application.
Editing Your Extracted Audio
After extraction, you might want to edit your audio. Perhaps you only want certain portions, or you want to enhance the sound quality.
CapCut online provides tools for these adjustments. You can trim audio to remove unwanted sections. You can adjust volume levels if audio is too loud or quiet. Some basic audio effects are also available for application.
Exporting Your Audio
When satisfied with your audio, it’s time to export. Click the export button in the upper right corner. Ensure you select audio format (like MP3) rather than video format.
You can then download the audio to your computer, or share it directly to social media platforms if desired.
Additional Impressive CapCut Features
CapCut offers more than just audio extraction. It contains numerous other features you might find valuable. Since you’re learning how to extract audio from video CapCut style, you might appreciate discovering these additional capabilities.
Voiceover Addition
If you create original videos, you might want to add narration. CapCut simplifies this with its voice recording feature. You can record your voice directly within the application and add it to your video projects.
This proves excellent for tutorials, presentations, or adding commentary to your videos. Quality remains quite good – particularly when using headphones with microphones.
Speech-to-Text Conversion
This stands among my favorite features. CapCut can automatically transcribe video speech into text. This works wonderfully for creating subtitles or captions.
Accuracy proves surprisingly good, especially with clear speech. Multiple languages are supported. This can save hours of manual typing if you regularly require subtitles for your videos.
Extensive Music and Sound Library
If you need background music or sound effects for your videos, CapCut offers an extensive library to explore. Thousands of tracks are available, all free for use in your projects.
You can search by mood, genre, or duration. This proves much easier than searching the internet for royalty-free music while wondering about usage permissions.
Voice Changer Entertainment
This serves more for entertainment than serious work, but CapCut includes a voice changer feature. You can make your voice sound robotic, chipmunk-like, or add echo effects.
This works great for creating humorous videos or protecting privacy when you prefer not using your real voice. Children particularly enjoy experimenting with this feature.
Advertisement-Free Experience
Unlike some free applications, CapCut doesn’t bombard you with advertisements during editing sessions. The interface remains clean and editing-focused, creating a much more pleasant user experience.
While premium features exist for purchase, basic features – including audio extraction – remain completely free without annoying limitations.
CapCut — Your all-in-one video & photo editing powerhouse! Experience AI auto-editing, realistic effects, a huge template library, and AI audio transformation. Easily create professional masterpieces and social media viral hits. Available on Desktop, Web, and Mobile App.

Helpful Audio Extraction Tips
Now that you understand how to extract audio from video on phone and computer, here are some suggestions for optimal results:
Begin with Quality Video
Your extracted audio quality depends on the original video quality. If the video features poor audio quality, your extracted audio will similarly suffer. Whenever possible, use videos with clear, high-quality audio.
Select Appropriate Audio Format
When exporting, you can typically choose between different audio formats. MP3 remains the most universal and compatible with nearly everything. However, if you require higher quality, consider WAV or FLAC formats. Remember that these will generate larger files.
Edit Before Exporting
Avoid extracting entire audio if you only need portions. Use CapCut’s editing tools to trim audio to your desired segments. This conserves storage space and makes the audio more useful for your purposes.
Utilize Headphones
When editing audio, use headphones if possible. You’ll detect details that might escape phone speakers. This helps create better edits and identify potential audio issues.
Preserve Your Projects
If you think you might want modifications later, save your CapCut project before exporting. This allows you to return and edit without restarting from scratch. This proves especially useful for longer or more complex audio extractions.
Final Thoughts
Learning how to extract audio from video on Android represents an incredibly valuable skill. Whether you want to listen to videos without watching, conserve storage space, or use audio for creative projects, you now possess the knowledge to accomplish this.
Several applications can assist, but CapCut undoubtedly ranks among the best. It’s user-friendly, feature-rich, and most importantly – completely free!
Remember, the process for how to export audio only in CapCut mobile remains simple: add your video, tap “Extract audio”, and export. The online version operates similarly and works excellently if you prefer computer workflow.
Now that you understand how to extract audio from video CapCut style, why not experiment yourself? Find a video on your phone and attempt the process. You might surprise yourself with how straightforward it is!
CapCut — Your all-in-one video & photo editing powerhouse! Experience AI auto-editing, realistic effects, a huge template library, and AI audio transformation. Easily create professional masterpieces and social media viral hits. Available on Desktop, Web, and Mobile App.
Common Questions Answered
Is audio extraction from videos truly free?
Absolutely! CapCut allows completely free audio extraction from videos. No hidden costs or limitations exist for basic audio extraction features.
How long does audio extraction require?
Duration depends on video length, but typically requires just seconds to minutes. Even lengthy videos process relatively quickly.
Does audio extraction damage original videos?
No, audio extraction doesn’t affect your original video file whatsoever. CapCut creates separate audio files without altering originals.
Which audio formats can I use for saving?
CapCut permits saving in multiple formats including MP3, WAV, and others. MP3 usually represents the best choice for most situations.
Can I extract audio from any video format?
You can extract audio from most common video formats including MP4, MOV, AVI, and others. If your video plays on your phone, chances are excellent that CapCut can extract its audio.
Is CapCut safe to use?
Yes, CapCut is developed by a reputable company (the same company that creates TikTok) and is completely safe to use. Millions of users worldwide utilize it without issues.
Does CapCut mobile require internet connection?
For most features, internet connection isn’t necessary after application installation. Some features might require internet access, but basic audio extraction functions offline perfectly.
Some images courtesy of CapCut