TOOL HUNTER

Ever recorded an amazing video on your phone only to discover it’s in portrait mode when you really needed landscape? Whether you’re preparing content for YouTube, a professional presentation, or just want that cinematic widescreen look, you’re definitely not alone in this situation. Many content creators and everyday users find themselves needing to adjust their video orientation to fit different viewing platforms.
The great news is that learning how to convert portrait video to landscape doesn’t have to be complicated or result in quality loss. With today’s advanced tools and techniques, you can transform your vertical footage into beautiful landscape format that looks like it was originally shot that way.
This comprehensive guide will walk you through everything from understanding the basic differences between formats to step-by-step instructions for conversion on various devices. We’ll also share some valuable tips to help you capture better landscape videos from the start. Let’s dive in and explore how you can master the art of converting your portrait videos to landscape format!
Table of Contents
Understanding Video Orientation Basics
Before we jump into the conversion process, it’s helpful to understand what we’re working with when we talk about portrait and landscape formats. When you record video, you’re making a conscious choice about orientation, whether you realize it or not.
Portrait videos are characterized by their tall, narrow frame—much like how you naturally hold your smartphone for selfies or quick captures. This format excels at highlighting vertical elements like people, buildings, or anything that benefits from a taller frame. It’s perfect for social media platforms like Instagram Stories or TikTok where mobile viewing dominates.
Landscape videos offer the opposite approach with their wide, shorter frame that matches how we typically watch television shows, movies, and most YouTube content. This format mirrors our natural field of vision and works beautifully for capturing expansive scenes, group activities, or any situation where width matters more than height.

The fundamental difference comes down to focus and composition. Portrait orientation emphasizes height and works well for individual subjects or vertical action, while landscape orientation prioritizes width and environmental context. When you need to convert portrait video to landscape, you’re essentially reimagining how your content fits within a wider visual framework.
Effective Methods for Orientation Conversion
So you’ve got portrait footage that needs to become landscape—how do you make this transformation without compromising quality or making your video look strange? Several reliable methods exist, each with distinct advantages and considerations.
AI-powered stretching represents one of the more advanced approaches to convert portrait video to landscape. This technology uses sophisticated algorithms to intelligently expand the sides of your footage, effectively filling the empty space that would normally appear as black bars. The system analyzes your video content and attempts to generate plausible background elements that match your existing footage, keeping your main subject intact and properly proportioned.
This method works exceptionally well when your primary subject remains centered throughout the clip. You maintain all your original content without cropping anything out, which is great for preserving important moments. However, the AI might occasionally struggle with complex backgrounds or important elements near the edges of your original frame, potentially creating some distortion or blurring in those areas.
Simple rotation offers another straightforward method to convert portrait video to landscape. This approach literally turns your entire video 90 degrees, maintaining every pixel exactly as originally captured. It’s incredibly easy to execute in most basic editing applications and preserves your video quality perfectly since no processing or rendering occurs beyond the rotation itself.
The significant limitation here is that your video remains in its original aspect ratio—you’re just watching it sideways. This means you’ll still have a narrow, tall video that requires viewers to tilt their heads or devices to watch properly. This approach only makes sense for content that remains comprehensible when viewed horizontally, which excludes most talking-head videos or any footage with text elements.
Background addition provides a creative alternative to convert portrait video to landscape. Rather than altering your original footage, this technique places your portrait video centered within a wider landscape canvas, then fills the empty side spaces with complementary elements. You might use a blurred version of your original video, a solid color that matches your content, or even custom graphics and branding elements.
This method completely preserves your original video quality since no stretching or cropping occurs. It’s fantastic for adding professional touches like logos, additional information, or creative framing elements. The challenge lies in selecting background elements that enhance rather than distract from your main content. Poor background choices can make your video look unprofessional or confuse viewers about where they should focus their attention.
Selecting the right method to convert portrait video to landscape depends entirely on your specific content and desired outcome. Consider what’s most important in your footage, where your subjects are positioned, and how you want your final product to look before choosing your approach.
Desktop Conversion Using CapCut
For computer users seeking a powerful yet user-friendly solution, the CapCut desktop video editor provides an excellent platform to convert portrait video to landscape. This software combines professional-level features with an intuitive interface that makes the conversion process accessible even for beginners.
Getting started is straightforward—simply download the application from the official website and follow the installation prompts. Once installed, launch the program and sign in using your preferred account (Google, Facebook, or TikTok work seamlessly) to access the full range of editing features.
Begin your project by locating the Import button typically found in the center of the main interface. Click this and navigate to your target portrait video file on your computer. Select your file and watch as it appears in your project library, ready for editing.
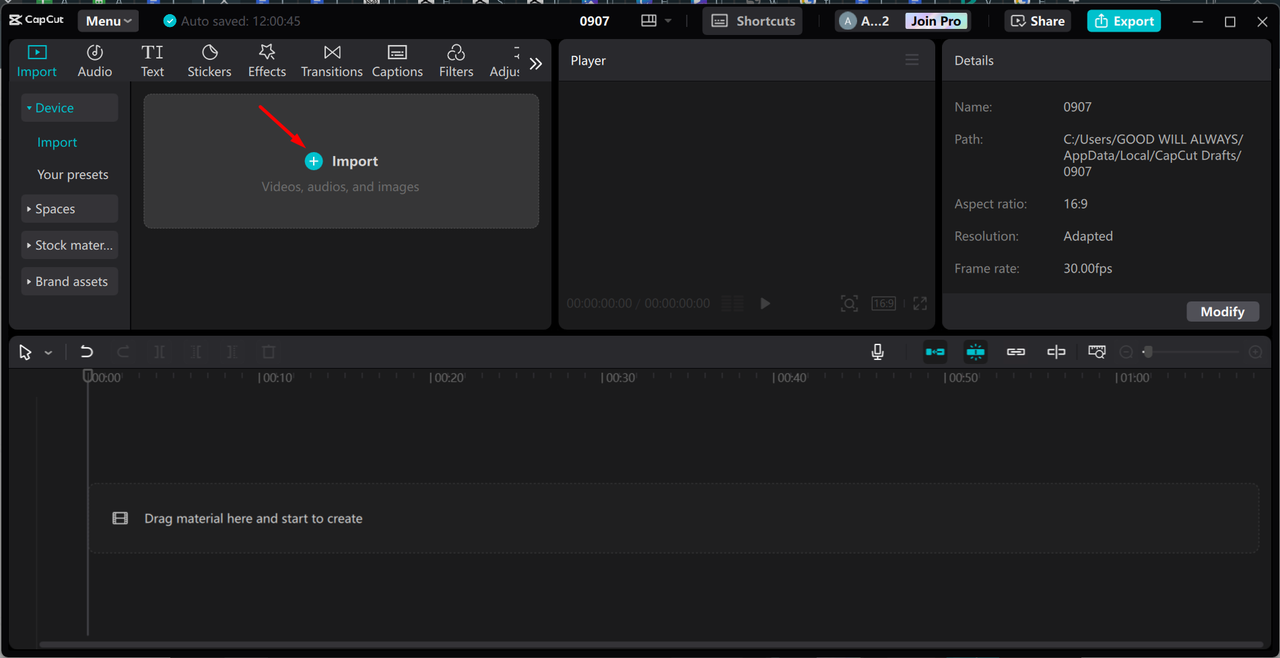
Now comes the actual conversion process. Drag your video from the library down to the editing timeline at the bottom of the screen. Locate the Ratio option (usually in the toolbar or settings menu) and select a landscape aspect ratio like 16:9. This immediately transforms your project canvas to widescreen format, with your portrait video centered between black bars on either side.
Address these empty spaces using CapCut’s smart editing tools. Navigate to the Basic section in the right-side editing panel and find the Auto Reframe feature. Select this tool and choose the 16:9 ratio option again. The software will analyze your video content and automatically adjust the framing to fit the landscape format, often by tracking your main subject and keeping it properly positioned.
For manual control, use the Resize option available above the timeline to adjust your video’s size and position precisely. To handle the empty side spaces more creatively, return to the Basic tab and find the Canvas options. Select the Blur feature, which generates a blurred extension of your video to fill the empty areas professionally while keeping attention focused on your main content.
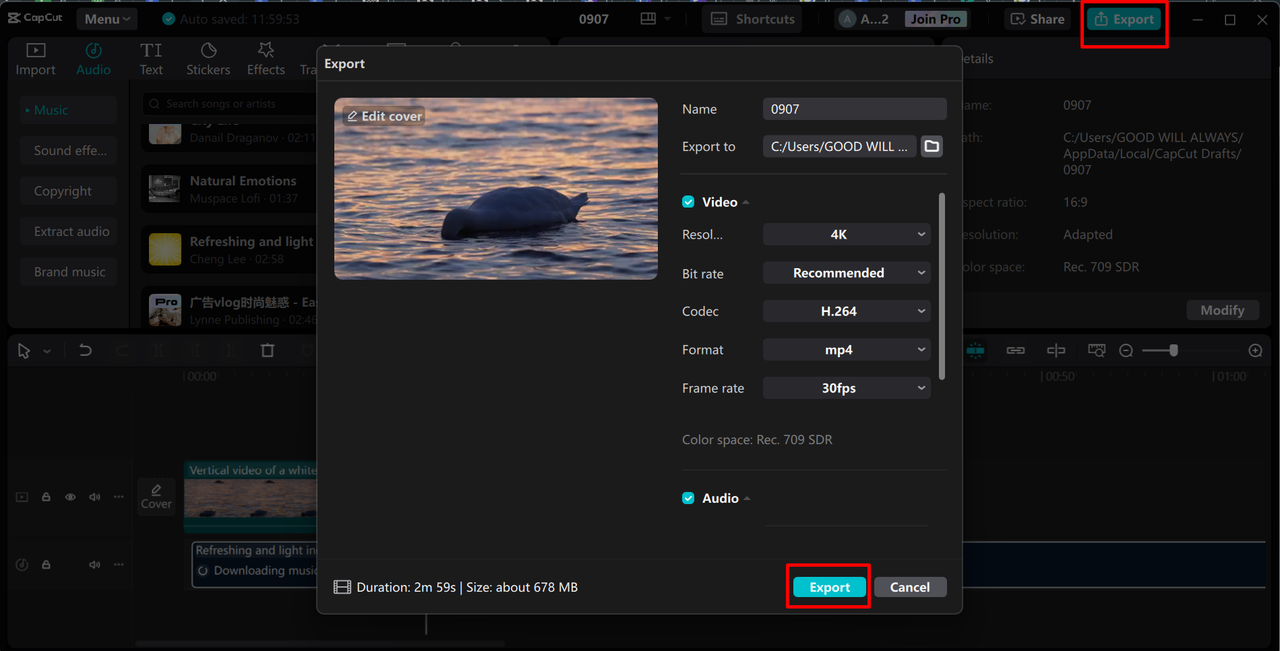
When satisfied with your landscape conversion, click the Export button in the top-right corner. A settings window appears where you can name your file, choose quality parameters including resolution and frame rate, and select your destination folder. CapCut processes your video efficiently, after which you can save it locally or share directly to platforms like YouTube or TikTok.
CapCut — Your all-in-one video & photo editing powerhouse! Experience AI auto-editing, realistic effects, a huge template library, and AI audio transformation. Easily create professional masterpieces and social media viral hits. Available on Desktop, Web, and Mobile App.

Download App | Sign Up for Free
CapCut stands out for its comprehensive feature set that makes it simple to convert portrait video to landscape. The adjustable aspect ratios accommodate any platform requirements, while the auto-reframe technology saves significant time on manual adjustments. Multiple background options and extensive format compatibility make this desktop solution ideal for serious video creators.
Online Conversion with Clideo
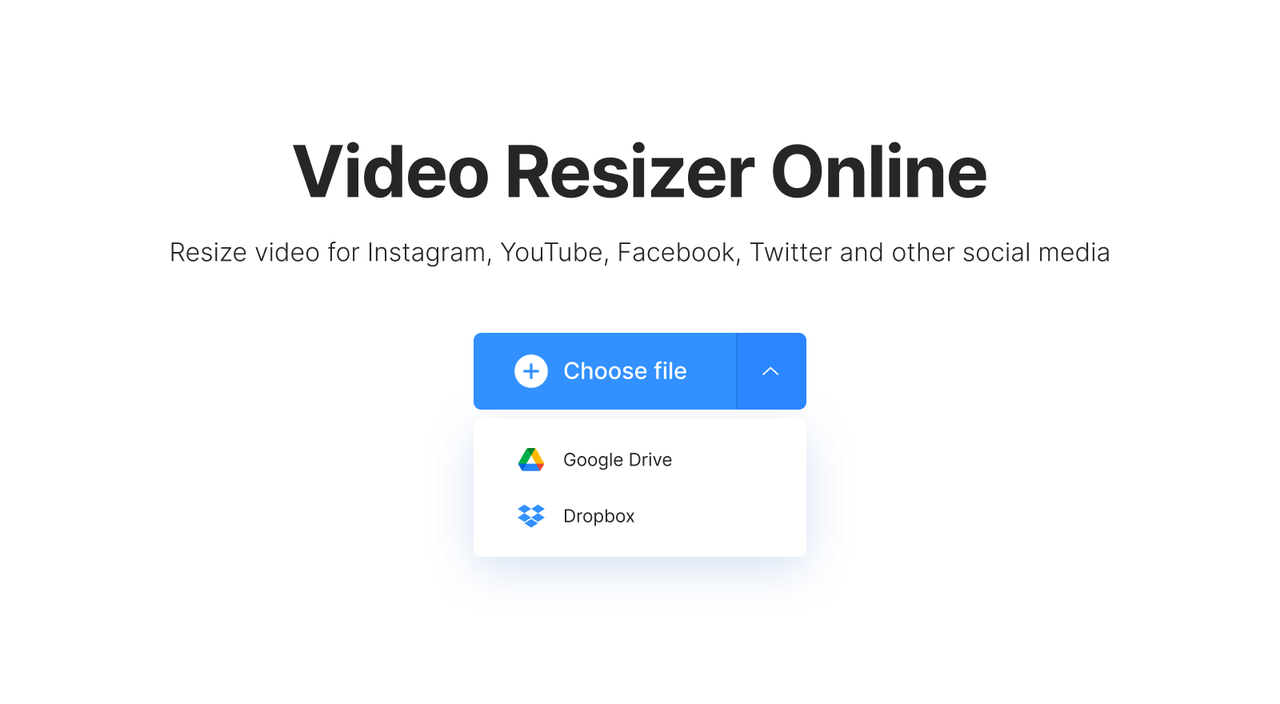
For those who prefer not to download software or are working on shared computers, online tools like Clideo offer a convenient alternative to convert portrait video to landscape. This web-based platform provides robust editing capabilities directly through your browser, requiring nothing but an internet connection.
Begin by navigating to Clideo’s video resizer page in your web browser. You’ll find a prominent Choose File button—click this to select your portrait video from your local storage. The platform also supports importing directly from cloud storage services like Google Drive or Dropbox, adding flexibility to your workflow.
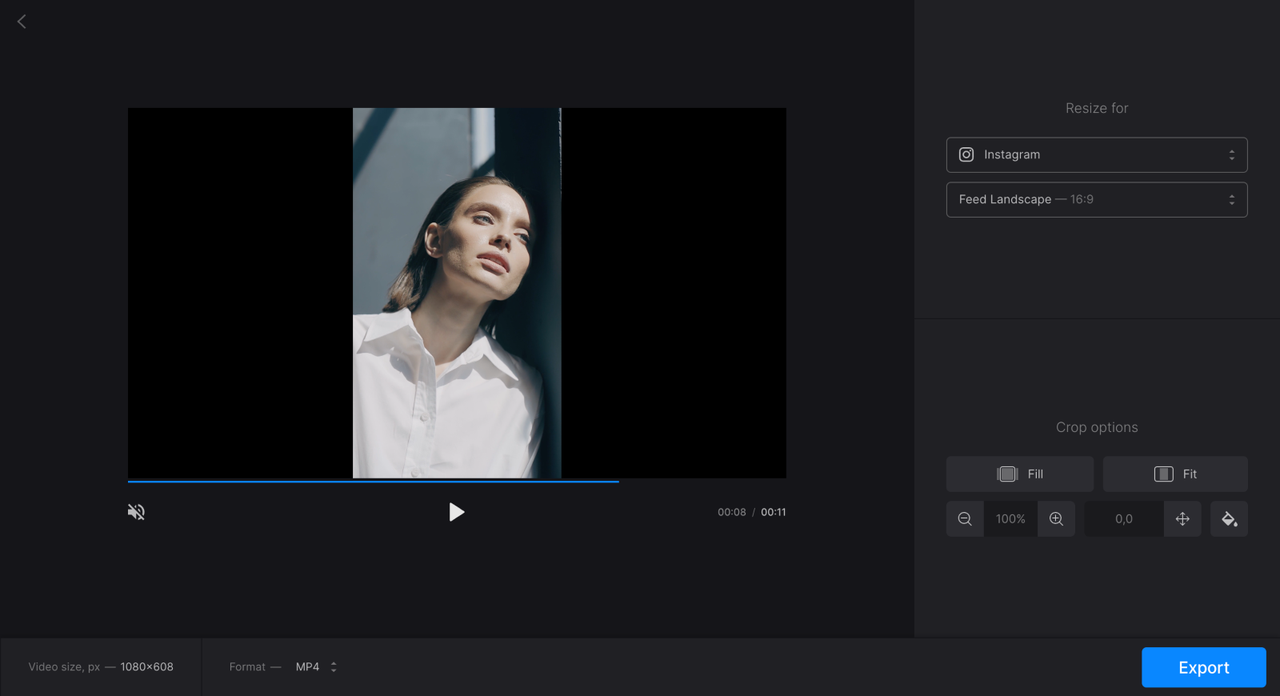
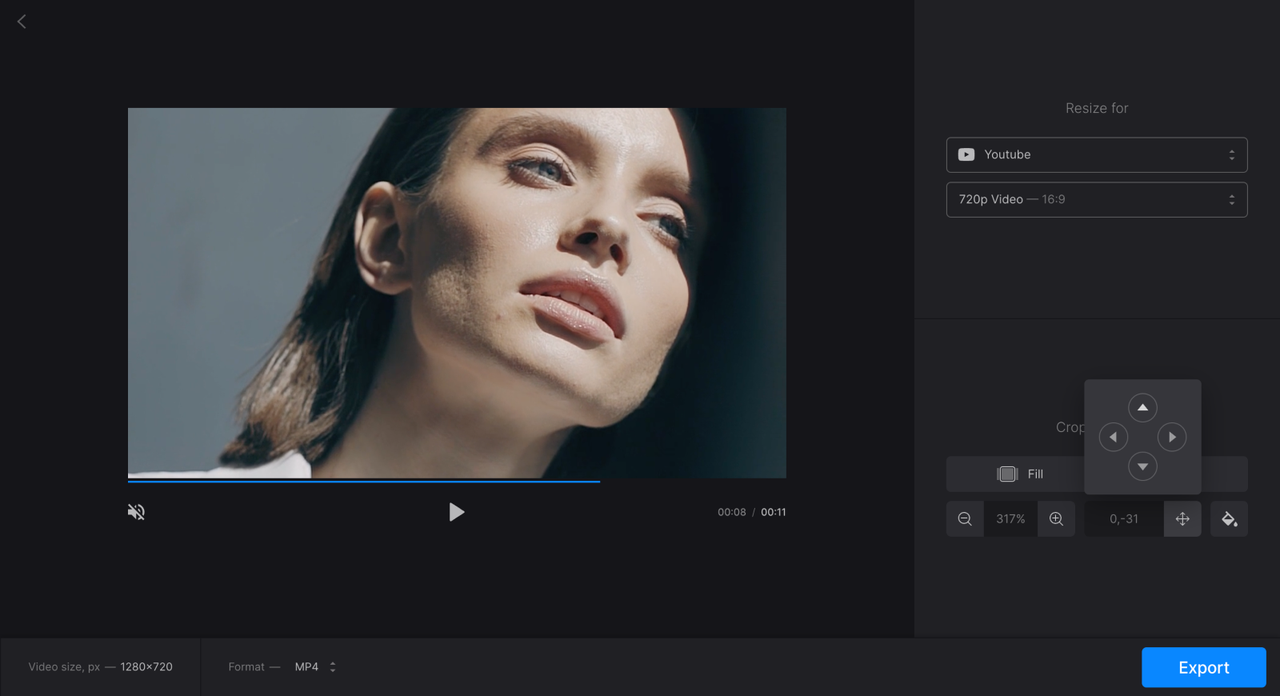
Once your video uploads completes, you’ll access the editing interface where the orientation transformation occurs. Locate the Resize For section where you can choose from preset options—select 16:9 for standard landscape format or enter custom dimensions if you have specific requirements.
Next, decide how to handle the conversion process using the Fill or Fit options. The Fill option crops your video to eliminate black bars, which works well if you can afford to lose some content from the top and bottom of your original footage. The Fit option preserves your entire original video centered within the new landscape frame, then adds content to the empty side spaces.
If you choose Fit, you’ll need to address those empty areas. Click the paint bucket icon to access background options including blur effects (which create a professional-looking extension of your video) or solid color fills. Use the zoom and position sliders to fine-tune how your main video appears within the new landscape framework.
When your converted video looks perfect, click the Export button on the right side of the interface. Clideo processes your video (which may take moments depending on length and internet speed), then provides a download link to save your new landscape video to your device.
Clideo’s browser-based approach makes it incredibly accessible across devices without installation requirements. Support for numerous video formats and intuitive controls make this an excellent choice for quick conversions when you need to convert portrait video to landscape without software downloads.
Mobile Conversion with CapCut App
Since smartphones are where most of us capture video initially, having mobile editing capabilities is incredibly valuable. The CapCut mobile app delivers powerful editing features right on your device, making it simple to convert portrait video to landscape directly from your phone.
Start by downloading the CapCut app from your device’s app store (available for both iOS and Android). The installation process is quick and straightforward, after which you can launch the application and immediately begin working on your projects.
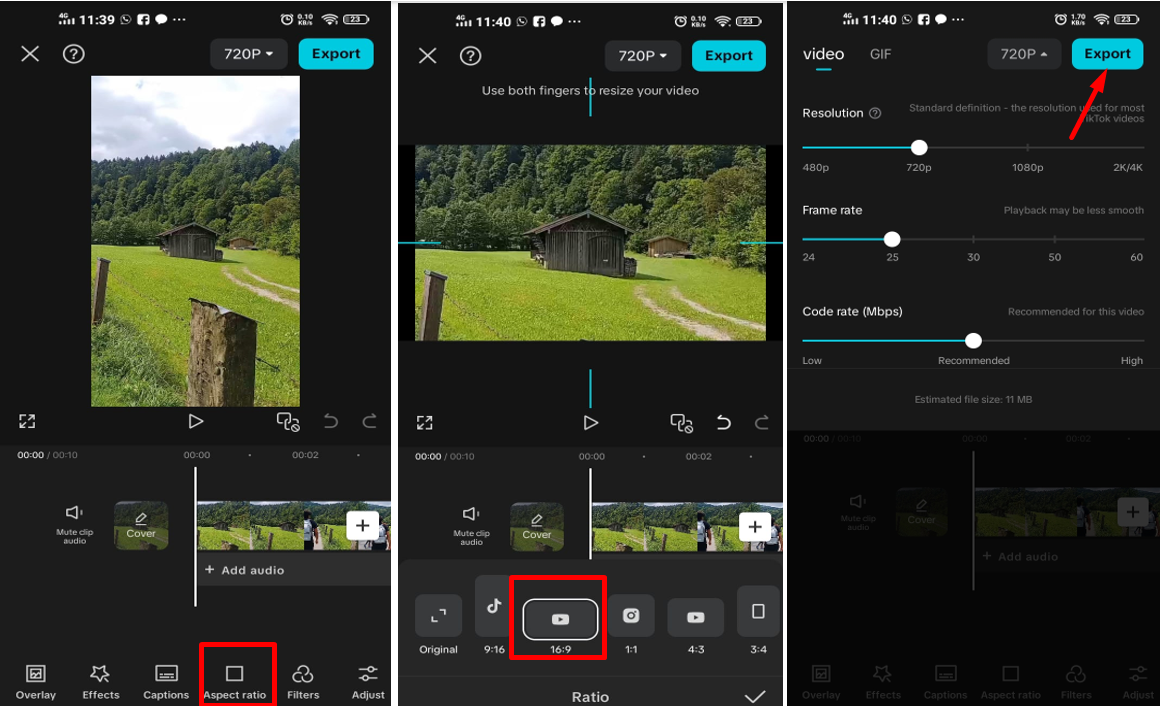
Open the app and select New Project to initiate your editing session. This accesses your phone’s gallery where you can select the portrait video you want to transform. Tap your chosen video and select Add to import it into your CapCut project.
Within the editing interface, locate the aspect ratio icon typically found at the bottom of the screen (it usually appears as a rectangle or dimension indicator). Tap this icon to view available ratio options including 9:16 (portrait), 1:1 (square), and 16:9 (landscape). Select 16:9 to convert your project to landscape format.
Your video now appears centered within the landscape frame. Use pinch gestures to zoom your video larger, filling more of the wide screen while maintaining important elements visible. Drag your video to reposition it within the frame, ensuring key subjects remain properly framed despite the aspect ratio change.
The app may offer automatic reframing features—look for options labeled Auto or Fit to Screen that can handle these adjustments automatically. Once satisfied with your video’s positioning within the landscape frame, you can further enhance your project with filters, text, stickers, or music available within the app.
When your converted video meets your expectations, tap the export icon (typically an upward arrow in the top-right corner) to save your landscape video to your device’s camera roll. From there, you can share directly to social platforms or messaging applications.
CapCut — Your all-in-one video & photo editing powerhouse! Experience AI auto-editing, realistic effects, a huge template library, and AI audio transformation. Easily create professional masterpieces and social media viral hits. Available on Desktop, Web, and Mobile App.
Download App | Sign Up for Free
The CapCut mobile app excels particularly for social media creators thanks to its platform-specific presets and streamlined sharing options. The ability to quickly convert portrait video to landscape directly on your shooting device makes for an incredibly efficient workflow from capture to publication.
Professional Landscape Shooting Techniques
While knowing how to convert existing footage is valuable, capturing properly framed landscape videos from the start saves time and often yields superior results. These techniques will help you create better landscape-oriented content right from the recording stage.
Lighting quality dramatically impacts your video’s professional appearance. For outdoor shooting, natural light during golden hour (the hour after sunrise or before sunset) provides flattering, soft illumination that enhances landscapes beautifully. Avoid harsh midday sun that creates unflattering shadows and contrast issues.
Stabilization separates amateur footage from professional-looking content. Use tripods whenever possible, or stabilize your camera against solid surfaces if tripods aren’t available. Enable your device’s built-in stabilization features and consider movement techniques like slow, smooth pans rather than quick, jerky motions.
Composition principles significantly enhance your landscape videos. Implement the rule of thirds by imagining your frame divided into nine equal sections with two horizontal and two vertical lines. Position important elements along these lines or at their intersections rather than centering everything, creating more dynamic and engaging footage.
Always record at the highest resolution your device supports. Higher resolution provides flexibility during editing, allowing cropping and zooming without noticeable quality loss. It also future-proofs your content as display technologies continue advancing toward higher definition standards.
Consider narrative elements within your landscape shots. Look for natural leading lines like paths, rivers, or architectural elements that guide viewers’ eyes through your frame. Pay attention to background details that might distract from your main subject, and adjust your positioning to create cleaner, more focused compositions.
Selecting Your Conversion Approach
Transforming portrait videos to landscape format represents an essential skill in today’s multi-platform content environment. This ability allows you to repurpose content across different viewing contexts while maintaining professional quality standards.
We’ve explored multiple methods to convert portrait video to landscape, from AI-assisted stretching to background addition techniques. Each approach offers distinct advantages depending on your specific content needs and quality requirements.
For quick, software-free conversions, online tools like Clideo provide accessible solutions through web browsers. For mobile editing convenience, the CapCut app delivers powerful features right on your shooting device. For maximum control and highest quality outcomes, the CapCut desktop editor offers the most comprehensive toolset for serious video projects.
The CapCut desktop solution particularly stands out for its balance of advanced features and user-friendly interface, making the process to convert portrait video to landscape both efficient and effective regardless of your experience level.
Common Conversion Questions
Can you actually convert portrait videos to landscape format? Absolutely! Converting portrait videos to landscape is not only possible but increasingly common with today’s editing tools. Applications like CapCut provide specific features designed to handle aspect ratio changes while maintaining video quality through intelligent reframing and processing techniques.
Does orientation conversion affect video quality? Quality impact depends entirely on your conversion method. Simple rotation preserves quality perfectly but may create viewing issues. AI stretching and background addition methods can maintain quality when properly implemented. Using professional tools like CapCut ensures minimal quality loss through optimized processing algorithms.
Are there quick methods for aspect ratio changes? Yes! Auto-reframe features in applications like CapCut can analyze your video and automatically adjust the framing for landscape format in seconds. These AI-powered tools save significant time compared to manual adjustment while delivering professional-looking results.
Some images courtesy of CapCut