TOOL HUNTER

Have you ever been watching a video and had to constantly adjust the volume because some parts were too quiet while others were too loud? It’s really annoying, right? Well, there’s a solution for that called audio normalization, and it’s something you can do pretty easily with editing software like Premiere Pro. Whether you’re making videos for YouTube, recording podcasts, or putting together presentations, knowing how to normalize audio in Premiere Pro can make your content sound so much more professional.
Audio normalization is all about making sure your sound levels are consistent throughout your whole project. It doesn’t change how your audio actually sounds – it just adjusts the volume so everything plays at a comfortable level for your listeners. The cool thing is you can normalize audio premiere pro style on single tracks or multiple tracks at the same time.
What Exactly Is Audio Normalization?
So what does it mean to normalize audio? Basically, it’s a process that adjusts the volume levels of your recording without messing with the actual sound quality. It’s not about changing how things sound – it’s about making sure your audio file plays at a consistent level that’s comfortable for your audience.
The great thing about learning how to equalize audio in premiere pro is that you can work on one track or multiple tracks simultaneously. And it maintains the balance between loud and quiet parts – the dynamic range stays the same, everything just gets adjusted to a better volume level.
You’ll want to use audio normalization when you need to make your audio as loud as possible without causing distortion. This is super common in podcast production, but it’s useful for all kinds of audio work. Some specific situations where you’d want to normalize audio include matching volume between different segments like ads, music, and spoken parts; evening out volume differences when you’ve recorded in different locations; and boosting quiet tracks to prepare them for mixing and mastering.
Different Ways to Normalize Audio in Premiere Pro
The good news is that normalizing audio in Premiere Pro is actually pretty straightforward. Whether you’re working with a single audio clip or multiple tracks, Premiere Pro gives you several ways to normalize your audio to achieve that industry-standard sound quality.
Working Directly From the Timeline
One of the easiest ways to normalize audio is right from your editing timeline. Here’s how you do it:
First, import your audio clips and get them organized in your timeline. Just select the clips you want to work with and arrange them in the order you want. You can drag the sliders to see the audio waveforms, which helps you visualize where the high and low points are in your audio.
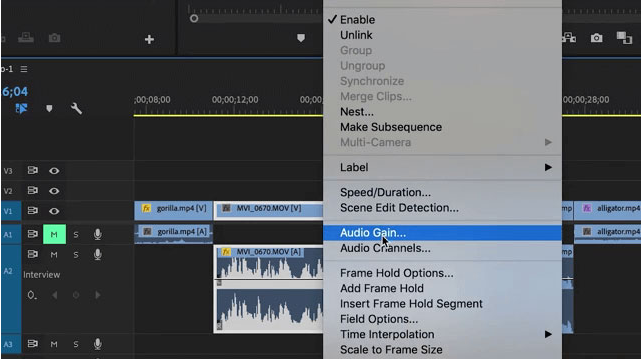
Next, select the audio clips you want to normalize. If you’re just working with one clip, right-click on it in the timeline and choose “Audio Gain” from the menu. If you need to work with multiple clips from the same track, you can hold down CTRL (on Windows) or CMD (on Mac) while clicking on each clip. Then right-click on any selected clip and choose Audio Gain. There’s even a keyboard shortcut – just press G – to open the audio gain dialog box.

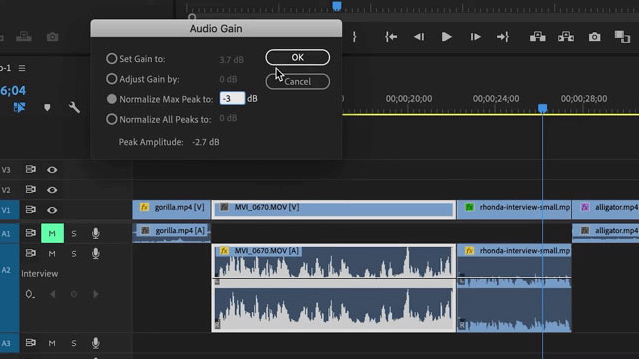
Now comes the actual normalization part. Premiere Pro automatically calculates the maximum peak amplitude for your selected audio clips and shows this value next to Peak Amplitude. You’ll want to select “Normalize Max Peak” and make sure to keep the audio level under 0dB to avoid clipping and distortion.

Here’s a pro tip: it’s usually smart to leave some headroom, maybe around -3dB, especially if you’re going to be applying other effects later that might affect volume. This works particularly well for speech content.
If you’re working with multiple clips, you might want to use the “Normalize All Peaks” option instead. This lets you set a gain target value that gets applied to all your selected clips, helping you find perfect audio levels quickly.
Using the Project Panel
Did you know you can also handle audio normalization with Premiere Pro directly from the project panel? This can be really handy if you want to normalize clips before you even add them to your timeline.
Start by importing your audio clips into Premiere Pro. You can do this by going to File > Import or using the keyboard shortcut CTRL+I (Windows) or CMD+I (Mac). Find the audio files you want to work with and drag them into your project panel area.
Once your audio files are in the project panel, right-click on them and select “Audio Gain” from the drop-down menu to open that familiar gain dialog box. If you need to select multiple audio files, use Shift+click to select a range or CTRL+click (Windows)/CMD+click (Mac) to select individual files. Again, you can press G to quickly access the gain dialog box.
In the audio gain dialog box, set your gain in dB for a single clip using the Normalize Max Peak option, or use Normalize All Peaks if you’re working with multiple audio files. Click OK when you’re done, and your audio levels will be normalized.
Normalizing Entire Tracks
Here’s another cool feature: when you use Adobe Premiere to normalize audio, you can actually normalize a whole audio track at once instead of working with individual clips. This can save you so much time!
First, import and arrange your audio sequence in the timeline. Then, on the sequence menu, click “Normalize Mix Track” to open the dialog box for this feature.

A new window will pop up where you can enter your preferred target dB level to normalize all your audio clips at once. Click OK to apply the changes and close the window.
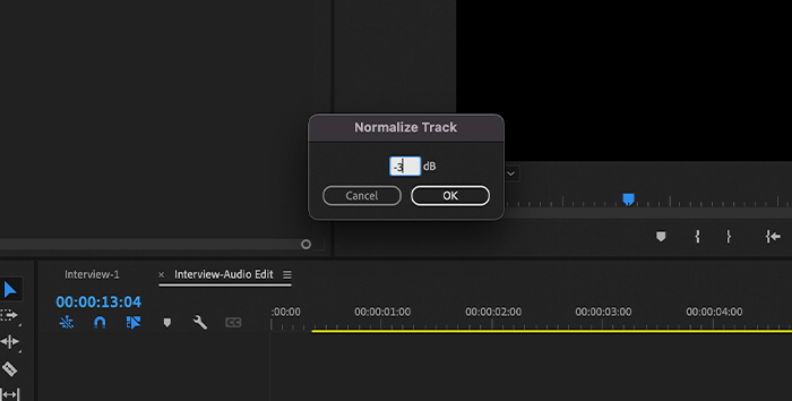
This method is super useful when you have a complete audio track that needs consistent volume levels throughout, like a voiceover narration or a podcast episode.
CapCut — Your all-in-one video & photo editing powerhouse! Experience AI auto-editing, realistic effects, a huge template library, and AI audio transformation. Easily create professional masterpieces and social media viral hits. Available on Desktop, Web, and Mobile App.

Great Alternative: CapCut for Audio Normalization
While Premiere Pro is definitely powerful, it’s not the only option out there. If you’re looking for alternatives, CapCut desktop video editor is definitely worth checking out. It’s designed for both professional and complex editing needs, and it includes some really impressive audio features.
CapCut offers powerful loudness normalization that helps ensure your viewers can hear your message clearly. No matter what recording equipment you used, CapCut can sharpen your audio loudness instantly for a smooth, professional listening experience.
Whether you’ve been creating content for years or you’re just starting out, CapCut makes it easy to achieve high-quality, evenly-balanced audio in your projects.
Getting Started with CapCut
First, download and install the CapCut desktop video editor from their official website. After installation, you can create an account using options like Google, TikTok, or Facebook credentials.
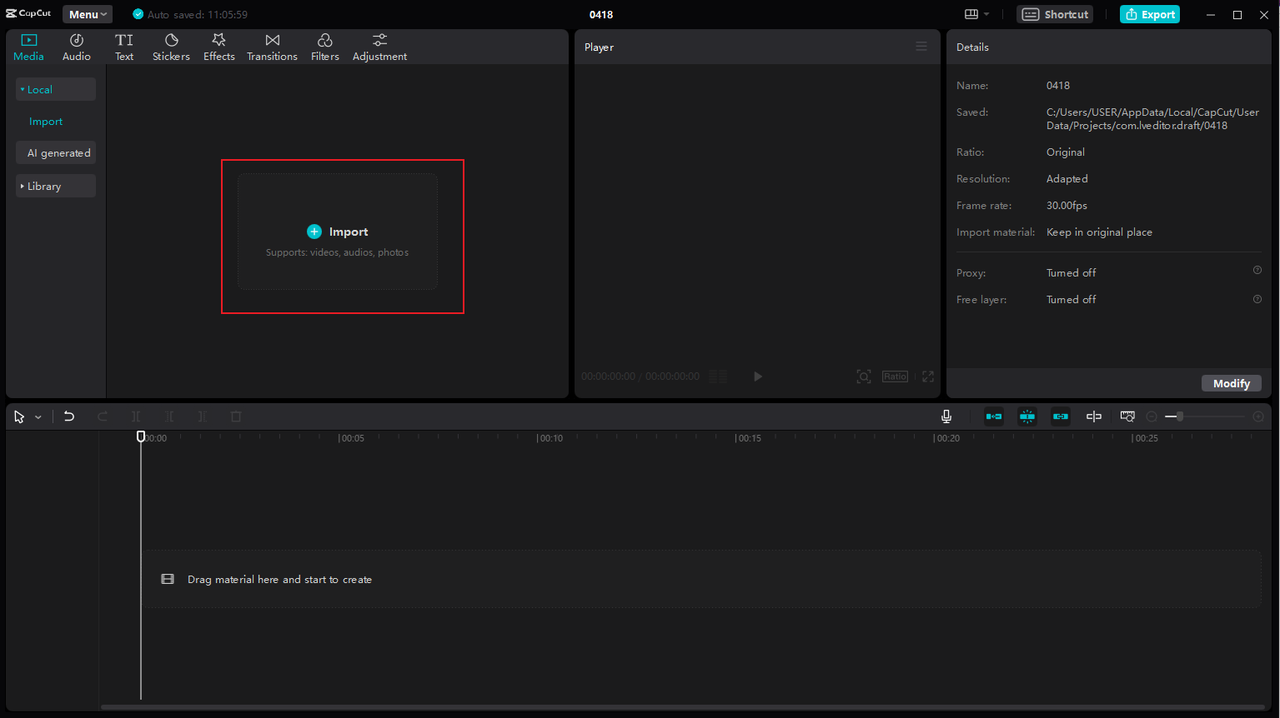
Once you’re set up, launch CapCut and click “New Project” to begin. Then click “Import” to upload the audio file you want to normalize from your computer. CapCut supports various formats including MP3, WAV, M4A, and FLAC, so you probably won’t have file compatibility issues.
Normalizing and Editing Your Audio
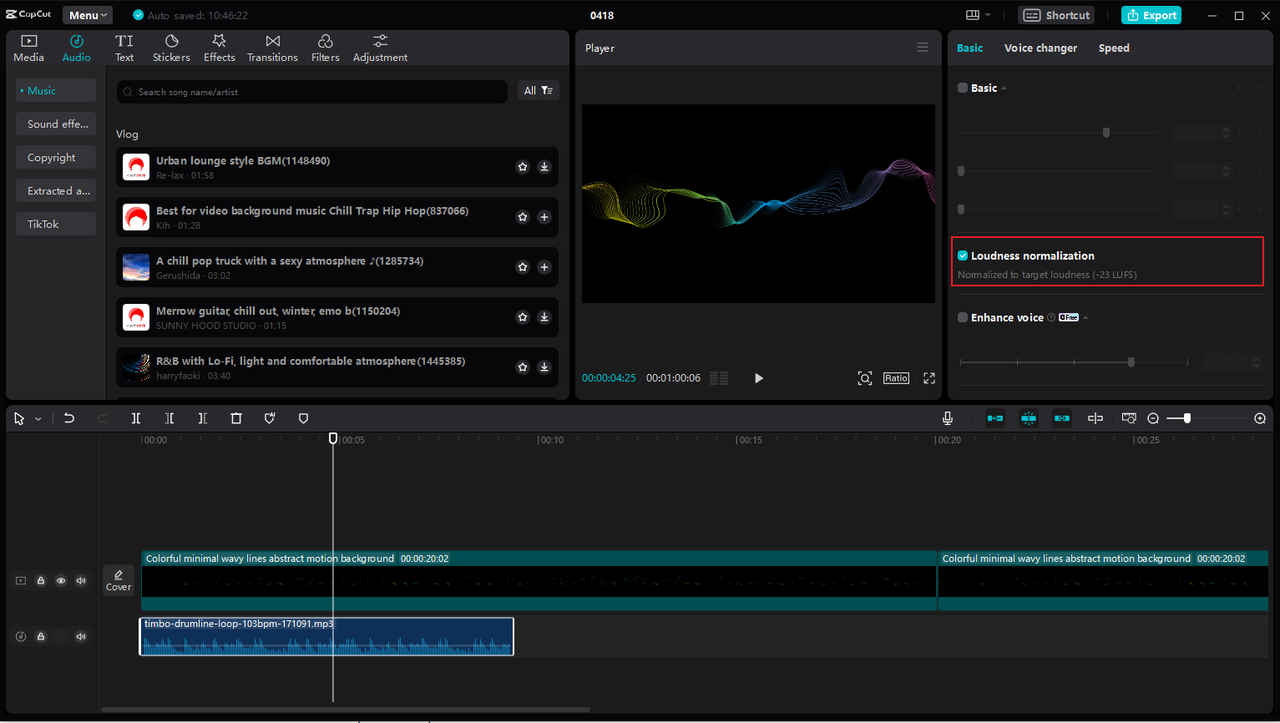
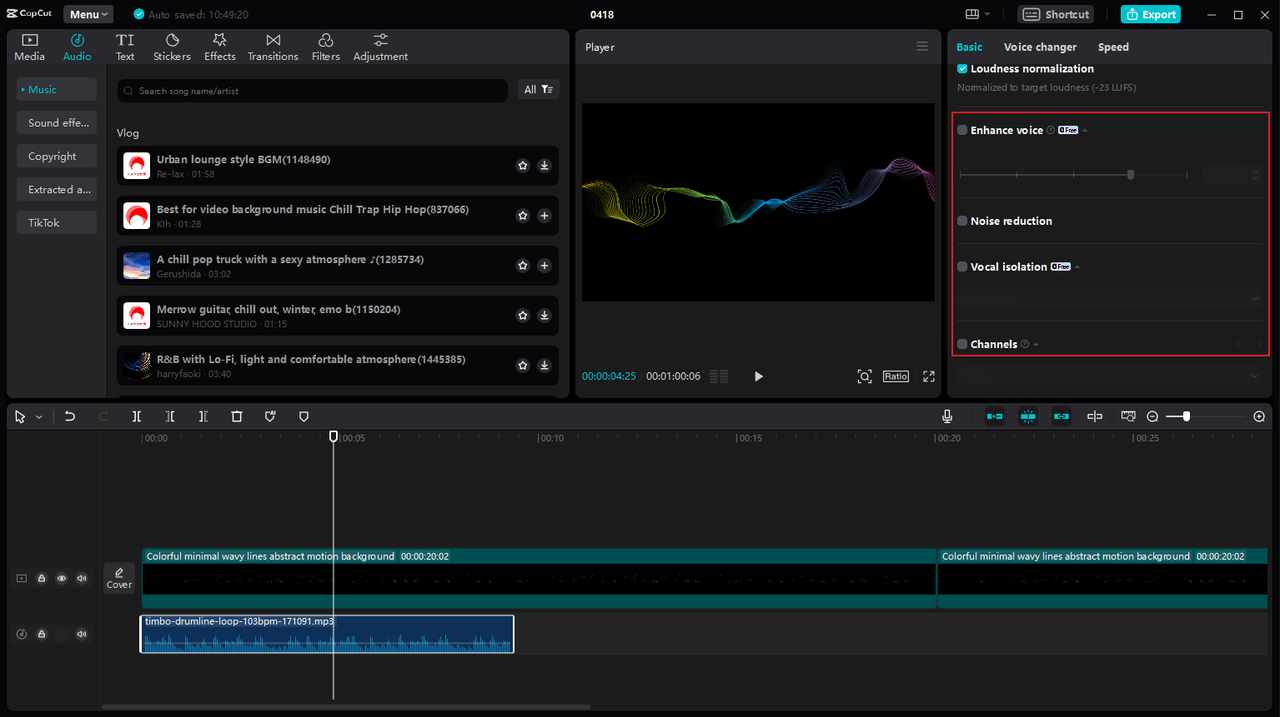
After importing your audio, drag it down to the timeline to start editing. Select the audio clip and find the Loudness Normalization feature on the right-hand toolbar. When you turn this on, CapCut automatically normalizes your audio to the target loudness of -23 LUFS, which follows the European Broadcasting Union standard.
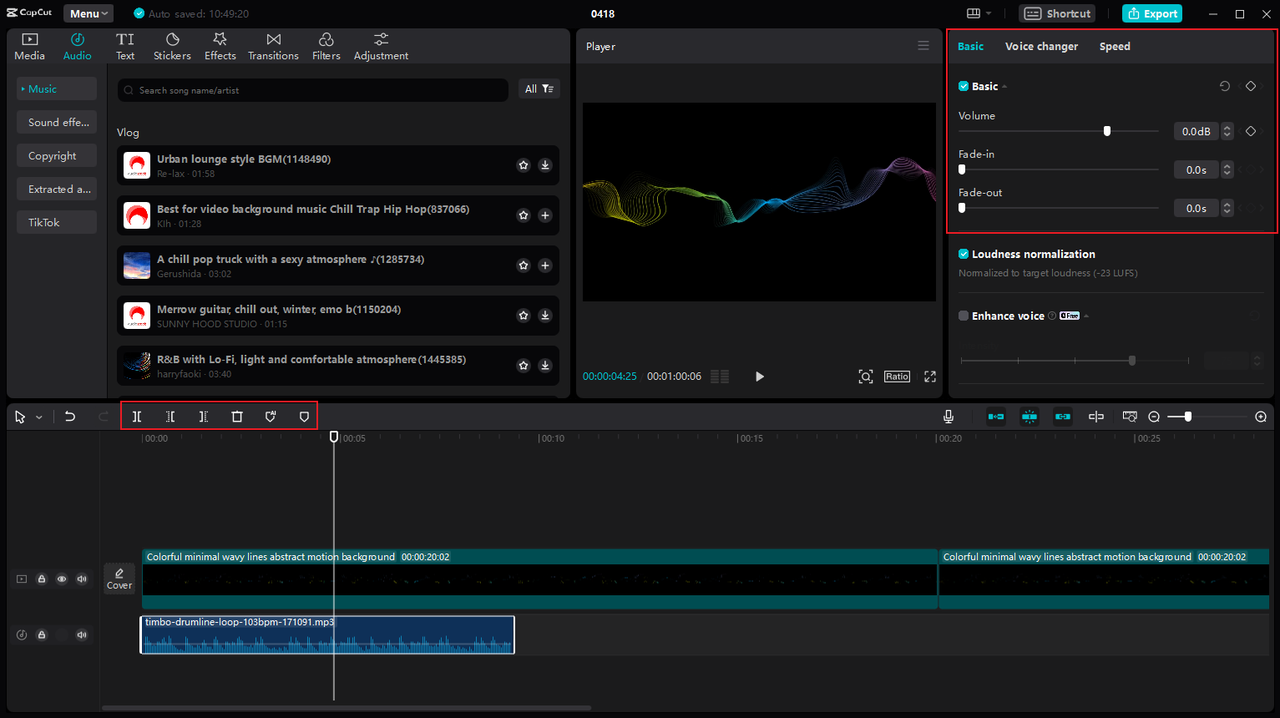
Once normalized, you can continue editing to perfect your audio. You might want to remove segments that don’t relate to your content, adjust volume in specific sections, add fade effects, or reduce background noise to minimize distractions.
CapCut also includes advanced audio editing features. The Enhance Voice and Vocal Isolation features help minimize background noise and improve speech clarity. You can also balance your audio frequency using the audio channels feature, which lets you adjust settings like filling right with left.
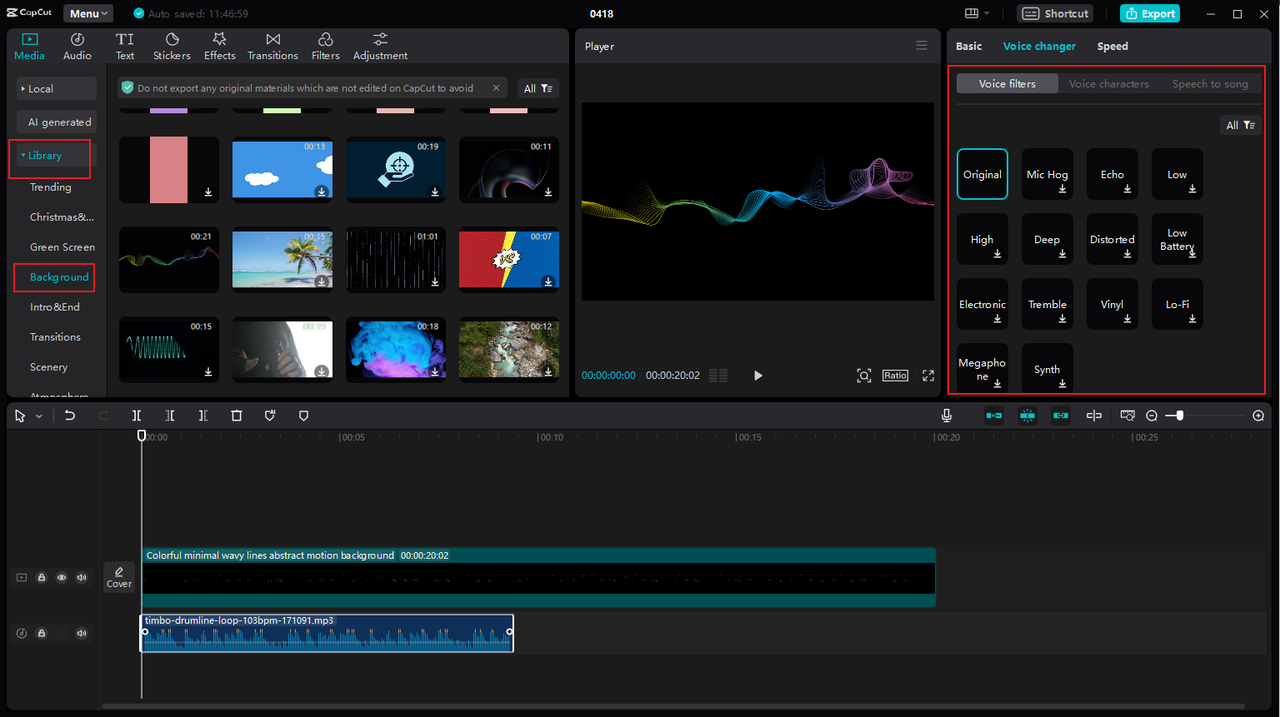
For creative projects, use the Voice Changer function to add voice filters and character effects that make your audio more engaging. You can also add background music from CapCut’s library to create more polished audio output.
Exporting Your Finished Audio
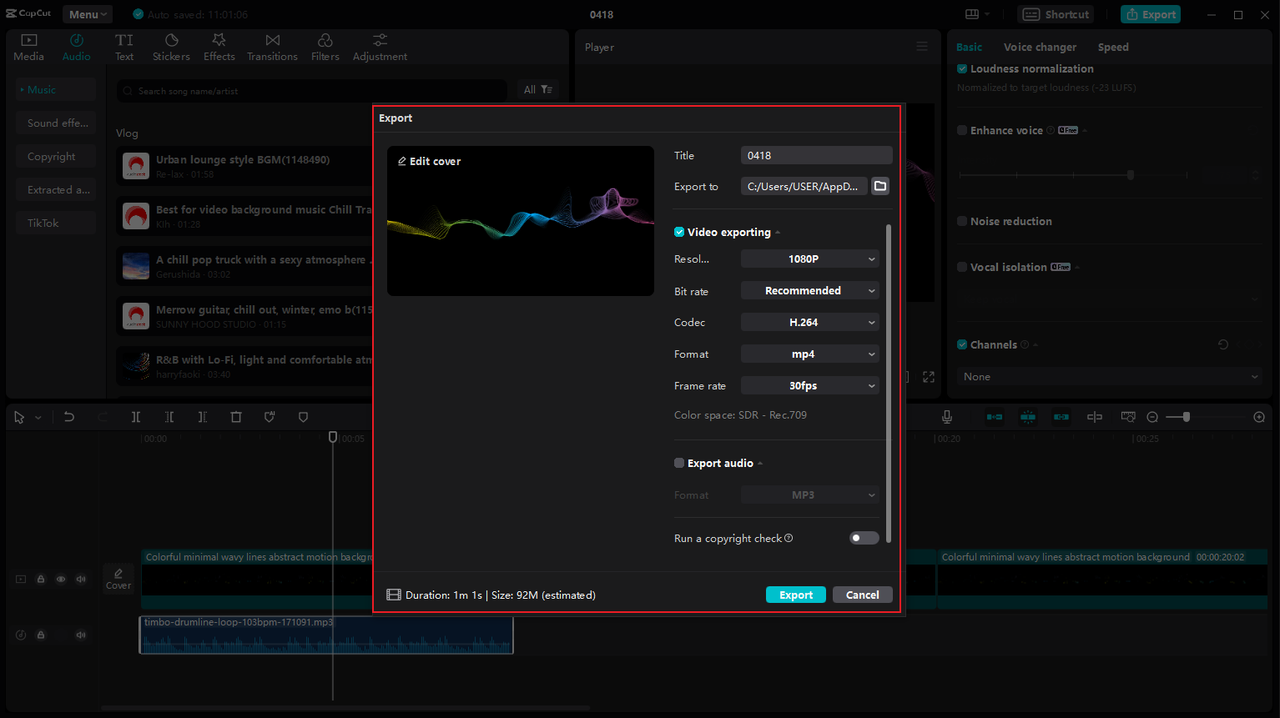
When you’re happy with your audio normalization and other edits, it’s time to export. The loudness normalization feature is available for free users to experiment with, but exporting final work requires subscribing to CapCut’s advanced features.
CapCut lets you export audio in four formats: MP3, WAV, AAC, and FLAC. Select your preferred format, click export, and your audio downloads to your computer.
Why CapCut Stands Out
Beyond normalization, CapCut offers several advantages over other desktop video editors. It provides extensive audio editing tools perfect for podcasters and interviewers who need clear voices even with imperfect recording conditions. Features like vocal removal, audio extraction, noise reduction, voice and pitch changing, and audio speed adjustment give you incredible control over your audio.
CapCut is also an all-in-one video editor that offers a powerful experience for content creators, advertisers, and marketers. It lets you blend various audio and video elements efficiently using features like keyframing, speed ramping, transitions, and transcript-based editing.
The program includes rich media resources like stock music, filters, effects, and stickers that help create professional results without sourcing assets elsewhere. For content creators, CapCut makes it easy to share work directly to platforms like YouTube and TikTok, helping you engage with your audience faster.
CapCut — Your all-in-one video & photo editing powerhouse! Experience AI auto-editing, realistic effects, a huge template library, and AI audio transformation. Easily create professional masterpieces and social media viral hits. Available on Desktop, Web, and Mobile App.
Wrapping Up
As we’ve seen, loudness normalization is super important for creating consistent volume across audio files or getting maximum volume from particular recordings. Differences between recording equipment make normalizing audio with Premiere Pro or similar tools essential for professional results.
Using tools like Adobe Premiere Pro to normalize audio can automatically make your audio sound louder and more consistent. But if you’re exploring alternatives, CapCut desktop video editor is also incredibly helpful for achieving balanced audio mixes. With CapCut, you can not only normalize audio but also reduce noise, change vocals, apply voice filters, and adjust speed to make your audio more memorable and impactful.
Learning how to equalize audio in Premiere Pro or similar tools is a skill that will dramatically improve your content quality. Whether you stick with Premiere Pro or try alternatives like CapCut, taking time to properly normalize your audio makes a huge difference in how professional your projects sound.
Common Questions Answered
Does Normalizing Affect Audio Quality?
No, normalizing audio with Premiere Pro only adjusts volume levels and doesn’t affect actual sound quality. The process is non-destructive and simply makes everything consistently louder without changing the audio’s character.
If you find Premiere Pro has a steep learning curve, consider trying CapCut desktop video editor, which can also help achieve high-standard audio quality while normalizing your audio. CapCut helps create clear, intelligible audio for effective audience communication. It also includes advanced audio editing features like vocal removal, noise reduction, voice enhancement, and voice-changing filters.
What’s the Ideal Audio Level for Normalization?
Typically, 0dB is considered standard audio level, but when doing Premiere Pro loudness normalization, it’s often better to use -3dB if you plan to apply other effects later. This provides headroom to work with.
If using CapCut desktop video editor instead, it follows the European Broadcasting Union recommendation of -23 LUFS, giving your audio uniform volume that works well across different platforms and devices.
What DB Levels Should I Use?
When you normalize audio with Premiere, keep your audio under 0dB to avoid clipping and distortion. This is crucial because clipping can make audio sound terrible and unprofessional.
If working with a Premiere alternative like CapCut desktop video editor, you can easily create great-sounding audio with their loudness normalization set to -23 LUFS. This standard helps ensure your audio sounds good on various playback systems and platforms.
Some images courtesy of CapCut