TOOL HUNTER

Have you ever been listening to your favorite playlist or podcast and suddenly had to scramble for the volume controls because one track was way too quiet and the next one blasted your ears? That’s one of the most common frustrations in audio listening, and it happens because different recordings are made at different volume levels. Luckily, there’s a technique called loudness normalization that can fix this issue, and Audacity is one of the best tools to help you achieve consistent volume across all your audio files.
Whether you’re editing podcasts, mixing music tracks, or working on video sound design, learning how to use Audacity to normalize audio will make your projects sound professional and polished. This guide will walk you through everything you need to know about loudness normalization, from the basic concepts to step-by-step instructions for both single files and batch processing. We’ll also explore some alternative tools if you’re looking for options beyond Audacity’s capabilities.
Understanding Loudness Normalization
Before we dive into the practical steps, let’s clarify what we mean by loudness normalization. When we talk about what is loudness normalization, we’re referring to the process of adjusting audio recordings to achieve a consistent perceived volume level. It’s important to understand that this doesn’t mean making every moment equally loud, but rather ensuring that the overall listening experience remains consistent across different tracks or segments.
The need for loudness normalization becomes obvious when you consider how annoying it is to constantly adjust your volume when switching between audio sources. This happens because different recordings are captured at different levels, and without normalization, these variations can create a jarring listening experience.
To truly grasp how normalization works, it helps to understand three key technical concepts: RMS, LUFS, and peak levels. RMS (Root Mean Square) measures the average loudness of an audio signal over time, which closely matches how humans perceive volume. LUFS (Loudness Units Full Scale) is a standardized measurement unit that streaming platforms like Spotify and YouTube use to maintain consistent volume across their content. Peak levels measure the highest points in your audio waveform, which are important for preventing distortion but don’t necessarily reflect how loud something sounds to our ears.
Audacity offers excellent tools for audio normalization, and understanding these concepts will help you make the most of its features. The Audacity normalize audio function is particularly useful for fixing volume inconsistencies in your projects.
How to Normalize Audio in Audacity
If you’re wondering how to use Audacity to equalize volume across your audio files, you’ll be pleased to know that the process is straightforward and user-friendly. The Audacity normalize audio feature is easily accessible through the effects menu, and with just a few clicks, you can significantly improve your audio quality.
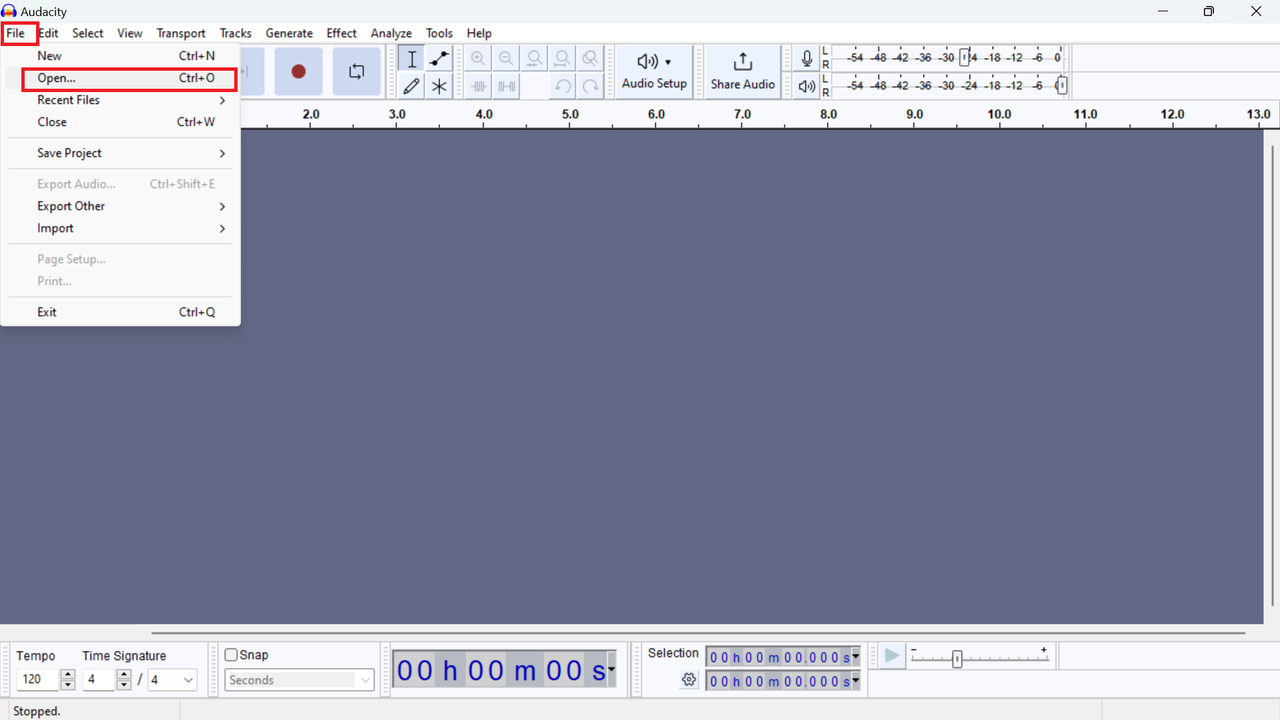
Let’s walk through the normalization process step by step. First, you need to get your audio file into Audacity. If you haven’t installed Audacity yet, you can download it for free from the official website. Once installed, open the program and click on “File” in the top left corner, then select “Open” to locate and load your audio file.
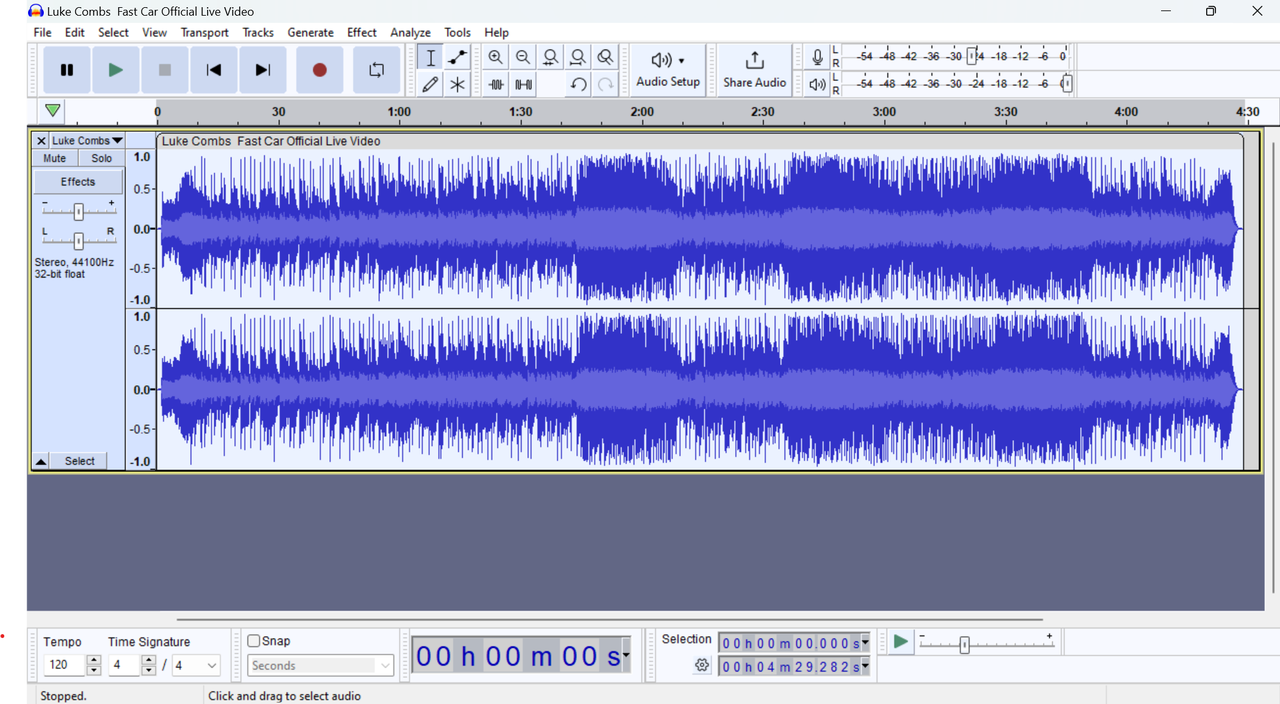
After your audio file is loaded, select the portion you want to normalize. For the entire track, use the keyboard shortcut Ctrl+A (or Cmd+A on Mac). You’ll see the audio waveform highlighted, indicating your selection.

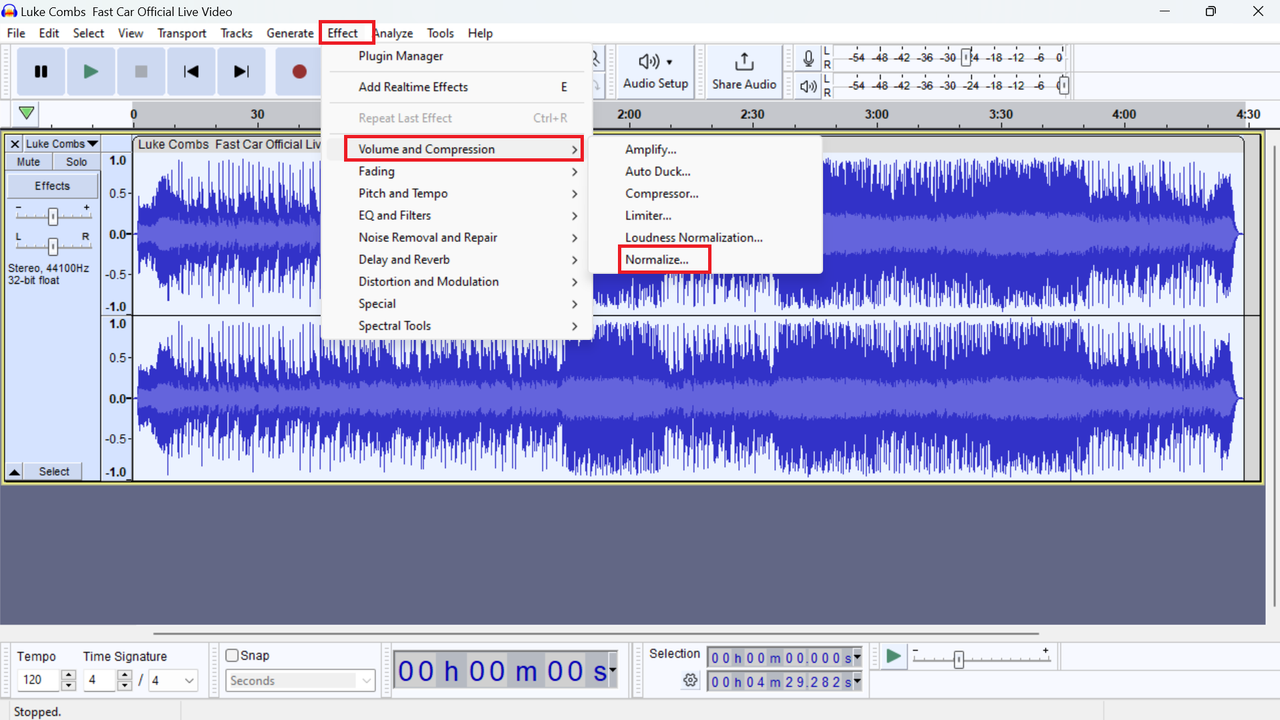
Next, navigate to the “Effect” menu at the top of your screen. From the dropdown, go to “Volume and Compression” and select “Normalize.” This opens the normalization options window.

The normalization window presents several options. The first option, “Remove DC offset,” ensures your waveform is properly centered on the 0.0 line. DC offset can cause issues and reduce available headroom for other effects if not addressed.
The second option lets you set your target peak amplitude, typically to -1.0 dB. This setting provides some headroom to prevent distortion while still achieving good volume levels. The dB (decibel) is the unit used to measure audio levels, and setting this to -1.0 dB means your audio will be adjusted so its loudest peak reaches just below the maximum level.
There’s also an option to “Normalize stereo channels independently,” which is useful when working with recordings that have different audio on left and right channels, such as separate microphone recordings. For regular music or mono recordings, you can leave this option unchecked.

Before applying the effect, use the Preview button to hear how your audio will sound after normalization. This plays about six seconds of audio, allowing you to verify the results before processing the entire track.
If everything sounds good, click OK, and Audacity will apply the normalization effect. The processing time depends on the length of your audio file.
This Audacity normalization process works well for single files, but what if you have multiple files that need consistent volume levels? That’s where batch processing becomes invaluable.
Batch Normalization with Audacity
When working on projects with multiple audio files that all need consistent volume levels, processing them individually would be time-consuming. Fortunately, Audacity offers batch processing capabilities that let you normalize multiple files simultaneously.
The batch normalization process shares similarities with single-file normalization but with some differences in approach. Here’s how to use Audacity to equalize volume across multiple files efficiently.
First, open Audacity and go to File > Open. Instead of selecting just one file, hold down the Ctrl key (or Cmd on Mac) while clicking on all the files you want to process.

Once all files are loaded, each appears as a separate track in the Audacity workspace. Select all tracks using Ctrl+A (or Cmd+A on Mac), which highlights all audio waveforms.
Now, as with a single file, go to the Effect menu, choose Volume and Compression, and select Normalize. The same options window appears with the settings we discussed earlier.
When you apply normalization to multiple tracks, Audacity processes each file independently. Each audio file adjusts to reach the target peak level you set, regardless of its original volume. So if you set normalization to -1.0 dB, each track will adjust so its loudest point reaches -1.0 dB.
This capability is incredibly useful for creating consistent volume across podcast episodes, music compilations, or any collection of audio files that need to sound uniform.

After processing, you can export each file individually or use Audacity’s export multiple feature to save all normalized files at once.
While Audacity’s normalization features are powerful, it’s worth noting that they primarily use peak normalization, which adjusts based on the highest points in your audio. This approach works well for many purposes, but other methods might better match how we perceive loudness.
CapCut — Your all-in-one video & photo editing powerhouse! Experience AI auto-editing, realistic effects, a huge template library, and AI audio transformation. Easily create professional masterpieces and social media viral hits. Available on Desktop, Web, and Mobile App.

Exploring Alternatives: CapCut for Audio Normalization
While Audacity remains a popular choice for audio editing, it’s not the only option available. If you’re looking for alternatives with different features or workflows, CapCut desktop video editor presents an interesting alternative with robust audio normalization capabilities.
Although primarily known as a video editor, CapCut includes impressive audio editing features, including loudness normalization tools that might appeal to certain users. What makes CapCut stand out as an audio editing alternative?
First, CapCut offers a comprehensive suite of audio editing tools beyond basic normalization. These include voice isolation, noise reduction, voice changer effects, and speed adjustment capabilities—all valuable for complex audio projects.
Second, if you’re working with video content alongside audio, CapCut provides an integrated editing environment. You can edit video and audio simultaneously with access to features like scene splitting, transcript-based editing, transitions, text overlays, effects, stickers, and filters.
Third, CapCut includes a library of media resources to enhance your projects. You can add sound effects from their collection or apply various audio filters to achieve specific sonic characteristics.
Finally, CapCut simplifies sharing your finished projects directly to platforms like TikTok and YouTube without leaving the editor.
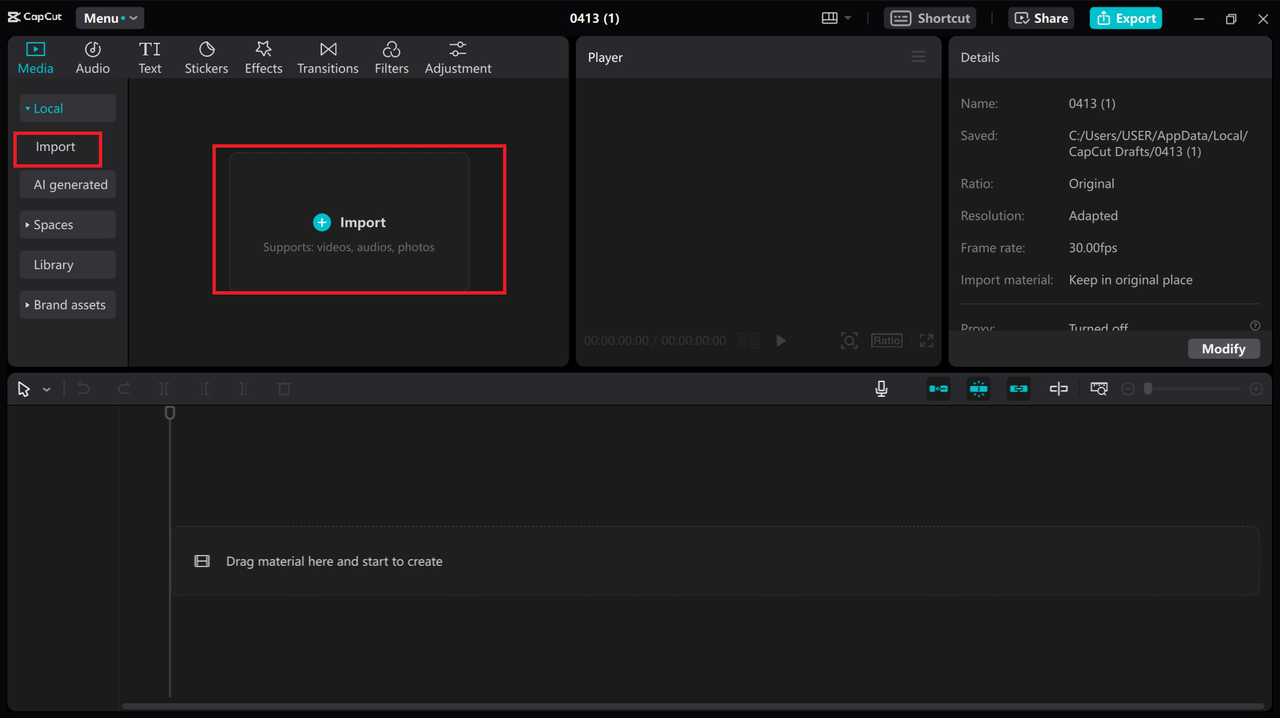
Now let’s explore how to use CapCut for loudness normalization. First, ensure you have the CapCut desktop app installed on your computer. Once opened, start a new project by selecting “New Project.”
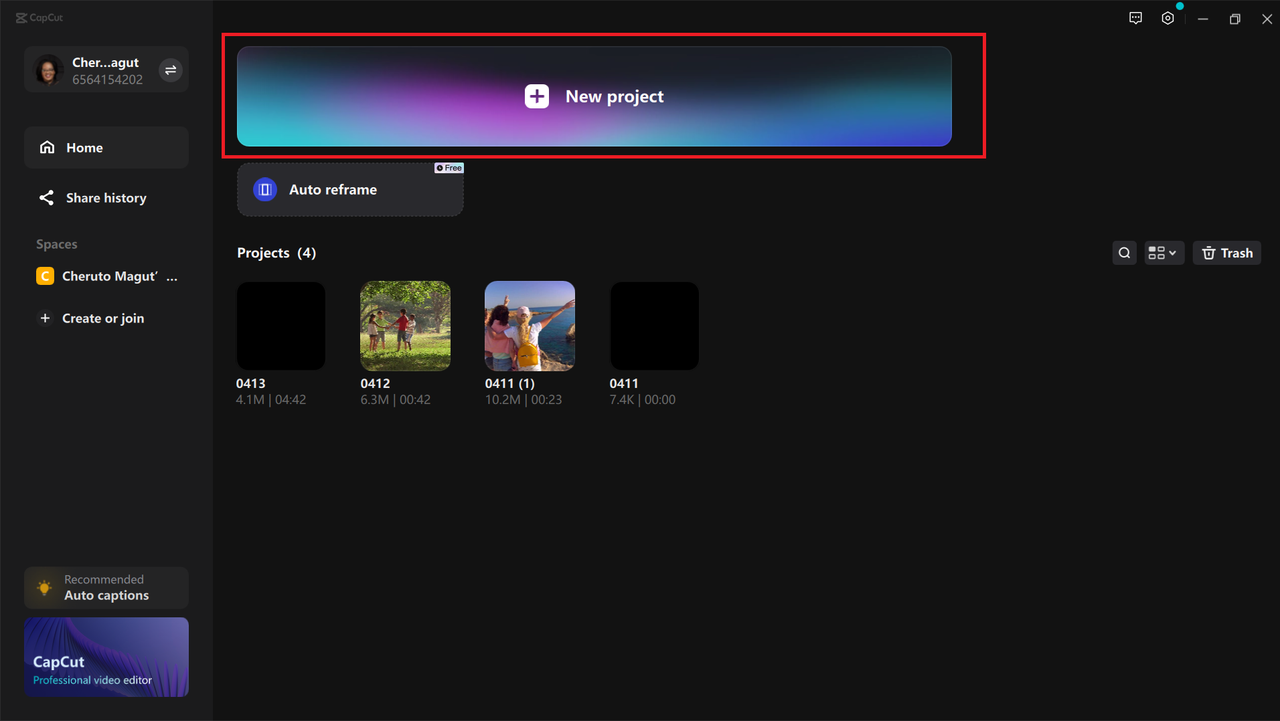
After creating a new project, you’ll reach the editing interface. On the left panel, click “Import” to bring your audio files into the project. CapCut supports various audio formats including MP3, WAV, M4A, and FLAC.
Once imported, drag your audio to the timeline to begin editing. In the upper right section of the interface, you’ll find the “Loudness normalization” feature. Enabling this automatically adjusts your audio to a target loudness of -23 LUFS, a common standard for broadcast content.
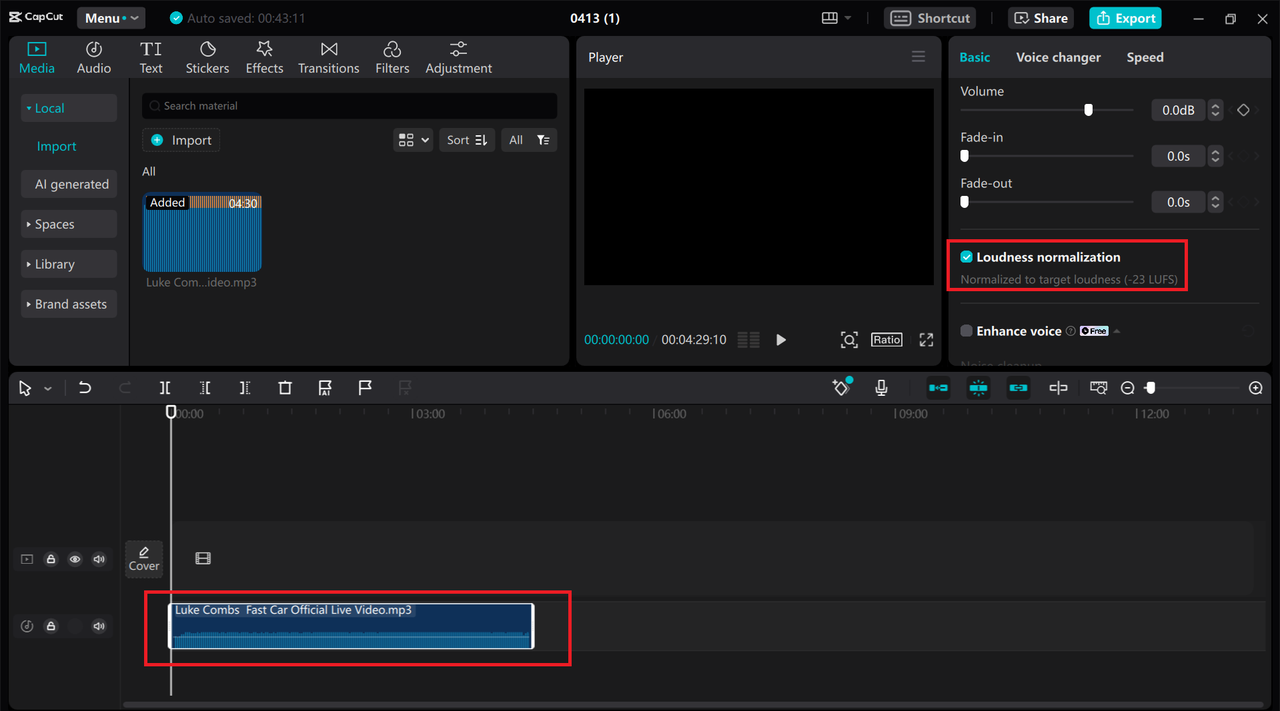
After normalizing your audio levels, you can make additional adjustments like trimming unwanted sections, fine-tuning volume levels, adding fade-ins and fade-outs, or removing background noise.
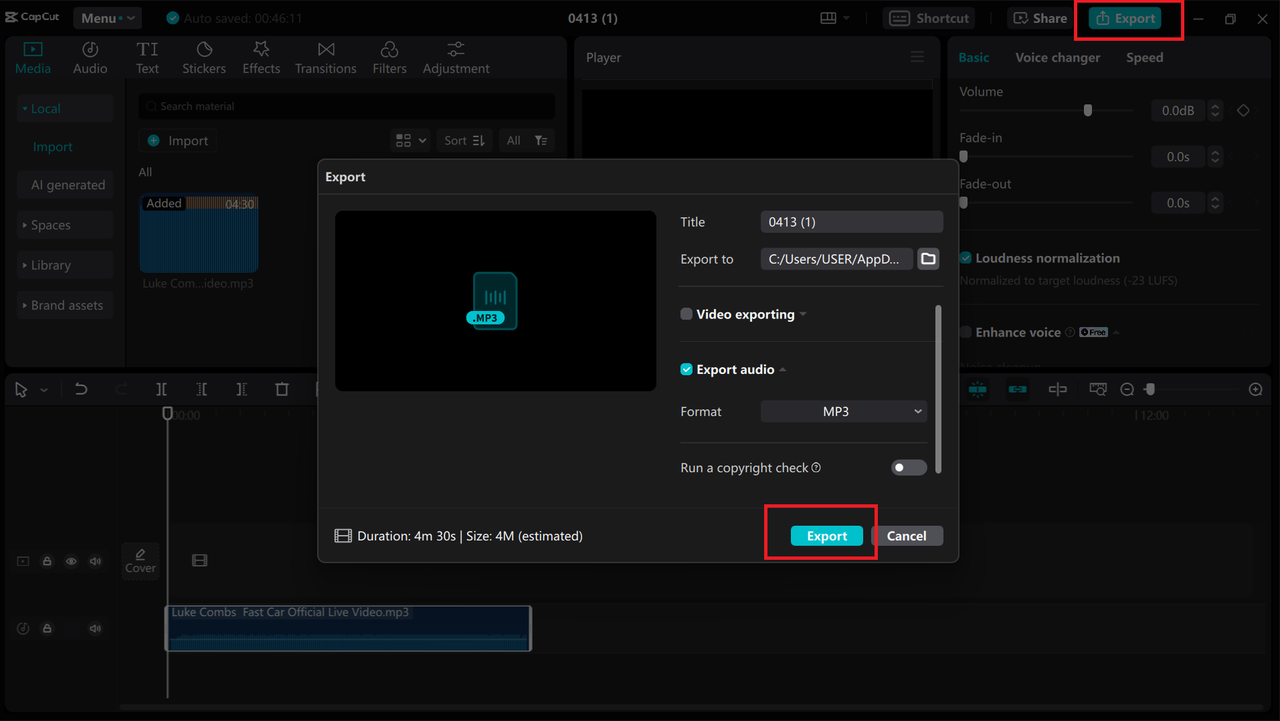
When finished editing, export your audio by clicking the “Export” button in the upper right corner. CapCut lets you export in several formats including MP3, WAV, AAC, and FLAC.
Your choice between Audacity and alternatives like CapCut depends on your specific needs and workflow preferences. Both offer powerful capabilities for improving audio quality through normalization and other processing techniques.
CapCut — Your all-in-one video & photo editing powerhouse! Experience AI auto-editing, realistic effects, a huge template library, and AI audio transformation. Easily create professional masterpieces and social media viral hits. Available on Desktop, Web, and Mobile App.
Practical Applications and Best Practices
Understanding what is loudness normalization is just the beginning. Implementing it effectively requires considering your specific use case and desired outcomes. For podcasters, consistent volume across episodes is crucial for listener retention. Musicians need balanced tracks that work well in playlists and albums. Video creators require audio that matches visual content without distracting volume fluctuations.
When using Audacity to normalize audio, remember that normalization is just one tool in your audio processing toolkit. For best results, you might need to combine it with other techniques like compression, equalization, or manual volume automation. Compression can help control dynamic range before normalization, ensuring that quiet parts aren’t brought up too much while loud parts are reduced appropriately.
The Audacity normalize audio function works well for most scenarios, but understanding its limitations helps you make informed decisions. Peak normalization, which Audacity primarily uses, ensures no part of your audio exceeds a certain level but doesn’t necessarily create consistent perceived loudness throughout a track. For content destined for streaming platforms, you might need to consider LUFS-based normalization to meet platform-specific standards.
When learning how to use Audacity to equalize volume across multiple files, consider creating custom presets for different types of content. You might have one setting for voice recordings, another for music, and a third for mixed content. This approach ensures consistent results across projects and saves time when processing multiple files.
Frequently Asked Questions
What are the best normalization settings in Audacity?The ideal normalization settings depend on your specific content and goals. For spoken word content like podcasts, a good target is around -16 LUFS. For music, -14 LUFS often works well. If using Audacity’s peak normalization (the built-in effect), setting the maximum amplitude to -1.0 dB is generally recommended. This provides headroom to prevent distortion while maintaining good volume levels. For more advanced options, tools like CapCut desktop offer additional features like enhanced audio normalization, sound enhancement tools, voice changing capabilities, and noise reduction that can further improve audio quality.
How to normalize multiple audio files in Audacity?Audacity allows batch processing through its built-in features. Open all the files you want to normalize, select them together, then apply the normalize effect as you would with a single file. Each file processes independently to reach your target peak level. Alternatively, CapCut desktop provides straightforward methods to normalize multiple audio files while offering additional features like noise reduction and sound enhancement.
Can I normalize MP3 volume in Audacity?Yes, Audacity can normalize MP3 files just like any other audio format. The process is identical: import your MP3 file, select the portion to normalize, apply the normalize effect from the effects menu, adjust your settings, and export the normalized audio. The normalization process works based on audio content rather than file format. CapCut desktop editor also supports MP3 files and can normalize them using its loudness normalization feature, often with additional processing options that might benefit specific needs.
Final Thoughts
Working with audio presents various challenges, especially when dealing with inconsistent volume levels across different recordings. Understanding what is loudness normalization and how to implement it using tools like Audacity significantly improves your audio projects’ quality. The Audacity normalize audio features provide straightforward methods to adjust audio levels, whether working with single files or multiple files through batch processing.
For those looking beyond Audacity normalization capabilities, alternatives like CapCut offer additional features and different workflows that might better suit certain projects, especially those involving both video and audio content. Regardless of your chosen tool, the knowledge of how to address volume inconsistencies empowers you to create professional-sounding content that delivers better experiences for your audience.
Remember that normalization is just one component of audio processing. While excellent for addressing overall volume issues, you might still need techniques like compression, equalization, or manual automation for optimal results in complex projects. Experiment with different approaches and tools to find what works best for your specific needs and creative vision.
Some images courtesy of CapCut