TOOL HUNTER

Ever noticed those sleek black bars at the top and bottom of movie scenes? They’re not just for Hollywood blockbusters—they can totally transform your videos too! Whether you’re editing a travel vlog, a short film, or just a fun clip for social media, adding cinematic bars is a quick and effective way to make your content look more polished and professional.
In this article, we’ll explore what cinematic bars are, why they’re useful, and—most importantly—how you can easily add them using some of the most popular video editors out there. We’ll pay special attention to how to add cinematic bars in CapCut, but we’ll also cover other great tools like Adobe Premiere Pro, DaVinci Resolve, and more. Let’s dive in!
What Exactly Are Cinematic Bars?
You’ve definitely seen them before: those horizontal black bars that appear above and below the video in movies. These are called cinematic bars, letterbox bars, or simply letterboxing. They usually show up when a widescreen film is displayed on a screen with a different aspect ratio, like your TV, laptop, or smartphone.
What’s really cool about letterboxing is that it preserves the film’s original aspect ratio. That means you’re seeing the video exactly as the director intended—no awkward cropping, no stretching, and no weird distortions. It’s all about keeping the visual composition perfect.

Why Should You Use Cinematic Bars?
Cinematic bars aren’t just for making your video look fancy—they serve some really practical purposes too. Here’s why you might want to use them:
- Professional Look: Adding black bars can instantly make your footage feel more high-end and intentional. It’s a simple trick, but it gives your content a cinematic flavor that stands out.
- Better Focus: By blocking out distractions at the top and bottom of the screen, black bars help guide the viewer’s eyes toward the main subject. This is super helpful for storytelling!
- Aspect Ratio Consistency: If you’re aiming for a specific widescreen look, cinematic borders let you achieve it without cropping out important parts of your video.
- Emotional Impact: Wide aspect ratios often feel more dramatic and immersive. That’s why adventure and fantasy films use them so often!
- Cross-Device Consistency: No matter if someone is watching on a phone, tablet, or desktop, letterboxing ensures your video looks the way you meant it to.
How to Add Cinematic Bars in CapCut
If you’re looking for a free, user-friendly tool to add cinematic bars, CapCut is an excellent choice. Here’s a step-by-step guide on how to add cinematic bars in CapCut:
Step 1: Download and Install CapCut
First, head over to the CapCut website and download the desktop version. It’s completely free, which is perfect if you’re just starting out or editing on a budget.
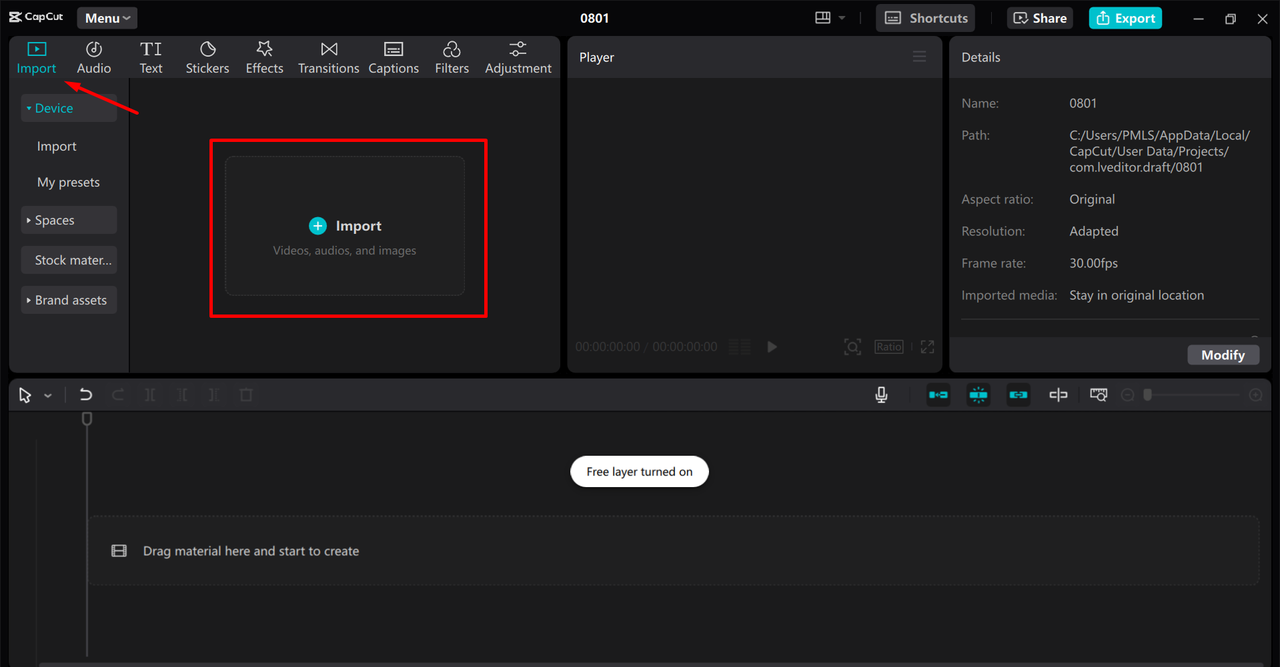
Step 2: Import Your Video
Open CapCut and start a new project. Click the “Import” button to bring your video into the editor. You can simply drag and drop your file onto the timeline.
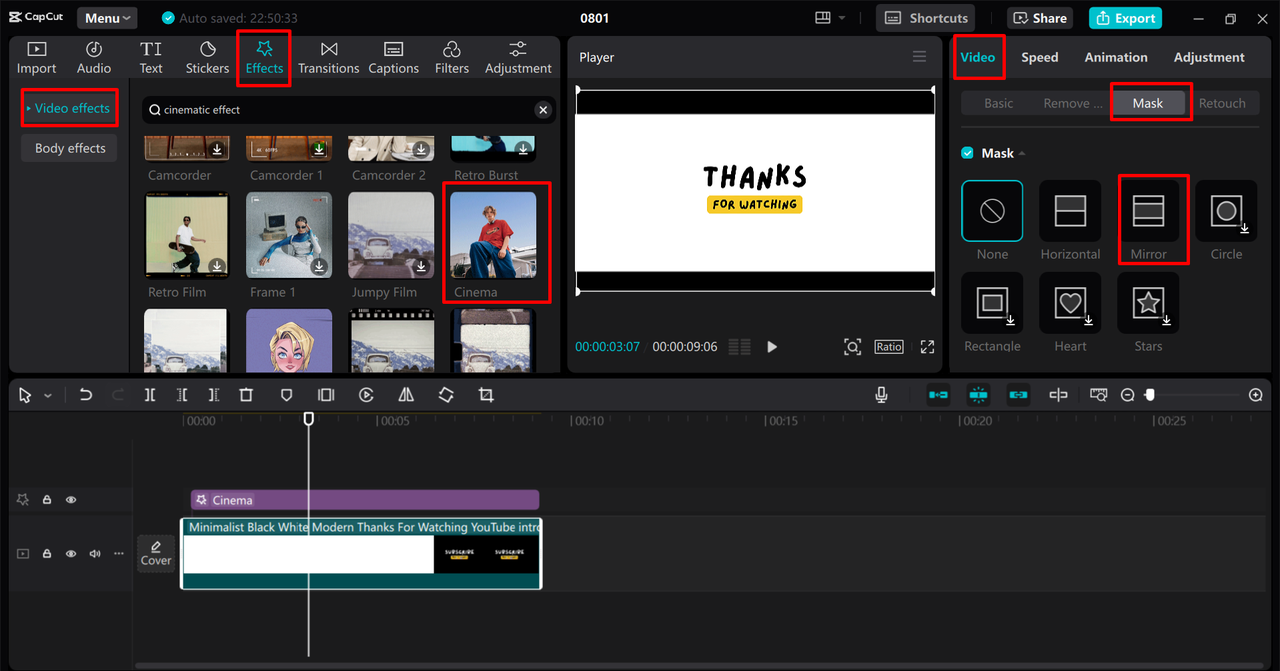
Step 3: Apply Cinema Bars Effect
Now for the fun part! Go to the “Effects” tab on the left and look for the “Cinema” category. Here, you’ll find options for cinematic borders. Just drag and drop your preferred effect onto your video clip in the timeline.
If you want more control, you can also use the masking tool. Go to the video settings, find the mask option, and adjust the top and bottom sliders until you’re happy with how the black bars look.
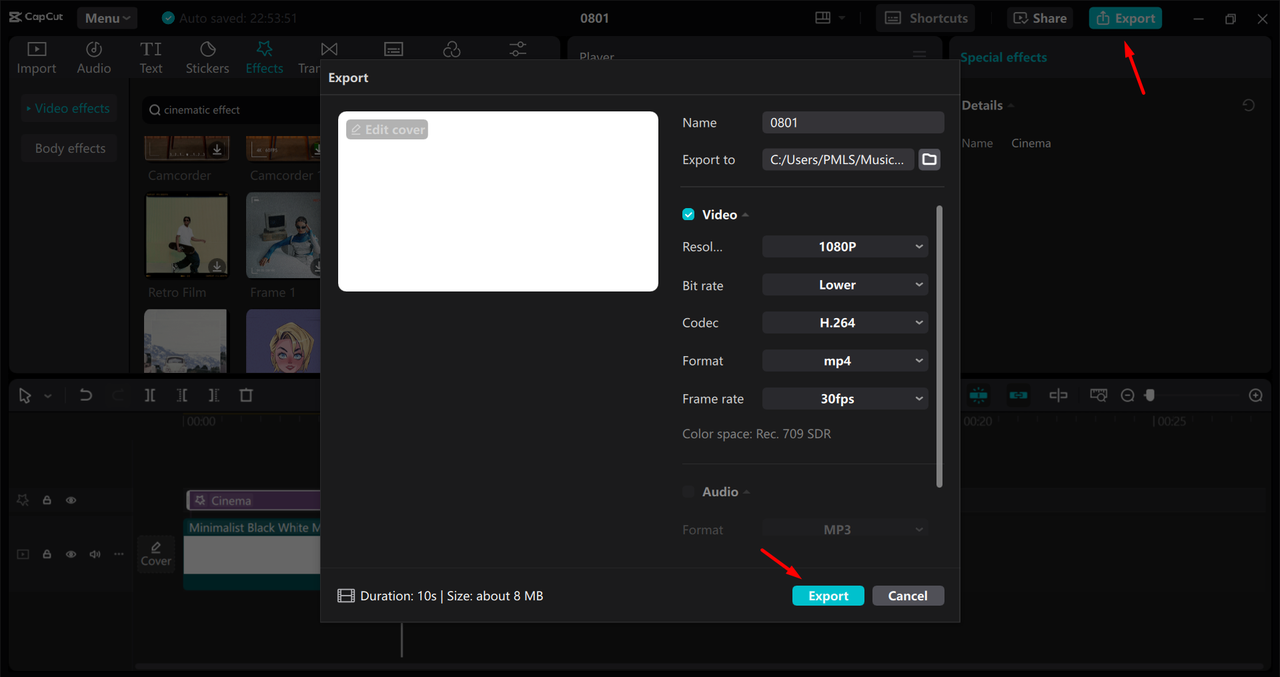
Step 4: Export Your Video
Once you’re satisfied with your cinematic bars, hit the “Export” button. CapCut lets you choose the resolution, format, and quality settings that work best for your project. You can save the video directly to your computer or share it on social media right away.
Why Choose CapCut?
CapCut isn’t just easy to use—it’s also packed with powerful features. You get overlay options for layering clips, a video resizer for perfect framing, cool visual effects and filters, and even cinematic color grading tools. It’s perfect for creating professional-looking videos without spending a dime.
CapCut — Your all-in-one video & photo editing powerhouse! Experience AI auto-editing, realistic effects, a huge template library, and AI audio transformation. Easily create professional masterpieces and social media viral hits. Available on Desktop, Web, and Mobile App.

Other Great Tools to Add Black Bars for Video
While CapCut is fantastic, it’s not the only option out there. Here are five other video editors that make it easy to add cinematic borders:
DaVinci Resolve
DaVinci Resolve is a professional-grade editor loved for its color correction tools. It’s also great for adding black bars for video.
To add cinema bars, open your project and go to the Cropping section in the Inspector. Adjust the “Crop Top” and “Crop Bottom” sliders until you achieve the desired black bar effect. It’s very precise!
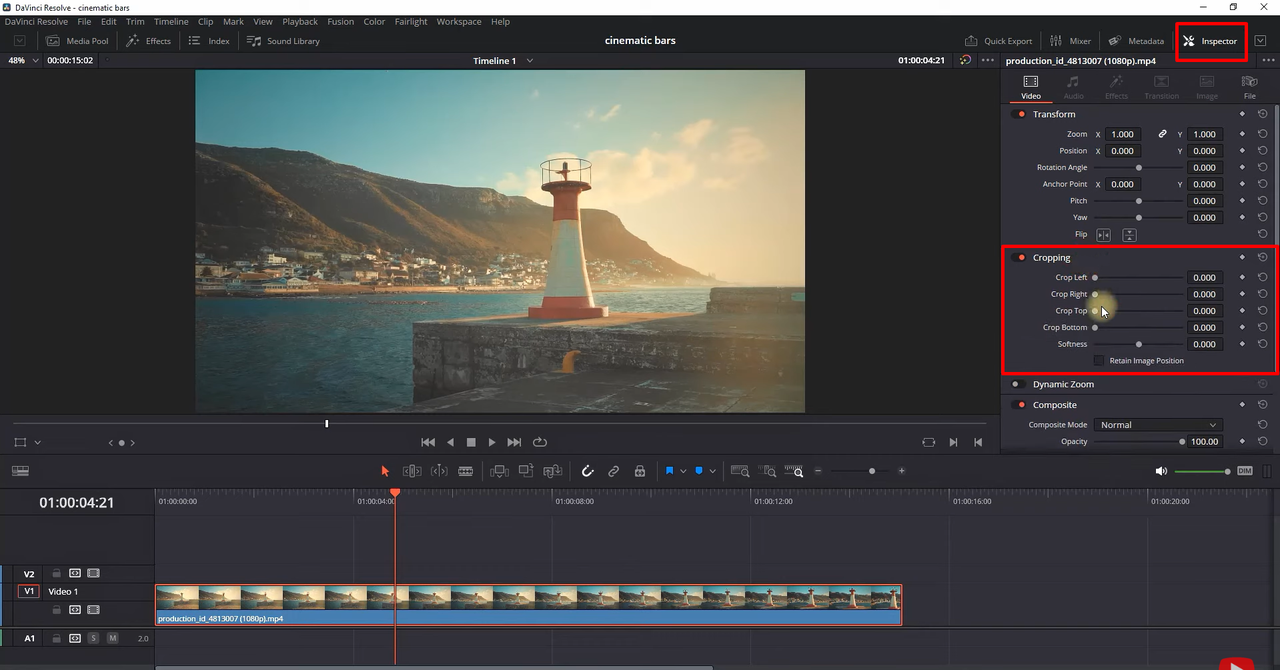
DaVinci Resolve also offers adjustment clips for non-destructive editing, Fusion for VFX work, and multi-user collaboration for team projects.
Adobe Premiere Pro
If you’re familiar with professional editing software, you’ve probably heard of Adobe Premiere Pro. It’s widely used by filmmakers and YouTubers.
Wondering how to add cinematic bars in Premiere Pro? It’s simple. Create an adjustment layer above your video track, apply the Crop effect, and adjust the top and bottom values to create black bars. You can fine-tune it to your exact preference.
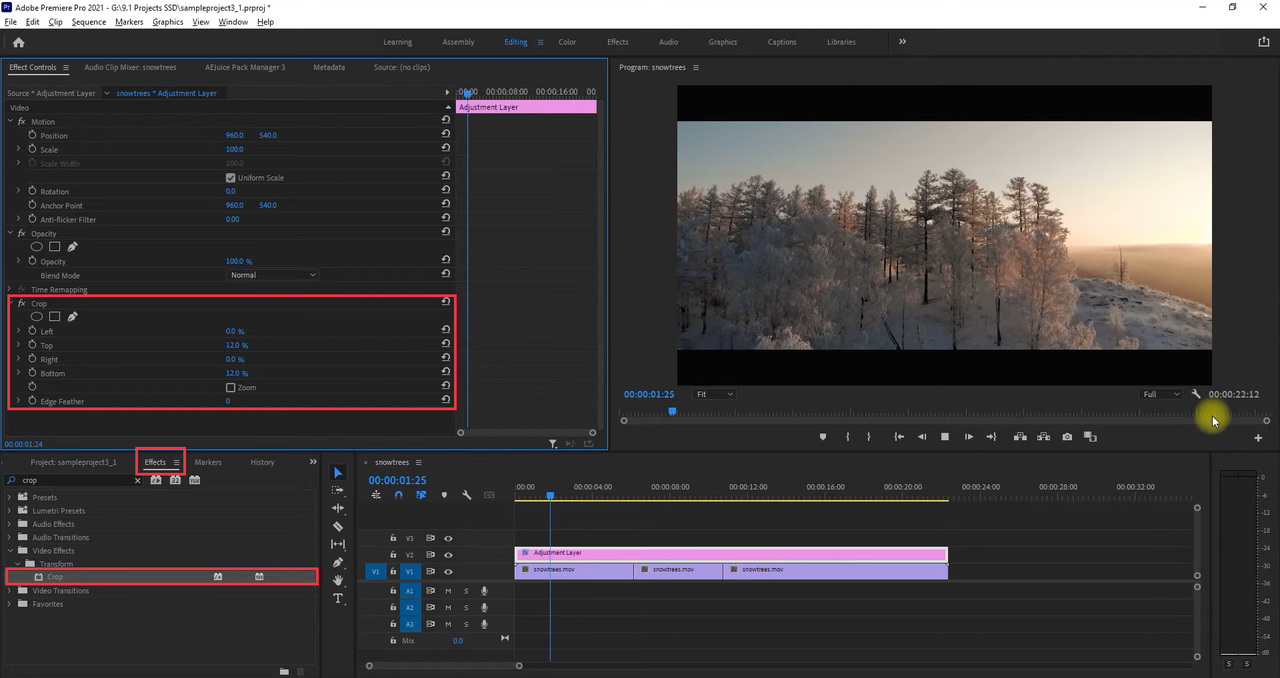
Premiere Pro also comes with awesome color grading, audio editing, and smooth integration with other Adobe apps.
Final Cut Pro
Mac users often prefer Final Cut Pro. It’s fast, powerful, and perfect for adding cinematic black bars.
Open your project, go to the Effects Browser, and search for “Letterbox.” Drag the effect to your timeline, then customize the aspect ratio and bar size in the Inspector panel.
Final Cut Pro also offers a magnetic timeline, great color wheels, and support for 360-degree and multicam editing.
Filmora
Filmora is perfect if you want something easy and fun. It’s great for beginners and comes with lots of cool effects.
To add cinematic bars in Filmora, go to Effects, search for “Cinema Scope,” and drag it onto your clip. You can easily adjust the size in the settings.
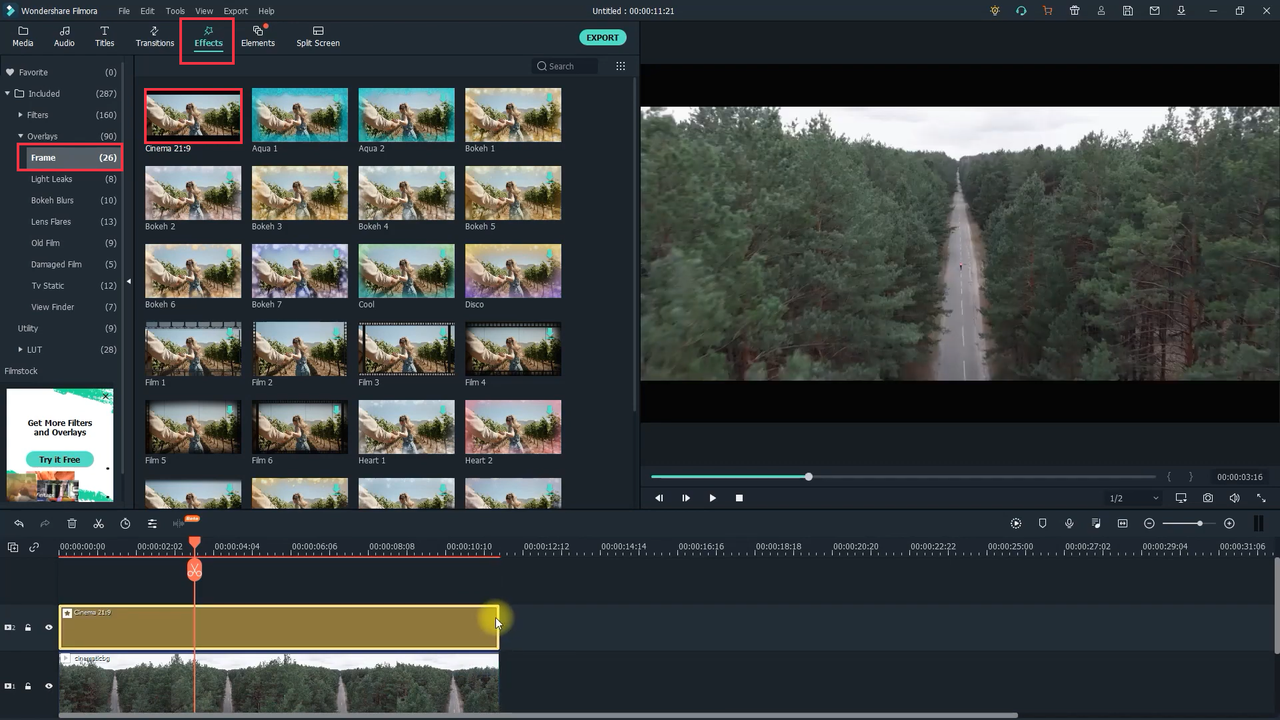
Filmora also includes motion tracking, screen recording, and plenty of templates for quick editing.
Clipchamp
Clipchamp is a browser-based editor, which means you don’t have to download anything. It’s simple and works on any device.
To add black bars, apply a cinematic overlay from the stock library. Then adjust the size to get the letterbox effect.
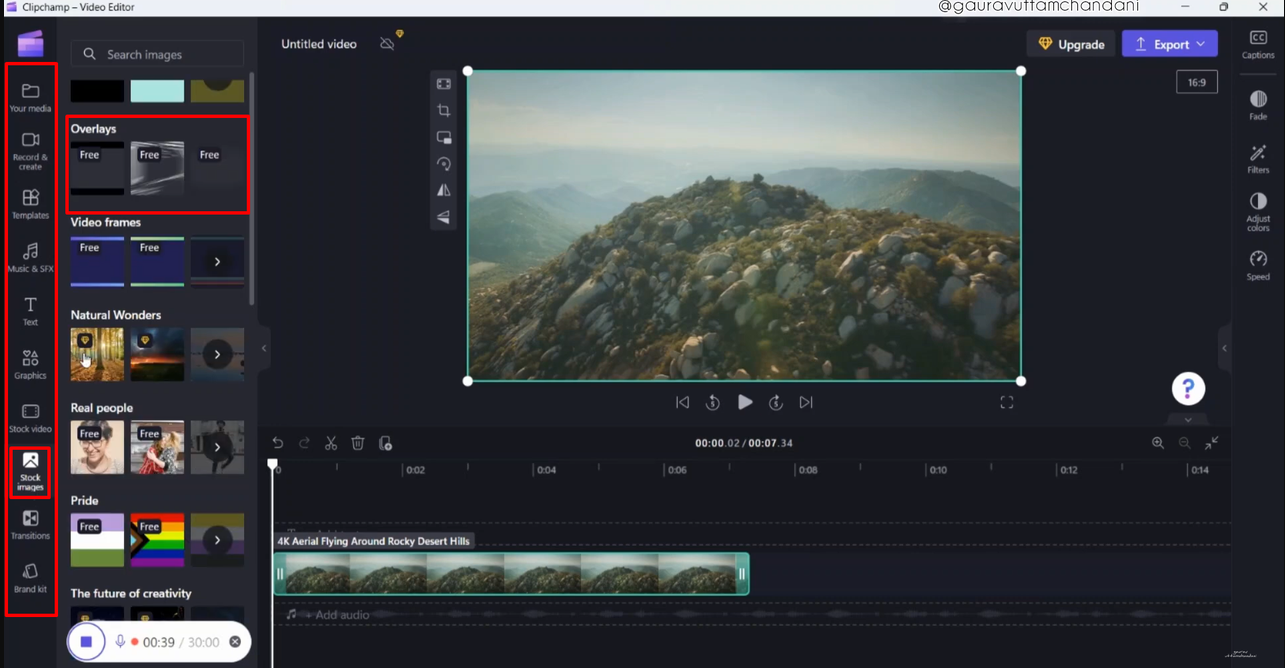
Clipchamp also has a built-in stock library, templates, and real-time collaboration features.
Which Tool Is Right for You?
With so many options, how do you choose? Here’s a quick breakdown:
- If you want something free and easy, CapCut is your best bet. It’s simple to learn and delivers great results fast.
- If you’re into color grading and professional features, DaVinci Resolve or Premiere Pro might be better. They’re more complex but offer greater control.
- For Mac users, Final Cut Pro is a dream—it’s smooth, powerful, and perfectly integrated with the Apple ecosystem.
- If you prefer simplicity and fun effects, give Filmora a try.
- And if you don’t want to install anything, use Clipchamp right in your browser.
Tips Before You Add Cinematic Bars
Before you go adding black bars to all your videos, here are a few things to keep in mind:
- Not every video needs cinematic bars. Think about the mood you’re going for. They work great for dramatic scenes, travel videos, short films, and moody content. But for vlogs or casual clips, they might feel out of place.
- Remember aspect ratios. The most common cinematic ratios are 2.35:1 or 2.39:1. Most editing tools let you choose these presets.
- Don’t overdo it. Sometimes, less is more. Black bars can add a lot, but they shouldn’t distract from your story.
CapCut — Your all-in-one video & photo editing powerhouse! Experience AI auto-editing, realistic effects, a huge template library, and AI audio transformation. Easily create professional masterpieces and social media viral hits. Available on Desktop, Web, and Mobile App.
Wrapping Up
Adding cinematic bars is an easy and effective way to make your videos look more professional and engaging. Whether you use CapCut, Premiere Pro, or any other tool, it’s a simple process that can totally change the vibe of your footage.
If you’re just starting out, I highly recommend trying how to add cinematic bars in CapCut. It’s free, easy to use, and surprisingly powerful. But no matter which software you choose, remember—the goal is to tell your story better. And sometimes, all it takes is two black bars.
Frequently Asked Questions
Can I add cinematic bars for free?
Yes! CapCut, Filmora, and Clipchamp all have free versions that let you add black bars easily.
What’s the best aspect ratio for black bars?
For a classic movie look, use 2.35:1 or 2.39:1. Most editors support these ratios.
Do I always need cinematic bars?
Not really. It depends on your video. If you want a wide, dramatic look, go for it. But sometimes, the original format works just fine.
Some images sourced from CapCut.