TOOL HUNTER

Ever tried to split a video into smaller sections for your social media posts or personal projects? Video splitting is one of those basic editing tasks that can make your content look way more professional. Whether you want to remove boring parts, rearrange scenes, or just make your videos more digestible, knowing how to split clips is essential.
For Apple users, iMovie is the go-to free option that comes built into your devices. It’s surprisingly powerful for a free tool, letting you create pretty impressive videos without spending a dime. Today, we’re diving deep into how to split a video in iMovie across different Apple devices, plus we’ll check out some alternatives if iMovie isn’t quite cutting it for you.
Table of Contents
- Why Would You Need to Split Videos Anyway?
- How to Split Video in iMovie on Mac
- How to Split Video in iMovie on iPhone and iPad
- Key Differences Between iMovie on Mac vs iPhone
- Pro Tips for Better Video Splitting in iMovie
- When iMovie Isn’t Enough: Exploring Alternatives
- Common iMovie Splitting Questions Answered
- Wrapping Up: Mastering Video Splitting
Why Would You Need to Split Videos Anyway?
Before we jump into the how-to, let’s talk about why splitting videos is so useful. When you split a video, you’re essentially cutting it into smaller pieces that you can then rearrange, delete, or edit separately. This comes in handy when you want to:
- Remove awkward pauses or mistakes from your recordings
- Rearrange scenes to tell a better story
- Insert transitions between different segments
- Add different effects to specific parts of your video
- Create shorter clips for platforms like Instagram or TikTok
Learning how to split clip in iMovie opens up a world of editing possibilities that can take your videos from amateur to professional-looking in no time.
How to Split Video in iMovie on Mac
If you’re using a Mac, iMovie provides several straightforward methods to split your videos. The process is pretty intuitive once you get the hang of it, and you’ve got multiple ways to accomplish the same task.
Basic Method: Splitting a Clip into Two Parts
Let’s start with the most common scenario – you want to cut a clip right down the middle. Here’s how to split a video in iMovie into two separate pieces:
First, open your video project in iMovie and find the clip you want to work with in your timeline. You’ll notice a red vertical line – that’s called the playhead. Drag this playhead to the exact spot where you want to make your cut.
Now you’ve got a couple of options. The quickest way is to use the keyboard shortcut Command-Shift-S. Just like that, your clip is now split into two separate parts at the playhead position.
Alternatively, you can right-click on the clip and select “Split Clip” from the menu that appears. Or go up to the top menu, click “Modify,” then choose “Split Clip.”
See? The process for how to split a clip in iMovie is pretty straightforward. Once split, you can drag the two sections apart, delete one, or apply different edits to each part separately.
Splitting Into Multiple Sections
What if you need to split your video into more than two pieces? Maybe you want to remove several sections or create multiple short clips from one long video. The process is similar – you just repeat the basic splitting process at different points in your clip.
Position your playhead at your first split point and use Command-Shift-S. Then move to your next split point and repeat. You can do this as many times as you need to create all the segments you want.
Pro Tip: If you accidentally split a clip in the wrong place or change your mind, just press Command-Z to undo. If you’ve already moved the split pieces around, you can reconnect them by placing them next to each other in the timeline, selecting both clips, right-clicking, and choosing “Join Clips.”
Removing Unwanted Sections
One of the most common reasons people want to learn how to cut a video iMovie style is to remove bad takes or boring parts. Here’s the technique:
Split your video right before the section you want to remove, then split it again right after that section. Now you’ve isolated the unwanted part as its own separate clip. Just click on that middle section and hit delete. Then drag the remaining clips together to close the gap.
Filme – Best Video Editor for Beginners.Explore Your Creativity, Limitless

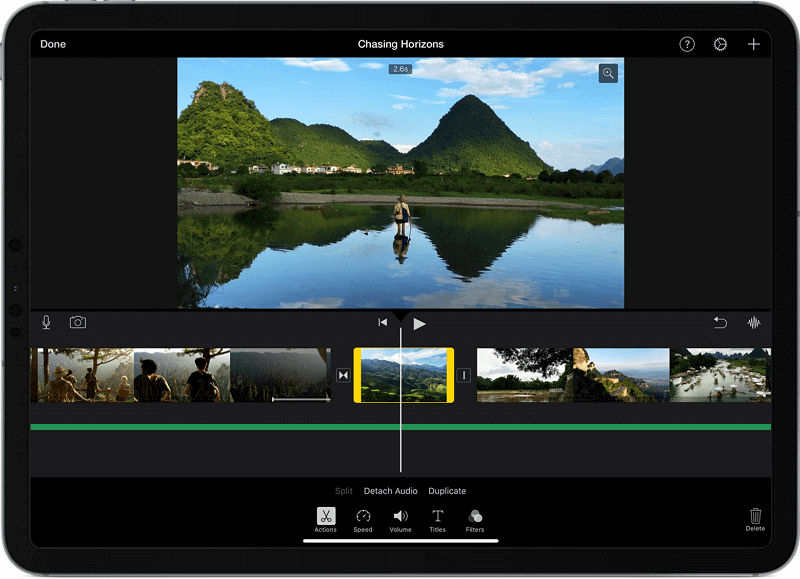
How to Split Video in iMovie on iPhone and iPad
The mobile version of iMovie works a bit differently since you’re using touch controls instead of a mouse and keyboard. But don’t worry – learning how to split a video on iMovie using your iPhone or iPad is just as easy once you know where to look.
Step-by-Step Mobile Splitting
First, fire up iMovie on your iOS device and either create a new project or open an existing one. Tap on the “+” icon to add your video to the timeline if you haven’t already.
Now, find the clip you want to split in your timeline and tap on it to select it. You’ll see editing tools appear at the bottom of your screen. Swipe through the timeline until the playhead (that vertical line) is positioned exactly where you want to make your cut.
Here’s the magic button – look for the “Split” option in the bottom right corner. It looks like a little scissors icon. Give that a tap and voila! Your clip is now divided into two separate parts at that point.
You can repeat this process as many times as needed to create multiple segments. The technique for how to split clip in iMovie on mobile is super intuitive once you try it a couple of times.
Removing Shaky or Unwanted Parts on Mobile
Got a section of your video that’s shaky, blurry, or just not working? Here’s how to cut a video iMovie style to remove those problematic parts:
Tap on your clip in the timeline and position the playhead right before the bad section. Tap the split tool to make your first cut. Then move the playhead to the end of the section you want to remove and split again.
Now you’ve got that shaky part isolated as its own clip. Tap on it and you’ll see a delete option – or you can just drag it upward out of the timeline to remove it. Simple as that!

Key Differences Between iMovie on Mac vs iPhone
While both versions of iMovie let you split videos, there are some notable differences in how you interact with the software:
On Mac, you’re using keyboard shortcuts and mouse clicks. The interface has menus at the top and more precise controls thanks to your mouse or trackpad.
On iPhone and iPad, everything is touch-based. You’re tapping, swiping, and pinching to zoom in for more precise edits. The controls are at the bottom of the screen for easy thumb access.
The split function itself feels different too. On mobile, there’s something satisfying about literally slicing through your clip with a tap of the scissors icon. On Mac, it feels more technical with keyboard commands.
But here’s the good news – regardless of which device you’re using, the core concepts of how to split a video in iMovie remain the same. Once you learn one version, picking up the other is pretty easy.
Pro Tips for Better Video Splitting in iMovie
Whether you’re learning how to split a clip in iMovie for the first time or you’re a seasoned pro, these tips will make your editing workflow smoother:
Zoom in for precision: Before making your splits, zoom into your timeline. This lets you place your cuts exactly where you want them, down to the specific frame.
Use the right tools for the job: On Mac, keyboard shortcuts are your friend. On mobile, take advantage of the touch controls for quick adjustments.
Think about transitions: After splitting, consider adding transitions between your clips. This can make the cuts feel more natural and professional.
Don’t forget about audio: When you split a video, the audio gets split too. Make sure your audio flows smoothly across the cut point.
Save versions as you go: iMovie has an undo function, but it’s always smart to duplicate your project before making major edits, especially when you’re still learning how to split a video on iMovie.
Experiment with pacing: Splitting lets you control the rhythm of your video. Try creating quicker cuts for energetic sections and longer clips for more thoughtful moments.
When iMovie Isn’t Enough: Exploring Alternatives
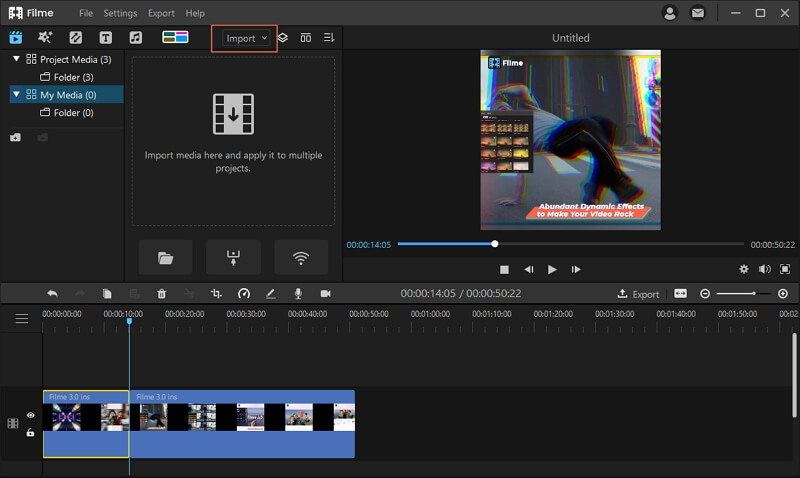
While iMovie is great for basic editing, sometimes you need more power or flexibility. Maybe you’re on a Windows device, or perhaps you’re finding iMovie’s features a bit limited for your projects. That’s where alternatives like iMyFone Filme come in.
Filme offers a more comprehensive set of editing tools while still being beginner-friendly. It’s available for both Windows and Mac users, so nobody gets left out. The interface is intuitive but packed with features that go beyond basic splitting.
How to Split Videos with Filme
If you decide to try Filme, here’s how the splitting process works:
First, import your video into the program. You’ll see it appear in your media library. Drag it down to the timeline at the bottom of the screen.
Now, move the playhead to where you want to make your cut. Click the split button (it looks like a little razor blade) or press “S” on your keyboard. Your video is now divided into two separate clips.
What’s nice about Filme is that you get real-time previews of where you’re cutting, so you can be super precise. You can also split multiple times quickly to create several segments from one clip.
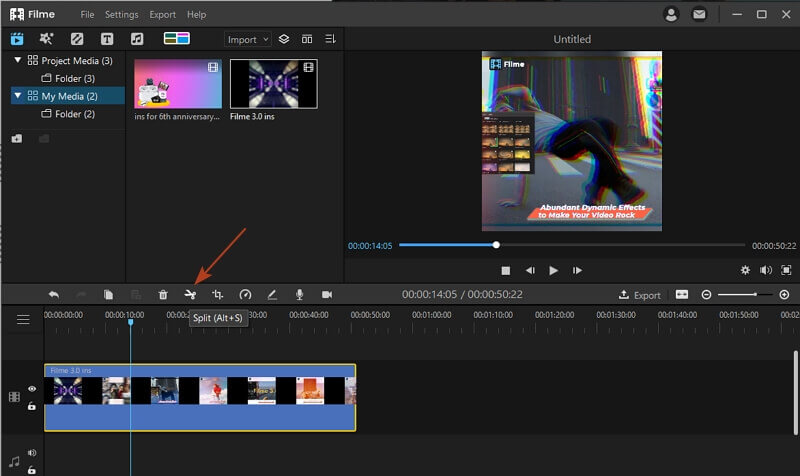
After splitting, you can apply different effects to each segment, adjust colors individually, or even speed up or slow down specific parts. It’s this level of control that makes alternatives worth considering once you’ve mastered the basics of how to split clip in iMovie.
Why Consider Switching from iMovie?
Filme and similar editors offer some advantages over iMovie:
More editing tools: Beyond basic splitting, you get advanced color correction, more transition options, and better text tools.
Cross-platform support: Works on both Windows and Mac, so you’re not locked into the Apple ecosystem.
Better performance: Some users find that alternative editors run smoother, especially with larger video files.
Regular updates: Unlike iMovie which gets updated sporadically, third-party editors often have more frequent improvements and new features.
More export options: Greater control over video quality, format, and compression settings.
Filme – Best Video Editor for Beginners.Explore Your Creativity, Limitless
Common iMovie Splitting Questions Answered
Why can’t I split a clip in iMovie?
This is a common frustration! If the split option is grayed out, first check that your clip is in the primary timeline row (not as a background or picture-in-picture). Also make sure you’re not trying to split a transition or title – these can’t be split. If that doesn’t work, try restarting iMovie or even your computer. Sometimes a quick reset clears up weird glitches.
How do I cut out parts of a video on iMovie on iPhone?
The process is similar to splitting – you’re just splitting twice and deleting the middle part. Position your playhead where the unwanted section begins and split. Then move to where it ends and split again. Now tap that middle section and hit delete. Drag the remaining clips together, and you’re done!
Is splitting the same as split screen in iMovie?
Nope, these are totally different functions! Splitting divides one clip into multiple pieces. Split screen lets you show two or more videos playing simultaneously in different parts of the frame. They serve completely different purposes – splitting is for editing timing and content, while split screen is for showing multiple perspectives at once.
Can I rejoin clips I accidentally split?
Absolutely! If you just split something and immediately regret it, hit undo (Command-Z on Mac, or the undo arrow on mobile). If you’ve already made other edits since the split, you can still reconnect clips by placing them next to each other in the timeline, selecting both, and choosing “Join Clips” from the menu.
What’s the difference between splitting and trimming?
Splitting cuts a clip into separate pieces that you can move around independently. Trimming just shortens the beginning or end of a clip without creating separate segments. Use splitting when you want to remove middle sections or rearrange pieces. Use trimming when you just need to shorten the overall length from either end.
Wrapping Up: Mastering Video Splitting
Learning how to split a video in iMovie is one of those fundamental editing skills that opens up so many creative possibilities. Whether you’re cleaning up your home videos, creating content for social media, or putting together a presentation, being able to precisely control where your cuts happen is incredibly valuable.
iMovie makes the process accessible for everyone – from complete beginners to more experienced editors who just need to do quick edits on the go. The techniques for how to split a clip in iMovie are consistent across devices, so once you learn them, you can edit comfortably on your Mac, iPhone, or iPad.
Remember that practice makes perfect. The more you work with splitting and rearranging clips, the more intuitive the process will become. Don’t be afraid to experiment – you can always undo your changes if something doesn’t work out.
As you become more comfortable with basic splitting, you can explore more advanced techniques like combining splits with transitions, color grading different segments separately, or using split points to sync your video with music beats.
Whether you stick with iMovie or eventually move on to more advanced software, the skills you’ve learned about how to split a video on iMovie will serve you well in all your video editing adventures. Happy editing!
*Some images sourced from imyfone