TOOL HUNTER
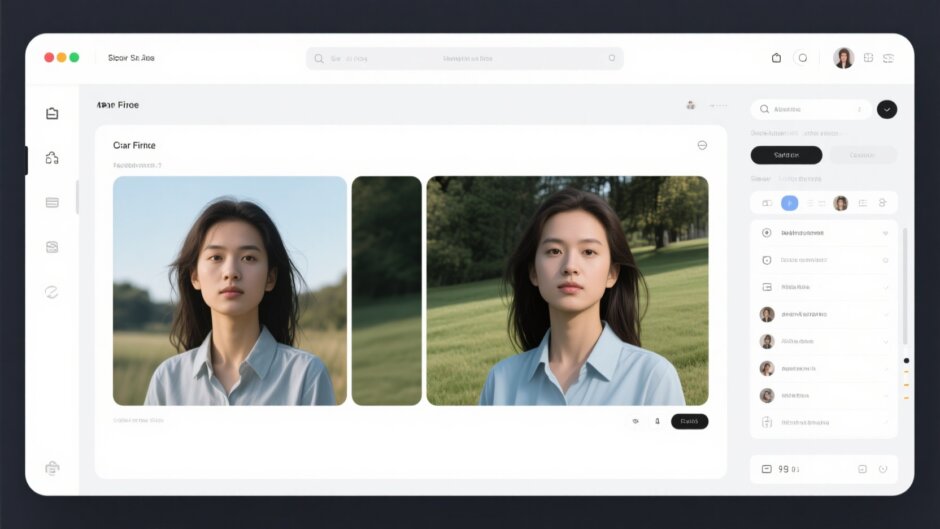

Ever snapped a photo and immediately thought, “Ugh, I wish that random person wasn’t photobombing the background” or “If only this was taken on a tropical beach instead of my messy living room”? We’ve all been there. The good news is, you don’t need to be a Photoshop wizard to fix this anymore. Learning how to add background in CapCut is like discovering a superpower for your photos, and it’s way easier than you might think.
CapCut is this awesome, free tool that lets you completely transform your images. Want to change background in photo to make your vacation pics look more Instagram-worthy? Or maybe you need to create professional-looking product shots for your small business? Whatever your reason, figuring out how to change background can totally level up your photo game. The best part? You don’t need any special skills or expensive software.
In this guide, I’m going to walk you through everything about how to change background on Capcut. We’ll start with the basic steps, then move to some cooler advanced tricks, and I’ll even show you a special feature perfect for anyone selling products online. By the time you’re done reading, you’ll be editing photos like a pro!
CapCut — Your all-in-one video & photo editing powerhouse! Experience AI auto-editing, realistic effects, a huge template library, and AI audio transformation. Easily create professional masterpieces and social media viral hits. Available on Desktop, Web, and Mobile App.

How to Change Background in Photo with Custom Changes
Okay, let’s get to the fun part! So you’ve got a photo that you want to make even better by giving it a completely new backdrop. This is where CapCut really shows off what it can do. Learning how to change background of your pictures opens up so many possibilities. Instead of being stuck with whatever was behind you when you took the shot, you can now put yourself in front of the Eiffel Tower, on a sandy beach, or even in space if you want!
The process of how to add background in Capcut is surprisingly simple. You can change background to picture scenes from all over the world, or keep it simple with a solid color that makes you really stand out. What’s great is that CapCut designed this feature for everyone – whether you’ve never edited a photo before or you do it all the time. The tools are powerful but not complicated, which means you can actually make your creative ideas happen without getting frustrated.
When you figure out how to change background in photo, it stops being something only professionals can do and becomes something anyone can have fun with. That thought of “I need to change my image background” suddenly becomes something you can actually do in just a few minutes!
Step-by-Step Guide: How to Change Background on Capcut
Let me walk you through the process step by step. This is the essential guide to how to add background in Capcut that’ll have you editing like a pro in no time.
1. Open CapCut and Create an Account
First things first, you need to get to CapCut. You can use it right in your web browser – no download needed! Just go to their website. If you already have an account, simply log in. If you’re new, signing up is super easy and free. You can use your Google, Facebook, or TikTok account to get started quickly.
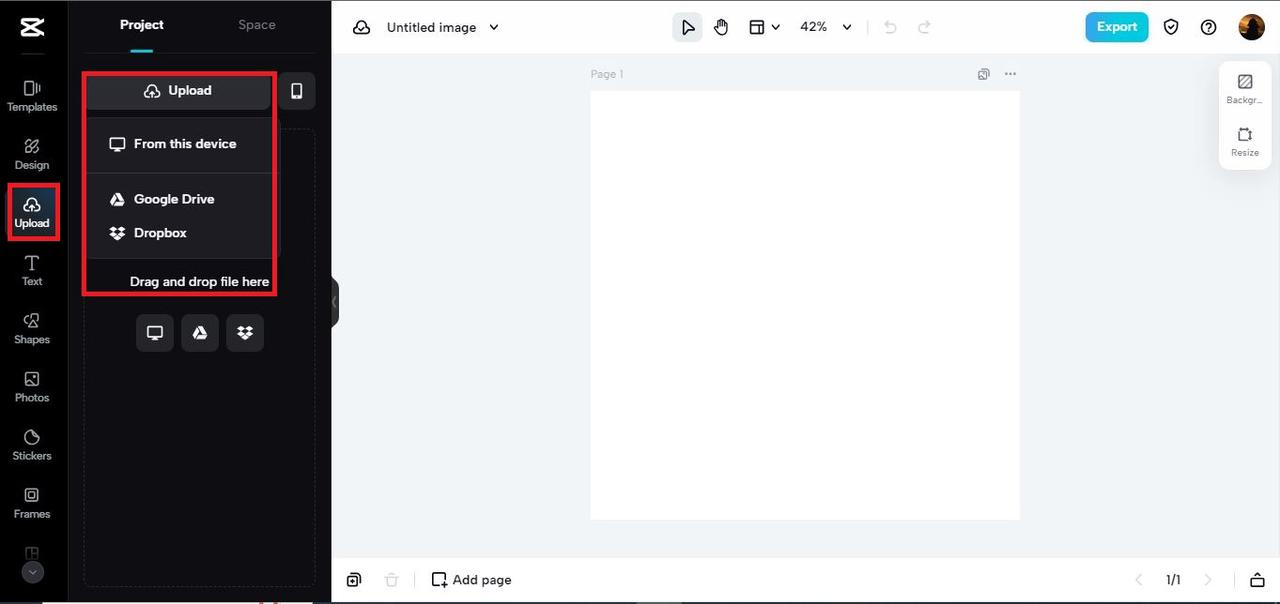
2. Upload Your Photo
Once you’re logged in, you’ll see an option to upload your image. Click that button and select the photo from your computer that you want to work with. This is the picture whose background you’re going to change.
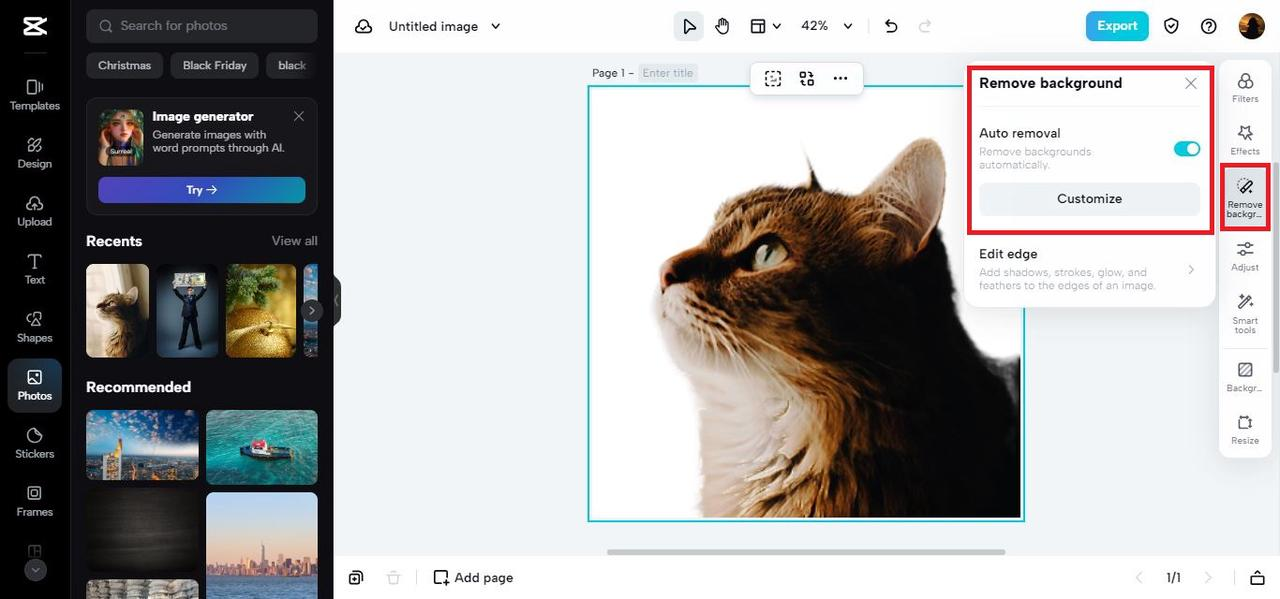
3. Remove the Current Background
Here’s where the magic starts! CapCut has this amazing “Remove Background” tool that does all the hard work for you. After you upload your image, just look for this option and click it. The software will automatically detect the main subject in your photo and erase everything else. It’s pretty smart about figuring out what to keep and what to remove.
4. Add Your New Background
Now for the creative part! You’ve got two main options here, which is important to know when learning how to change background color in Capcut or adding a full image.
Solid Color Background: If you want something clean and simple, you can choose a solid color. Find the “Background” tool, click on it, and you’ll get a color picker where you can select any color you want. This is perfect for professional headshots or minimalist looks.
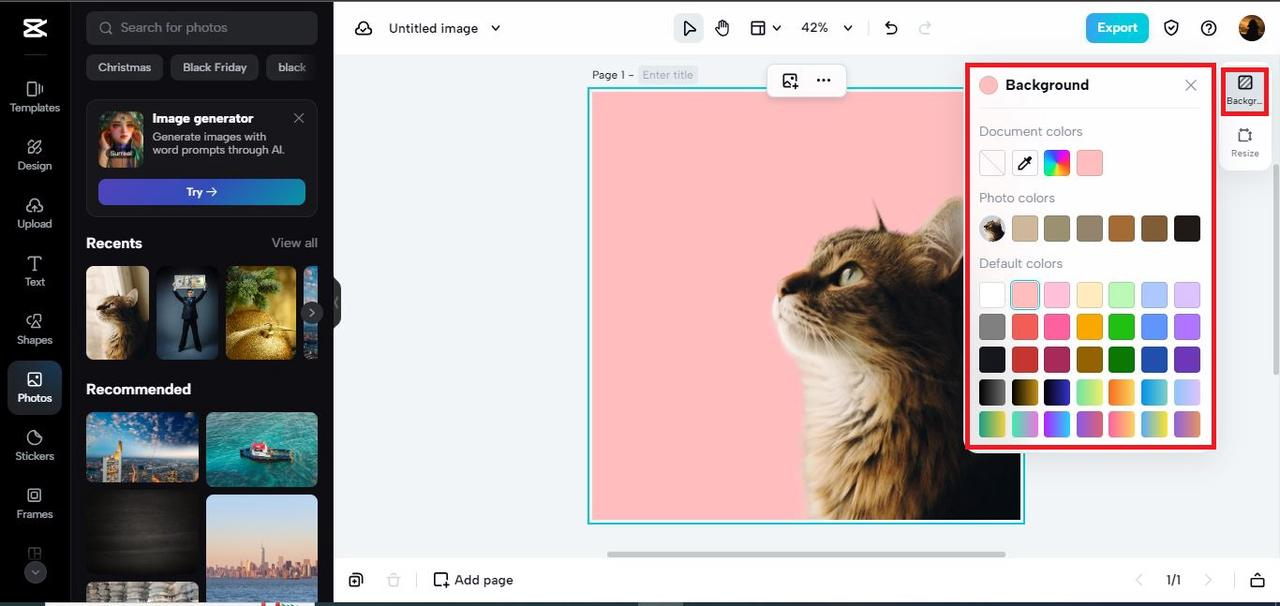
Image Background: Want something more exciting? You can upload any image from your computer to use as your new background. After you upload it, just right-click on the image and select “Set as Background.” CapCut will automatically place your subject in front of this new scene.

5. Save Your Edited Photo
Once you’re happy with how everything looks, it’s time to save your creation. Click the export or download button, and CapCut will save your new image with its brand-new background directly to your computer. That’s it! You’ve just learned how to change background in photo using CapCut.
When You Might Want to Use This Feature
Knowing how to change background on Capcut comes in handy in so many situations. Here are some common times when this skill is super useful:
Travel PhotosRemember that amazing vacation where it rained every day? Or when you finally got to see that famous landmark, but there were so many tourists you could barely see it? With CapCut, you can fix that! You can change background of your picture to show sunny skies instead of rain, or remove those crowds so it looks like you had the place all to yourself. It lets you make your travel memories match how amazing the trip actually felt.
Creative ProjectsIf you’re someone who loves expressing yourself creatively, this tool is like a dream come true. You can experiment with all sorts of wild backgrounds to create exactly the mood you want. Maybe you want to change background of your photo to make it look like you’re in a fantasy world, or use a cool abstract pattern that matches your style. CapCut gives you a blank canvas to play with and bring your creative visions to life.
Professional HeadshotsFor job applications, professional profiles, or formal portraits, what’s behind you really matters. A cluttered or distracting background can take attention away from you. CapCut lets you change the background of a picture to something clean and professional, like a plain gray or white backdrop. This ensures that you’re the main focus and presents you in the best possible light.
CapCut’s background-changing feature is seriously powerful for all kinds of photo editing needs. It’s not just about making pictures look better – it’s about creating completely new stories with your photographs.
CapCut — Your all-in-one video & photo editing powerhouse! Experience AI auto-editing, realistic effects, a huge template library, and AI audio transformation. Easily create professional masterpieces and social media viral hits. Available on Desktop, Web, and Mobile App.
How to Change Background for Product Photos with CapCut
Now let’s talk about something really practical for anyone who sells products online. CapCut has this special feature designed just for product photos, and it’s a total game-changer for small businesses and online shops. How your product looks in pictures can seriously affect whether people decide to buy it. A clean, professional-looking background makes your product appear more trustworthy and high-quality. The best part? CapCut makes it incredibly easy to create these great-looking product images in no time.
Step-by-Step: How to Change Background of Your Product Photo
Here’s how you can use the Product Photo function for your online items. This is a specialized approach to how to change background in photo for business purposes.
1. Open CapCut in Your Browser
Start by opening your web browser and going to the CapCut website. Make sure you’re logged into your account to access all the features.
2. Upload Your Product Image
Click to upload the picture of the product you want to edit. A little tip: try to take your product photos against as plain a background as possible originally, as this makes the next step work even better. After uploading, you’ll select the aspect ratio that fits where you’ll use the image (like square for Instagram or rectangular for website banners).
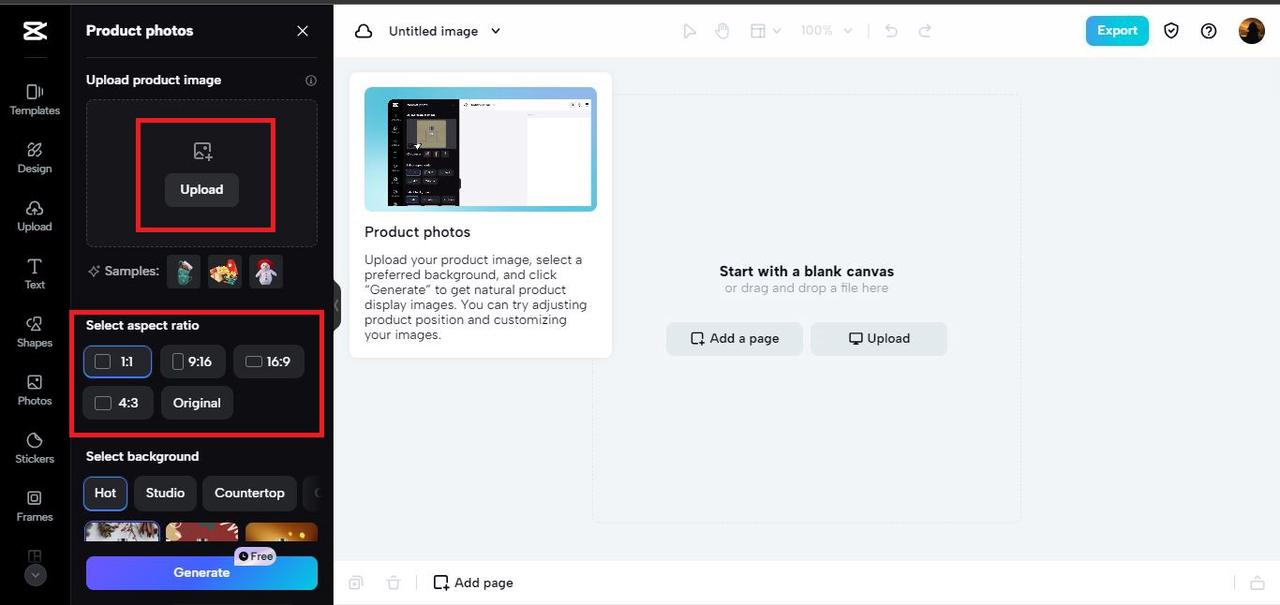
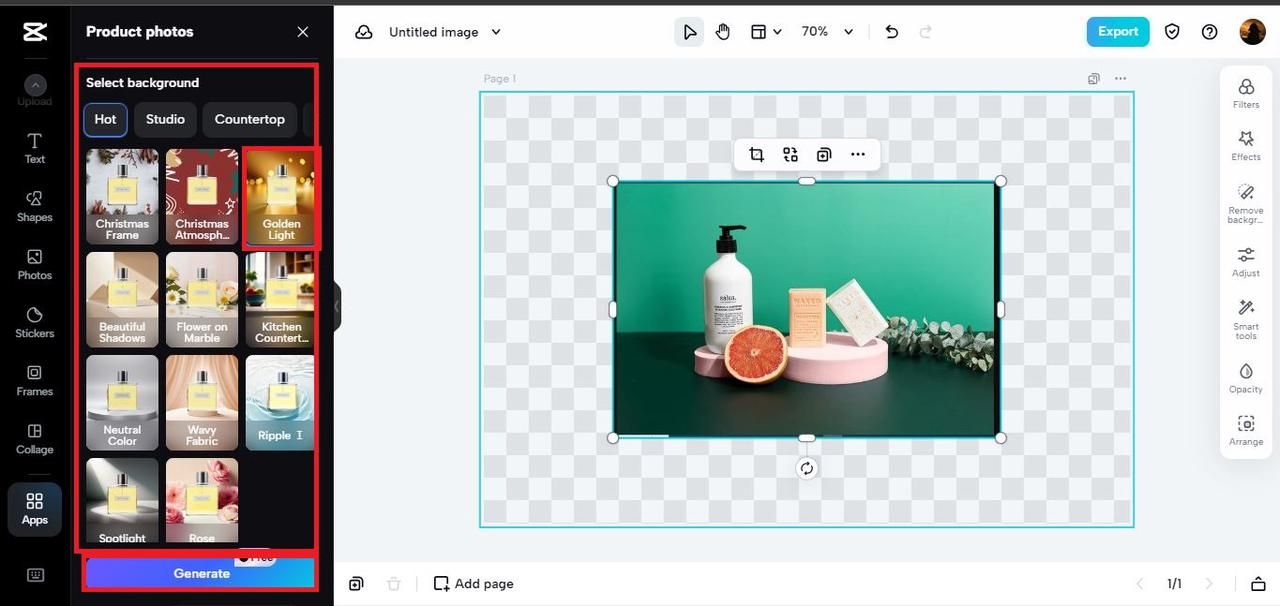
3. Select and Generate Your New Background
This is where the special product magic happens! CapCut will show you a variety of background options that work particularly well for products. You can choose one that complements your item – maybe a light color to make a dark product stand out, or a simple texture that doesn’t distract from your product. After you make your selection, just click the ‘Generate’ button. CapCut will automatically remove the old background and place your product onto the new one you chose.
4. Add Extra Touches
The tool might also offer you some additional rendering options to make your product look even more professional. You might be able to adjust shadows, add a subtle reflection under the product, or tweak the lighting. These small details can make your product look like it was shot in a professional photography studio.
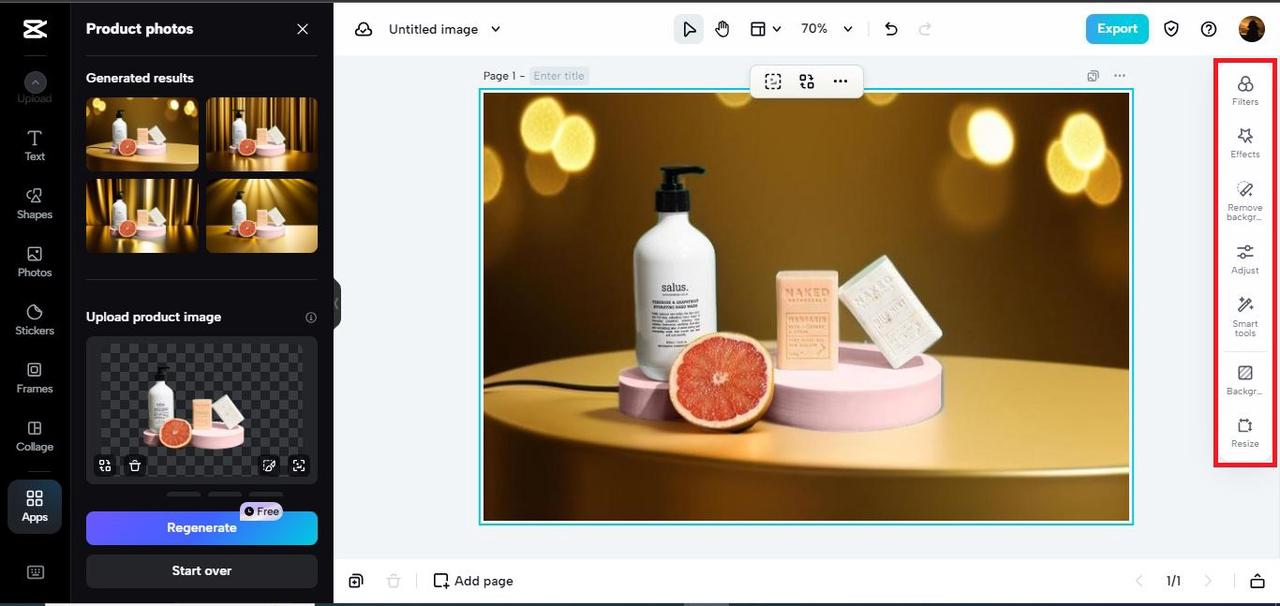
5. Save and Use Your Image
When you’re completely happy with how your product looks, hit the save or download button. Now you’ve got a perfect product image ready to upload to your online store, Amazon, eBay, or social media platforms.

Who Benefits Most from the Product Photo Function?
This feature is like a secret weapon for several types of people:
Online SellersIf you sell products on any platform, you know how important good photos are. This tool helps you change a picture’s background to make your items look more appealing and professional. When customers can see your product clearly without any distractions, they’re more likely to make a purchase.
Social Media MarketersFor influencers, small businesses, or anyone using Instagram, Facebook, or Pinterest for marketing, having a consistent look is crucial. You can change the background on all your product photos to maintain the same color scheme or style. This makes your brand look more organized and helps people recognize your products instantly.
Catalog and Brochure CreatorsIf you need to create digital catalogs or PDF brochures, you want all your product images to have a uniform appearance. Using CapCut to change your picture background for each product creates a clean, professional, and cohesive look across your entire catalog.
Using CapCut’s Product Photo function is a smart strategy for anyone with an online business. It specifically addresses how to change background on Capcut for products, helping you present your items in the most attractive way possible.
Advanced Editing Techniques for Professional-Looking Results
So now you know the basic steps for how to change background in photo. But what if you want to make your edited images look even more realistic and polished? After you change the background of an image, CapCut offers several other editing tools that help blend everything together perfectly. These techniques help you fix those little issues that can make an edit look fake, like color mismatches or lighting differences, making your final image look seamless and amazing.
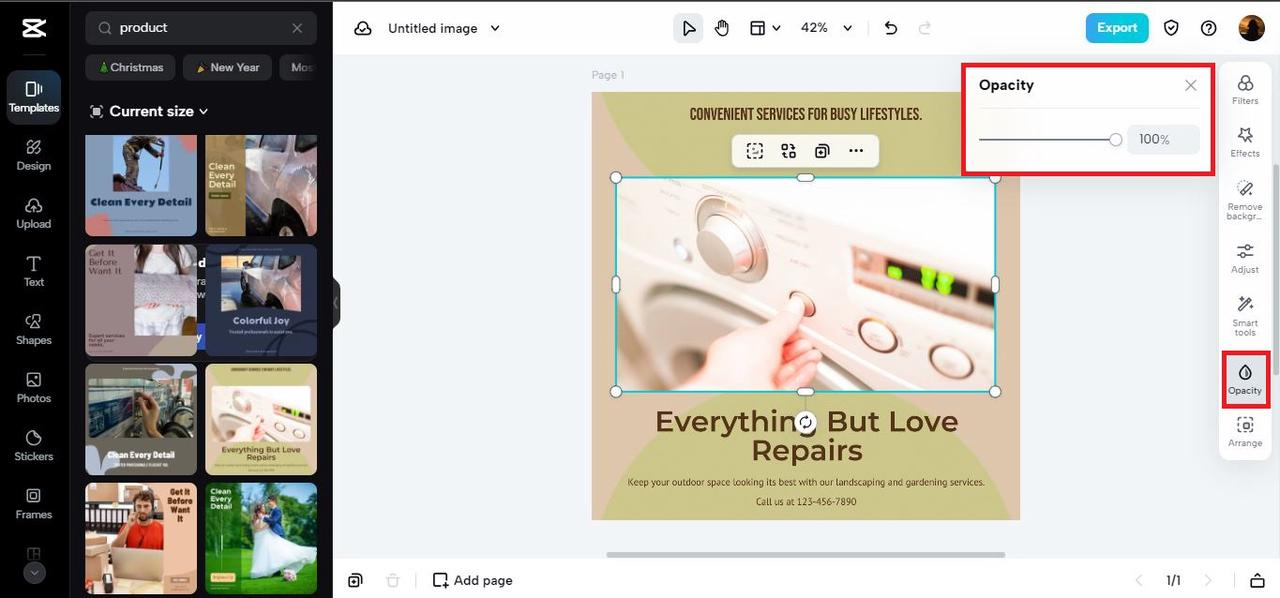
1. Adjusting Opacity for Better Blending
Sometimes your new background might feel a bit too intense, or you might want your main subject to blend into the scene more naturally. This is where the opacity tool comes in handy. You can find it in the right-side toolbar under ‘Opacity.’ Sliding this adjustment makes elements of your photo more transparent. This is super useful for creating a subtle and natural blend between your subject and its new environment.
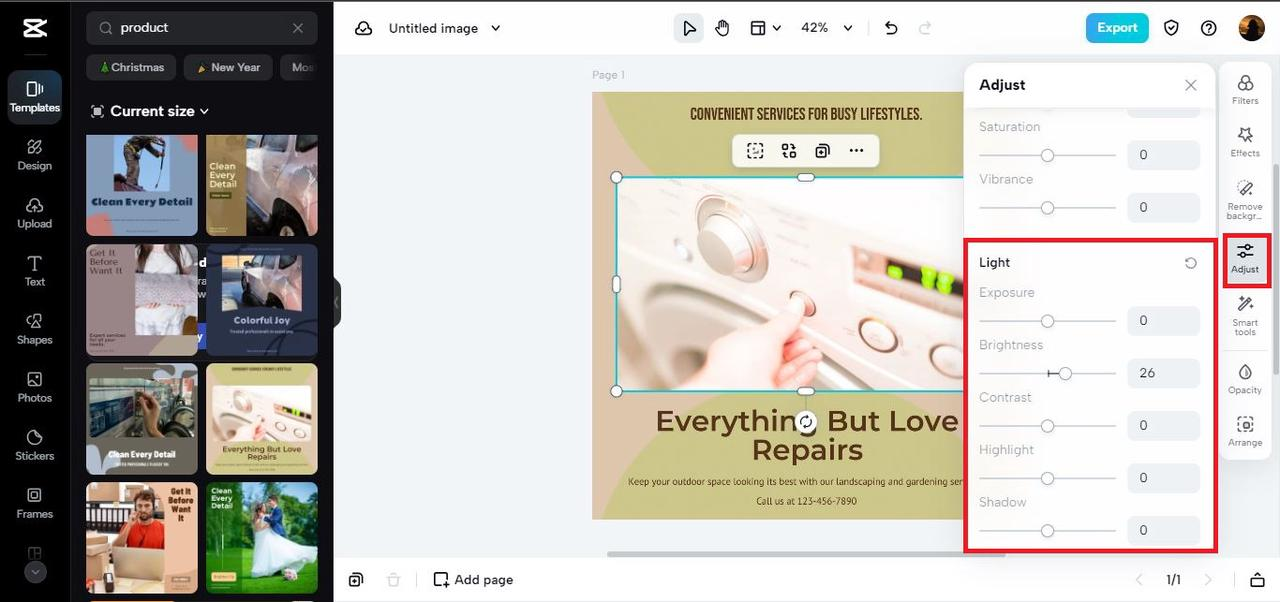
2. Fixing Lighting with Brightness Adjustments
Have you ever noticed that your subject was photographed in bright light, but your new background is darker? This kind of mismatch can make your edit look obviously fake. To fix this, find the ‘Adjust’ section in the toolbar and look for ‘Brightness.’ By modifying the brightness of your main subject, you can make its lighting match the new background much better. This creates a much more natural and believable composite image.
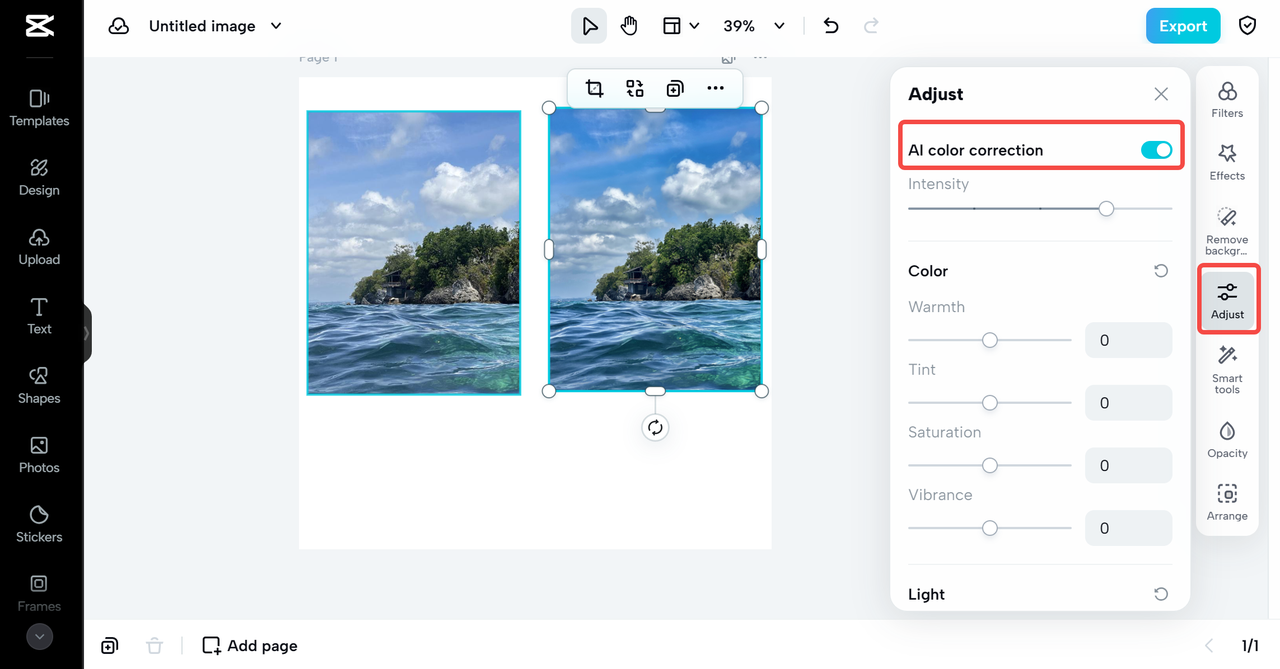
3. Color Correction for Harmony
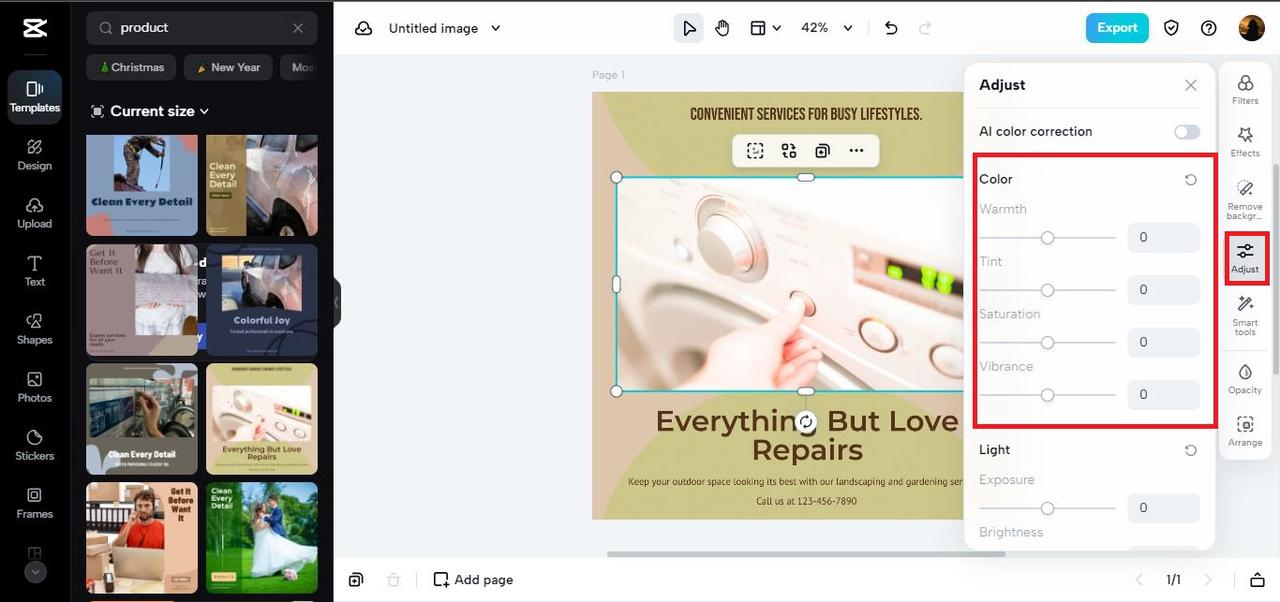
Similar to brightness issues, colors might not match between your subject and the new background. If your subject has warm, yellow tones but the new background is cool and blue, it will look obviously edited. In the same ‘Adjust’ section, you can find tools to tweak the colors. You can change the temperature, tint, saturation, and more. Getting the colors to harmonize is a key step when you change background to picture settings that have a different color mood.
4. Applying Filters for Consistent Mood
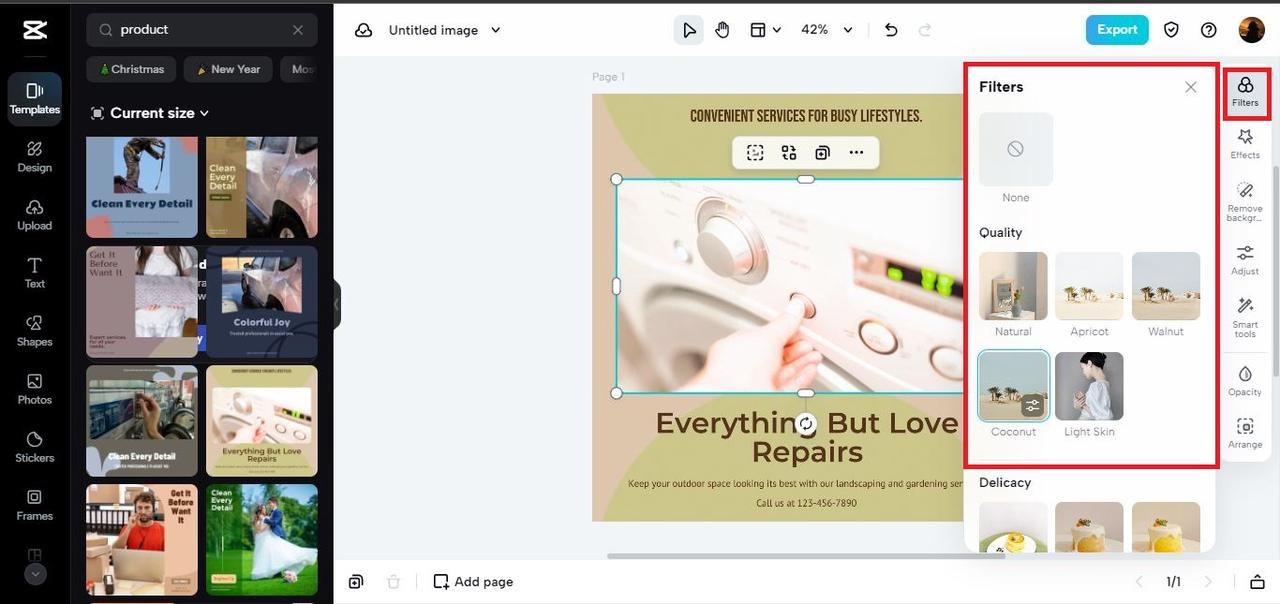
Want to change the entire feeling of your photo instantly? Try using a filter! CapCut has a huge collection of filters that can alter the overall mood and style of your image. Applying the same filter to both your subject and the new background can tie everything together beautifully. It can make it look like both elements were always meant to be together, creating a consistent atmosphere throughout the image.
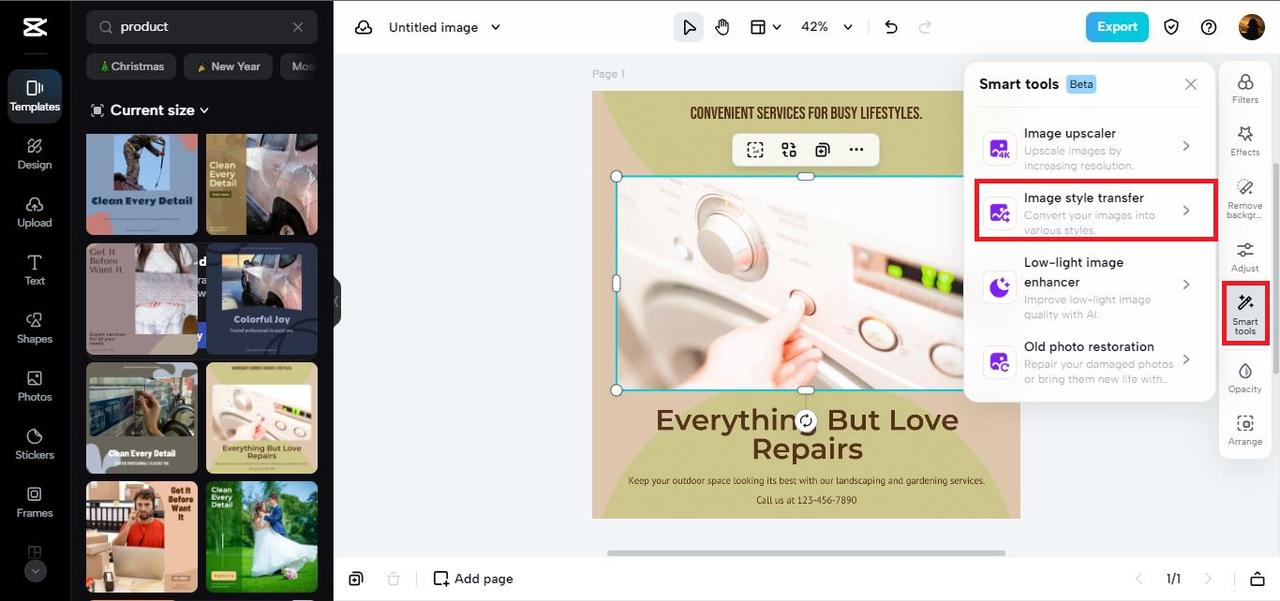
5. Enhancing Image Quality
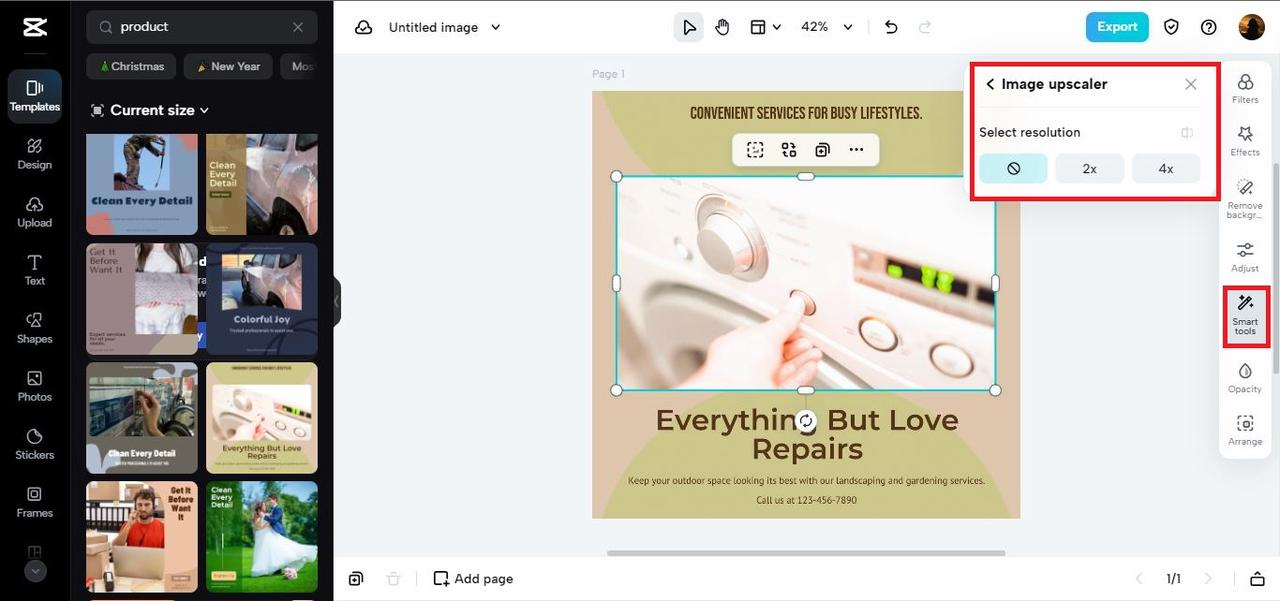
Sometimes the original photo you took might be slightly blurry or low resolution. If you then place it on a sharp, high-quality background, the difference in quality will be obvious and make your edit look fake. CapCut has a tool to fix this too. Go to the ‘Smart tool’ in the toolbar and select ‘Image upscaler’. This tool uses AI to enhance your image’s resolution and clarity. This ensures your subject looks just as sharp and clean as the new background you added.
6. Changing Overall Picture Style
This is a really fun and creative tool for when you want to get really artistic with your edits. Also under ‘Smart tool,’ you can find ‘image style transfer’. This feature lets you apply different artistic styles to your entire image. You can make your photo look like a painting, a sketch, or use many other cool effects. Adding this creative flair after you change the background of a picture can lead to some stunning and unique results that are truly eye-catching.
7. Automatic Color Calibration
If all these color and light adjustments seem overwhelming or confusing, don’t worry! CapCut has an automatic helper that does the work for you. In the ‘Adjust’ section, look for ‘AI color correction.’ When you click this, CapCut’s smart technology will automatically analyze your photo and make adjustments to the colors for you. It tries to find the best balance and harmony between all the elements in your image. This is a fantastic and easy final step to make sure your edited photo looks professionally done, even if you’re not a color expert.
Each of these tools acts like a finishing touch that professional editors use. They help you refine your photo after you change the background of an image, taking your edits from “pretty good” to “absolutely amazing!”
Why CapCut Stands Out for Background Editing
With so many photo editing apps available these days, you might wonder why CapCut should be your go-to choice for changing backgrounds. There are some really